I wanted to write a post about Poke bowls because of their current popularity and also because Poke (pronounced POH-keh) will always remind me of Hawaii, a special place and the home to my uncle Ben, who passed away unexpectedly last week. I must confess, it’s been a sad week for me. Loss is always difficult, and getting older has not seemed to help. But making poke has comforted me and made me smile again.
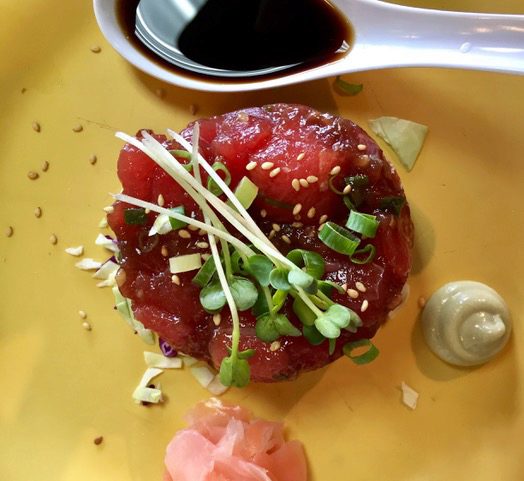
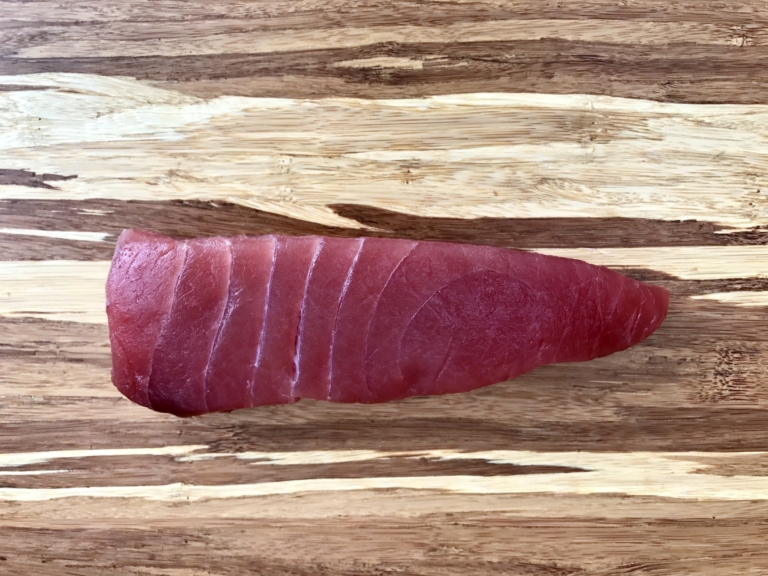
Poke itself is a Hawaiian version of Japanese sashimi. To me, it is a great meal, packed with protein and low in saturated fat. The most common Hawaiian Poke is made with ahi (tuna), but you will see lots of variations. Restaurants dedicated entirely to poke have popped up from New York to California. Some of the more traditional Hawaiian Poke is “limu poke,” “spicy mayo poke,” or “shoyu Poke.” But all are made the same: cubes of fresh, chilled, deep red ahi tuna tossed in a sweet, yet slightly salty, marinade.
A more recent modern invention is the “Poke bowl,” which seems to be on menus everywhere. A poke bowl is simply poke and some variety of seasonal fresh raw vegetables (and at times, fruit), artistically arranged on top of a bed of rice, featuring beautiful poke in the center. I always order poke when I’m in Hawaii and I look forward to having it, as it perfectly symbolizes the raw natural beauty of the islands.
My uncle, although originally from the Midwest, loved Hawaii, its food, its culture, and its people. He moved there many years ago to raise his family, assimilating to the islands’ customs and laid-back style. They say everyone has different coping mechanisms when it comes to death; we all process things differently and in our own time.
I am typically quite private. I would not have thought making or blogging about Poke would comfort me, but it has. I am incredibly thankful for the time my family and I had with my uncle, for the fishing and hunting stories he told us, and how warmly he embraced us after many years of distance. I guess Poke will now have some deeper meaning for me, reminding me of happy times with Uncle Ben.
Hawaiian Poke Bowl

Ingredients:
For the Marinade:
- 1/4 cup toasted sesame oil
- 3 tablespoons fresh squeezed lemon juice
- 2 tablespoons rice vinegar
- 2 teaspoons fresh ginger grated
- 1 tablespoon black sesame seeds
- 1 teaspoon salt
- Dash of cayenne pepper
For the Poke Bowls:
- 1 1/2 pounds sashimi grade wild ahi tuna, small cubes
- 3 cups steamed cooked white or brown rice
- 1 cup fresh pineapple, small dice
- 1 cup shredded purple cabbage
- 1 cup sliced cucumber
- 1 cup grated carrot
- 1 cup daikon radish, cut into matchsticks
- 1-2 avocados, sliced
- Extra sesame seeds and for garnish
- 1/4 cup Sriracha mayonnaise
- Salt for sprinkling
- Low-sodium soy sauce, for serving
Directions:
- For the Marinade: In a medium-sized mixing bowl, add the sesame oil, lemon juice, rice vinegar, ginger, sesame seeds, salt, and cayenne pepper and whisk well to incorporate. Add the tuna and mix well. Set aside.
- To Serve: Evenly divide the brown rice among six serving bowls. Top each bowl with the desired amount of vegetable toppings. Place a generous scoop of the seasoned tuna in the middle with a small dollop of Sriracha mayonnaise on top. Garnish with extra sesame seeds and sprinkle lightly with salt. Serve with small bowls of soy sauce
Bananas are delicious. A perfect food, some would say, loaded with vitamin B, that even comes in their very own traveling case. We buy bananas to eat them, but bananas are tricky. In the grocery store, it takes time to select the perfect bunch, I often grab them last as it takes some thought. Not too green, but not overly yellow. Slightly firm to the touch, but not hard or squishy. And no matter what, no dark black spots or god forbid, bruises because these guys need to last.
In my kitchen, bananas hold the highest ranking in the fruit hierarchy, not because my kids love them (they don’t), but because they sit on the very top of my two-tiered wire fruit basket on the counter. Apples, oranges, grapefruit, mangos, and even tomatoes are all below, but bananas, are on top, they are viewed from across the room, they are kings. Sadly, their reign is short, only a few days, and they turn.

Commonly, it is a small fruit fly that informs me that their time has come and gone unnoticed by me. What is left is always a bit sad, a bunch of, formerly beautiful, now untouched, battered-looking former “kings” still resting in their fruit throne. But bananas have a greater purpose, they can do what their fellow fruits typically cannot do…they can be made into sweet delicious bread.
So, when in doubt, I say, making banana bread with chocolate chip or double chocolate is my favorite. I make banana bread often. Although my kids don’t appreciate a banana on its own, they enjoy a slice of warm chocolate chip banana bread almost any day of the week. This is one of the simplest recipes I make, just 8 ingredients, one of which is a beautiful bunch of bananas you took time selecting, yet somehow overlooked.
Chocolate Chip Banana Bread
Ingredients:
- 1 1/2 cups all purpose flour
- 1 cup sugar
- 1 teaspoon baking soda
- 1/4 teaspoon salt
- 2 eggs, lightly beaten
- 1/4 cup vegetable oil
- 3 bananas, mashed well
- 1 cup semi-sweet chocolate chips
Directions:
- Preheat the oven to 350 degrees F. Lightly grease and flour an 8 1/2-inch x 4 1/2-inch loaf pan. Set aside.
- In a large mixing bowl add the sugar, flour, baking soda, and salt. Set aside. In a small mixing bowl, mash the bananas well, till very little chunks remain. Add the eggs and oil, and stir well to incorporate.
- Using a rubber spatula, mix the wet ingredients into the dry ingredients and mix thoroughly. Fold in the chocolate chips. Pour the mixture into the prepared pan. Place in the oven and bake for about 55-60 minutes or until firm and a cake tester comes out clean.
Power bars, protein snacks, and energy drinks are all some of the products you see on store shelves selling “power” and “energy.” Don’t be deceived: most don’t have either; many are not healthy; and most of us avoid equating sugar with energy. A good friend of mine from college, a marathon runner, a mom of three, and a fellow blogger, recently introduced me to the world of power bites. She makes them often and her kids (all athletes) eat them as well. I have managed to hook myself.
These little bites are easy to make, store well, and are a healthy protein alternative or pick-me-up that you can munch during the day. Good protein-rich options can be filling and give an energy boost that lasts. Is there anyone who does not need a boost around 3 p.m.? Power bites, or protein bites, have limitless recipe options; you can truly make them out of almost anything and adjust them to your likes.
Sweeter, saltier, nuttier, crunchier–you name it, it’s possible. Power bites are very easy to make and don’t typically involve cooking, making them a relatively easy and less expensive alternative to the junk you see in the grocery store. I kept these on hand recently while skiing. What I found so appealing is that they are a quick, easy, healthier snack alternative, and they gave me energy!
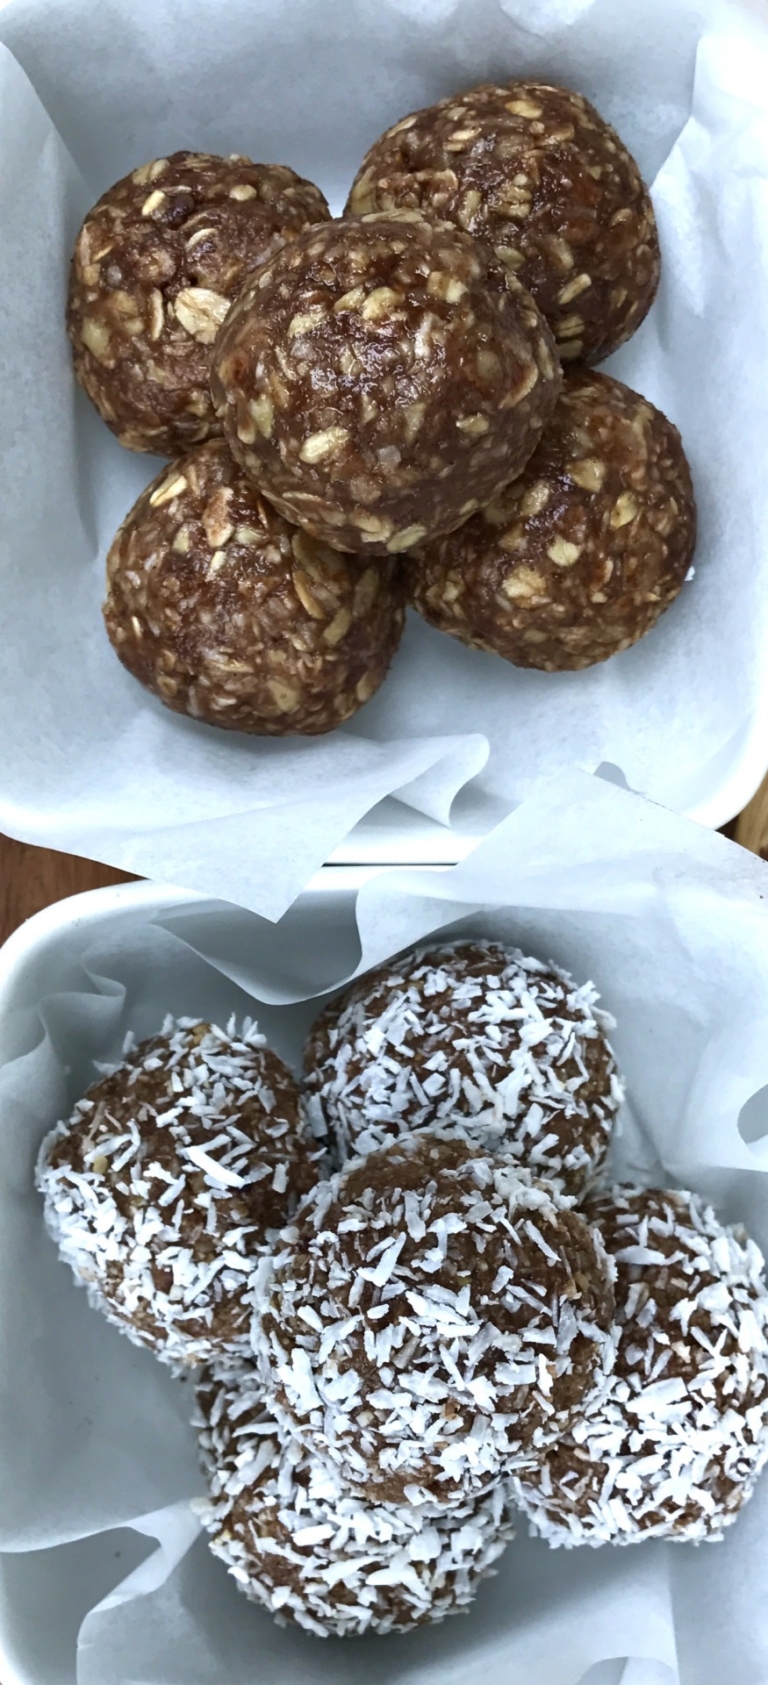
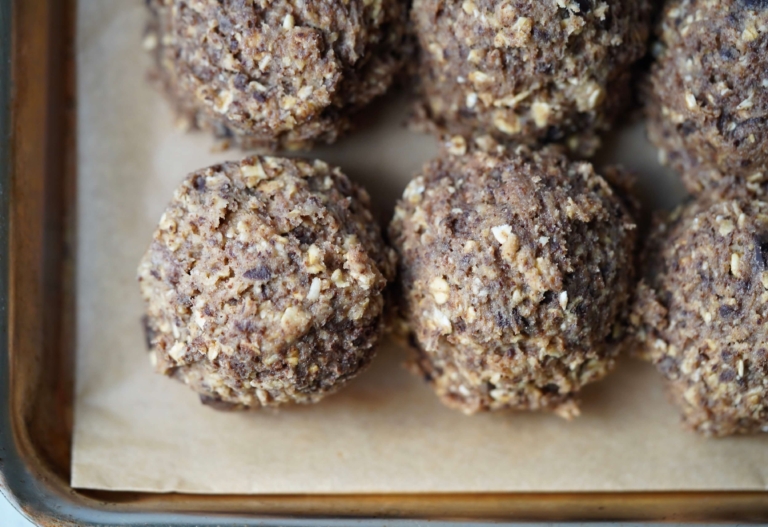
The first recipe for Oatmeal + Almond Butter Power Bites is one I developed after playing around in the kitchen for a bit with some of my favorite ingredients. The second recipe for Cocoa + Coconut Power Bites is one my friend sent me and I adapted slightly from Mark Sisson’s Cocoa and Coconut Snack Recipe on his blog, Mark’s Daily Apple. Sisson, a former elite endurance athlete, is also a health and fitness nut who talks about healthy snacking on his blog. My friend said Sisson’s recipe is a go-to for her, and a perfect snack after a long run.
Protein Power Bites
Ingredients:
For the Oatmeal + Almond Butter Power Bite:
- 1 1/4 cups whole rolled oats, toasted
- 1 tablespoon ground flaxseed mixed with 3 tablespoons warm water
- 1/4 cup roasted almond butter
- 1 Tablespoon blue agave
- 4 dates, pitted
- 2 tablespoons coconut oil
- 1/2 teaspoon vanilla extract
- 1/4 teaspoon cinnamon
- 1/8 teaspoon sea salt
- 1/4 cup raw almonds
- 1/4 cup walnuts
- 1/2 cup shredded unsweetened coconut
- 1/4 cup mini chocolate chips
For the Cocoa + Coconut Power Bites:
- 1/2 cup raw almonds
- 1/2 cup walnuts
- 1/2 cup pecans
- 1/2 cup hazelnuts
- 1/2 cup pumpkin seeds
- 7 dates, pitted
- 4 tablespoons coconut oil
- 2 teaspoons blue agave
- 1 1/2 tablespoons unsweetened cocoa powder
- Dash of salt
- 1/4 cup shredded unsweetened coconut, plus more for coating
Directions:
- For the Oatmeal + Almond Butter Power Bites: Place the oats in a large saucepan and lightly toast over low heat until just browned around the edges. Set aside to cool.
- Combine the flaxseed and warm water in a small mixing bowl and set aside.
- In a food processor, such as a Cuisinart, fitted with a blade attachment, add the almond butter, agave, dates, coconut oil, vanilla, cinnamon, and salt. Mix well to incorporate. Add the flaxseed mixture and blend until smooth. Add the almonds and walnuts and gently pulse to incorporate. Add the toasted oats, coconut, and chocolate chips and pulse just until evenly incorporated. Chill the mixture for 20 minutes to firm.
- Using your hands, roll the mixture into bite-size (~20) balls. Store in an air-tight container in the refrigerator.
- For the Cocoa + Coconut Power Bites: Using a food processor, such as a Cuisinart, fitted with a metal blade, blend the almonds, walnuts, pecans, hazelnuts, and pumpkins into fine flour. Place in a medium mixing bowl and set aside. Put the dates, 1/4 cup shredded coconut, and salt in the food processor and blend till smooth. Add to the nut flour, and stir in the cocoa. add the coconut oil and agave and mix well to incorporate.Chill mixture for 30 minutes to firm.
- Using your hands, roll the mixture into bite-size (~20) balls. Roll each ball in coconut to cover. Store in an air-tight container in the refrigerator
To me, hearty soups are good all year round, not just on a rainy winter day. Soups are comforting and soul-healing, they say. They are also not all that hard to make. The word “soup” comes from the French “soupe” (meaning “soup” or “broth”), which derived from the Latin word “suppa” (meaning bread soaked in broth) and also from a Germanic source, the word “sop”, which refers to a piece of bread typically used to soak up soup or a thick stew. This helps explain why soup is often served with bread: they complement one another nicely.
In the cooking world, soup is almost error-proof; it is adaptable and forgiving. Most soups also benefit from sitting, so making a soup the day before serving it is ideal for blending flavor and adding complexity. Any soup (or stew for that matter) can easily be thinned out slightly the following day with stock (or water); that’s what is done in professional kitchens. The secret is that the chef must always adjust the soup seasoning. This is what home cooks often forget.
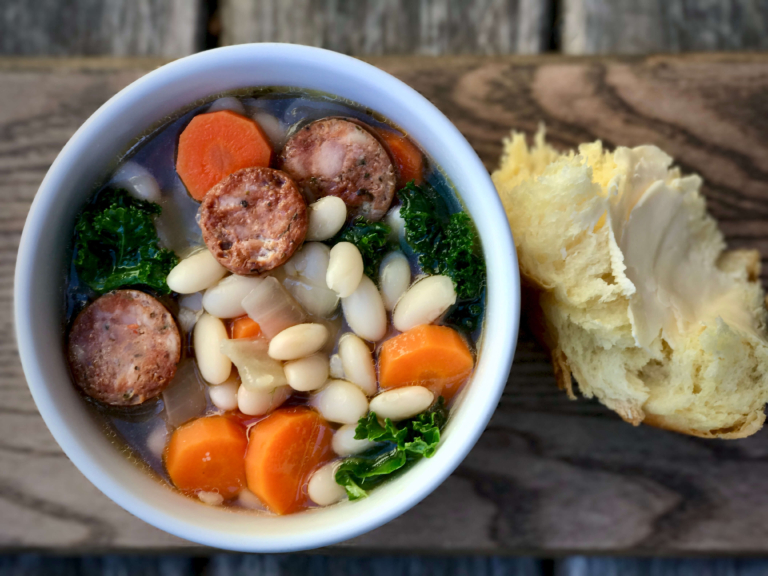
Readjusting the salt and pepper is a must, and sometimes other spices need refreshing as well. This recipe for white bean soup with kale & sausage is for a clean, clear broth soup that is also filling (and packed with protein) because of the addition of beans and sausage. So simply serve it with a nice green salad and your favorite bread. And to me, you have a pretty perfect meal.
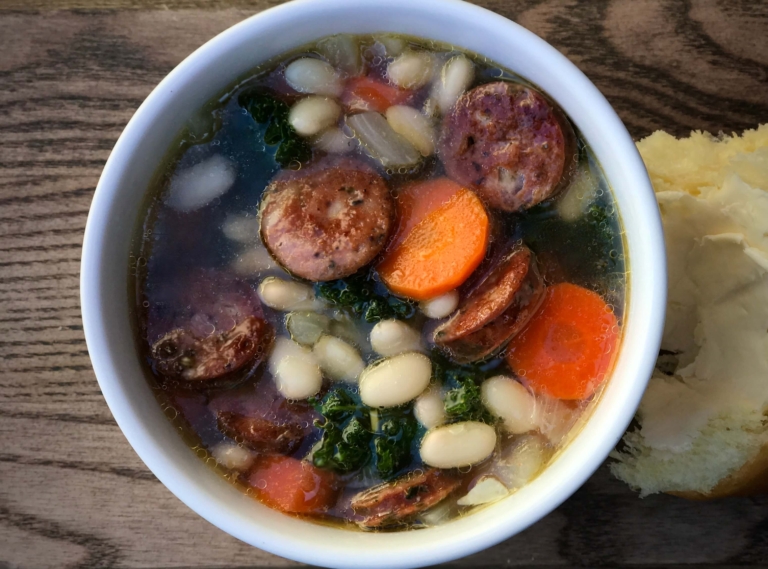
White Bean Soup With Kale And Smoked Sausage
Ingredients:
- 1/2 dried Great Northern white beans
- 1 large onion, small dice
- 3 tablespoons olive oil
- 5 garlic cloves, finely chopped
- 8 cups chicken broth
- 4 cups water
- One (3-inch) piece of Parmigiano-Reggiano rind
- 2 teaspoons salt
- 1/2 teaspoon black pepper
- 1 bay leaf
- 1/2 teaspoon fresh rosemary, finely chopped
- 1/2 teaspoon fresh thyme, finely chopped
- 1 pound smoked sausage such as kielbasa or I use chicken sausage, sliced crosswise 1/4 inch thick
- 6 medium carrots, cut into 1/2-inch pieces
- 1 pound kale, stems and center ribs discarded and leaves chopped
Directions:
- In a large stockpot, place the beans and cover with water by 2 inches. Place over high heat and bring to a boil. Once boiling, remove from heat and let stand, uncovered, for about 1 hour. Drain beans, rinse and set aside.
- Place a medium stock pot over low heat and add the olive oil. When hot, but not smoking, add the onions and carrots and sauté, stirring occasionally, until softened, about 5 minutes. Add garlic and cook and additional 1 minute. Add the beans, chicken broth, water, cheese rind, salt, pepper, bay leaf, thyme and rosemary. Simmer, uncovered, until beans are just tender, about 50 minutes.
- While the soup is simmering, brown the sausage in batches in a heavy skillet over medium heat. Drain the sausage on a plate lined with paper towel and set aside. Add the carrots to the soup and simmer for an additional 5 minutes.
- Add the kale, browned sausage, and additional water (only if needed) simmer, uncovered, stirring occasionally, until the kale is tender, about 20 minutes.
- Season the soup to taste with salt and pepper one last time before serving
It’s almost Easter and this is a treat for all ages. This is not my recipe, but I have been making it for years and had to share it. The original cake recipe is called “Umbrian Chocolate Cake“, or in Italian Torta di Cioccolato di Olio di Oliva, and comes from the cookbook Ciao Italia in Umbria. The author, Mary Ann Esposito, is a well-known Italian chef and PBS television personality. I had the pleasure of meeting Esposito years ago and she is a lovely and very talented lady.
This recipe was so appealing to me because of its use of olive oil and vinegar, which help make this cake incredibly moist and fluffy, yet not too sweet. This cupcake recipe is egg and dairy-free, which is a great option for so many people out there with allergies (my niece included). Esposito uses a traditional mascarpone frosting. I have changed it to a cream cheese-based one, but you can easily substitute it with your favorite frosting, especially if you need to accommodate any allergies.

I make these for big gatherings and even class parties at my kids’ school. If you poke around, you will find many recipes for olive oil cakes. The concept is not new, but typically they are vanilla-based with a hint a citrus. Using rich cocoa powder gives this a different twist, and is a nice alternative to the classic chocolate cupcake.
Chocolate Olive Oil Cupcakes
Ingredients:
For the Cake:
- 3 cups all-purpose flour
- 2 cups sugar
- 6 tablespoons cocoa powder
- 2 teaspoons baking soda
- 1/2 teaspoon salt
- 3/4 cup extra-virgin olive oil
- 1 tablespoon vanilla extract
- 2 tablespoons white vinegar
- 2 cups cold water
For the Frosting:
- One (8-ounce) package of cream cheese, room temperature
- 1 teaspoon vanilla extract
- 3 1/2 cups confectioners' sugar
Directions:
- For the Cupcakes: Preheat the oven to 350 degrees F. Line 2 cupcake baking pans with 18 cupcake liners. and set aside.
- In a large mixing bowl add the flour, sugar, baking soda and salt. Mix well to incorporate. Add the olive oil, vinegar, vanilla and water and whisk well until smooth.
- Pour the batter into the cupcake pans. Bake for about 20 minutes or till the cupcakes are firm to the tough. Remove from the oven and let cool completely before frosting.
- For the Frosting: Using a kitchen mixer, such as a KitchenAid, fitted with a paddle attachment, whip the cream cheese until smooth, scraping down the sides as you go. With the mixer on low, add the vanilla extract and mix well. Gradually add the confectioner's sugar and mix well to incorporate.
- Once the cupcakes have completely cooled, use an offset spatula to frost. Decorate the tops as desired. Note: for these Easter cupcakes I used small marzipan rabbits to keep them simple yet completely edible
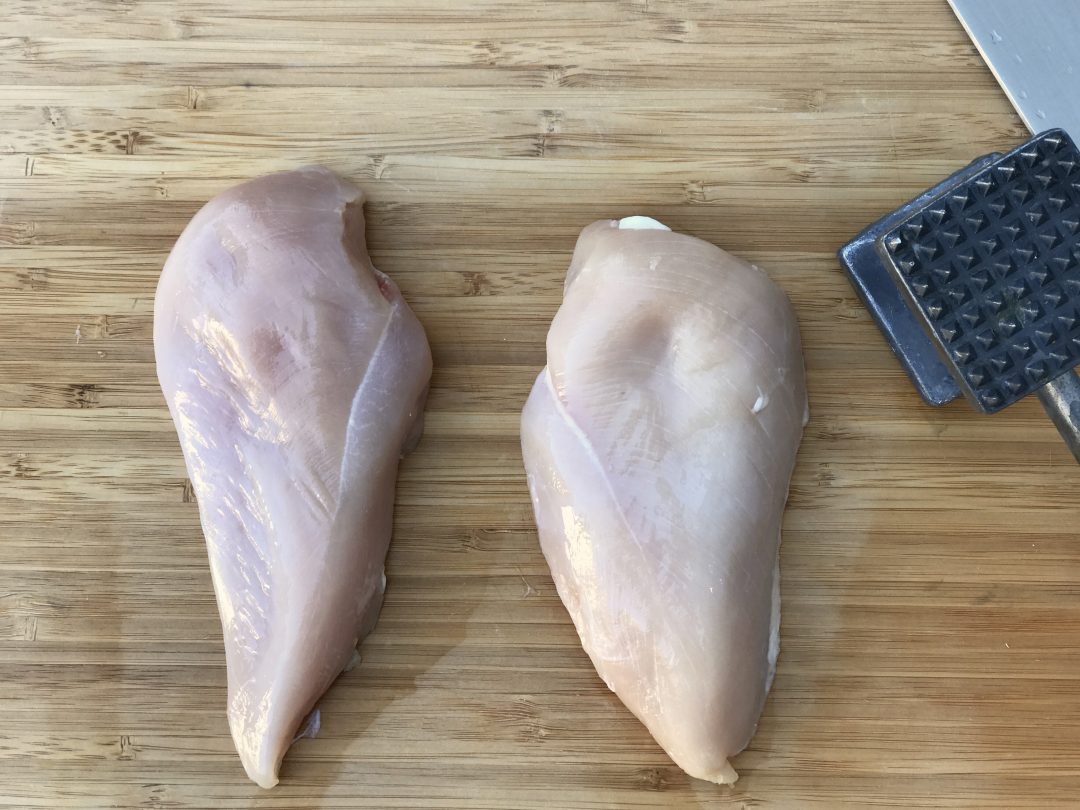
Step 1: Trim, and wash chicken breast, pat dry with a paper towel. Place on a cutting board.
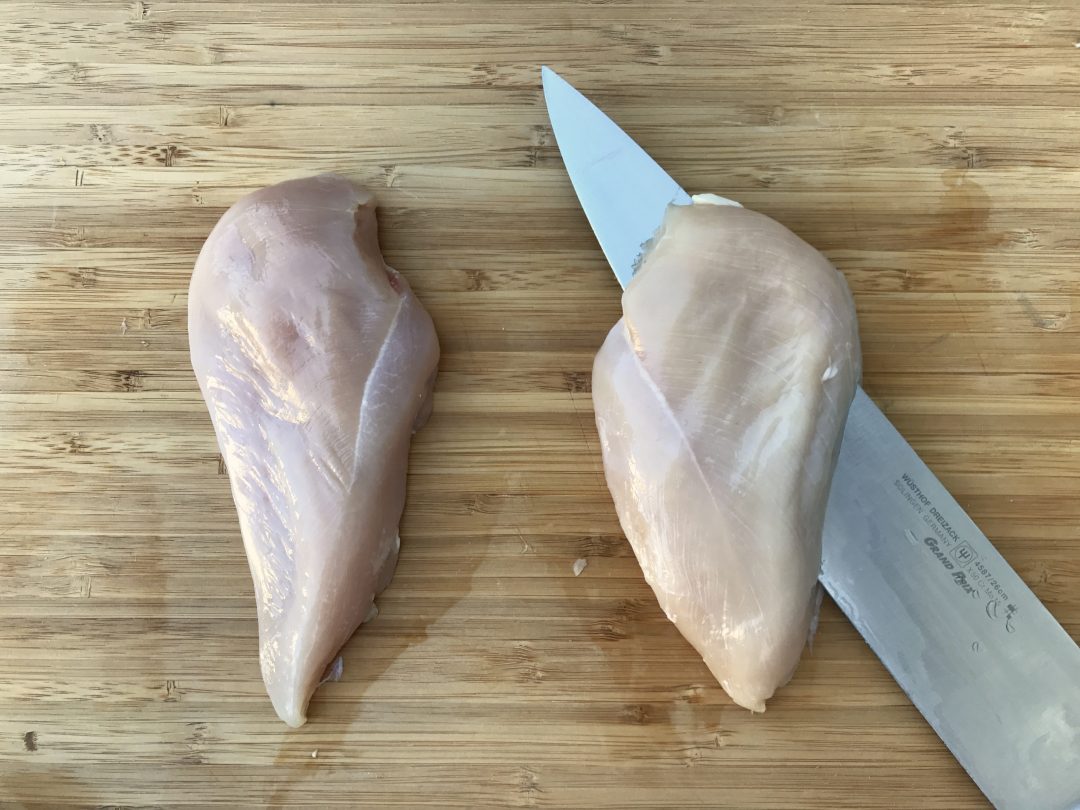
Step 2: Place your hand (palm side down) on the chicken, slightly off center. With a sharp chefs knife, slowly and carefully entering from the top right hand corner, begin to slice through the chicken breast.
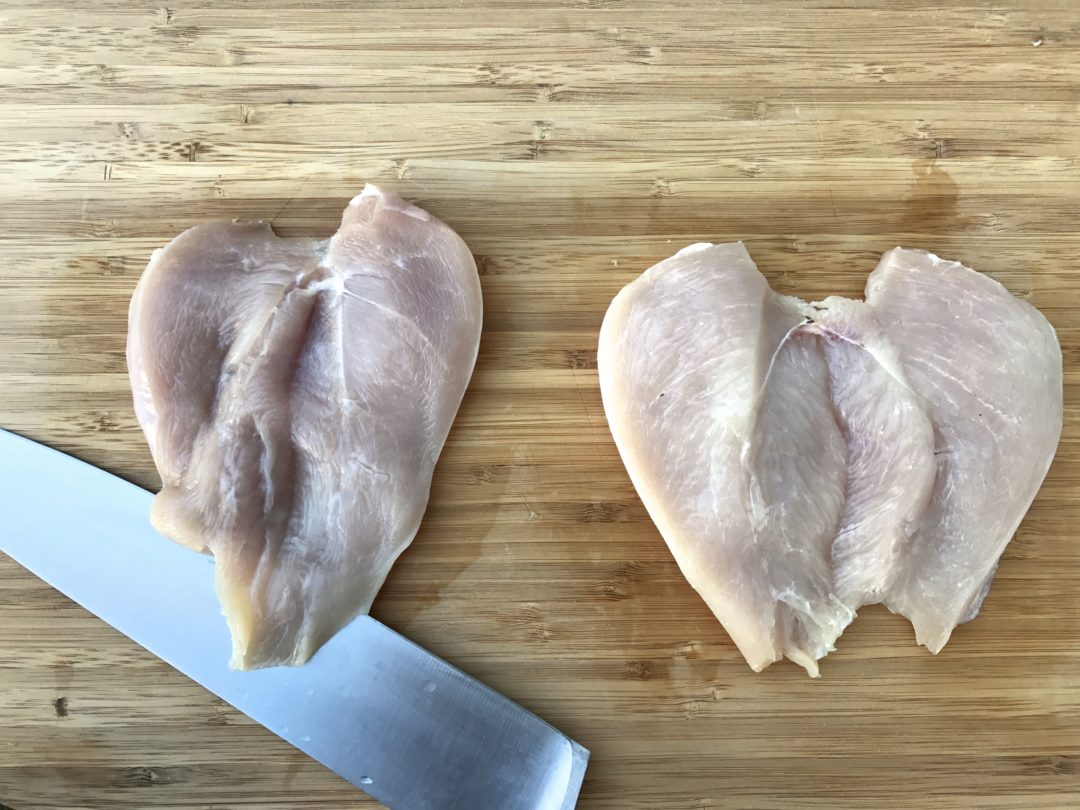
Step 3: Continue to move your chefs knife almost entirely through the chicken breast. Do not let your knife cut entirely though and come out the other side. Put the knife aside, open the chicken up creating almost a heart shape.
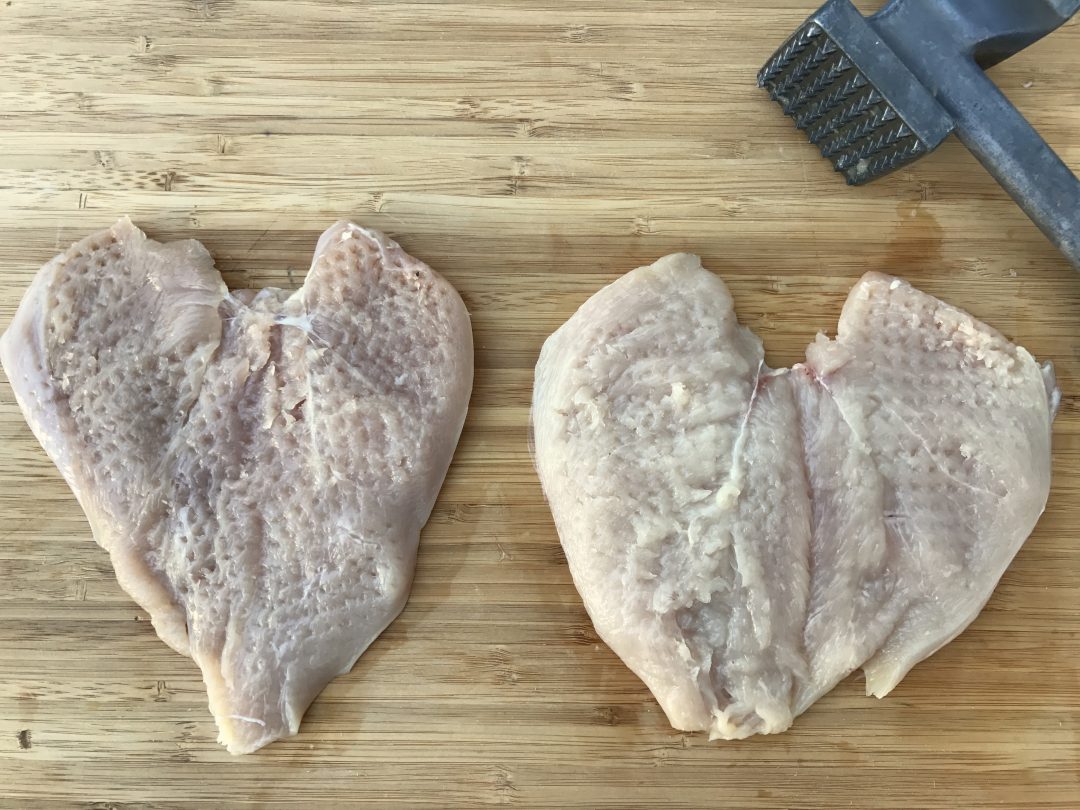
Step 4: Turn the chicken over and with a tenderizer (or mallet) gently pound the chicken breast out flattening it. At this point, if you wish, you can go ahead and trim the butterflied chicken breast further for a more uniform look. Note: You can also cut the butterflied chicken breasts in half to allow for a thinner cutlet when cooking cutlets such as in Eli’s Chicken.
According to my oldest son, he does not like chicken. Untrue really; he’s just particular when it comes to chicken. This, I can relate to. Most chicken is over-cooked. Nothing overcooked tastes good. But chicken, in particular, is the worst because it becomes dry and flavorless. Chicken must be moist, slightly soft, and juicy–never, ever dry. The average home cook lives in fear of raw chicken in their kitchen. The thought of salmonella and getting others sick is unnerving. I get it. But in all honestly, that rarely happens, especially if you wash your hands and knife well. While cooking for people professionally, the thought did cross my mind a few times, but you get over that quickly.
Touch is your best measure of “doneness” when cooking chicken, or any other kind of meat for that matter. This is what they teach in culinary school. Chicken is a muscle. As it loses moisture during the cooking process, its fibers tighten up. By pushing down on the meat, you can see how much it springs back. The question most people have is “what is the appropriate amount of firmness?” You can find the best answer on your hand. See the photo below. If you touch your middle finger to your thumb while keeping your hand relaxed, use your other hand to touch the muscle that operates your thumb, right above the wrist. This represents the approximate amount of firmness you should expect from a piece of chicken when it is done.

The touch test is a very useful technique here. Another well-known test, looking for clear juices, is difficult with a boneless skinless cutlet. I don’t particularly like thermometers, as they can easily pierce through the meat–which can cause it to dry out even faster. The shrink test is also important when evaluating a chicken’s doneness. Chicken should shrink slightly, but not dramatically. If a piece of chicken is half the size it was when you started, it’s overcooked.
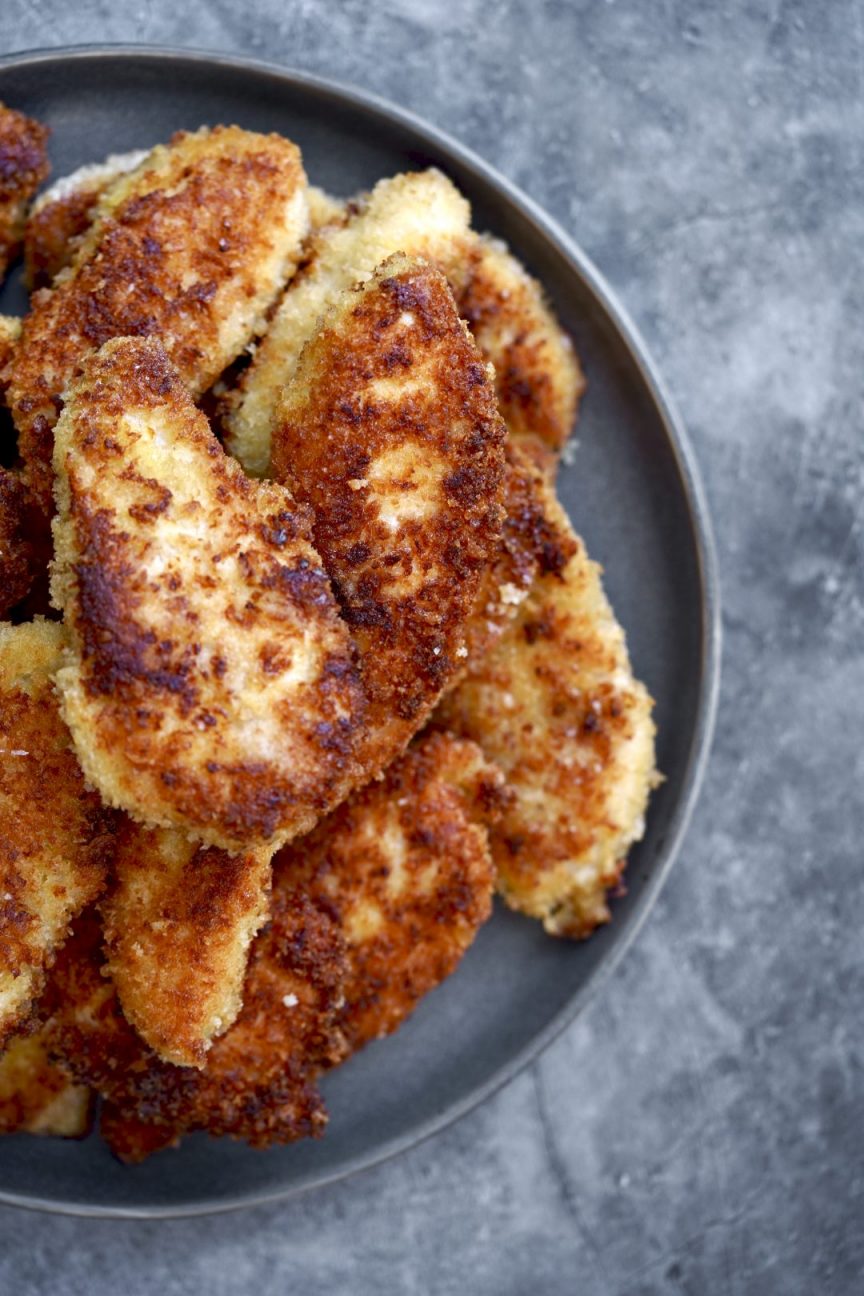
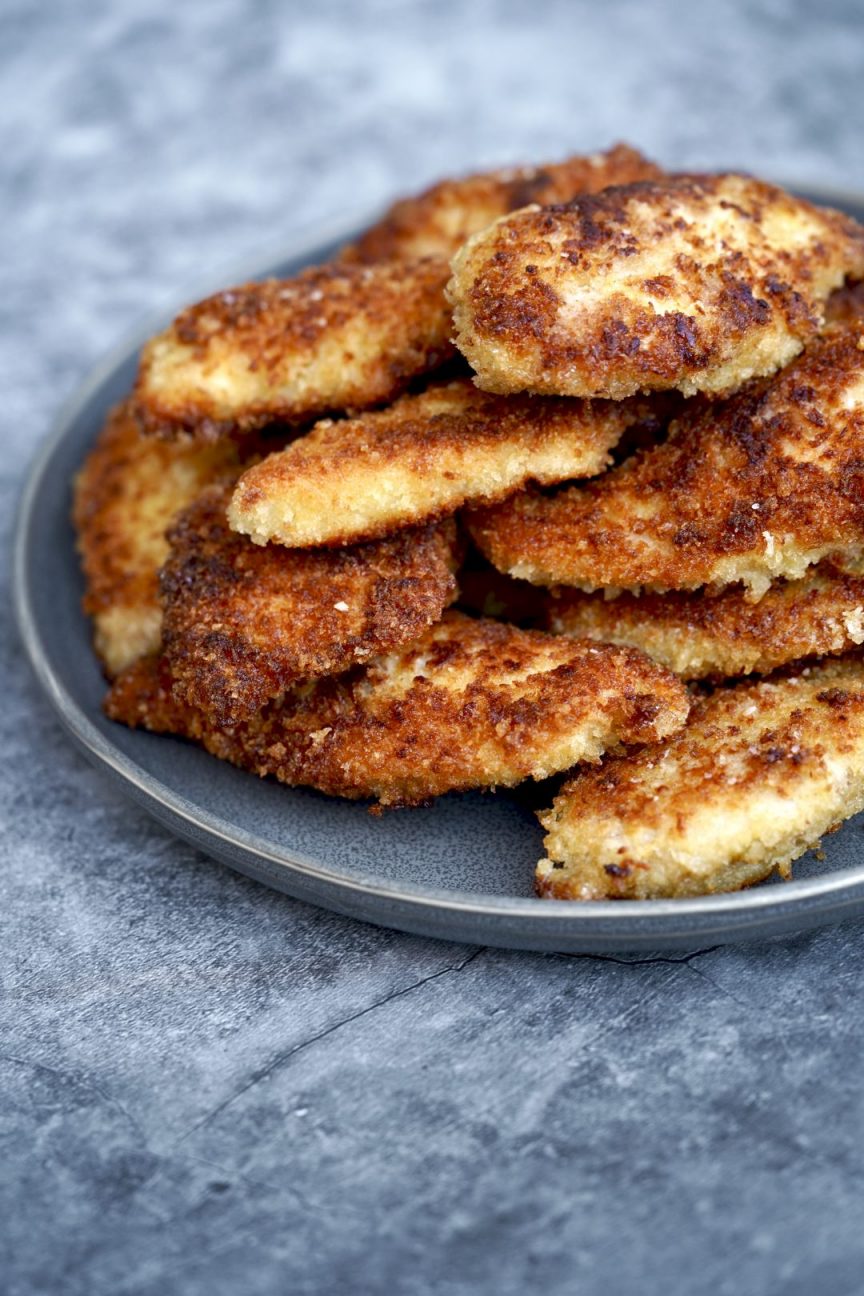
Fear aside, what makes my recipe for Eli’s crispy chicken so delicious is the crispy golden-brown panko breading, finished with fresh lemon juice. It is salty and crisp and always a crowd-pleaser. The technique for properly coating the chicken is one I did not fully understand until culinary school. The basic technique is French and it is called “panure a l’anglaise“. This technique consists of three important steps: step 1- dredging in flour, step 2- evenly coating in egg, and step 3- completely and evenly covering with breadcrumbs.
It seems so obvious, but why is it so important? The flour-egg-breadcrumb coasting seals in the moisture during the cooking process and creates the irresistible crunch of the cutlets. To avoid the mess, if you prefer, you can use large ziplock bags for the flour and breadcrumbs instead of large bowls. This classic technique is extremely versatile and can be used with fish, pork, or firmer vegetables like eggplant. You can also replace breadcrumbs with different coatings, depending on your recipe, such as chopped nuts, mixed herbs, coconut, etc.
Once I started making this chicken recipe, my oldest son, Eli, decided he liked chicken. The dish was thus named accordingly–Eli’s crispy chicken. It has become a staple in our house and many of our friends make this for their kids. If I go too long without making it, my kids will ask for it. Most of us eat it just as it is, others (who will remain nameless) dip it in spicy ketchup. But I simply turn my head to that.
Eli's Crispy Chicken
Ingredients:
- 2 whole boneless, skinless chicken breasts, (I normally buy organic) split, butterflied, and slightly pounded
- 2 cups unflavored panko bread crumbs
- 3/4 cup all-purpose flour
- 3 eggs, slightly beaten
- salt to taste
- vegetable oil, for frying
- 2 tablespoons unsalted butter, for frying
- 1 lemon
Directions:
- Rinse chicken in cold water and pat dry on a paper towel. Season both sides generously with salt.
- Dredge the chicken in flour, shaking off any excess. Coat the chicken evenly in egg wash, letting excess drip off. Finally, coat evenly in breadcrumbs, turning twice and patting gently to adhere.
- Place a good amount of oil in a large cast-iron skillet over medium heat. When the oil is hot, but not smoking, working in batches, add the chicken to the skillet. Add 1 tablespoon of butter and cook. Gently shake the skillet occasionally, until the chicken is browned, rotating as needed.
- Gently turn the chicken with tongs and continue cooking until both sides are golden brown and opaque throughout, about 3-4 minutes per side depending on the size of the chicken. If browning too quickly, lower the heat. Squeeze the juice of half a lemon evenly over the chicken while it's still in the pan.
- When the chicken is cooked though, drain on a sheet tray lined with paper towels. Season with salt. Serve the chicken hot, whole or sliced, with lemon wedges on the side.
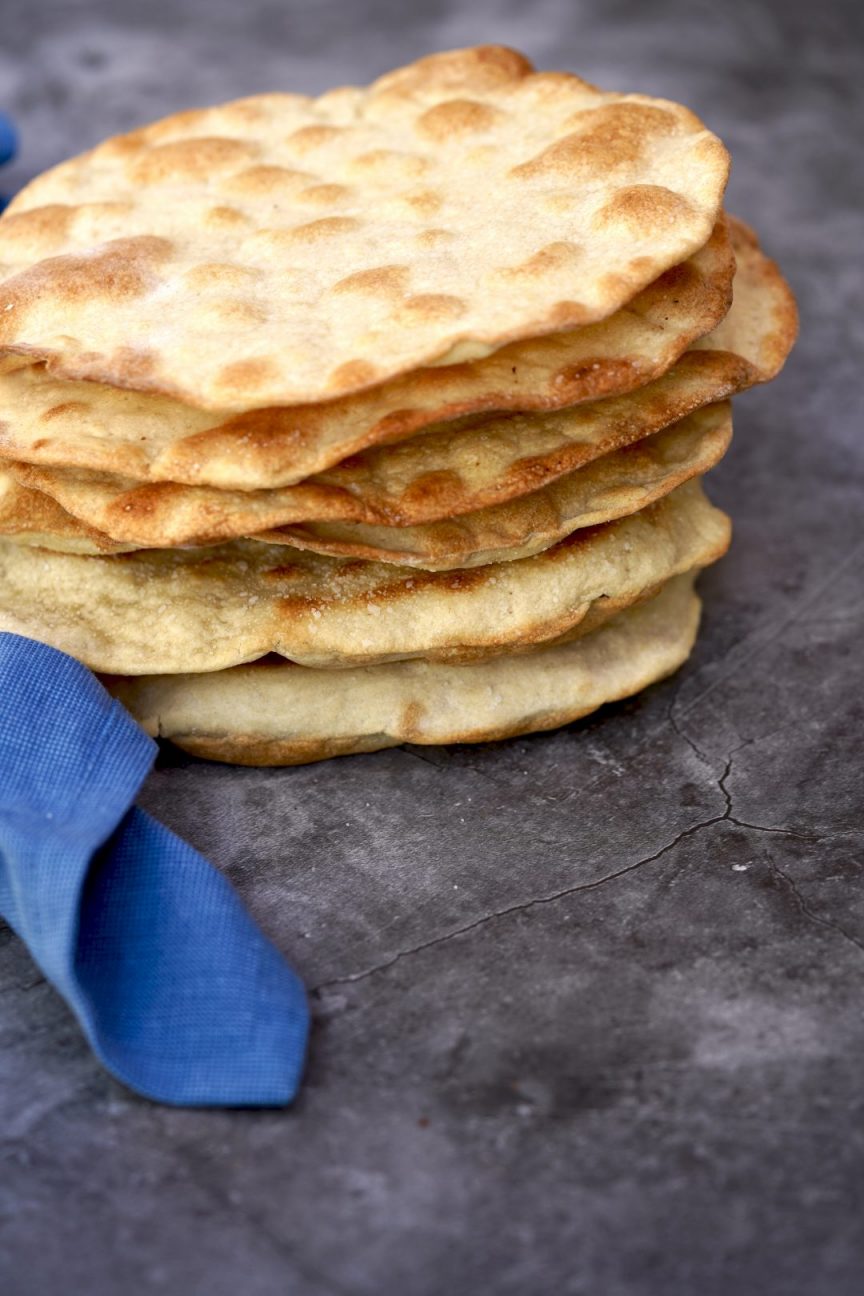
If you eat matzo during the eight days of Passover (or just want a fun cooking project with kids) try making this easy homemade matzo recipe, it is so good, that you may never go back to the store-bought stuff.
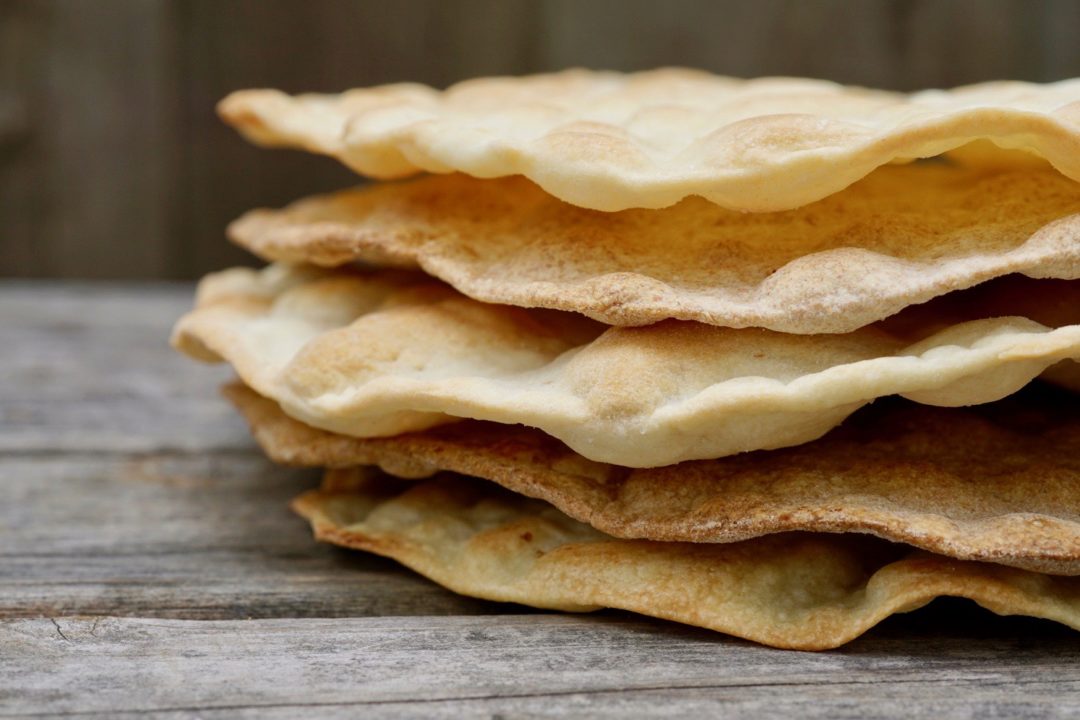 This recipe can be made will regular all-purpose flour or whole wheat flour, both are wonderful. And while I prefer to use a pizza stone, you can use a baking sheet if you do not have one. Note, if you need the matzo to be kosher, once the water meets the flour you have 18 minutes to complete the cooking and baking process. If you’re looking for a Passover dessert, check out my simple Passover cake recipe or my favorite flourless chocolate cake.
I prefer to use my kitchen mixer to make this dough but if you don’t have one, don’t let that stop you. This simple dough can easily be made by hand.
Homemade Matzo For Passover
Ingredients:
- About 2 3/4 cups all-purpose (or whole wheat) flour
- 1/2 teaspoon kosher salt
- 1/3 cup olive oil
- 2/3-1 cup warm water
- Sea salt as needed
Directions:
- Place a pizza stone on the lowest oven rack and heat oven to 500 degrees F. Heat the oven and stone for about 45 minutes.
- Using a food processor, such as a Cusinart, fitted with a metal blade, add the flour, kosher salt and olive oil and pulse till blended.
- While continuing to pulse, slowly add the water. Stop at 2/3 cup and check consistency. Add additional water as needed. The dough will begin to come together into a ball and should feel soft. Add additional water as needed. If at any point the dough is too sticky, add a little more flour.
- Divide dough into 6 portions and form into smaller disks. Set aside. Using a floured rolling-pin, roll 1 disk at a time on a well-floured work surface into a 9-inch circle. The thinner the better without making holes in the dough.
- Sprinkle with sea salt. Using your hands, lightly press the salt into the dough to set. Using a fork, prick dough all over to prevent the dough from puffing up too much in the oven.
- Gently slide the rolled dough onto a cutting board to transport to the oven. Carefully slide dough onto hot pizza stone.
- Bake matzo until slightly golden in color and crisp on each side, about 3 minutes per side. Transfer matzo to a wire rack to cool. Repeat the process with the remaining dough pieces.
Passover is approaching, as is the scramble to come up with a dessert to bring to the Seder you’ve been invited to. Preferably a dessert that is not the flourless chocolate cake that you made last year. Try this recipe. This is a cross between a true sponge cake, a classic French genoise, and a chiffon cake with the essence of citrus. It is fantastic.

This is not my recipe, it is from Marcy Goldman’s cookbook: A Treasury of Jewish Holiday Baking. I have only adapted it slightly. This is an incredibly easy cake to make and a real keeper, not just for all my Jewish friends looking for something to make on Passover, but for everyone, at any time of year, who wants a light fluffy vanilla-citrus sponge cake. I serve mine with simple sugared strawberries to compliment the lemon zest and fresh vanilla bean.

Vanilla-Citrus Sponge Cake
Ingredients:
- 8 large eggs, room temperature
- 1/3 cup matzo cake meal
- 1/3 cup potato starch
- 1 tablespoon lemon juice
- 3 tablespoons Kosher for Passover coconut oil or unsalted Passover margarine, melted
- 3/4 cup sugar
- 1 vanilla bean, split lengthwise, seeds only
- 1/2 teaspoon salt, divided
- 1 tablespoon fresh lemon zest
- Confectioners' sugar for dusting
Directions:
- Preheat the oven to 350 degrees F. Generously grease a 10-inch springform pan with coconut oil and line the bottom with parchment paper. Set aside.
- The eggs must be at room temperature, not cold. Very important, using a kitchen mixer, such as a KitchenAid, heat the bowl by filling it with very hot water. Set aside.
- In a medium-size mixing bowl, sift together the cake meal, potato starch, and 1/4 tsp salt.
- In another small bowl mix the lemon juice and melted coconut oil (or margarine if using). Set aside.
- Empty and dry the kitchen mixer bowl you have been warming. Add the eggs, sugar, seeds of the vanilla bean, 1/4 tsp. salt and lemon zest. Using the whisk attachment, beat on low to incorporate. Once mixed well, increase the speed to high and beat for 12 minutes. The batter should become voluminous.
- With the mixer on very low, add the potato starch and matzo cake meal mixture, mix minimally, taking care not to deflate the mixture too much (some deflation is impossible to avoid).
- With the mixer off, gently fold in the lemon juice and melted coconut oil.
- Pour the batter into the prepared pan. Using a rubber spatula, gently even the cake surface. Bake for 30 to 35 minutes, until the cake is set in the center or until it seems just firm when lightly touched. Cool completely before removing from the pan.
- When completely cool, dust generously with confectioners' sugar. Slice with a serrated knife and serve with fresh strawberries, sprinkled with sugar and a dash of orange juice. Note, that this cake is best served the day you make it.
Some fruits are hard to tackle. Cutting a pineapple safely is crucial to avoid accidents and injuries. Many of the steps below can also be used when cutting other round fruits such as melons.
Why the Proper Technique is Important
- Sharp Edges: Pineapples have tough, spiky skin and a hardcore. Without proper technique, there’s a high risk of cutting yourself with a knife.
- Slippery Surface: The skin of a pineapple can be quite slippery, especially when it’s wet. This increases the chances of losing control of the knife and causing an accident.
- Protecting Your Hands: Holding a pineapple securely and using the correct cutting technique helps prevent accidental slips or sudden shifts that can lead to cuts or injuries.
- Avoiding Strain: Cutting a pineapple improperly can strain your wrists, especially if you’re using excessive force or an awkward angle. This can lead to muscle strain or even more serious injuries.
- Preserving the Fruit: When cut properly, you’ll be able to extract the maximum amount of fruit without wasting any. Improper cutting can result in unnecessary waste.
- Maintaining Presentation: Properly cut pineapple slices or chunks that look more appealing. It enhances the visual presentation of the fruit, making it more appetizing.
- Preventing Contamination: If you’re planning to share the pineapple with others, using clean, safe-cutting techniques helps prevent cross-contamination and ensures everyone can enjoy the fruit safely.
- Avoiding Damage to Kitchen Tools: Using the wrong technique can lead to damage to your knives or other kitchen equipment. A safe-cutting method prolongs the life of your tools.
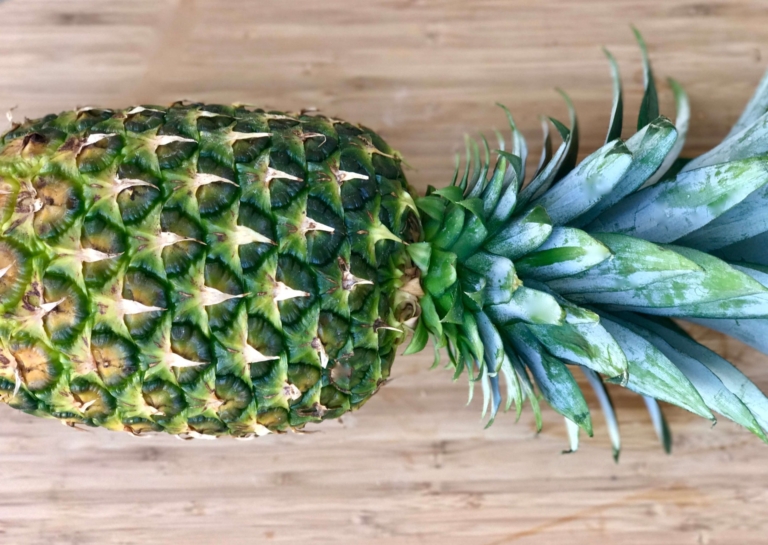
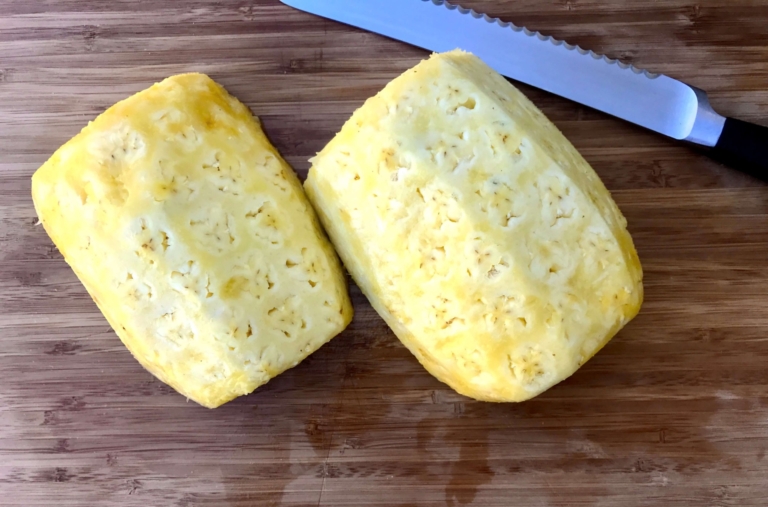
Step 1: Place the pineapple on its side on a cutting board.
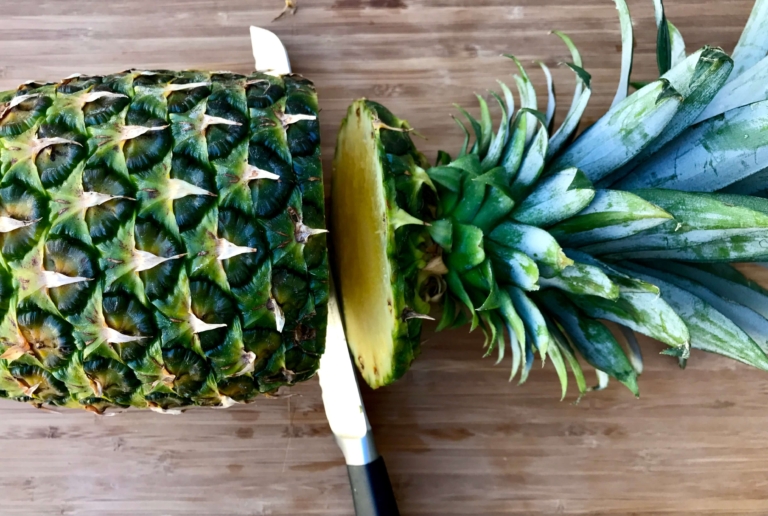
Step 2: Using a serrated knife, cut off the crown and stem.
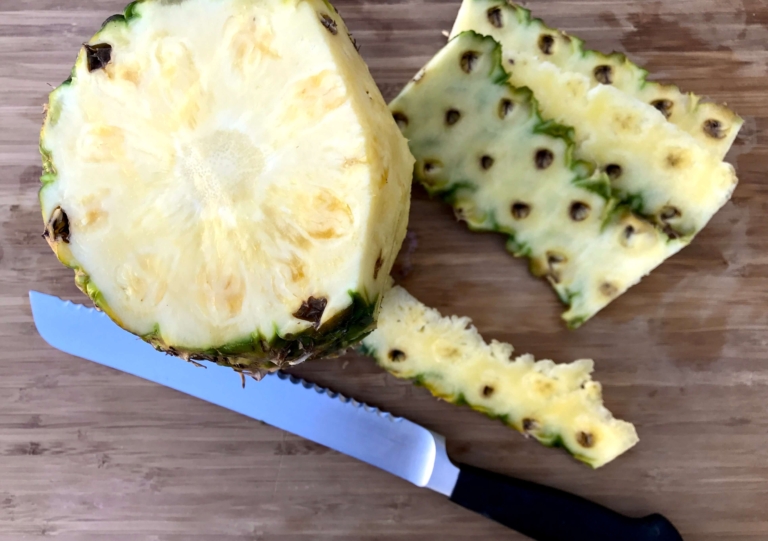
Step 3: Stand the fruit up on one end, using your knife, following the contour of the fruit, carefully slice the skin off the sides.
Step 4: While the fruit is standing, use your knife to slice the fruit in half lengthwise, and place flat side down on the cutting board.
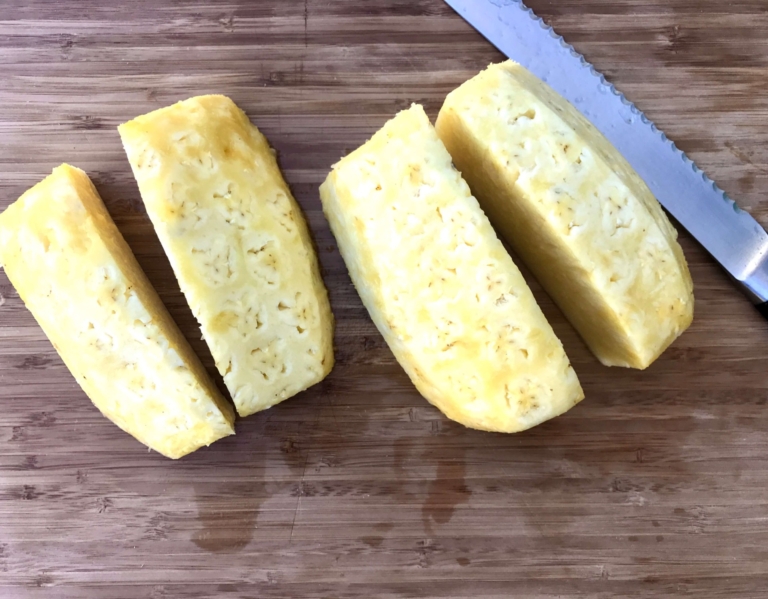
Step 5: Cut each half in half again, leaving you with quarters.
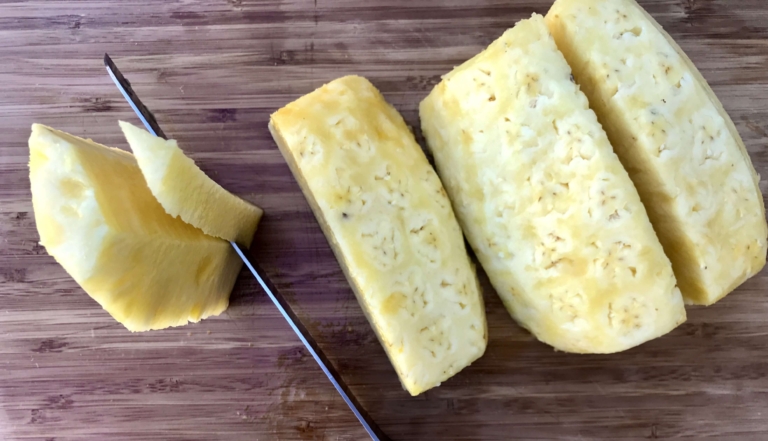
Step 6: Stand up one section and using your knife, slice off the fibrous inner core section.
Step 7: Remove the core on all remaining pieces.
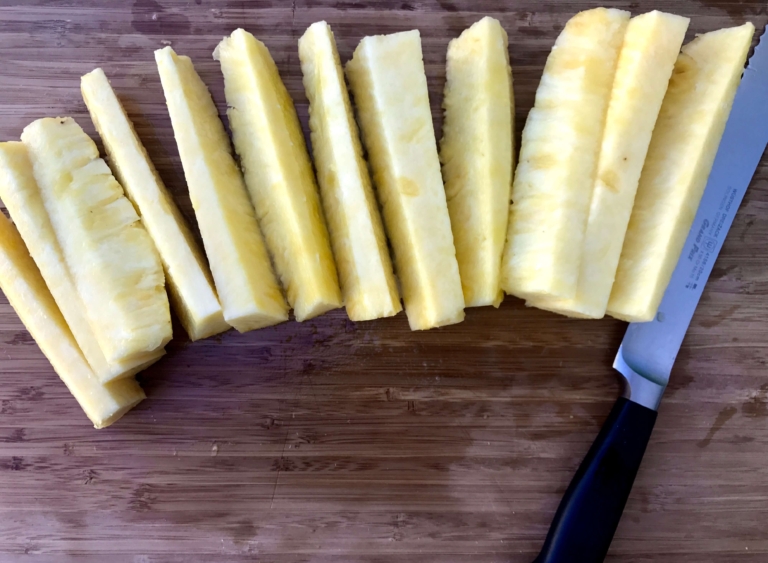
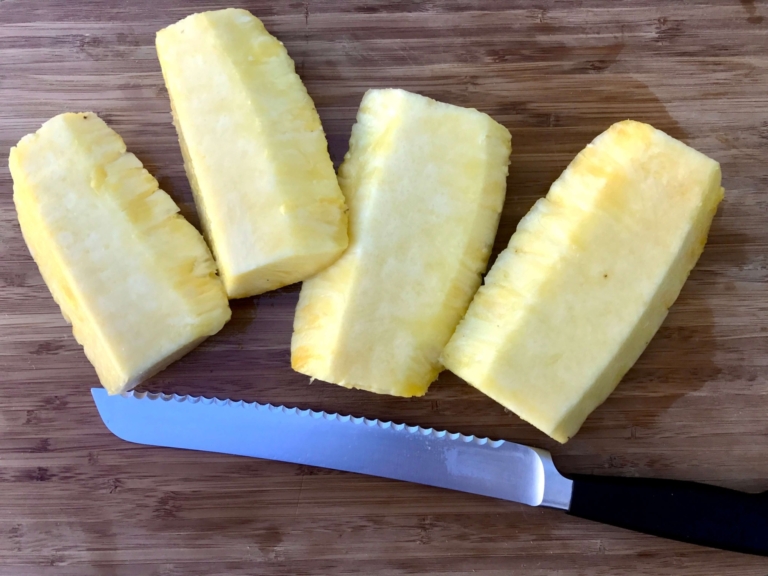
Step 8: Cut each quarter into thirds.
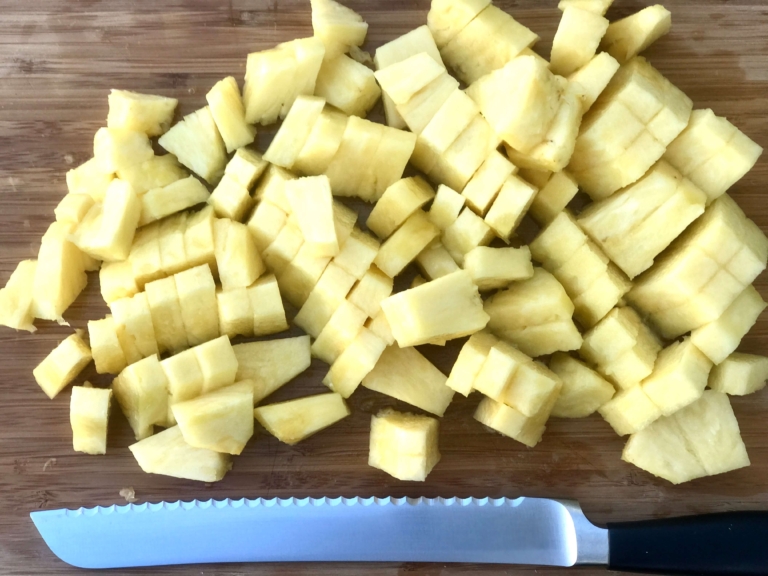
Step 9: Dice fruit into cubes as desired.
If you are unfamiliar, watermelon radishes are supremely beautiful. Their deep pink/magenta color is eye-catching and adds a real pop to any ordinary salad. Watermelon radishes are considered a heirloom Chinese Daikon radish and a member of the mustard family (along with arugula, broccoli, and turnips–who knew!). Typically, watermelon radishes are available during the spring and fall, since they are a cool season crop. Overly warm temperatures can affect the radish’s mild flavor, turning it rather bitter–I learned this the hard way.
I was first introduced to a watermelon radish when it appeared on a brine-pickled vegetable board my husband and I ordered at Nick Balla and Cortney Burns’ well-known (but now closed) Bar Tartine in San Francisco. Since then, I have noticed its popularity and availability have increased. Its flesh is tender yet crisp, and its flavor is mild, with a slight peppery note. Depending on when it is harvested, watermelon radishes can vary in size from a golf ball to a baseball. This lesser-known radish can be eaten fresh (which is what I prefer) or cooked, and it goes well with various other vegetables, such as fennel, apple, cucumbers, mild greens, and soft cheeses like Feta and chèvre.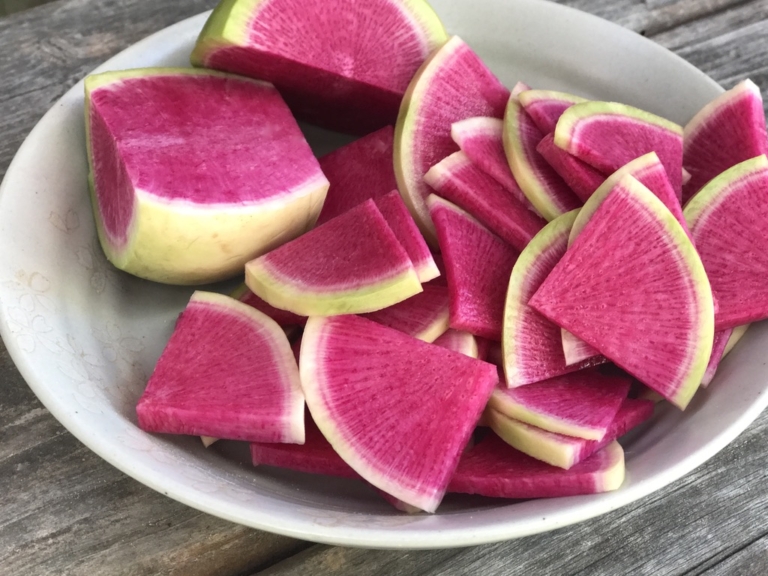
Both my husband and I are big salad eaters. We eat them almost daily. I am, however, somewhat picky about my salads, I like them interesting and I like them to look beautiful. A nice presentation is important. This was further engrained in me during culinary school when I had to log countless hours carving vegetables into very precise shapes and sizes.
I came up with this easy little salad for my husband, who has always been a radish lover. One of the best salads he ever had was also at Bar Tartine. It consisted of fresh radishes, homemade sweet cream butter, and flake salt. I thought he was crazy when he ordered it; but the waitress was right, it was incredible. Sometimes, the most basic recipe is the best. Despite trying, I could not recreate that perfect radish and butter salad, (primarily because I do not grow my radishes, or make my butter); but I created this one instead. I make this often: it’s easy and I typically have all of these ingredients in my refrigerator. My kids also like this salad. Well, they like everything except the radishes. That is still a work in progress. But they’ll get there eventually.
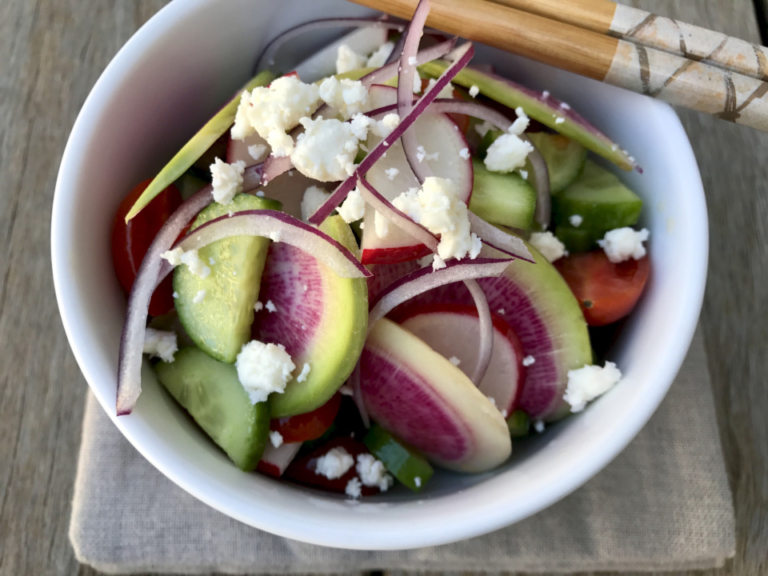
Radish Salad
Ingredients:
- 6 Persian cucumbers, cleaned, but not peeled
- 1 medium watermelon radish, cleaned and trimmed
- 1 bunch red radishes, cleaned and trimmed
- 1/4 red small red onion, thinly sliced
- 1 1/2 cups grape tomatoes
- 1/4 cup Feta cheese, crumbled
- 2 tablespoons extra virgin olive oil
- Salt and freshly ground pepper to taste
Directions:
- Slice the cucumbers lengthwise and place the flat side on a cutting board. Cut cucumbers into 1/4 inch slices and place in a large mixing bowl. Set aside.
- Cut the watermelon radish in half. Slice into thin, 1/8-inch slices and place in bowl with cucumbers.
- Cut red radishes in half, and cut into thin slices. Add to other vegetables. Add the sliced onion. Cut the grape tomatoes lengthwise and add to bowl.
- Right before serving, gently toss the vegetables with the extra virgin olive oil and season to taste with salt and pepper. Place in a serving bowl and garnish with crumbled Feta cheese.
When I started my blog, I had no intention of voicing political views. So this will likely be my first and only post referring to anything political. I strongly believe everyone is entitled to their opinion, whatever that may be. But “Dump” cookies are delicious; I’m no fan of Trump; and the rhyme is too good to pass up. So there you go.
A dump cookie itself is nothing new, it has been around a long time, and you have probably had one. Also referred to as “compost cookies,” “monster cookies,” “kitchen sink cookies,” “garbage cookies,” and “everything cookies,” the names and ingredient combinations are limitless. Whatever your political views, I hope you try this recipe because cookies tend to make people happy. This cookie recipe I created has a great flavor balance, and the addition of cornflakes gives the cookies a nice texture. If you like the recipe, please feel free to share it!
Dump Trump Compost Cookies
Ingredients:
- 2 sticks unsalted butter, room temperature
- 1 3/4 cups all-purpose flour
- 1 1/2 cups corn flakes, crushed up, plus an additional 1/2 cup kept whole
- 3/4 cup brown sugar
- 3/4 cup sugar
- 2 eggs
- 1 teaspoon vanilla extract
- 1 teaspoon baking powder
- 1 teaspoon baking soda
- 1/4 teaspoon salt
- 1 cup milk chocolate chips
- 1/2 cup white chocolate chips
- 1/2 cup Heath Bar, roughly chopped
- 1 cup macadamia nuts, roughly chopped
Directions:
- preheat the oven to 350 degrees F. Line two baking sheets with parchment paper and set aside.
- In the bowl of a kitchen mixer, such as a KitchenAid, fitted with a paddle attachment, add the butter and sugar and beat until pale and fluffy. Add the eggs, one at a time, mixing well after each addition. Add the vanilla.
- With the mixer on low gradually add the flour, crushed cornflakes, baking soda, baking powder, and salt. Mix to incorporate.
- Using a large rubber spatula, gently fold in the chocolate chips, white chocolate chips, Heath Bar, and macadamia nuts, and mix well. Next, fold in the remaining 1/2 cup of whole cornflakes. Mix well to incorporate.
- Cover and refrigerate for 1 hour. When ready to bake, I use about two tablespoons of cookie dough per cookie. Using a tablespoon, drop rounded mounds of dough about 3 inches apart (this may vary depending on how large you are making the cookies).
- Bake for 10-12 minutes still starting to brown on the edges. Allow to cool for 5 minutes before serving.
My husband is not a cook. He will, however, if asked, make a dish or meal without hesitation and often rather enthusiastically. He will often return from a trip to the grocery store with a vast assortment of condiments and pickled products and, if we are lucky, the complete ingredients for whatever recipe he decides to tackle that day.
My husband is an attorney, he is not easily intimidated, thus time-consuming recipes or endless lists of ingredients are not a concern. He embraces a challenge and is fairly patient. However, he may need to work a bit on his timing (the art of getting more than one dish on the table at once), but his overall effort and determination are impressive, especially for a non-cook. The result of all this can be fantastic, like his kreplach.
Neal’s kreplach is not traditional kreplach, but he’s Jewish, more a modern take of the well-known favorite. He did not grow up eating this and his recipe is not exactly healthy. But it is tasty. Our boys love his kreplach, and I am a big fan as well. Making this recipe fully from scratch takes a bit of commitment, but the use of store-bought wonton wrappers reduces the time substantially. You can also assemble these in advance, refrigerate them, and cook them later–which is often what I do.
Traditionally, kreplach is a type of small Jewish dumpling filled with ground meat, mashed potatoes, or another filling. They are typically boiled and served in chicken soup, though they can also be fried. There are various ideas about the meaning of the word “kreplach.”
Some believe the name comes from the initials of three Jewish festivals: “K” for Kippur, “R” for Rabbi, and “P” for Purim, which together form the word Krep. “Lach” comes from Yiddish, meaning “little”. Another suggestion is that the word comes from the German word “Krepp”, meaning “crepe”. Kreplach also carries a considerable amount of symbolism; its triangular shape is said to represent Judaism’s three patriarchs: Abraham, Isaac, and Jacob.
Historically, kreplach is served during several Jewish holidays: (1) Rosh Hashanah, the Jewish New Year; (2) at the pre-fast meal before Yom Kippur, the Day of Atonement; and (3) on Purim, a Jewish holiday that commemorates the Jews being saved from Haman, who was planning to kill them.
A variety with a sweet cheese filling is sometimes served on Shavuot, a holiday that marks the giving of the Torah on Mt. Sinai. Fried kreplach (similar to what my husband makes) is popular on Chanukah (or Hanukkah as some say) commemorating the rededication of the Holy Temple in Jerusalem, because the kreplach is fried in oil, which references the oil in the miracle of Chanukah.
History aside, my husband’s kreplach is delicious mainly for its simplicity. There is a fried outer wrapper and a simple seasoned meat filling. My family eats them as is. Depending on the filling, I have seen some top kreplach with sour cream or applesauce. But truthfully, nothing else is needed.
Neal's Kreplach
Ingredients:
- 1 pound organic ground beef (I prefer grass-fed)
- 1 small yellow onion, minced
- 1/2 bunch parsley, cleaned and finely chopped
- One (12-ounce) package of wonton wrappers
- 3 tablespoons Extra Virgin olive oil
- 1 egg, whole
- 1/2 teaspoon salt, plus more to season after cooking
- 3/4 cup vegetable oil for frying
- 1 egg lightly beaten, for egg wash
Directions:
- Place 1 tablespoon of olive oil in a large sauté pan over medium-high heat. When hot, but not smoking, add the onion and sauté till tender and beginning to brown. Place the cooked onions in a medium mixing bowl and set aside.
- Place the sauté pan back on the heat and add the remaining two tablespoons of olive oil. When hot, add the ground meat and brown, stirring occasionally. Using a small strainer, strain the cooked meat and add to the onions. Let the mixture cool slightly.
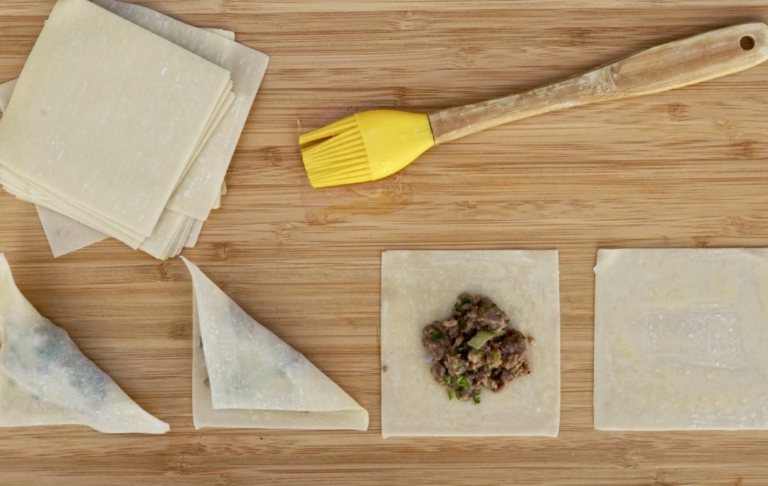
- Once the meat is cool, add the egg, chopped parsley, and salt. Mix well to blend and set aside. Set up your workstation. Make your egg wash. Line a baking sheet with parchment paper or lightly grease so the kreplach won't stick.
- Working with a few at a time, place the wonton wrappers on the cutting board. Using a pastry brush, outline all edges of the wonton wrapper with egg wash. Place about 1 tablespoon of the ground meat mixture in the center of the wrapper. Fold the wrapper into a triangle. Gently pick up the kreplach holding the point of the triangle upward, and using your fingers, gently press the sides of the wonton firmly together to create a seal around the filling. This will take patience to do well. Add as much egg wash as needed to seal the kreplach completely.
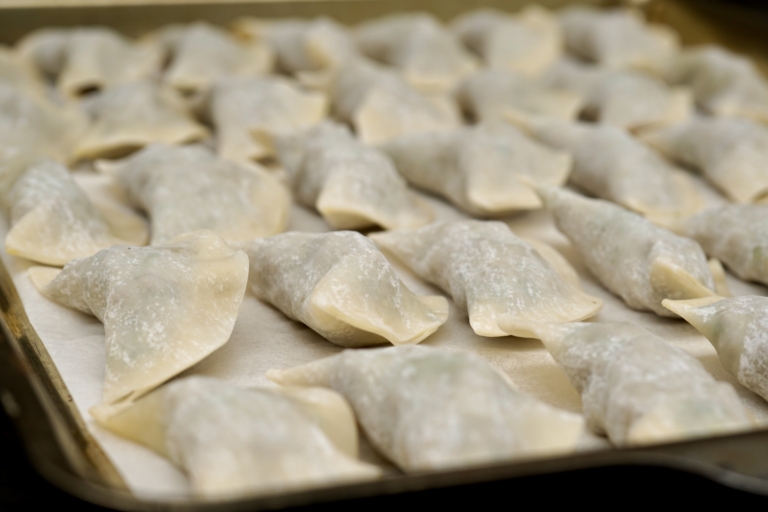
- Place the kreplachs on the prepared sheet tray and repeat until all the filling has been used. The kreplach can be stored at this point and cooked later if desired, just wrap well with plastic wrap and refrigerate so they don't dry out.
- To cook the kreplach, place a large sauté pan on medium-high heat. Add the vegetable oil. When the oil is hot, add one kreplach to test. If it starts to sizzle a bit around the edges, go ahead and add a few more. Be careful not to overcrowd the pan or they will stick together. Watch closely. Rotate the kreplach and turn it over during the cooking process. Depending on how hot your oil is, cook the kreplach for approximately 3-4 minutes per side.
- When the kreplach is evenly golden brown, carefully remove it from the pan and drain on a baking sheet lined with paper towel. Lightly salt the cooked kreplach. Repeat the above until all kreplach is cooked. Kreplach is best served warm. You can heat in a 300-degree F oven for about 5 minutes right before serving if needed.
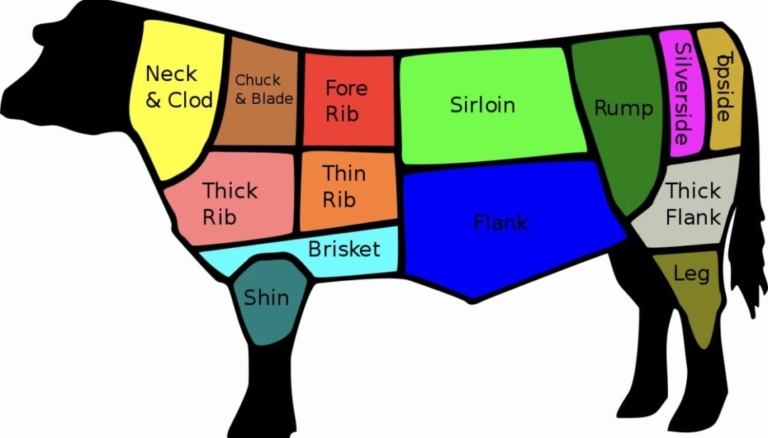
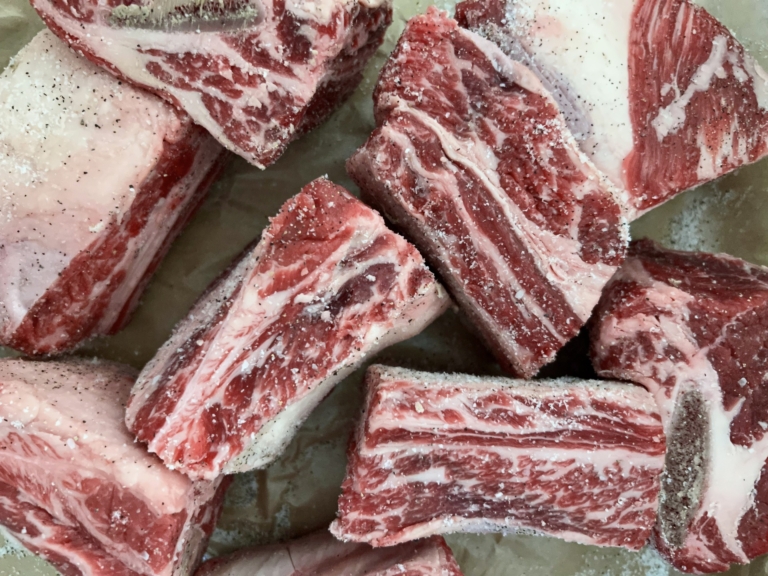
I did not grow up eating this, my husband did; I ate pot roast. Short ribs are a cut of beef taken from the brisket, chuck, plate, or rib areas of a cow. In essence, they are the short portion of the rib bone, which varies in thickness. Short ribs come in two ways: (1) “flanken cut,” which is cut across the bone (about 1-2 inches long), and (2) “English cut,” which is the cut parallel to the bone (about 6 inches in length). English cut short ribs can be served individually or, more commonly, connected–which is referred to as “plate”. Short ribs are themselves a fattier cut of meat, allowing for a richer flavorful taste. That flavor is also what makes it superior to pot roast.
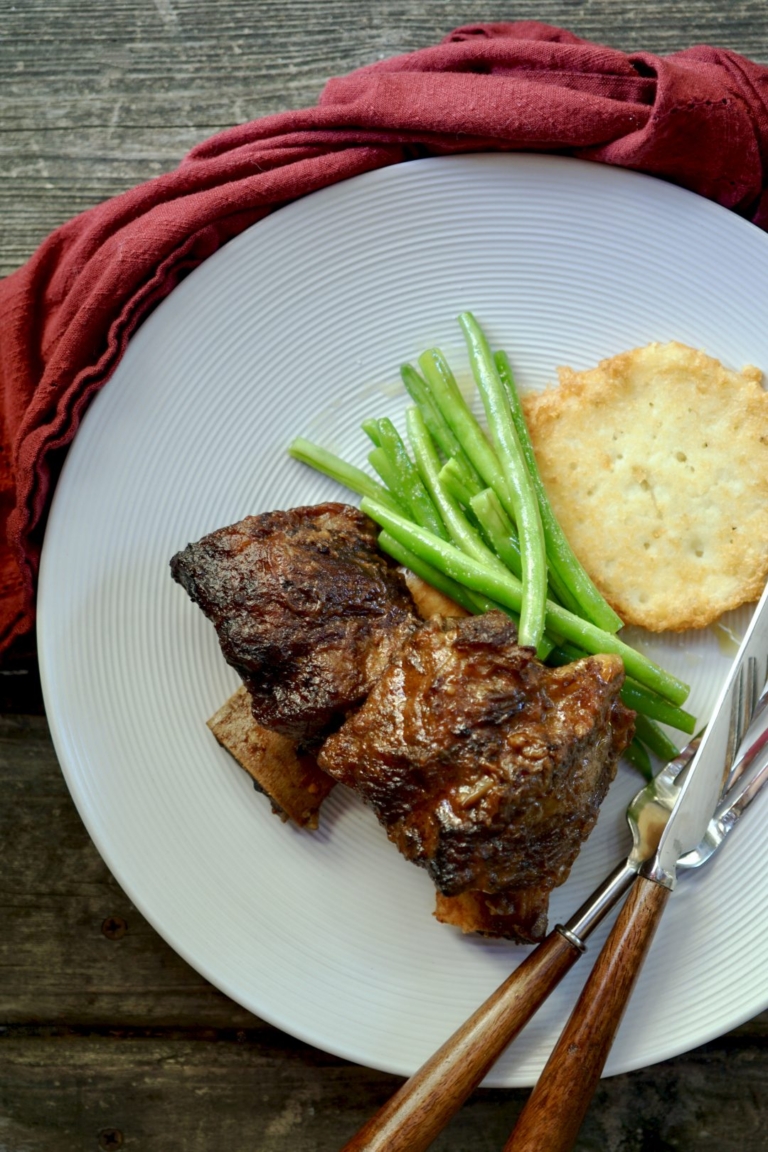
According to my sixth-grader, short ribs are “boss” in comparison to other roasting beef cuts. I tend to agree, and now cook with them often. I have come to believe a slow-cooked short rib is truly one of life’s simple, decadent savory pleasures. Flavorful, tender meat that falls off the bone and practically melts in your mouth is well worth the labor of love put into making them. But short ribs must be cooked slowly, they simply cannot be rushed. You can braise them in the oven, cook them stove top, or use a slow cooker, which is what I have come to prefer over the years. My recipe takes a good 9 hours from start to finish. But on a cold or rainy night, they’re the perfect hearty comfort food you’re looking for.
My husband, who is Jewish, was raised on short ribs, and they were a common dish seen at Passover, an important holiday commemorating the liberation of the Israelites from Egyptian slavery. We now carry that tradition on with our boys (substituting matzo meal for flour), but my older son (a true carnivore) would eat them every day if I served them. Accompanied by almost any form of potatoes, they are, to him, the ideal dinner.
Requested now for birthdays, the start of school, and other various special occasions, I can often be found searing short ribs while simultaneously making breakfast at 7 a.m. and trying to get my kids ready for school. (Not typical I know, but I am who I am.) I have made numerous short rib recipes over the years and continually test out new ones. Two favorites have been one that called for over 50 cloves of garlic (that was exhausting) and another more decadent one, which required 2 whole bottles of full-bodied red wine (“rich” does not begin to cover it). What I noticed about these recipes, however, was my kids wouldn’t eat them.
This recipe I developed is a much more basic one, a family-friendly version made in a slow cooker, but it does require a bit of patience (as well as some planning). The result is worth it, as you will have a rich, tender, flavorful meat far superior to the dry tasteless pot roast of my youth, and thanks to the slow cooker, it’s practically cooked itself!
Slow Cooker Short Ribs
Ingredients:
- 5 Pounds of beef short ribs, cut in thirds by butcher
- 3 large carrots, rough chop
- 3 celery stalks, rough chop
- 1 yellow onion, rough chop
- 8 garlic cloves, peeled and smashed
- Two (28-ounce) cans of chopped tomatoes
- 1 small can of tomato paste
- 2/3 cup cold water
- 5 tablespoons Extra Virgin olive oil
- 1 cup all-purpose flour
- 1 cup dry red wine (optional)
- Salt and freshly ground black pepper, to taste
Directions:
- Season short ribs generously with salt on all sides. Evenly coat the short ribs with flour, shaking off any excess. Set aside.
- Place a large pan over medium heat. Add 2 tablespoons of olive oil. When hot, but not smoking, add the onions, carrots, celery, and garlic. Sauté till beginning to brown, about 6-8 minutes. If adding red wine, add it now and cook with the vegetables one minute longer. Place the vegetables in a medium-large slow cooker.
- Place the pan used for the vegetables back on the stove over medium-high heat. Add the additional 3 tablespoons olive oil and heat. When hot, add the short ribs coated in flour. Sear the short ribs for about 1 minute on each side. Turn the short ribs frequently until all sides are browned, about 10 minutes. Remove from the heat and place on top of the vegetables in the slow cooker.
- Add the tomatoes, tomato paste, 1 teaspoon salt, and water to the slow cooker, and stir gently. Place the cover on the slow cooker and set the timer for 8 hours on low heat, carefully turn once while cooking (if you are able, not required).
- When the short ribs are finished cooking, turn the oven on to 400 degrees F. Using tongs, gently remove the short ribs from the cooking liquid and place them in a rectangular baking dish. Strain the cooking liquid through a fine sieve into the baking dish using a soup ladle to smash all the cooked vegetables and push the liquid through. Discard the solids.
- Place the short ribs in the oven and heat for 20-25 minutes till the sauce has darkened a bit in color. Remove from the oven and cool slightly before serving. You can remove the bone prior to serving or leave it in for a more dramatic presentation
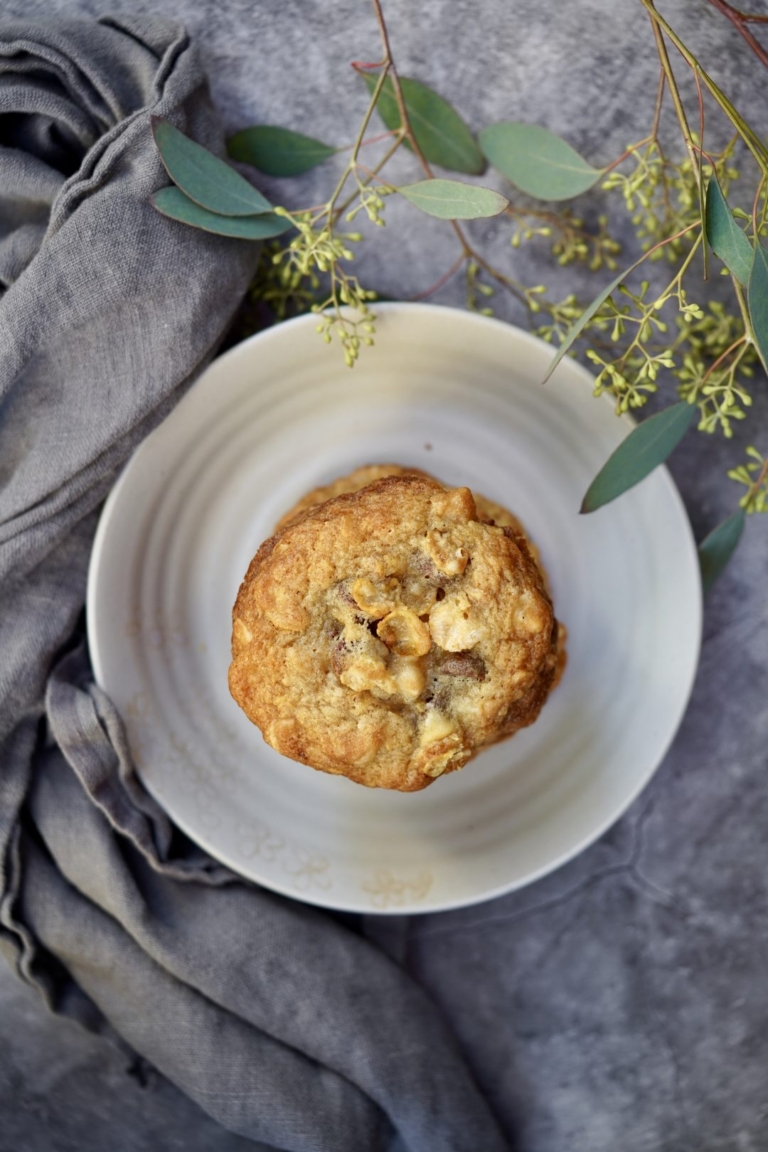
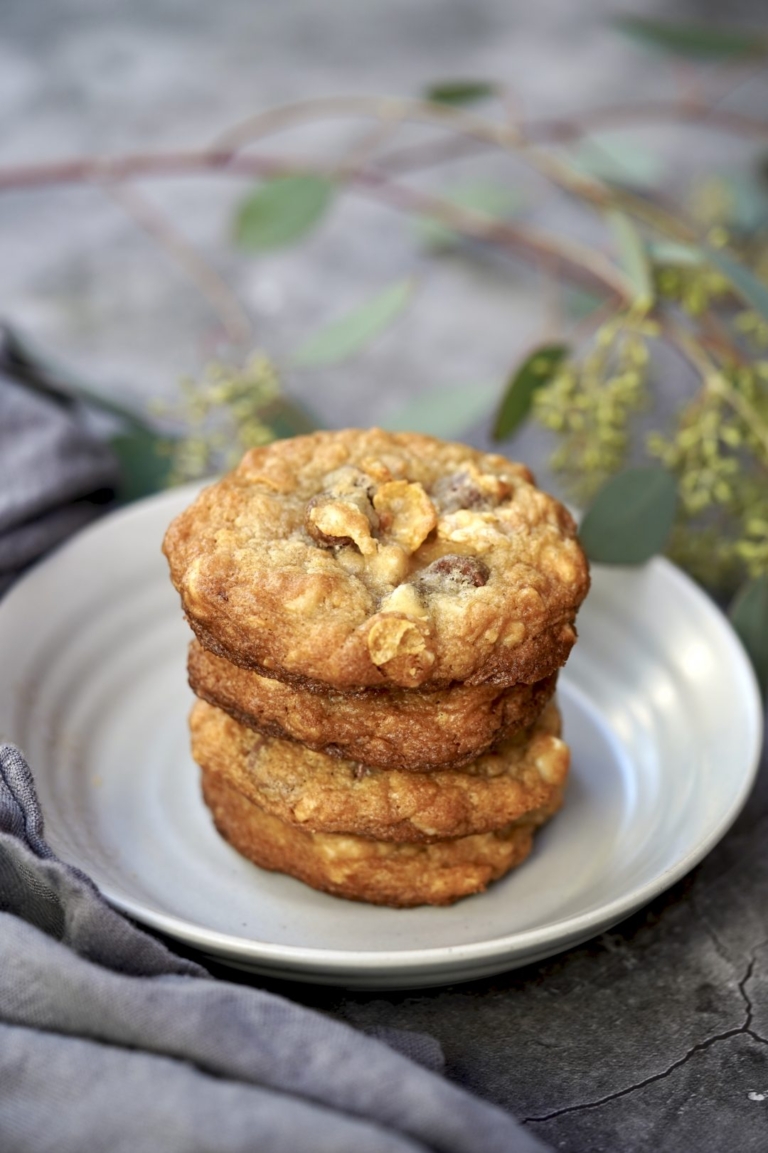
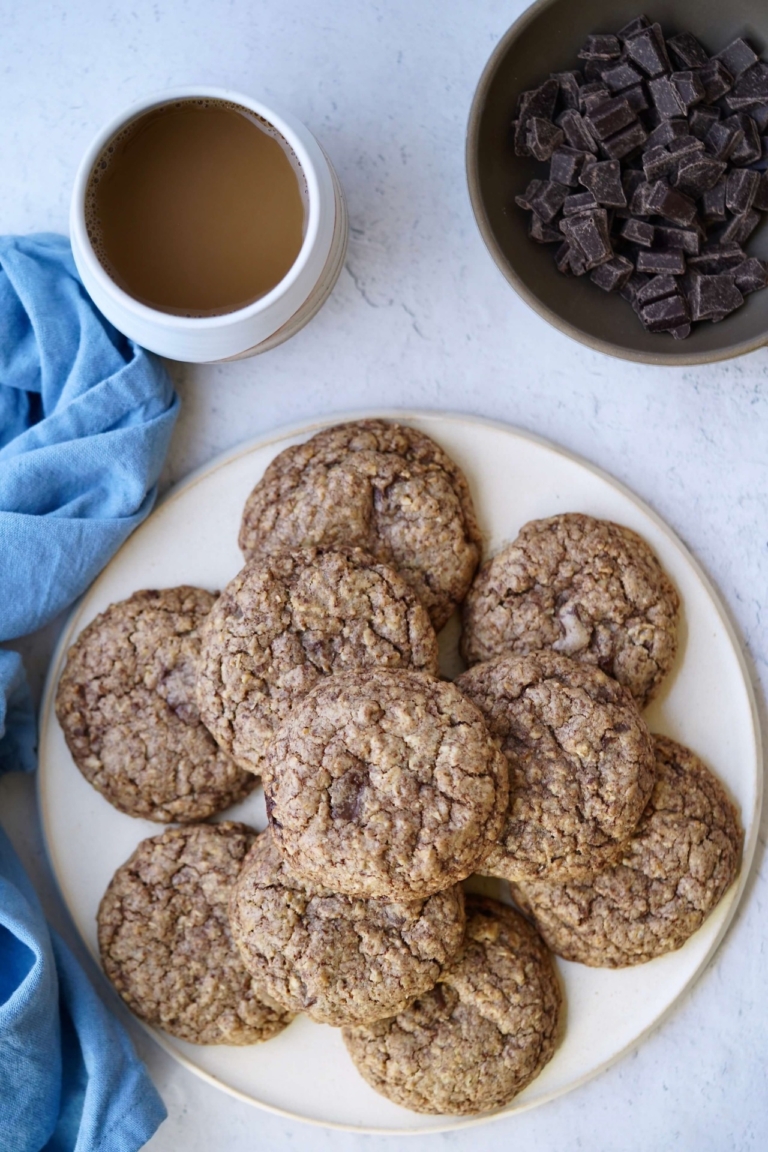
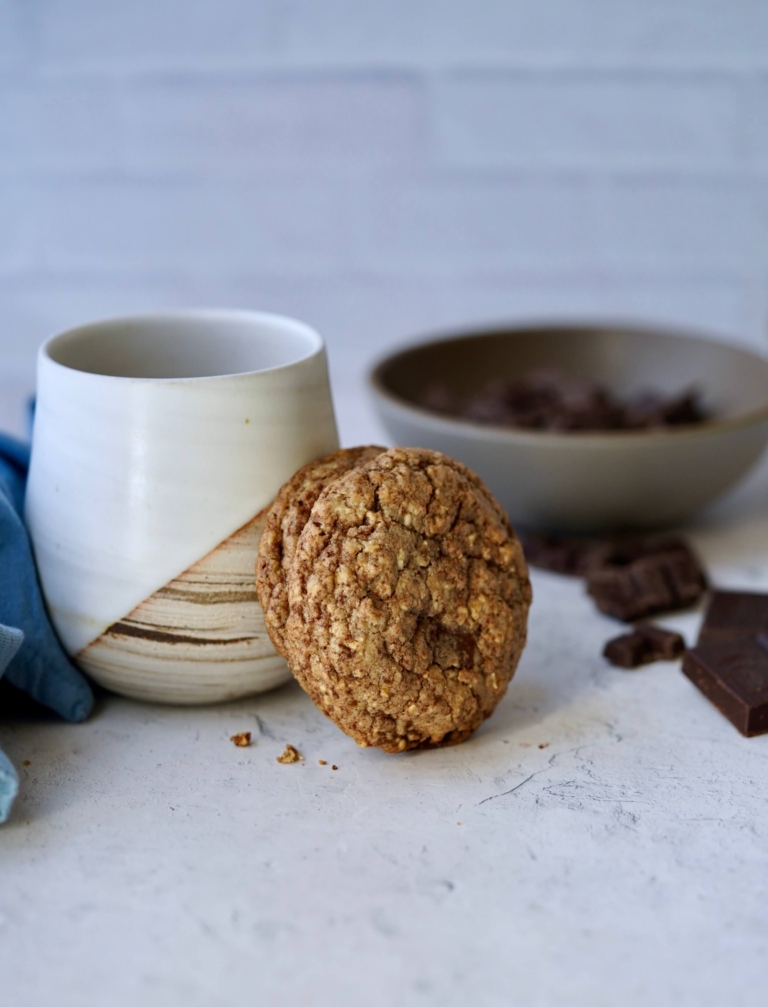
The timeless allure of oatmeal chocolate chip cookies traces back to early 20th-century America. These chewy, comforting treats have been gracing cookie jars for generations, embodying a perfect blend of heartiness and sweetness. These are hands-down a family favorite and I am confident that will never change.
I have elevated the classic recipe with a subtle innovation in this modern twist. Finely ground oatmeal lends a delicate texture, offering a nuanced depth of flavor. But it doesn’t stop there – we’ve taken it up a notch with shaved chocolate and hearty chunks, ensuring each bite is a symphony of chocolatey goodness.
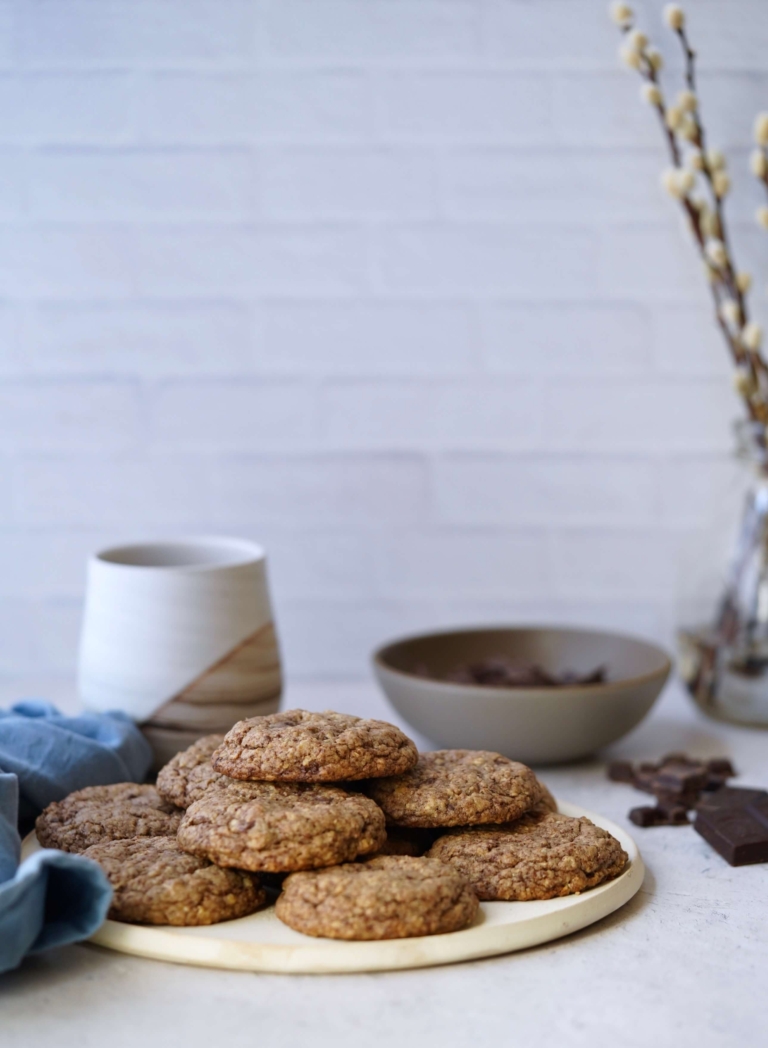
This reinvented classic not only pays homage to the nostalgia of yesteryears but also embraces the culinary creativity of today. The result? It is a cookie that marries tradition and innovation, offering a delightful journey through time with every delectable bite. Whip up a batch and savor the harmonious blend of old and new in every mouthful.
Good Quality Chocolate
- Favor Intensity: High-quality chocolate has a richer, more complex flavor profile. It provides a deep cocoa taste that enhances the overall flavor of the cookie.
- Texture and Mouthfeel: Good quality chocolate has a smooth, velvety texture that complements the cookie’s texture. It melts evenly, creating a luscious, creamy contrast to the cookie’s crunch or chewiness.
- Balanced Sweetness: Quality chocolate tends to have a balanced sweetness. This ensures that the cookie isn’t overly sweet, allowing the chocolate to shine without overwhelming the palate.
- No Unwanted Additives: Lower-quality chocolates often contain additional additives, like artificial flavors and preservatives, which can affect the taste and texture of the cookie.
- Melting Properties: Quality chocolate melts more evenly and consistently. This means it blends into the cookie dough better, creating a more uniform distribution of chocolate throughout the cookie.
- Appearance and Presentation: Good quality chocolate chips or chunks also tend to hold their shape and appearance better during baking, resulting in a more visually appealing cookie.
- Health Benefits: Higher-quality chocolates often contain a higher percentage of cocoa solids, which are rich in antioxidants and other beneficial compounds. This can contribute to a slightly healthier indulgence.
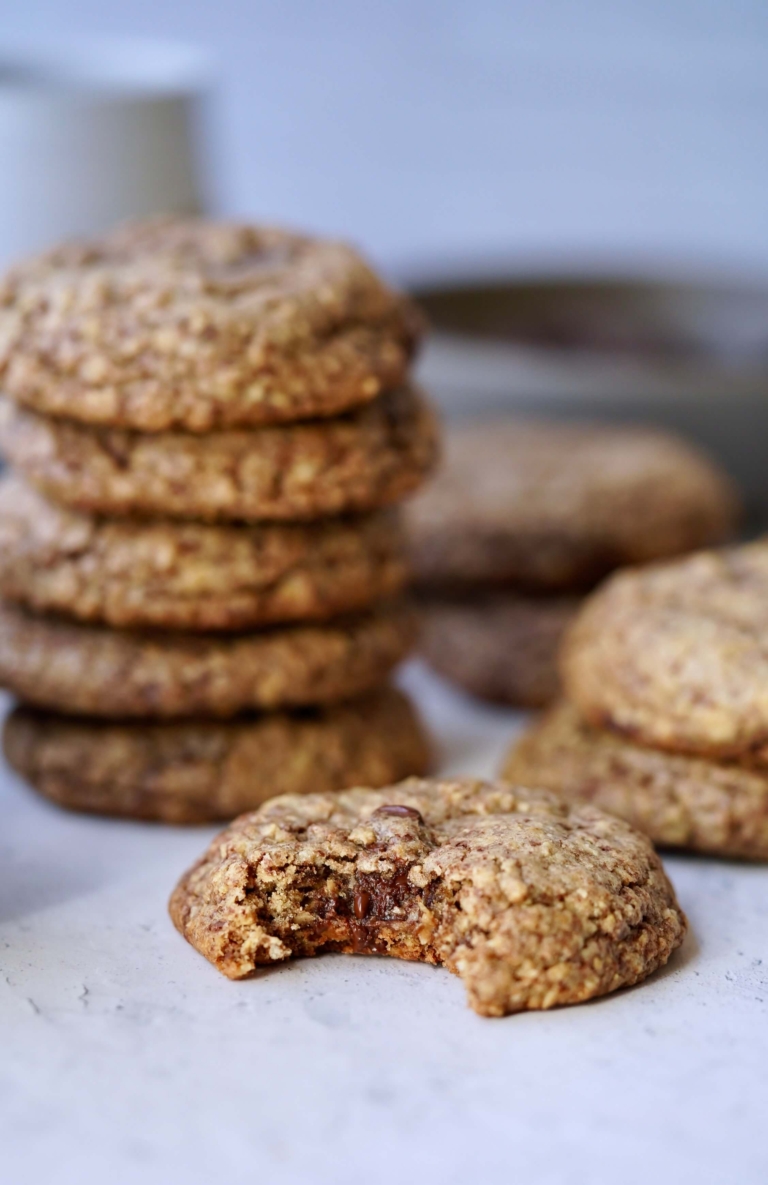
By using good quality chocolate, you elevate the overall taste and experience of your chocolate chip cookies. It’s a small investment that can make a significant difference in the final product. Years ago I used to add finely chopped almonds to the recipe but have over time stopped doing so as my family prefers them without them. That said, almonds, pecans, and walnuts all make a wonderful addition if you are a nut fan.
Oatmeal Chocolate Chip Cookies
Ingredients:
- 1 cup unsalted butter, room temperature
- 1 1/4 cups brown sugar, packed
- 3/4 cups sugar
- 2 eggs
- 2 cups all-purpose flour
- 2 1/2 cups oatmeal, finely blended
- 1 teaspoon baking powder
- 1 teaspoon baking soda
- 1/4 teaspoon salt
- 1 1/2 teaspoons vanilla extract
- Three (4-ounce) good quality chocolate bars (a mixture of semi-sweet and bittersweet chocolate depending on your preference), grated
- One (12-ounce) bag of good quality bittersweet dark chocolate chunks
- 1 cup almonds, finely chopped (optional)
Directions:
- Preheat the oven to 375 degrees F. Line two baking sheets with parchment paper and set aside.
- Using a Cuisinart, fitted with a blade attachment, finely blend the oatmeal into a fine powder and set aside.
- In a medium size mixing bowl combine the flour, oatmeal, salt, baking powder, and baking soda. Mix well.
- In a mixer, such as KitchenAid, fitted with a paddle attachment, cream the butter and both sugars. Add the eggs and vanilla. With the mixer on low, slowly add the dry ingredients to the egg mixture and mix well to incorporate. Add the chopped nuts (if using), grated chocolate, and chocolate chips. Mix well.
- Using your hands, roll the cookie dough into balls (I typically use a heaping 2-tablespoon scoop to measure) and place them on the prepared baking sheet, about 2 inches apart. Bake the cookies for 9-10 minutes. Let cool slightly to set.