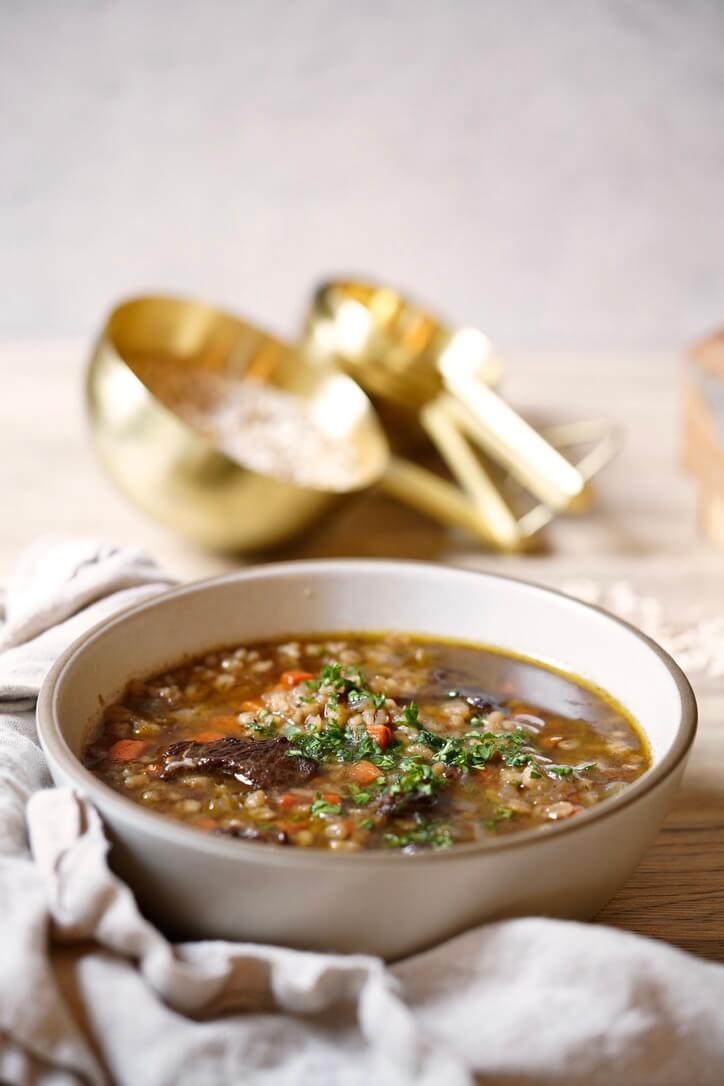
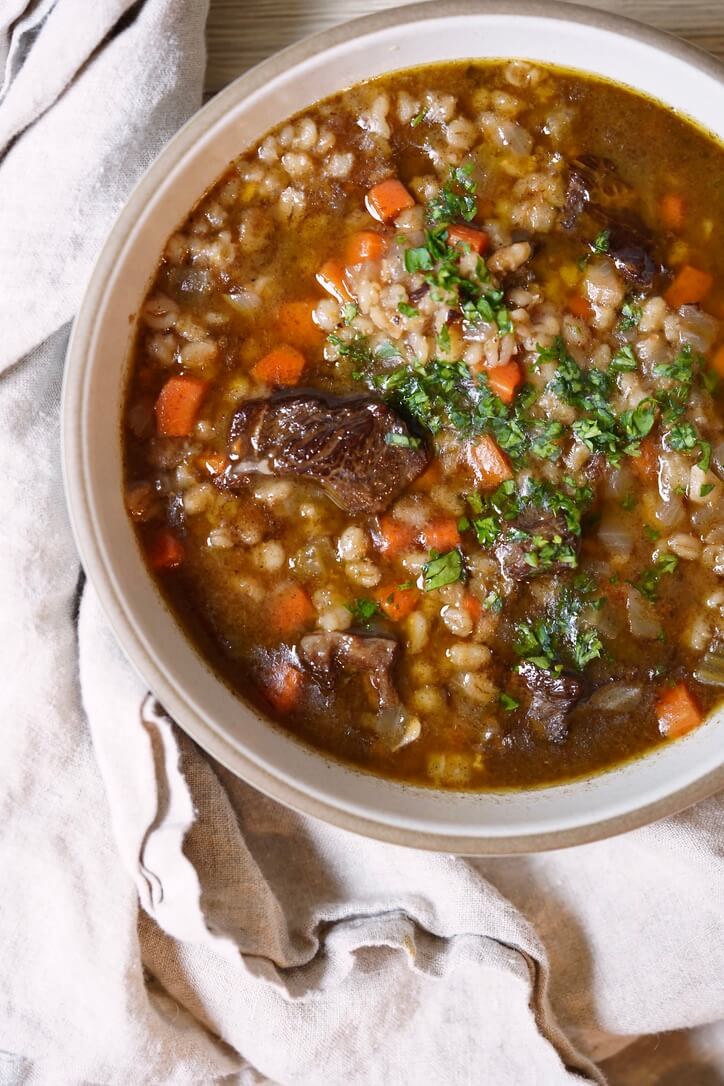
Beef and barley soup is a classic dish that has been enjoyed for centuries and oozes cozy vibes. It is a hearty, filling soup packed with flavor and nutrition that’s perfect in the winter months. The soup is believed to have originated in Scotland, where it was a popular dish among farmers and laborers who used locally available ingredients like beef, barley, and root vegetables to make hearty and nourishing soup.
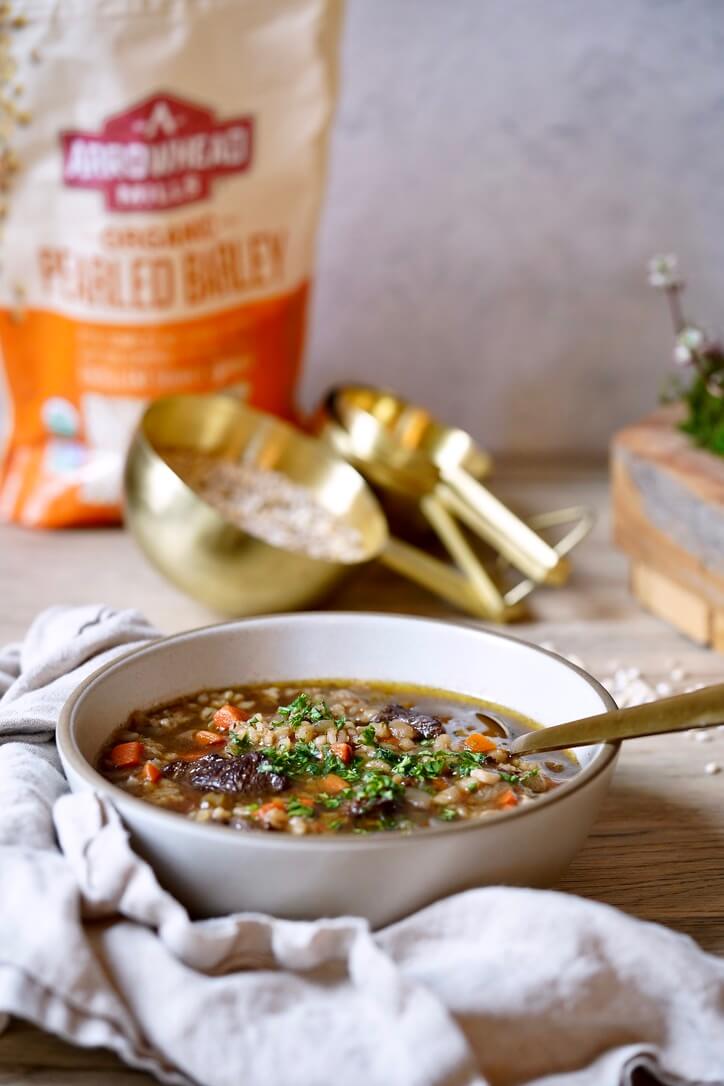
Over time, the recipe for beef and barley soup has evolved to include a variety of ingredients and cooking techniques. In some regions, vegetables like parsnips and potatoes are added to make the soup more hearty. Some recipes call for the addition of red wine, which adds a deep richness to the soup. The slow-cooked beef helps to create a rich and savory broth that is both comforting and satisfying. The addition of barley adds a chewy texture and nutty flavor that complements the beef and vegetables perfectly.

Health Benefits of Barley
Barley, for those who don’t know, is a highly nutritious cereal grain that has been consumed for thousands of years. It is a rich source of many essential nutrients, including fiber, vitamins, and minerals, which make it a healthy addition to any diet. Below are some of the many health benefits of barley:
- High in fiber: Barley is an excellent source of dietary fiber, which is important for maintaining a healthy digestive system. The fiber in barley can help lower cholesterol levels, and reduce the risk of heart disease.
- Good for heart health: The soluble fiber in barley helps to lower cholesterol levels, which can reduce the risk of heart disease. Barley also contains antioxidants, which may help prevent damage to the heart and blood vessels.
- Helps to control blood sugar: Barley has a low glycemic index, which means that it releases glucose into the bloodstream slowly. This makes it an ideal food for people with diabetes or those trying to control their blood sugar levels.
- Rich in vitamins and minerals: Barley is a good source of vitamins and minerals, including vitamin B6, iron, magnesium, and phosphorus. These nutrients are essential for maintaining good health and can help to boost energy levels.
- Weight loss: The low-calorie high fiber of barley makes it an ideal food for people who are trying to lose weight, as it can help to reduce hunger and keep you feeling full for longer.
American Comfort Food
Beef with barley soup is considered a classic American comfort food that has been enjoyed by people of all ages for decades. The soup became popular in the United States after it was introduced by Scottish immigrants who brought their traditional recipes with them to the new world. This iconic soup became a common staple in American households during the Great Depression when people were looking for economical and filling meals that were easy to prepare. Since then, this beloved soup has remained a staple of American cuisine and is often found on the menus of diners, cafes, and restaurants across the country.
Beef and barley soup is a delicious and nutritious dish that is perfect for any occasion, but especially welcome on frigid winter evenings. Whether you are looking for a warming meal on a blustery winter day or an easy one-pot meal for a busy week you truly can’t go wrong.
Beef With Barley Soup

Ingredients:
- 2 pounds beef chuck cut into 1-inch cubes
- 3 Tablespoons Extra virgin olive oil
- 1 medium onion small dice
- 2 celery stalks, small dice
- 3 large carrots, peeled and small dice
- 3 cloves garlic, minced
- 3/4 cup dry red wine
- 6-7 cups good quality beef stock
- 1 tablespoon Worcestershire sauce
- 2 sprigs fresh thyme
- 1/3 cup pearl barley
- Salt and pepper to taste
- 1/4 cup fresh parsley, minced, for garnish
Directions:
- Place a large heavy pot to medium heat and add the olive oil. Pat the beef dry with paper towels and season with salt and pepper. When the pot is hot, but not smoking, add the beef and sear on all sides until well browned. Be careful not to overcrowd the pan. Work in batches if needed.
- Remove the beef from the pot and set it near your workstation. Return the pot to the heat, add the onions, celery, and carrots, and saute for 5 minutes until softened. Add the garlic and cook for an additional 30 seconds. Add the red wine and turn the heat to high. Reduce by half, about 2-3 minutes. Add the beef stock, Worcestershire sauce, thyme, and the beef back to the pot. Once boiling reduce to a simmer. Simmer the soup, partially covered, for 45 minutes.
- Next, add the barley and continue to simmer until tender, about 45 minutes. Taste and adjust the seasoning as needed. Garnish with parsley to serve.
Rise and shine to the goodness of whole grain fruit and nut breakfast bars, a delicious energy booster, that’s both wholesome and incredibly easy to prepare. These no-bake, dairy-free bars are a treasure trove of natural goodness, combining various, readily available nutritious ingredients for a breakfast bar that fuels your day.
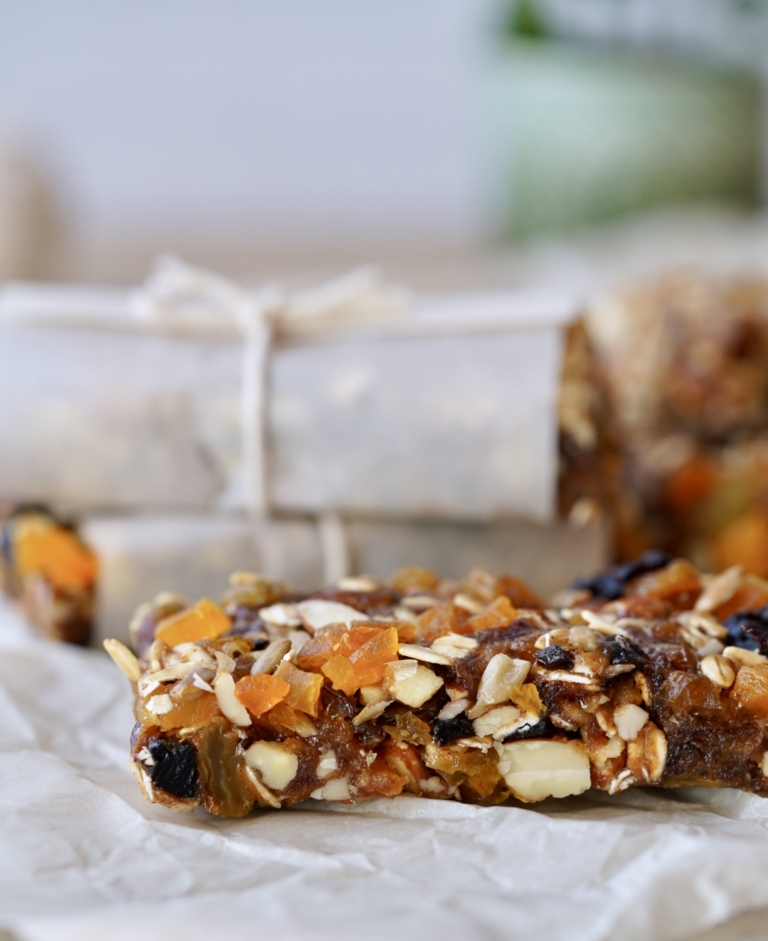
Dried apricots, cherries, golden raisins, and dates come together in perfect harmony, offering a symphony of flavors and a burst of natural sweetness. Almonds and sunflower seeds provide a satisfying crunch and a boost of protein. Almond butter and honey help bind everything together with a creamy, luscious texture that complements the hearty whole grains within.
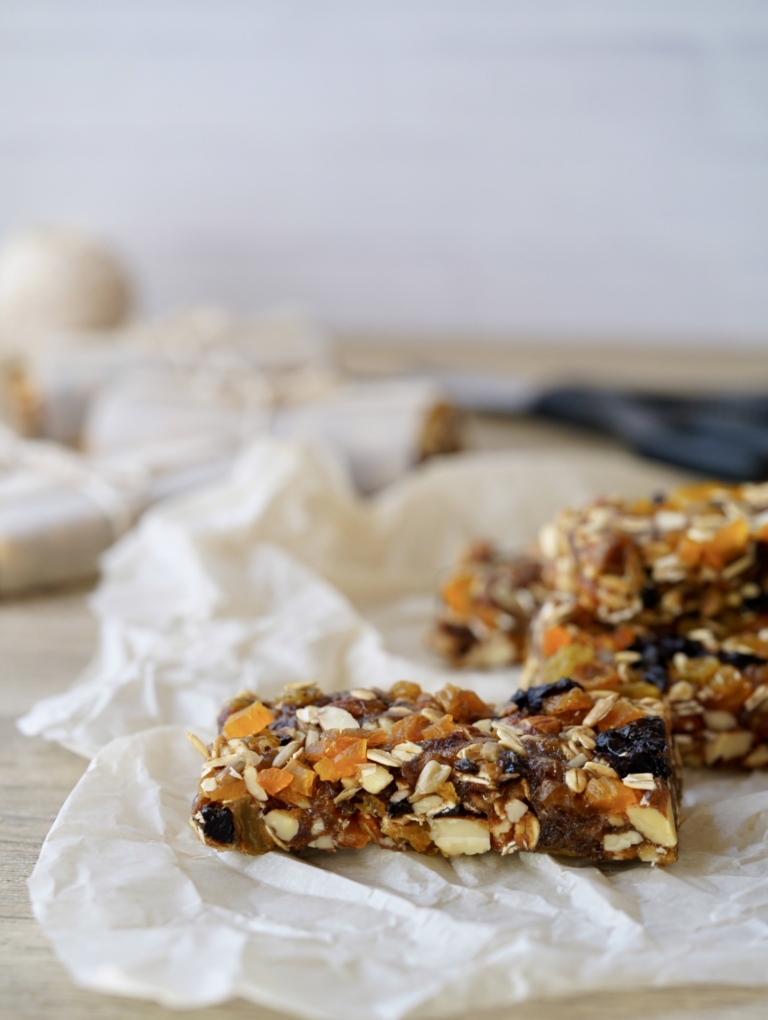
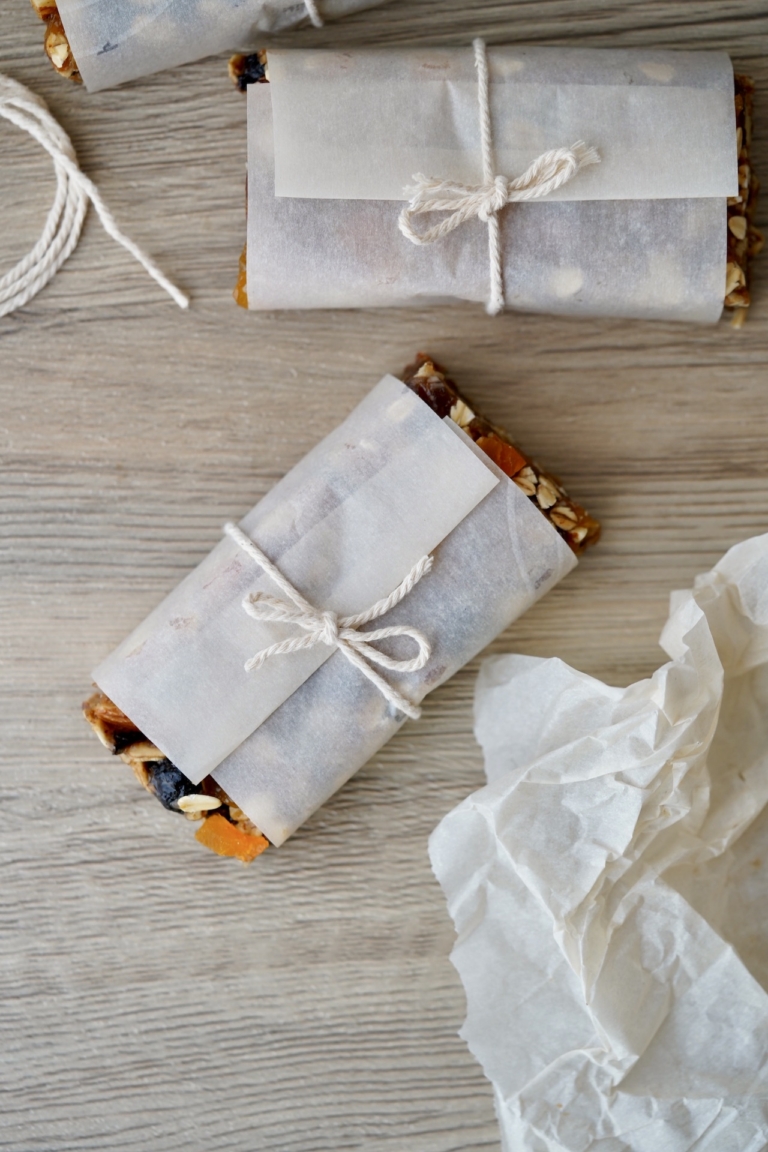
These bars are a busy person’s best friend. With no baking involved, they can be whipped up in a matter of minutes, offering a hassle-free breakfast, or snack option, for those on the go. Packed with energy-sustaining ingredients, they keep you fueled and focused throughout the day.
Embrace the ease of these healthy fruit and nut breakfast bars and savor the grab-and-go aspect for those busy mornings. Whether enjoyed with a steaming cup of coffee or tucked into your bag for a mid-morning pick-me-up, these bars are a delicious testament to the power of whole foods. January is a long month and most of us like to start the new year with a few new health goals. So go ahead and start your day off right with a little bit of wholesome, homemade goodness.
No-Bake Fruit + Nut Breakfast Bars
Ingredients:
- 1 cup pitted dried dates
- 1/4 cup smooth almond butter
- 1/4 cup local honey
- 1 teaspoon vanilla extract
- 1 cup roasted unsalted almonds, roughly chopped
- 1/2 cup whole grain extra wide rolled oats
- 1/4 cup dried apricots, roughly chopped
- 1/4 cup dried cherries, roughly chopped
- 1/4 cup golden raisins
- 1/4 cup sunflower seeds
Directions:
- Line an 8-inch square pan with parchment paper leaving an overhang on all sides. Lightly oil and set aside.
- In a food processor, chop the dates and transfer to a medium-size mixing bowl.
- In a small saucepan add the almond butter, honey and vanilla and place over low heat. Stir the mixture occasionally, until combined and slightly warm, about 1 minute. Add to the dates and mix well to combine.
- Fold in the almonds, oats, apricots, cherries, raisins and sunflower seeds and blend. Pour the mixture into the prepared pan and press the mixture using your hands or a small glass jar. Place in the freezer to set for 30 minutes. Slice into 12 bars. Store in the refrigerator.
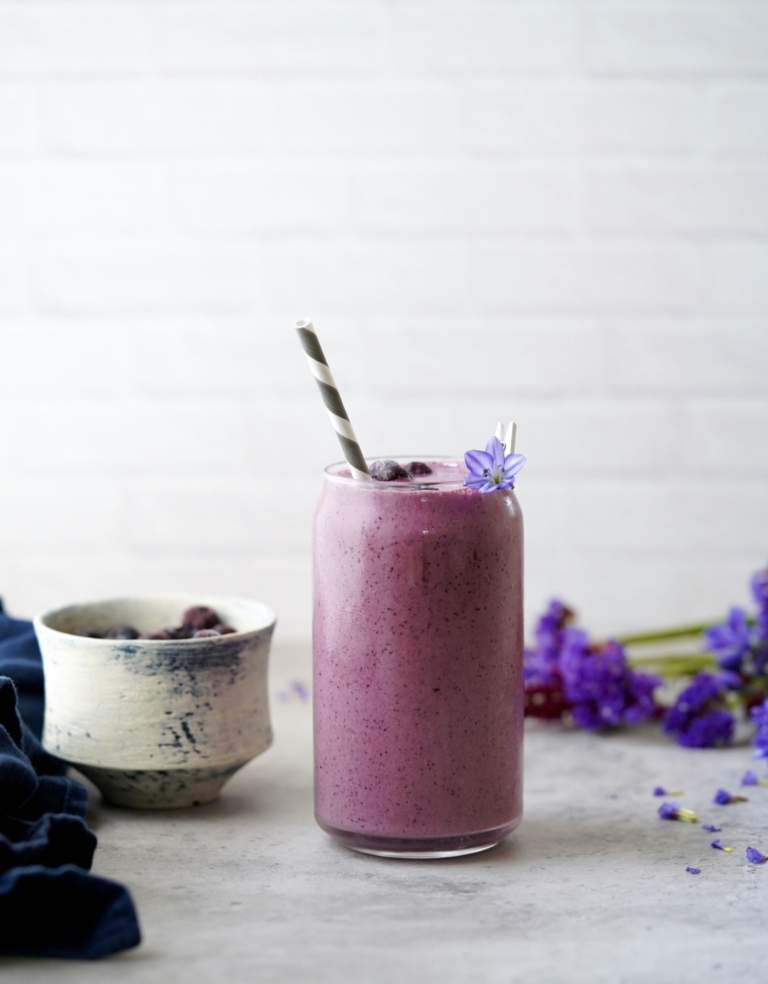
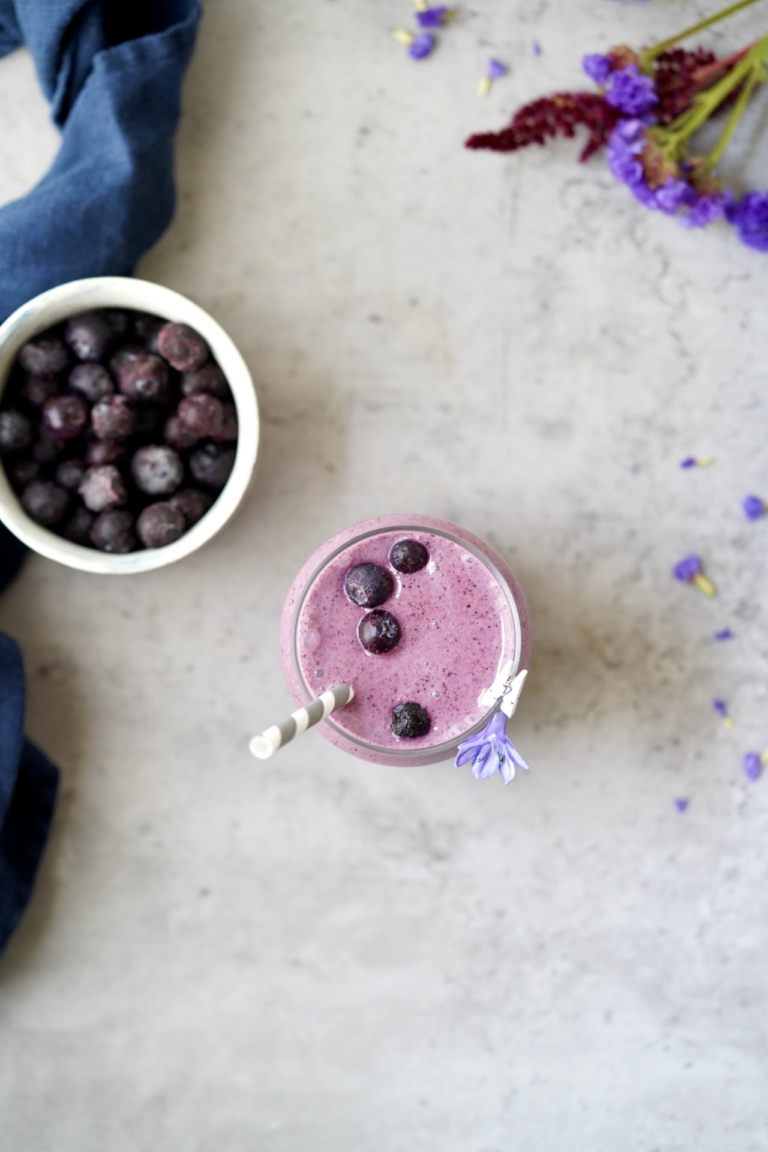
Happy 2024! Health experts have been saying it for years, but of all the fruits out there, you should seek ways to incorporate more blueberries into your diet. Blueberries are sweet, low in calories, nutritious, and incredibly popular. Blueberries are the most nutrient-dense of all berries. Just 1 cup of blueberries contains 4 grams of fiber, 24% of the RDA of Vitamin C, 36% of the RDA of Vitamin K, and 25% of the RDA of manganese.
Of all the fruits, blueberries are believed to contain the highest antioxidant capacity of all fruits and vegetables. That is a very impressive title to hold. I’ve always been a big blueberry fan and they are a go-to for me in any fruit salad and smoothie.
Mangos, considered the “king of all fruits” are something I am learning to appreciate more. I’m not sure why I have avoided them as much as I have over the years but tastes change as we age (that’s the good part). In 2017 mangos were named the most widely consumed fruit in the world.
There are many different varieties of mangos; they can range in shape, color, flavor, and seed size. The skin of mangos can vary from green to yellow or orange, but the flesh is always a lovely golden yellow and a distinct sweet almost creamy-like taste. mangos are low in saturated fat, cholesterol, and sodium and they are a fantastic source of dietary fiber as well as Vitamins B6, A, and C.
There are many different varieties of mangos; they can range in shape, color, flavor, and seed size. The skin of mangos can vary from green to yellow or orange, but the flesh is always a lovely golden yellow and a distinct sweet almost creamy-like taste. Mangos are low in saturated fat, cholesterol, and sodium and they are a fantastic source of dietary fiber as well as Vitamins B6, A, and C.
I add almonds (raw, milk and yogurt) to this smoothie because they are as close to perfect as a food can get. Not only do almonds add protein, but they are also high in antioxidants and fiber so they help reduce hunger, and lower blood sugar levels to prevent that post-eating crash no one enjoys.
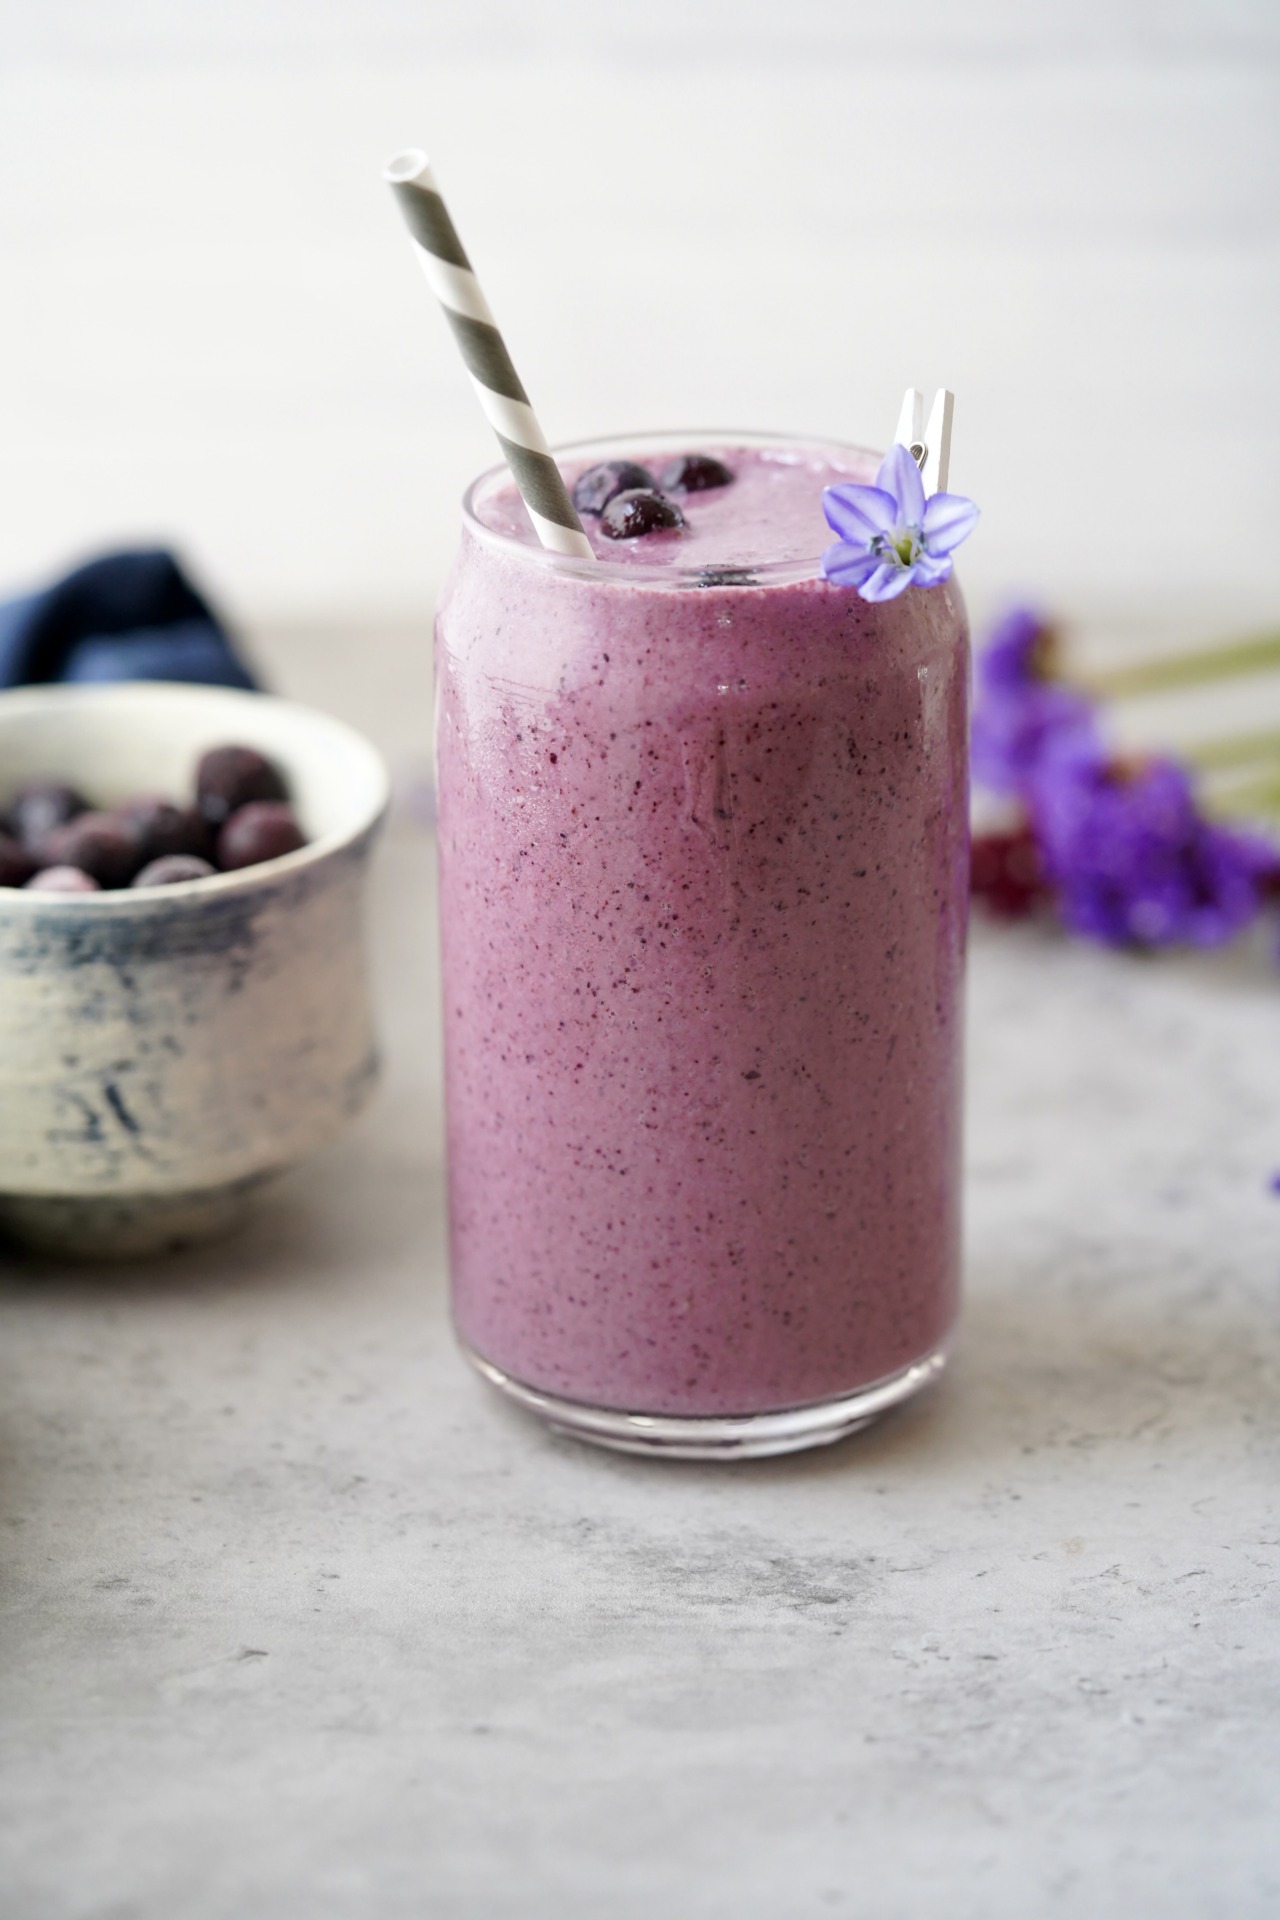 The blueberry-mango combination speaks for itself in terms of health benefits. And if time is precious, but health matters, this blueberry breakfast smoothie should become your new go-to, especially in the new year when kicking off better, healthier eating habits is a goal for many of us.
Blueberry Breakfast Smoothie
Ingredients:
- 1 cup frozen organic blueberries
- 1/4 cup fresh mango, chopped
- 2 tablespoons sliced raw almonds
- 1/2 cup almond milk
- One (5.3-ounce) container of dairy-free vanilla flavored almond-milk yogurt
- 1/2 cup ice
Directions:
- Using a kitchen blender, add the blueberries, mango, almonds, almond milk, dairy-free yogurt, and ice. Blend on high for at least 1 minute to incorporate. Serve right away.
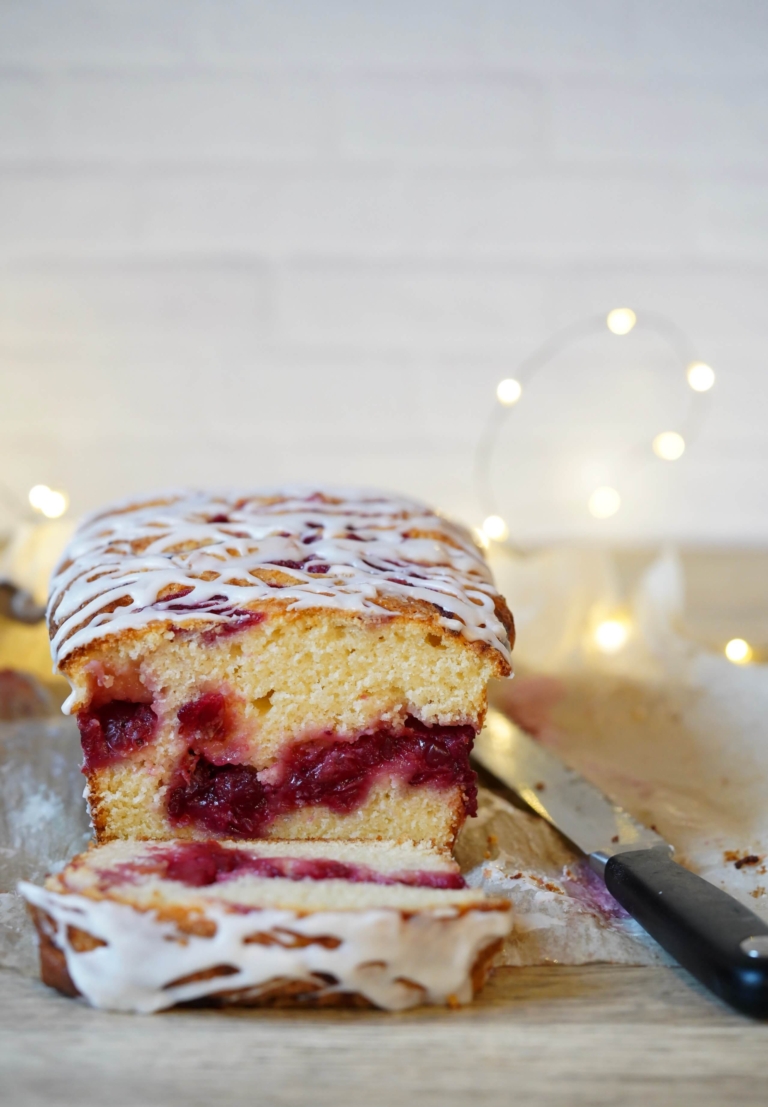
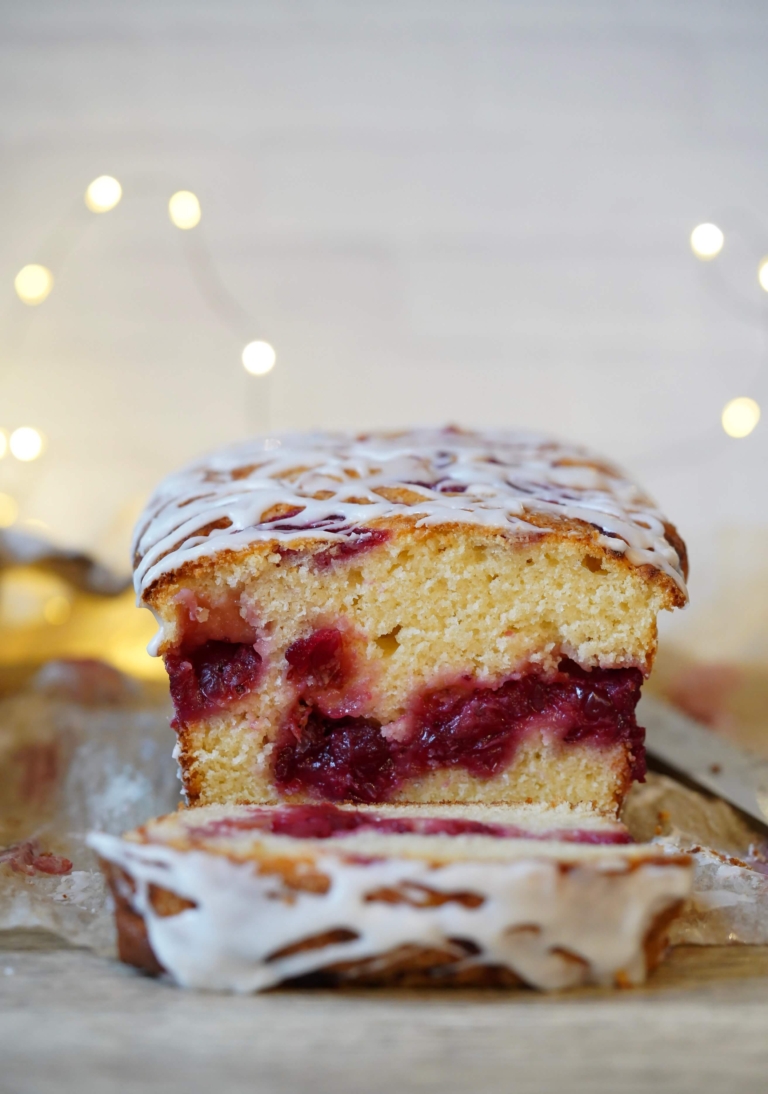
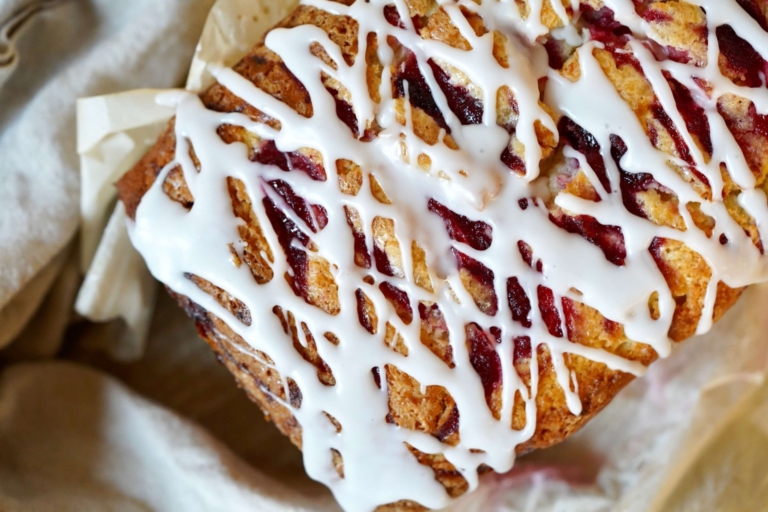
Add this irresistible cranberry-orange loaf cake to your holiday baking list right this very minute. Effortless in preparation, this loaf cake has a moist, tender crumb, with a sweet and tangy seasonal cranberry flavor. Lightly drizzled with glaze, this easy, fruit-forward loaf cake is perfect for breakfast, dessert, or anything in between.
Unlike most cranberry loaf recipes, I don’t use fresh cranberries. Instead, I swirl in homemade cranberry sauce adding flavor and moisture to the cake itself. The addition of fresh, homemade cranberry sauce layered within elevates this loaf cake to a different playing field and makes a wonderful addition to Christmas morning.
Sweet Loaf Vs. Cake
Most people don’t know the difference between a sweet loaf and a cake. I get it. The most obvious difference is the vessel one bakes them in. For loaf cakes, you use a rectangular loaf pan, but for cakes, you typically use a square or round pan. Although both cakes and loaf cakes share similar ingredients, the ratio of flour, fat, sugar, and the mixing methods differ, yielding a different result.
Quick breads, such as banana bread, scones, and muffins, are commonly made by combining the wet ingredients in one bowl and the dry ingredients in the other and then mixing the two till just combined with a few lumps. Cakes, in contrast, are made by creaming the butter and sugar together. Or, at times, by folding whipped egg whites into flour, sugar, and egg yolks, to create a finer crumb.
As a result. cakes are generally lighter than loaves and other quick breads. Think of it as similar to the difference between a muffin and a cupcake, a cupcake being a mini cake and a muffin being a type of quick bread. Additionally, loaf cakes almost always with some kind of fruit within them, whereas cakes can be with or without fruit. Add this festive cranberry loaf to your lazy holiday morning and all you need to do is add a great cup of coffee to go along with it.
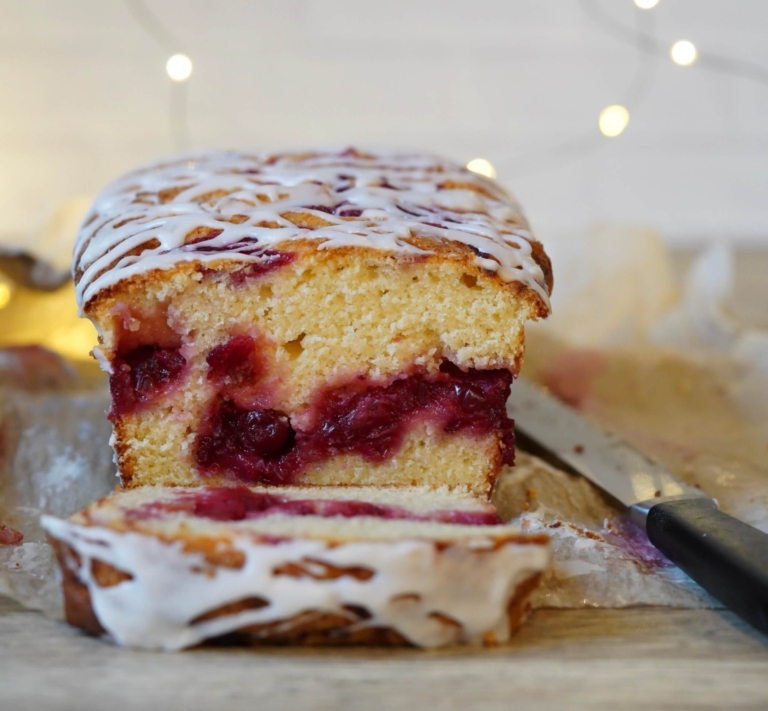
Frosted Cranberry-Orange Loaf Cake
Ingredients:
For the Loaf Cake:
- 3/4 cup homemade cranberry sauce
- 1 cup sugar
- 2 cups all-purpose flour
- 2 teaspoons baking powder
- Dash of salt
- 1/2 cup unsalted butter, softened
- 2 eggs
- 1 1/2 teaspoons vanilla extract
- 1/2 cup whole milk
For the Frosting:
- 1/2 cup Confectioners' sugar
- 2-3 tablespoons milk, as needed
Directions:
- Make my cranberry sauce recipe and allow it cool. Preheat the oven to 350 degrees F. Line a 9x5-inch loaf pan with parchment paper, lightly oil, and set aside.
- Place the cranberry sauce in a food processor, such as a Cuisinart, fitted with a blade attachment, and pulse on/off until finely chopped.
- In a medium mixing bowl add the flour, baking powder, and salt, and blend well.
- Place the butter and sugar in a kitchen mixer, fitted with a paddle attachment, and beat on medium until light and fluffy, about 3-4 minutes. Reduce the speed and add the eggs, one at a time, beating well after each addition. Mix in the vanilla. Reduce the speed to low and add the flour mixture and milk alternating. Mix until just incorporated.
- Spread half of the batter evenly in the prepared baking pan. Spoon the cranberry sauce evenly over the batter. Spread the remaining batter on top. Using a butter knife, gently swirl the batter from one of the pan to the next and back again.
- Place the loaf on a baking sheet, place in the oven, and bake until set, about 50-55 minutes, or a cake tester inserted in the center comes out clean. Remove the loaf from the oven and allow to cool.
- For the Frosting: In a small mixing bowl add the confectioners' sugar and milk, whisk to blend. Adjust the sugar and liquid consistency as needed until you have a nice consistency that's easy to drizzle. Use a teaspoon to drizzle the frosting in a zig-zag, or criss-cross motion. Slice and serve.
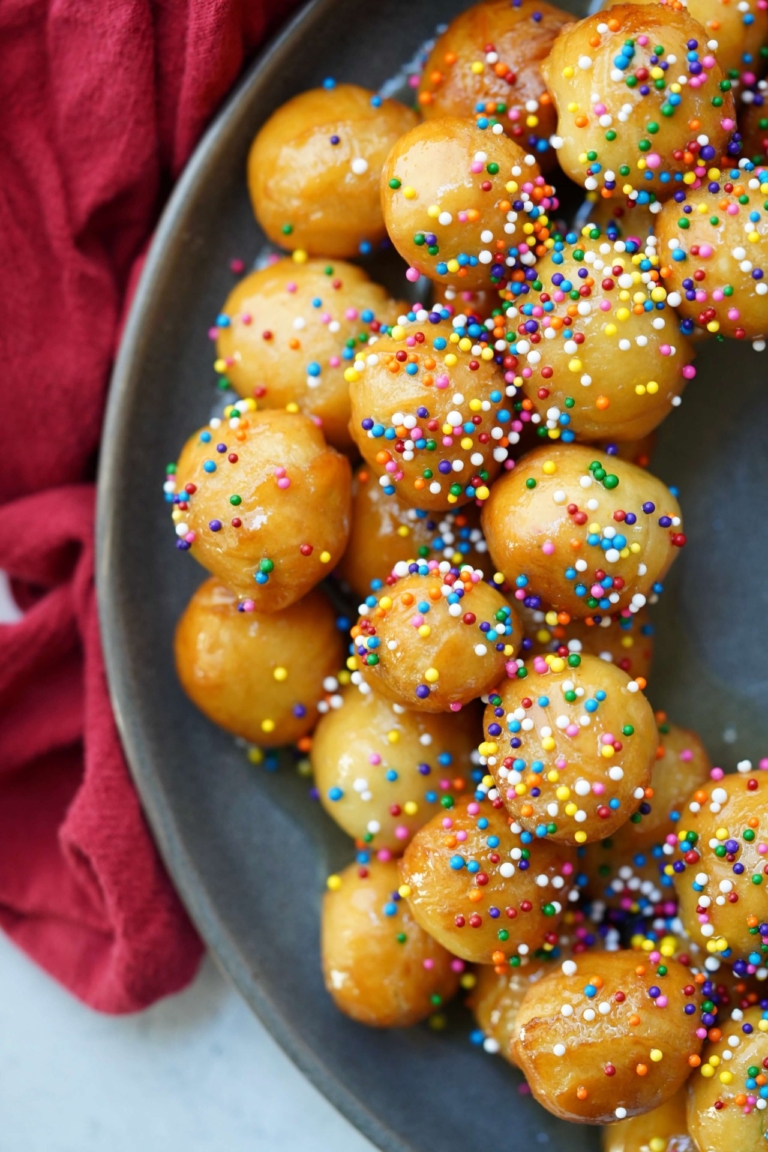
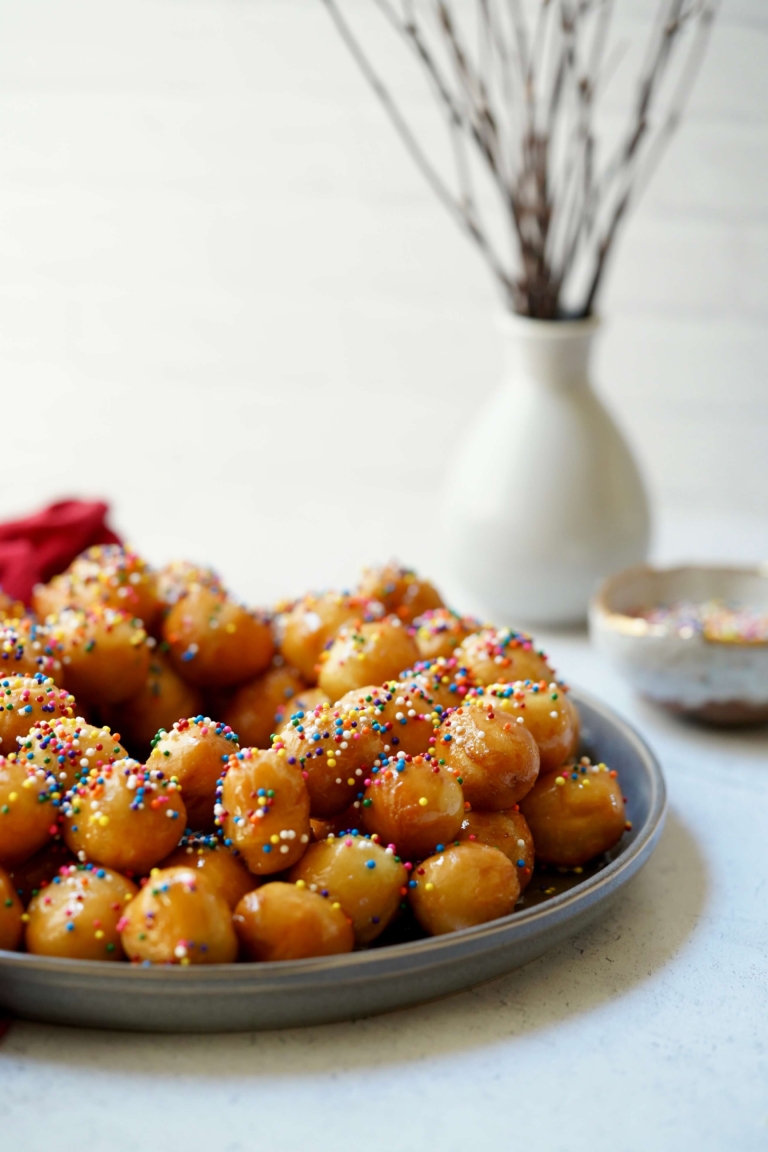
Originating from Italy, Struffoli is a delightful dessert that has captured the hearts and palates of people worldwide for decades. This bite-sized delicacy consists of small dough balls, typically fried until golden and then coated in honey. Struffoli’s origins can be traced back to the regions of Campania and Calabria, where it is often enjoyed during festive occasions and celebrations.
Struffoli is typically made from a sweet dough mixture rolled into small balls before frying. After frying, the Struffoli are coated in honey and often garnished with sprinkles, nuts, or other toppings. The result is a dense, bite-sized treat with a crunchy exterior and a soft pillowy interior.
While Struffoli is traditionally associated with Christmas in Italy, its popularity has spread to other countries, including the United States and Canada, where many Italian communities enjoy it. Beyond Christmas, Struffoli can be savored throughout the year, making it a versatile sweet treat for various occasions. Over time, other desserts have derived from Struffoli, such as zeppole, a similar fried dough pastry often enjoyed during the Italian feast of St. Joseph’s Day.

Holiday Variation
To make Struffoli festive for any holiday, not just Christmas, consider incorporating different flavors and decorations. For example, during Easter, you can add pastel-colored sprinkles and candy-coated chocolate eggs. For Halloween, black and orange sprinkles or miniature pumpkin candies can bring a playful touch. The possibilities are endless, allowing you to adapt this scrumptious treat to suit any occasion.
Struffoli is a versatile dessert with a rich history and worldwide appeal. Whether enjoyed during the traditional Christmas season or otherwise, Struffoli brings joy and a touch of sweetness to the table for all to enjoy.
Struffoli
Ingredients:
For the Dough:
- 4 large eggs
- 1 teaspoon orange zest
- 1 1/2 teaspoons vanilla extract
- 3 tablespoons sugar
- 1/4 cup unsalted butter, melted
- 2 cups all-purpose flour
- 1/4 teaspoon baking powder
- Vegetable oil for frying
For the Glaze:
- 1 cup honey
- 2 tablespoons freshly squeezed orange juice
- 1/2 cup sugar
- Rainbow nonpareils
Directions:
- For the Dough: To the bowl of a food processor, add the eggs and pulse until frothy. Add the orange zest, vanilla, sugar, and melted butter, and pulse on/off until combined and foamy. Add the flour and baking powder and pulse on/off until just combined. (Note: The dough will be very sticky, that is what you want). Wrap the dough in plastic wrap and refrigerate for 30 minutes.
- When the dough is chilled, transfer to a lightly floured work surface. Divide the dough into four even pieces. Roll each section into a long rope, about 1/2 inch in thickness. Cut dough ropes off into small pieces about 1/2-inch wide. Roll each section into a ball about the size of a marble. Lightly dust the balls of dough with flour to prevent them from sticking.
- Add 2-3 inches of cooking oil to a medium saucepot and place over medium-high heat. Heat the oil to 350 degrees F. (Use an instant-read candy thermometer to determine the oil temperature). Line a baking sheet with a paper towel and set it near your workstation. Once the oil is hot, fry dough balls in batches 8-10 turning the dough constantly while frying to evenly brown all sides, about 1 minute per batch. Use a slotted spoon to lift the cooked dough balls out of the oil and transfer them to the prepared baking sheet.
- For the Glaze: In a small saucepan add the honey, orange juice, and sugar and place over medium heat. Stir to combine. Cook, continuously stirring, until the sugar has completely dissolved, about 5 minutes. Remove the paper towels from under the fried dough balls. Pour the honey glaze over the dough balls and gently toss to fully coat.
- Lightly oil a drinking glass with oil and set it in the center of a serving plate or platter. Arranged the glazed Struffoli balls forming a wreath around the glass. Sprinkle generously with the nonpareils.
- Allow the Struffoli to set for about two hours before serving. When ready to serve, simply remove the glass from the center of the wreath.
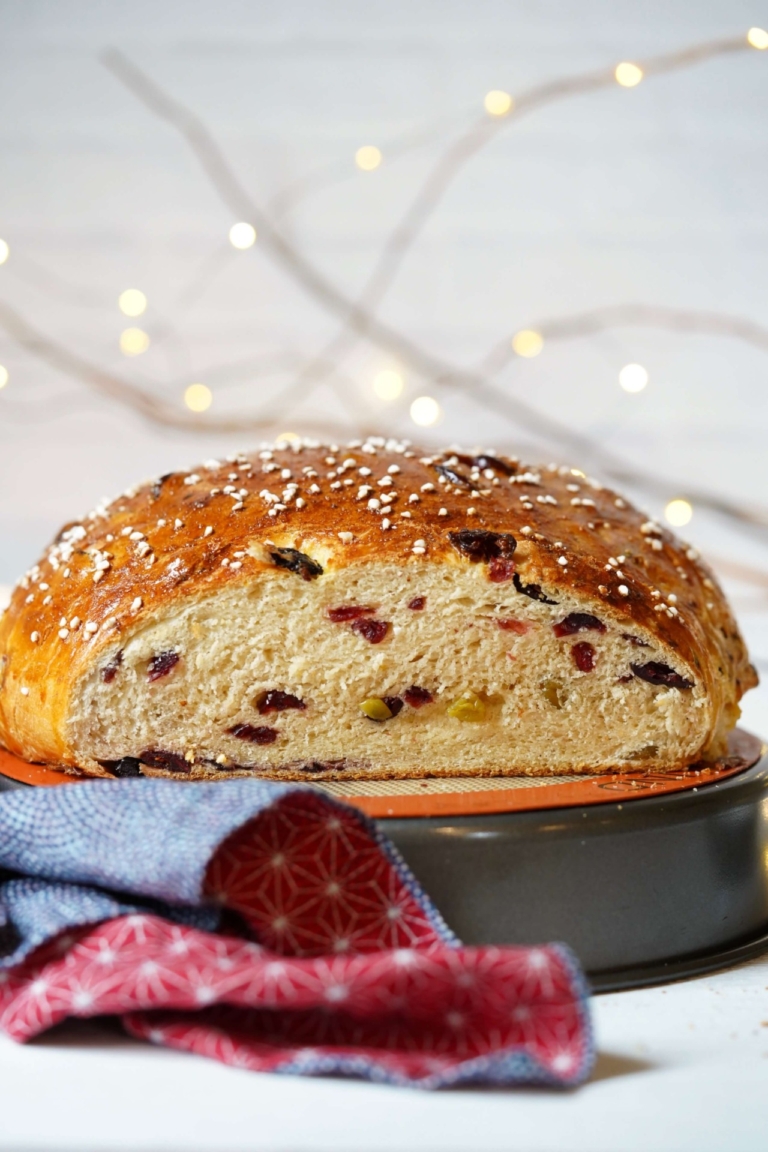
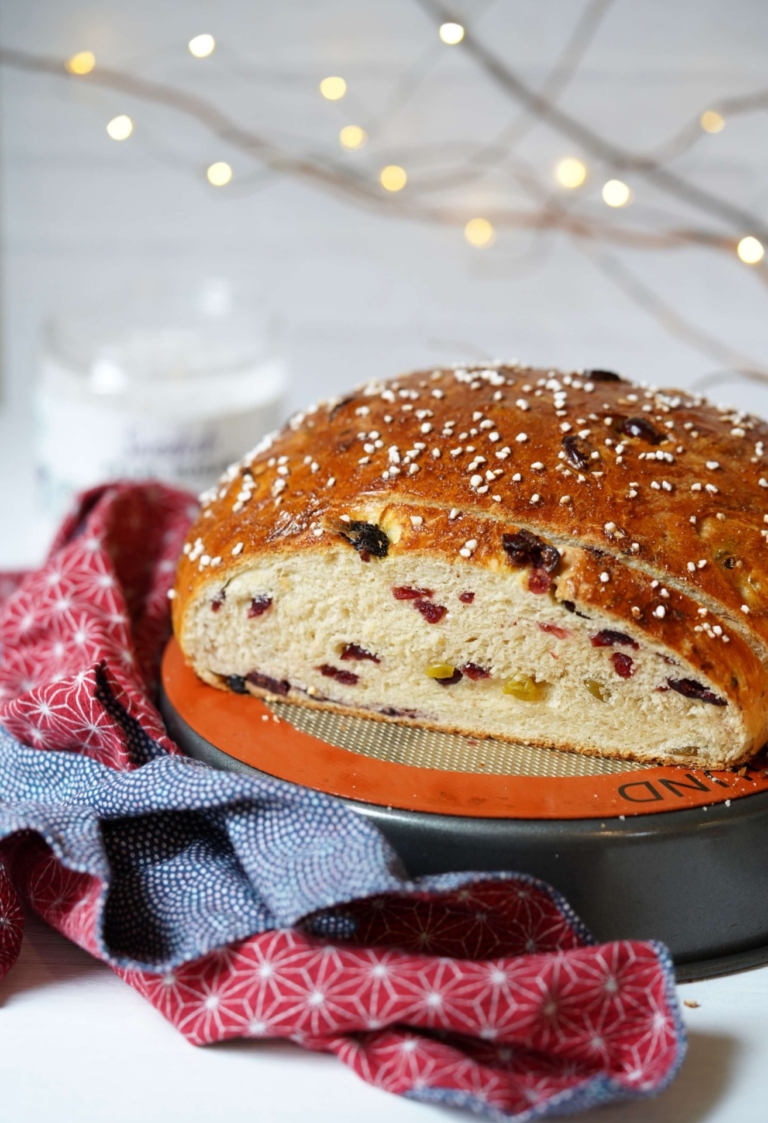
Norwegian Christmas bread, also known as Julekake, is a traditional holiday bread that is enjoyed throughout Norway during the Christmas season. This delicious bread has been a staple in Norwegian homes for centuries and is loved for its rich and aromatic flavors. In my modern version of this classic bread, I use a combination of dried cranberries, cherries, golden raisins, and blueberries with the more traditional spices and flavorings; ground cinnamon, cardamon, and orange zest.
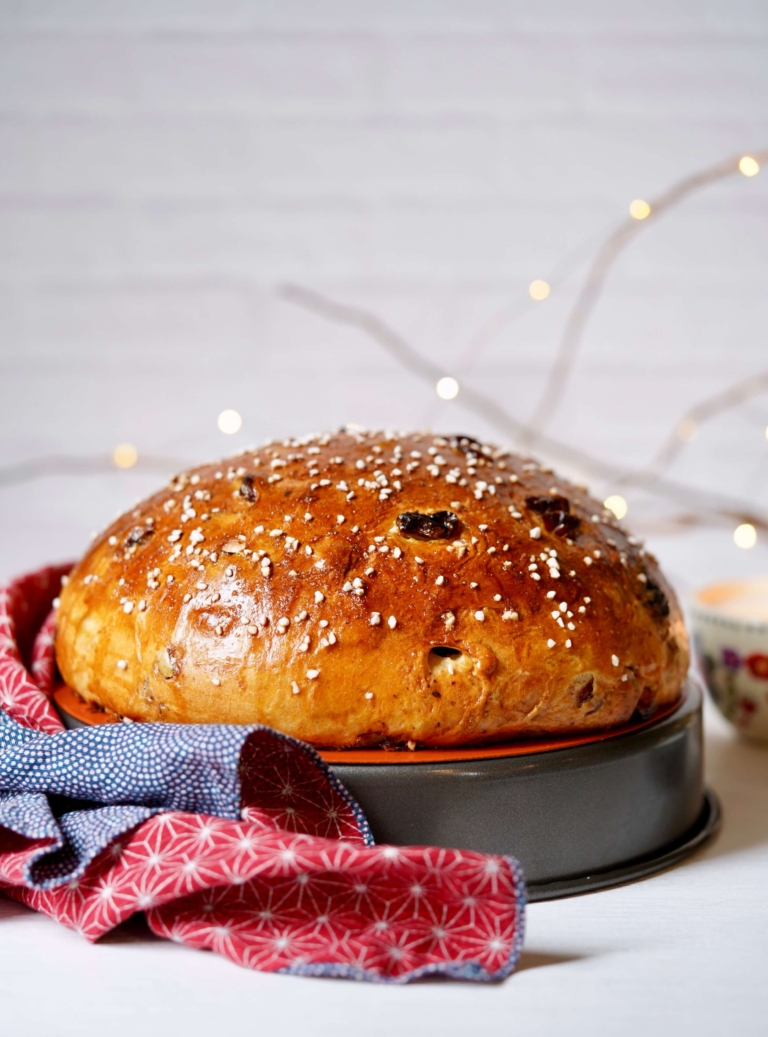
Julekake originated from a time when Christmas was celebrated for several days, and families would bake large loaves of bread to last them throughout the festive period. Many of the first Julekake bread recipes were made using a combination of wheat and rye flour, mixed with raisins, candied orange peel, and cardamom for a seasonal festive taste.
Traditionally, Julekake is eaten on Christmas Eve, often accompanied by butter, cheese, or jam. It is also enjoyed during the Christmas morning breakfast and is a popular treat to share with friends and family.
Similar breads are made in different parts of the world, such as the German Stollen, Swedish Lussekatter, and Italian Panettone. These lovely breads share a common theme of being slightly sweet and aromatic, with a mixture of fruits and spices commonly seen in many types of baked goods during the holiday season.
Julekake is a delicious and festive bread that is sure to bring warmth and cheer to any holiday celebration. Making this seasonal bread is a wonderful culinary tradition that has been passed down through generations and is a must-try for anyone looking to experience the flavors of a Norwegian Christmas.
Norwegian Christmas Bread (Julekake)
Ingredients:
For the Bread:
- 1/2 cup unsalted butter
- 2 cups warm milk
- 1/4 teaspoon ground cardamom
- 2 1/4 teaspoons active dry yeast
- 1/3 cup sugar, divided
- 1 egg lightly beaten
- Zest of one orange
- Pinch of salt
- 1/2 teaspoon cinnamon
- 3 cups all-purpose flour
- 1 1/3 cups dried fruit (I use a mixture of cranberries, cherries, golden raisins, and blueberries)
- 1 egg blend with 1 teaspoon water, for the egg wash
- 1 1/2 tablespoons pearl sugar
Directions:
- For the Bread, in a small saucepan add the butter and place over low heat. Add the milk and scald. Remove from the heat and add the cardamom, allow to steep while the milk cools slightly.
- In a large mixing bowl add the yeast with 1/4 teaspoon of the sugar just a little of the warm milk. Mix to blend, cover with plastic, and let it proof until it bubbles about 5 to 10 minutes. Add the remaining milk, 1 egg, the remaining sugar, the orange zest, salt, and cinnamon. Add 3 cups of flour and gently mix with your hands until the dough begins to pull away from the sides of the bowl.
- Transfer the dough to a lightly floured surface and knead for about 10 minutes. Fold in the dried fruit and transfer to a well-greased clean mixing bowl. Cover with a clean towel and let rise in a warm lake in the kitchen until doubled about 1 hour.
- Punch down the dough and form into a smooth ball. Place the dough ball in a well-greased 9-inch round cake pan. Cover with the towel and let rise again until doubled about 1 hour.
- Preheat the oven to 375 degrees F.
- Brush the loaves with the egg wash and sprinkle with the pearl sugar. Place in the oven and bake for 30 minutes, or until golden. Cool on a wire rack before slicing.
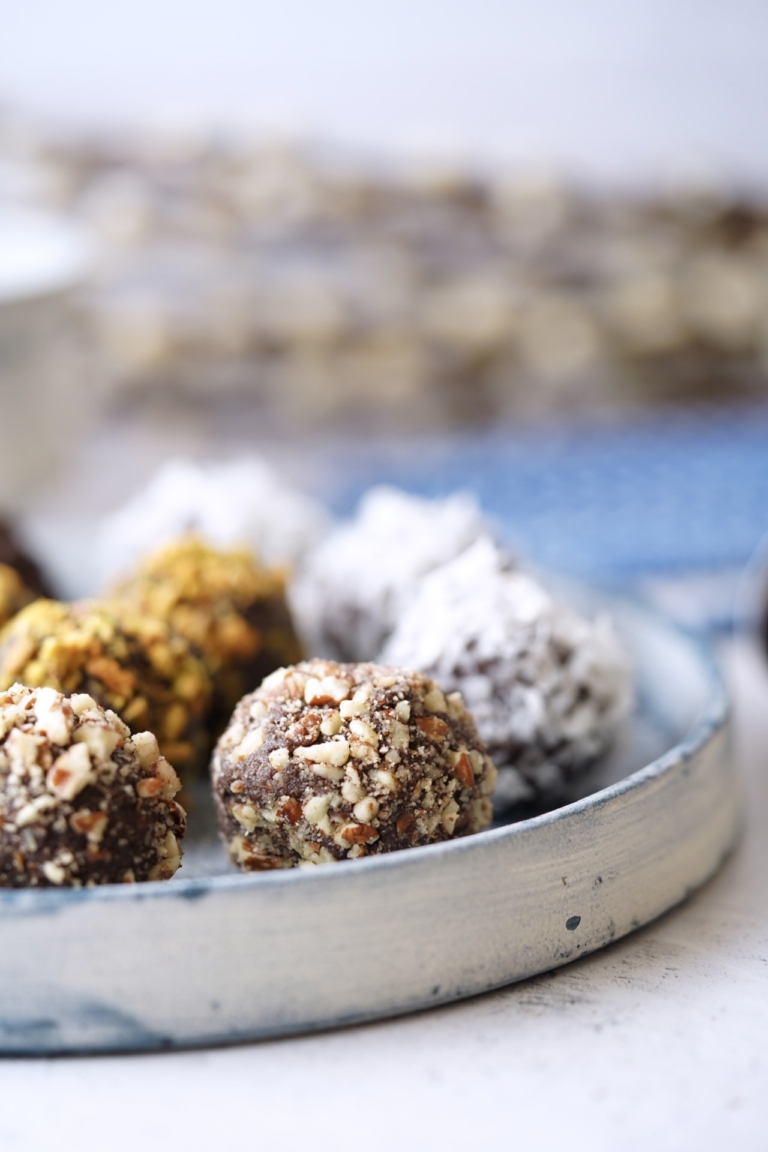
In the vibrant tapestry of Israeli cuisine, one delectable treat stands out like a shining gem: Israeli chocolate balls. These little spheres of bliss are believed to have been invented in the bustling markets of Tel Aviv in the early 20th century. Crafted with passion and precision, they quickly became an iconic sweet in Israeli culture, and I can totally see why.
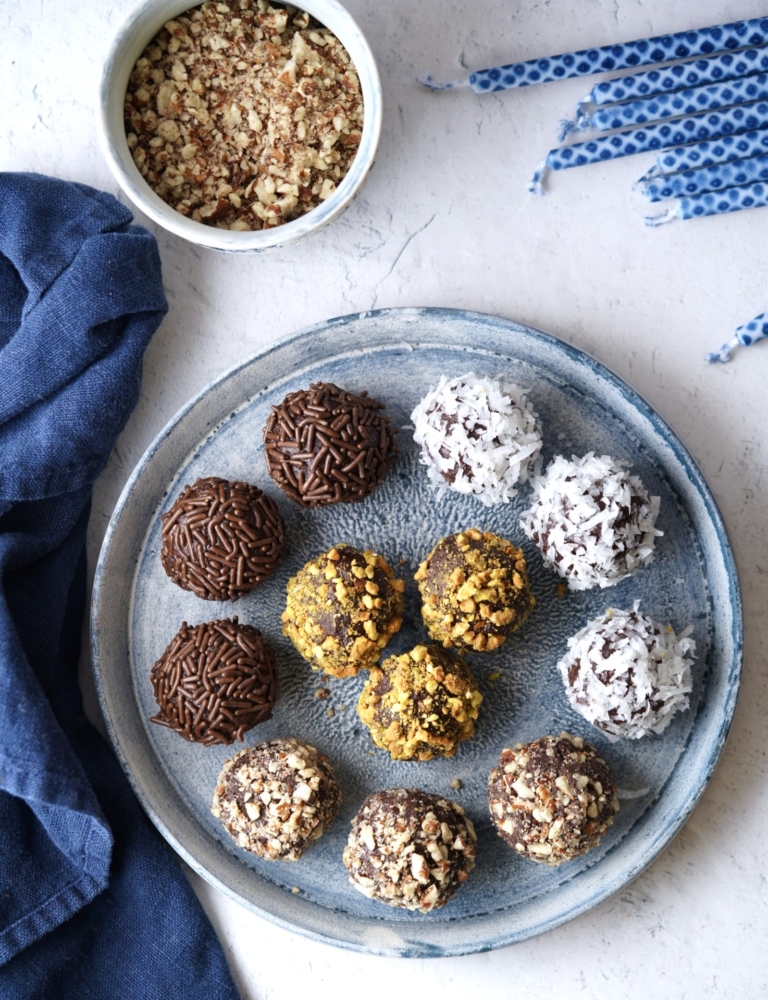
The beauty of Israeli chocolate balls lies in their simplicity and versatility. From classic dark chocolate to creamy milk chocolate, and even exotic white chocolate and passion fruit varieties, there’s a flavor to suit every palate. Some adventurous souls even infuse them with Middle Eastern spices like cardamom or za’atar for a truly unique, modern twist.
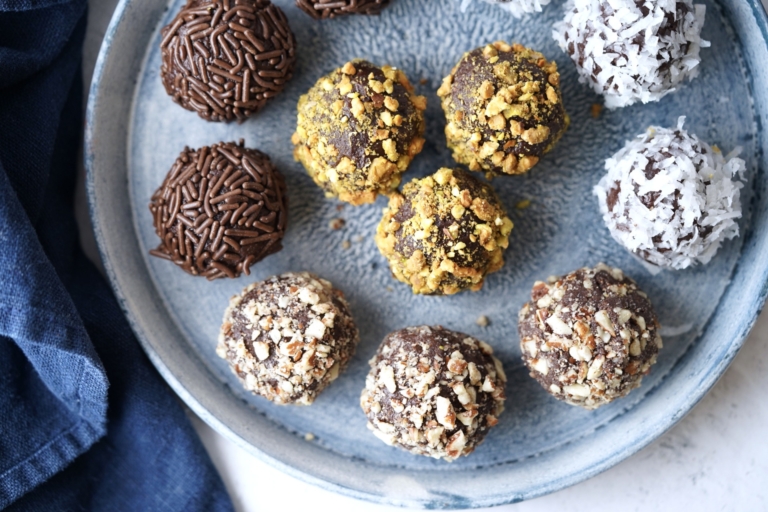
Quality ingredients are the heart of this confectionery masterpiece. Using top-notch chocolate and cocoa powder ensures a rich, velvety texture that melts in your mouth. Opt for high cocoa-content chocolate for an intense, robust flavor that elevates these little sweet treats to a whole new level. Topping-wise, the sky’s the limit, from nuts to sprinkles, you truly can’t go wrong.
Holiday Gifting
These chocolate balls are more than just a delectable treat for Hanukkah or Christmas, they’re a perfect gift for almost any occasion. Whether it’s a festive holiday celebration or a heartfelt token of appreciation, their handmade charm and addictive taste make them a delightful present that shows you care.
So, whether you’re crafting a batch for a special occasion or simply indulging in a sweet moment of self-care, Israeli chocolate balls promise to be a taste sensation that lingers long after the last bite. Elevate your confectionery game and let these little no-bake wonders transport you to the vibrant streets of Tel Aviv with every wonderful bite!
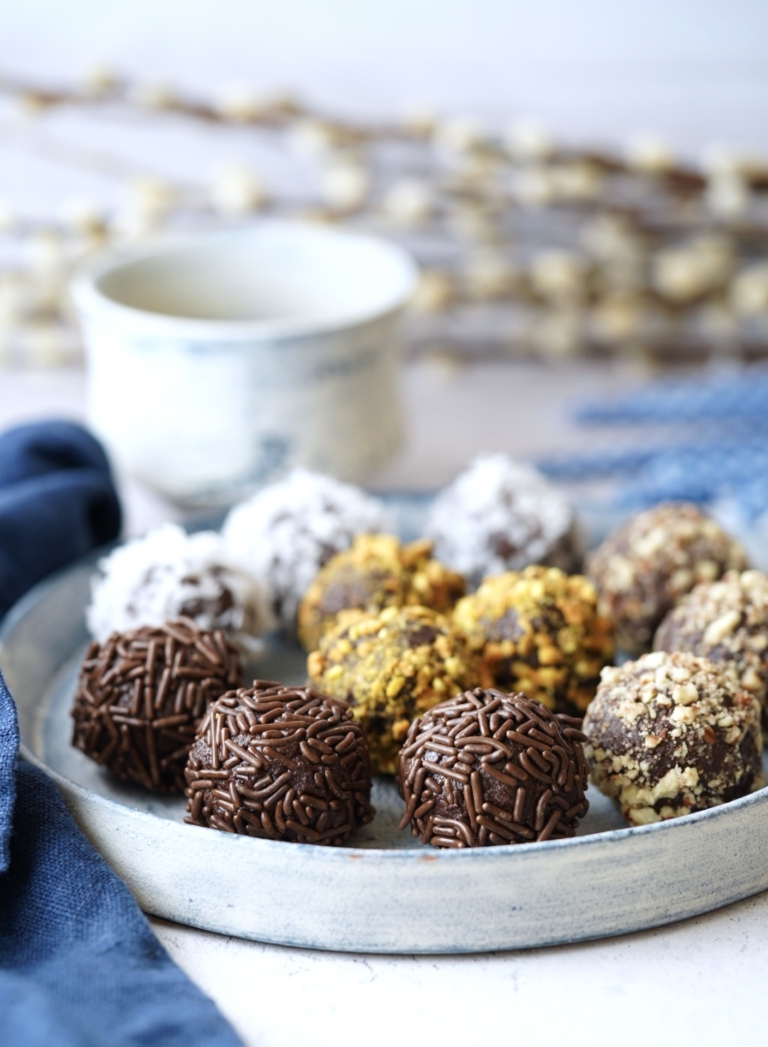
Israeli Chocolate Balls
Ingredients:
For the Chocolate Balls:
- Two (5.3-ounce packages) Walkers Classic shortbread cookies
- 3 1/2 ounces good quality dark chocolate
- 1/2 cup sugar
- 2/3 cup cocoa powder
- 1/2 cup milk
- 2 teaspoons vanilla extract
For the Toppins:
- 1/3 cup sweetened shredded coconut
- 1/3 cup roasted pistachios, roughly chopped
- 1/3 cup pecans, roughly chopped
- 1/4 cup chocolate sprinkles
Directions:
- Place the cookies in the bowl of a kitchen mixer, such as a Cuisinart, fitted with a blade attachment and pulse on and off until you have fine crumbs. Set aside.
- Using a double boiler, melt the chocolate over simmering water, Add the sugar and stir until completely dissolved. Remove from the heat and set it near your workstation.
- In a large mixing bowl, add the crushed cookies, chocolate mixture, cocoa, milk, and vanilla, and mix well to blend.
- Place the toppings into a small bowl. Line a baking sheet with parchment paper and place it near your workstation.
- Gently wet your hands take a scoop of the chocolate mixture (about 1 tablespoon) and roll it into a ball. The ball should be about 1 inch in diameter.
- Gently roll the ball into your chosen topping, making sure to cover all sides, then place on the prepared baking sheet. Repeat the above process with the remaining mixture.
- The chocolate balls can be served immediately or refrigerated for an hour to firm them up. If serving later, allow them to warm up slightly before serving.
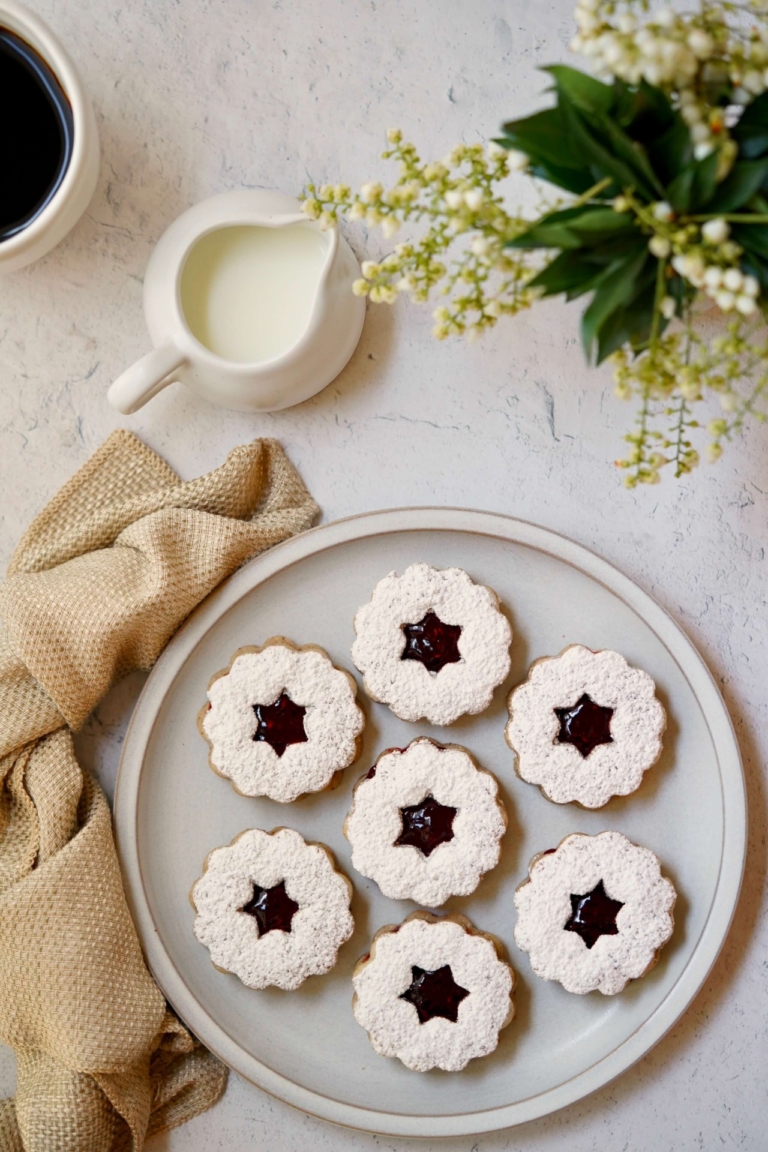
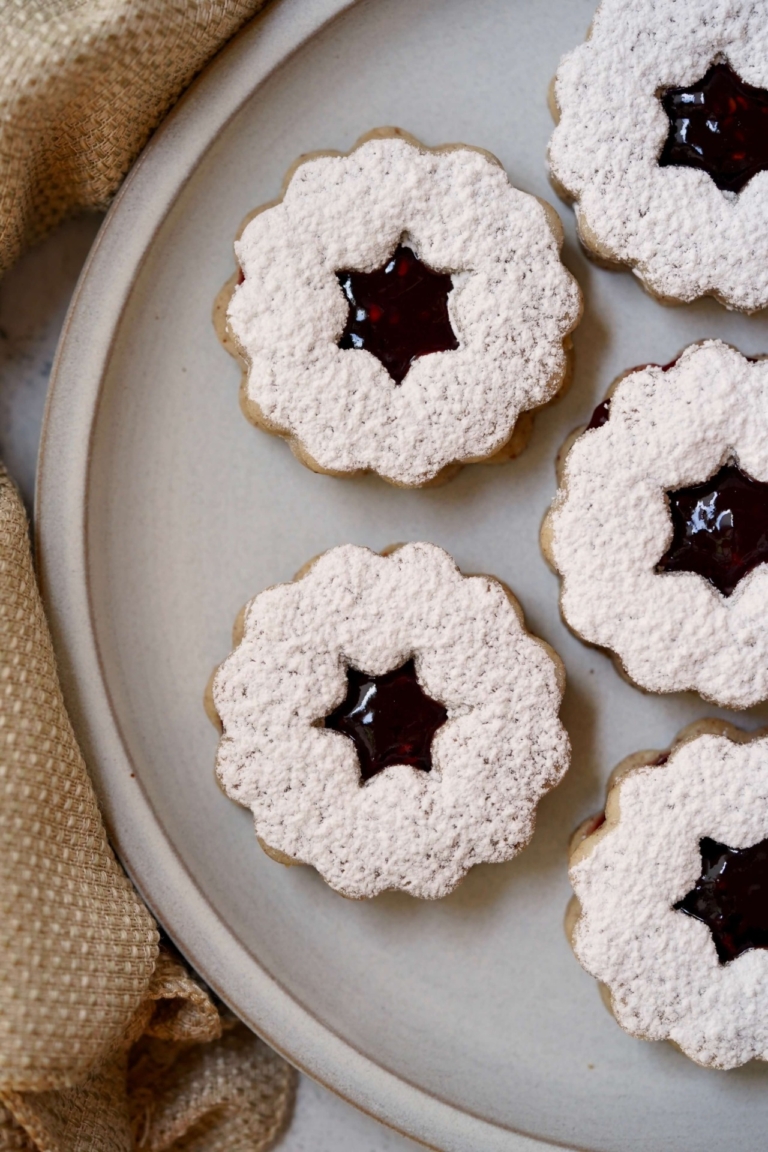
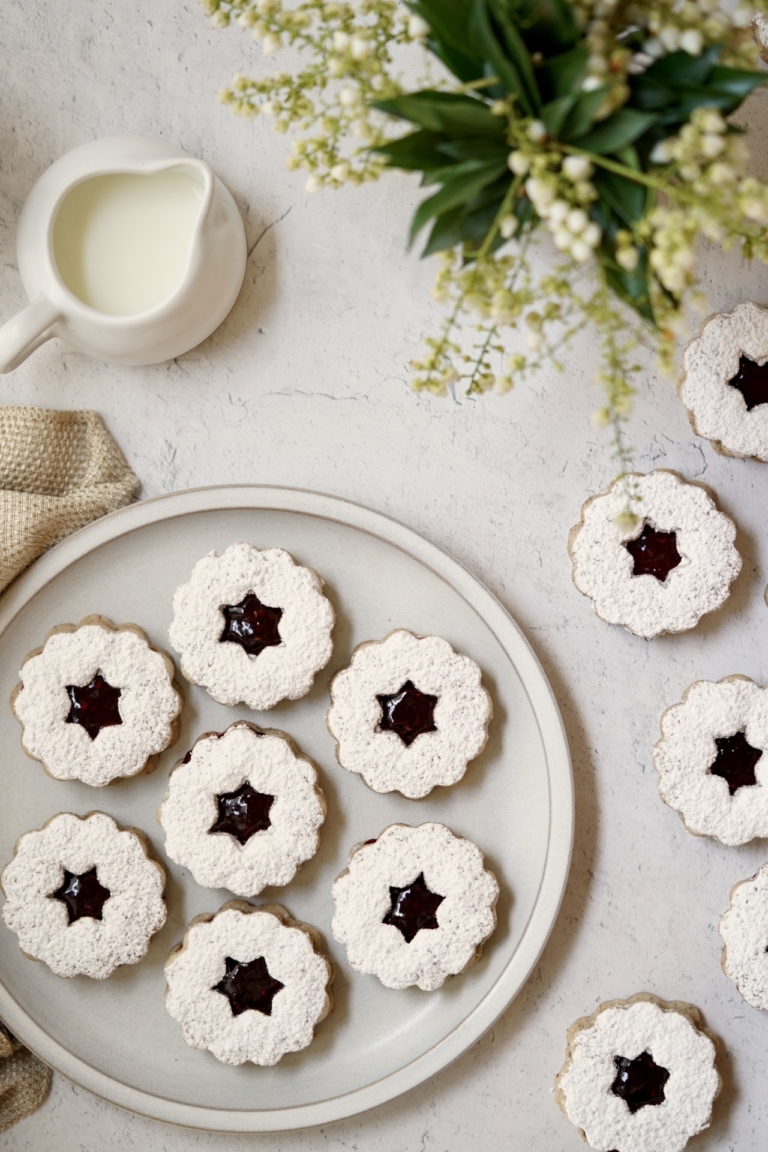
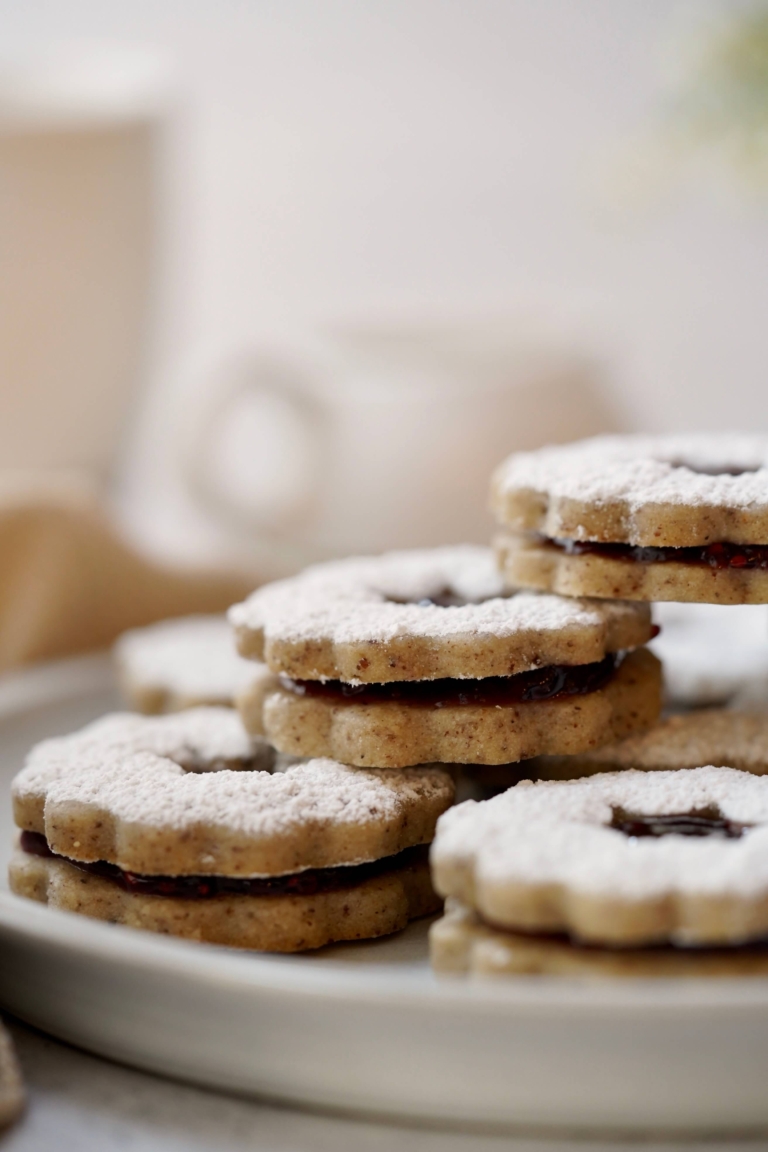
We’ve waited all year and it’s finally here, cookie season! And with that, it’s time to indulge in the sweet and nostalgic flavors that define this festive time of year. And what better way to celebrate than with raspberry-pecan Linzer cookies? These are a modern take on a classic cookie that has been enjoyed for centuries. These Linzer cookies are made with a unique blend of all-purpose and pecan flour, resulting in a nutty twist on the beloved Linzer cookie we all know and love.
History of Linzer Cookies
Linzer cookies originated in Austria and have become a go-to holiday favorite for their beautiful appearance and irresistible taste. The origin of Linzer cookies can be traced back to Linz in Austria. Linz is known for its rich culinary history and has given birth to several iconic desserts, including the famous Linzer Torte.
Linzer cookies are believed to be a variation of this classic torte which dates back to the 17th century. The torte, a lattice-topped pastry filled with fruit preserves, inspired the creation of smaller, bite-sized cookies with a similar flavor profile. These delicate and decorative sandwich cookies became popular during the holiday season due to their festive appearance.
Pecan Flour
What sets these Linzer cookies apart is the addition of pecan flour to the dough. Pecans lend a buttery richness and a delightful crunch to each bite, elevating the overall experience. The aromatic essence of pecans perfectly complements the tangy sweetness of the raspberry filling.
Traditional Linzer cookie dough is commonly made with ground almonds or hazelnuts, creating a distinctive, nutty taste and crumbly texture. In this recipe, I blend in pecan flour instead to play on the seasonal winter flavors I love most. The center of a Linzer cookie is cut out to create a small “window”, allowing the vibrant fruit jam, traditionally raspberry, to shine through.
Over the years, Linzer jam cookies have gained popularity worldwide as a delightful treat for various occasions, especially during the holiday season when cookie plates are as elaborate as ever. Their charming appearance and delightful combination of flavors make them a beloved and timeless classic at any holiday gathering.
Linzer Cookie Cutters
To create the iconic Linzer cookie shape, a special [Linzer cookie cutter| https://amzn.to/3SWb97a] is essential. This cutter features a fluted edge and a small cutout in the center, allowing the vibrant raspberry jam to peek through. The combination of textures and flavors is simply divine!
Fillings
While raspberry jam is the traditional filling for Linzer cookies, and the one my family loves, you can explore a variety of other fillings to suit your taste preferences. Apricot preserves, strawberry jam, or even chocolate ganache are all excellent alternatives that bring their unique character to these iconic cookies.
Linzer Cookie-Making Tips
- Use room-temperature butter, or the dough will not mix evenly.
- Sift the flour(s) and Confectioners’ sugar before mixing, or the dough won’t come together.
- Work quickly when rolling out the dough, and cutting it with the cookie cutters. The dough softens quickly because of the high butter content.
- Any flavor jam can work in these cookies, go ahead and get creative.
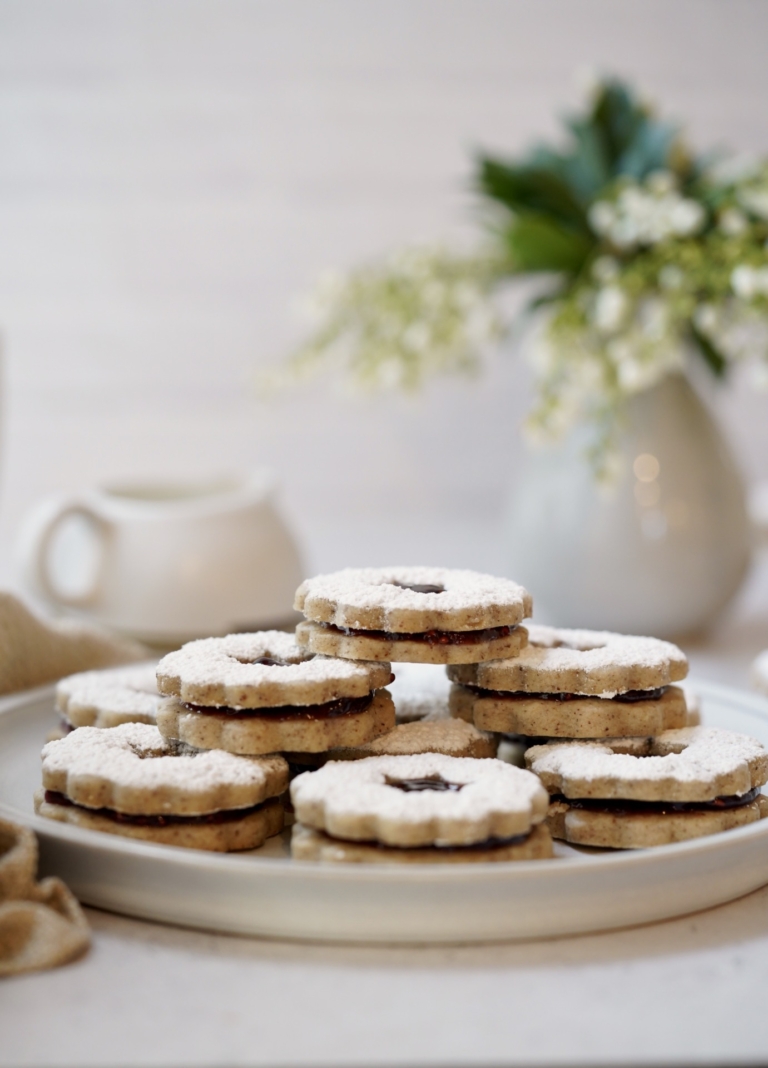
While baking these raspberry-pecan Linzer cookies for your Christmas celebrations, you’ll be transported to a world of holiday enchantment. The combination of pecan flour, the intricate Linzer cookie shape, and the burst of raspberry jam filling makes these treats an irresistible addition to your festive dessert table. Share these cookies with loved ones and savor the joy and warmth that the holiday season brings.
Raspberry-Pecan Linzer Cookies
Ingredients:
- 1 cup unsalted butter, room temperature
- 3/4 cup Confectioner's sugar, sifted, plus more for dusting
- 1/4 teaspoon salt
- 1 teaspoon vanilla extract
- 1 1/2 cups all-purpose flour, sifted
- 1/2 cup pecan flour, sifted
- 1/2 cup raspberry jam
Directions:
- Preheat oven to 325 degrees F.
- In the bowl of a kitchen mixer, fitted with a paddle attachment, add the butter, Confectioners' sugar, salt, and vanilla, and mix on medium until light and fluffy, about 3 minutes. Reduce the speed to low and add the flour, mix just until combined.
- Remove the dough from the mixer, and knead the dough into a ball. Wrap the dough in plastic wrap, and refrigerate for 30 minutes.
- Once the dough has chilled, line two baking sheets with parchment paper and set near your workstation. Use a lightly floured rolling pin to roll the dough out into a large circle about 1/4-inch thick. Use a 2-inch Linzer cookie cutter, to cut out an even amount of bottoms and tops, rerolling and cutting scrap.
- Place the cookies on the prepared baking sheets, and place in the oven on the top and bottom racks, rotating and switching pans halfway through, until edges are lightly golden, about 10 minutes. Remove cookies from the oven and let them cool.
- Once the cookies have cooled, use an offset spatula to spread the jam over the bottom of each whole cookie. Dust Confectioners' sugar over the top cutout cookies and gently place them on the cookie with jam filling, sugar side up.
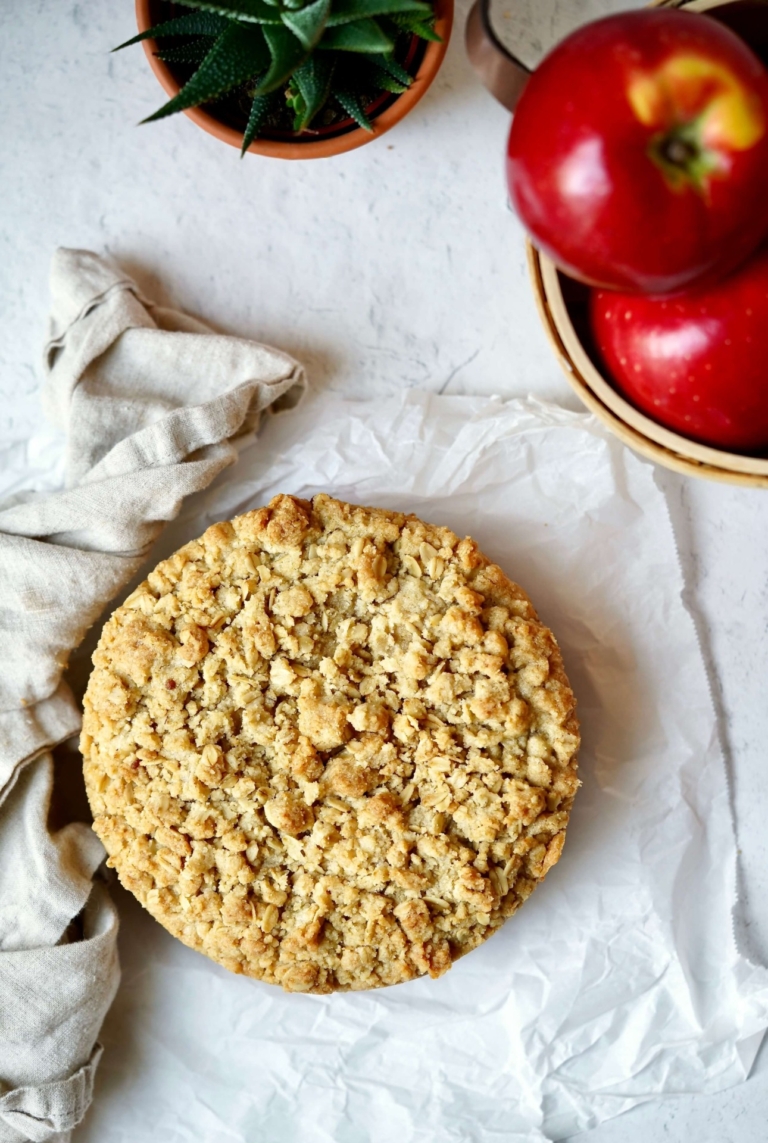
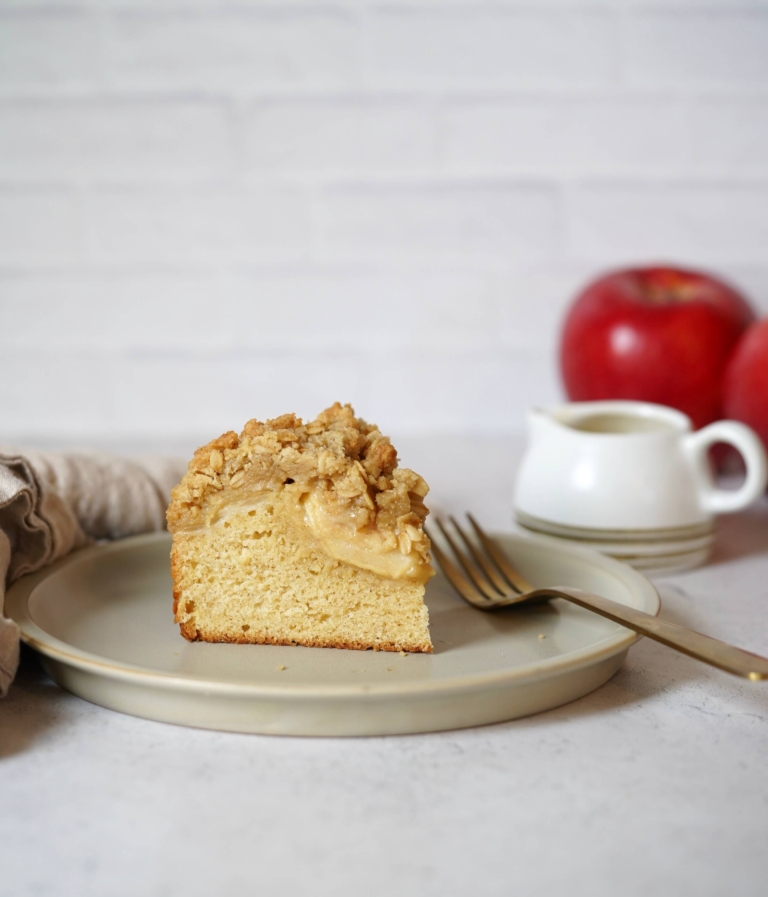
Apple oatmeal cake is a delicious and wholesome dessert, (or breakfast if you ask my husband), that combines the warm and comforting flavors of apples and hearty oatmeal. It’s the perfect cake to enjoy with a cup of tea or coffee and although I am part Irish, I have only recently discovered how wonderful this style of cake truly is.
Irish Roots
This simple cake is one the Irish have been enjoying for generations. Perhaps the best part is it’s made with just a few simple pantry ingredients, including whole grain oats, juicy apples, sweet butter, sugar, and flour, which are combined to create a lovely, moist, fruit-forward cake that makes a wonderful alternative to the American apple pie.
Traditionally, apple oatmeal cake, known also called Irish apple cake, was enjoyed during the cool autumn months when apples are in peak season. This style of cake became an easy and popular way to use up surplus apples, which are abundant in Ireland during the autumn. This rustic cake is a popular dessert to serve at family gatherings and celebrations and a go-to on cold and rainy days. Forgiving in preparation and flexible in preparation allowing you to customize the flavor and sweetness to suit your tastes.
Apples For Baking
When it comes to making a killer apple cake such as this, the type of apple you use can have a big impact on the final result. You’ll want to choose a flavorful apple, firm, and holds its shape well when cooked.
Some of the best apple varieties for apple cakes include SugarBee, Bramley, Granny Smith, Honeycrisp, and Braeburn. Bramley apples are a traditional choice for this recipe (or other apple sweets and desserts) as they have a tart flavor that works well with the sweetness of the cake. Granny Smith apples are also a good option as they are tart and firm, and they hold up well during baking.
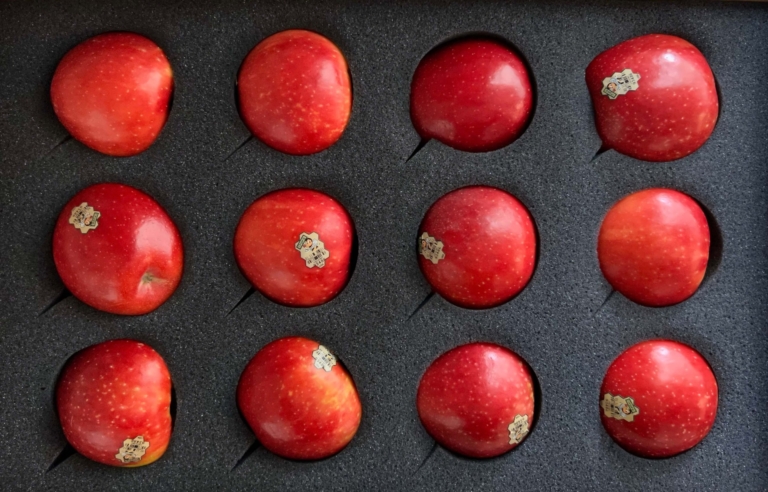
My go-to, when in season, is SugarBee apples which are crisp, mildly sweet, slightly tart juicy apples that hold up well when baked. Ultimately, the best apple variety for your oatmeal apple cake will depend on your personal preference and what’s seasonably available in your area.
Considered a beloved and timeless cake that has stood the test of time, apple oatmeal cake is a comforting and satisfying sweet that will leave you feeling warm and cozy inside, whether it’s for a holiday dessert or breakfast the day after.
Apple Oatmeal Cake
Ingredients:
For the Cake:
- 1/2 cup unsalted butter, softened
- 1/2 cup, plus 2 tablespoons sugar
- 2 eggs
- 3 tablespoons whole milk
- 1 1/4 cups all-purpose flour
- 1 teaspoon baking powder
- 3/4 teaspoon cinnamon
- Dash of salt
- 2 apples, peeled and thinly sliced (I use SugarBee apples)
For the Oatmeal Streusel Topping:
- 3/4 cup all-purpose flour
- 1/4 cup extra wide old-fashioned oats
- 6 tablespoons unsalted butter, cut into small pieces
- 1/2 cup sugar
- 1/4 cup brown sugar
Directions:
- Preheat the oven to 350 degrees F. Generously grease a 6-inch springform pan and set aside.
- For the streusel topping: In a medium mixing bowl add the flour, oats, butter, and both sugars. Using your hands, blend the bits of butter into the flour, sugar, and oats until the butter is incorporated and the mixture has a coarse crumbly texture.
- For the cake: In the bowl of a kitchen mixer, such as a KitchenAid, fitted with a paddle attachment, add the butter and sugar and blend until light and fluffy. Add the eggs, one at a time, scraping down the sides as needed.
- In a separate mixing bowl, whisk the flour, baking powder, cinnamon, and salt. Alternate the dry ingredients into the butter/sugar mixture, with the milk. Spoon the batter into your prepared baking pan, and flatten the top as best as possible. Place the apples on top of the batter in an even layer. Scatter the strudel topping on top.
- Place the pan on a baking sheet and in the oven. Bake for about 45-50 minutes until the top is lightly browned and a cake tester comes out clean. Allow to cool in the pan slightly before removing. Serve warm or cold, for breakfast or dessert.
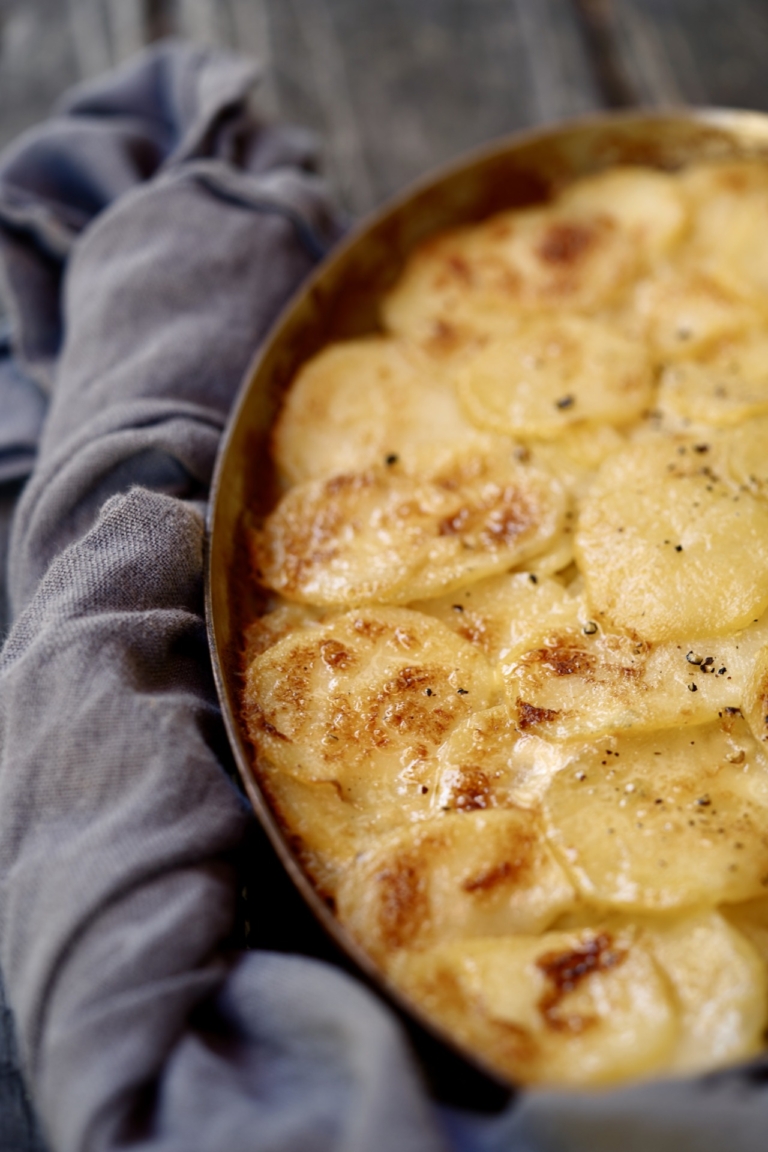
I was born in the mid-west and my love of potatoes and cheese confirms that. Dauphinoise potatoes (also known as Pommes de terre dauphinoise, potatoes à la dauphinoise, gratin Dauphinoise, and gratin de pommes à la dauphinoise) is a French dish of sliced potatoes baked in milk, or cream, (or a combination), using the gratin technique. In a nutshell, they are an easy elegant way to dress up potatoes. So if you’re looking for the perfect, prep-ahead potato dish for Thanksgiving, that everyone is guaranteed to love, look no further, this is it.
Dauphinoise potatoes are a classic French dish from the Dauphiné region in south-eastern France. Although similar to the American potato au gratin, they are creamier and more indulgent, due to the potatoes soaking in a rich cream/milk mixture they are cooked in. In this iconic French favorite, the starch in the potatoes themselves is what binds the whole dish together effortlessly.
Traditional Dauphinoise recipes don’t include garlic, but my recipe does, adding even more depth and richness to the overall flavor. The more common use of garlic in more standard Dauphinoise recipes would be to rub a raw garlic clove on the inside of the baking dish to capture its essence. Instead, I prefer to add the garlic to the cream mixture which still allows for a subtle garlic flavor that is not overwhelming to the potatoes themselves. While potato au gratin and Dauphinoise potatoes are similar style dishes there are some subtle differences between the two in terms of both ingredients and preparation.
Potato Au Gratin vs. Dauphinoise Potatoes
Cheese:
- Potato au Gratin: This dish typically includes cheese as a key component. The potatoes are layered with a mixture of cream, milk, and cheese, and the top is often baked to form a golden-brown, cheesy crust.
- Dauphinoise Potatoes: Traditionally, Dauphinoise potatoes do not contain cheese. The dish is made by layering thinly sliced potatoes with cream and milk, and sometimes garlic and nutmeg, creating a creamy texture without the addition of cheese.
Region of Origin:
- Potato au Gratin: While the origins of the dish are not strictly French, it is commonly associated with French cuisine. The term “au gratin” refers to the cooking method of browning the top layer.
- Dauphinoise Potatoes: This dish is specifically associated with the Dauphiné region in southeastern France. The name “Dauphinoise” reflects its regional origin.
Cheese Varieties:
- Potato au Gratin: The choice of cheese can vary, but common options include Gruyère, cheddar, or Parmesan.
- Dauphinoise Potatoes: This dish traditionally does not include cheese, focusing on the creamy texture created by the combination of potatoes and cream.
While these differences exist, it’s worth noting that the terms are sometimes used interchangeably, and variations in recipes can be found. Some modern recipes may incorporate cheese into Dauphinoise potatoes, blurring the lines between the two dishes. Ultimately, both dishes showcase the delicious combination of thinly sliced potatoes, cream, and flavorful seasonings, making them popular choices for comfort food, holiday or otherwise.
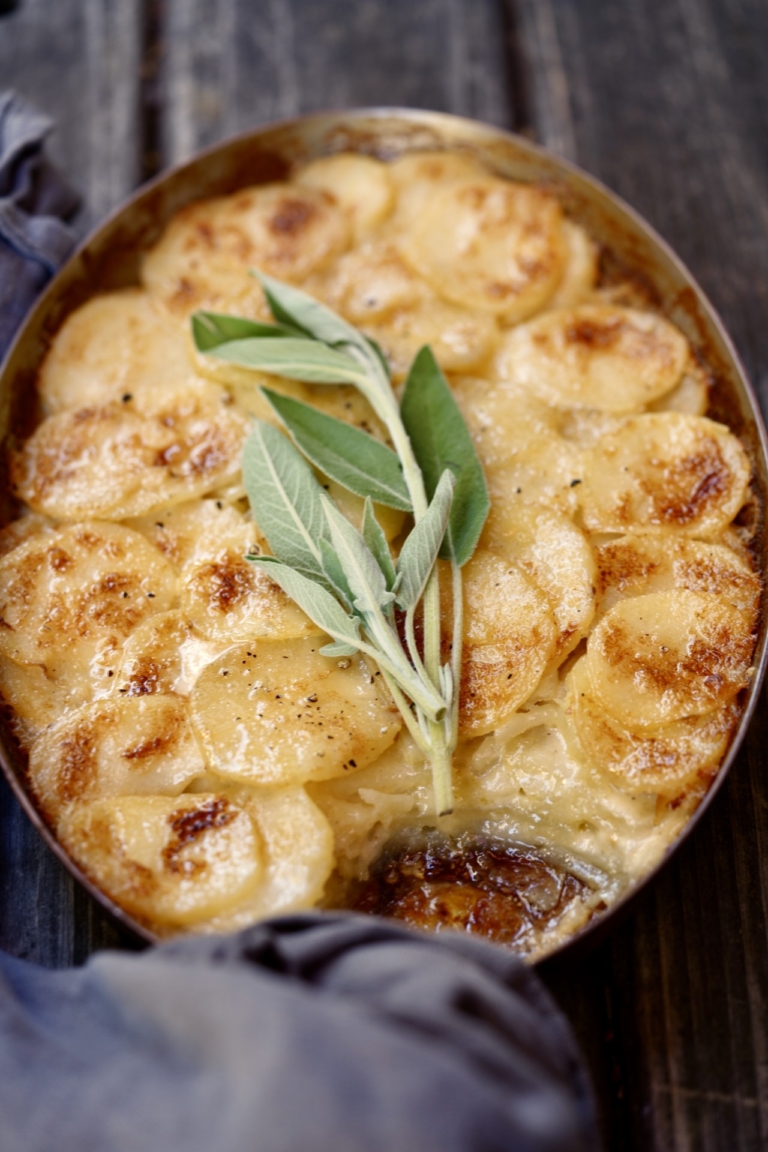
The real trick to making Dauphinoise potatoes is the sling itself. Potatoes are peeled and sliced to the thickness of a coin, usually with a mandoline; they are layered in a shallow baking dish, or this case, a pan which is what I prefer. Although I would encourage all home chefs to invest in a good mandolin, it is not required to make this dish. A good, sharp chef’s knife can work just as well. Although working with potatoes is a week-long class in culinary school, this recipe is forgiving, just make sure the potatoes are cooked through which is a rookie mistake made by many.
Dauphinoise Potatoes
Ingredients:
- 2 cups heavy cream
- 1 cup half-and-half
- 6 garlic cloves, peeled and smashed
- 1 sprig fresh sage
- 3 pounds Idaho potatoes, peeled and thinly sliced
- Salt and pepper to taste
Directions:
- Heat the oven to 350 degrees F. Butter 12x8 ovenproof dish, place on a baking sheet, and set aside.
- In a large saucepan add the the cream, half-and-half, garlic, and sage. Season with salt and pepper and place over medium heat. Reduce the heat and simmer for 10 minutes. Using a slotted spoon, remove the garlic cloves and sage and discard.
- Place the sliced potatoes and add to the saucepan. Gently stir and return the mixture to the boil. The potatoes and cream tend to stick to the bottom of the pan so keep an eye on them. Cook for about 4 minutes.
- Gently layer the sliced potatoes in the prepared baking pan and pour the cream mixture over them. Layer the slices of potato in the greased dish and pour the cream over them. Sprinkle each layer with a little salt and freshly ground black pepper. Cover the baking pan with aluminum foil and cook for 45 minutes. Remove the foil increase the oven temperature to 400 degrees and cook for an additional 15 minutes or until the top is golden and bubbling and the potatoes are tender.
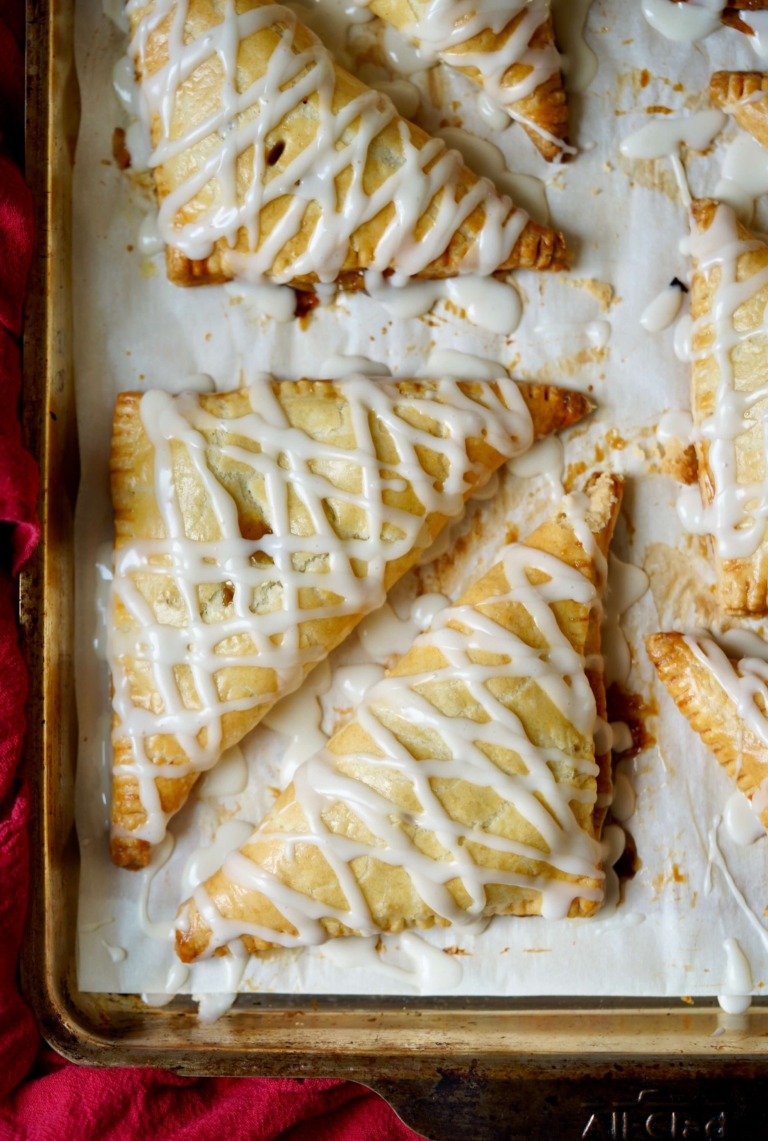
An apple turnover is a classic pastry that has been enjoyed for centuries. And I get it, what’s not to love? These beloved sweet treats are a favorite among many, due to their flaky, buttery crust and sweet, spiced apple filling. But where did these delectable pastries come from, and when is the best time of day to be enjoying them?
Turnovers in History
Turnovers are said to have existed as far back as the Medieval period but did not grow in popularity until the 17th century. Food historians believe that turnovers were created in a small French town called Saint-Calais, which is situated in the Sarthe region. It is said that the town was suffering through a terrible epidemic, and to aid them with food supplies, the Lady of the Town, known as the chatelaine, distributed flour, butter, and apples. The townspeople made apple turnovers using the ingredients, and soon, the town’s situation slowly started to improve. In recent years, the town has begun celebrating the historic pastry during the ‘Chaussons aux Pommes’ (Apple Turnover) Festival each year.
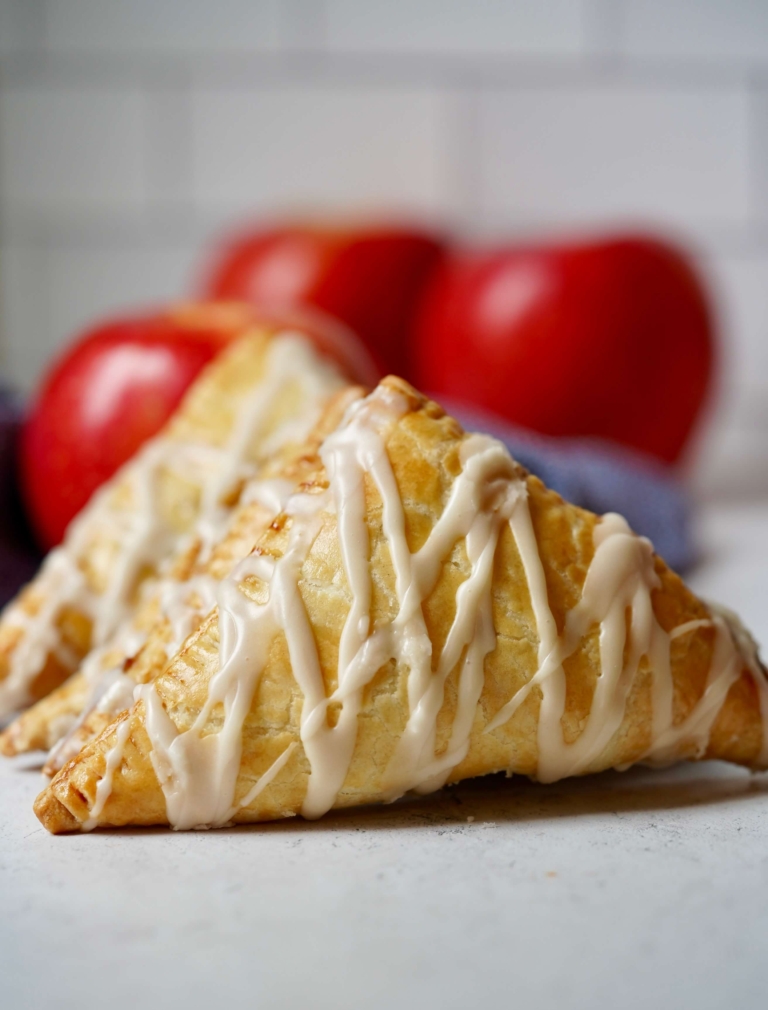
Through the years and across continents, apple turnovers have remained a beloved pastry, especially during the fall harvest season when apples are in abundance. Traditionally eaten as a dessert or as a sweet mid-day snack, turnovers are also equally as wonderful when served as a breakfast pasty, something you see commonly in the States. Turnovers can be served warm or cold, with a dollop of whipped cream, a scoop of ice cream on top, with icing or straight up. Truthfully this is no wrong way, or time, to enjoy a turnover.
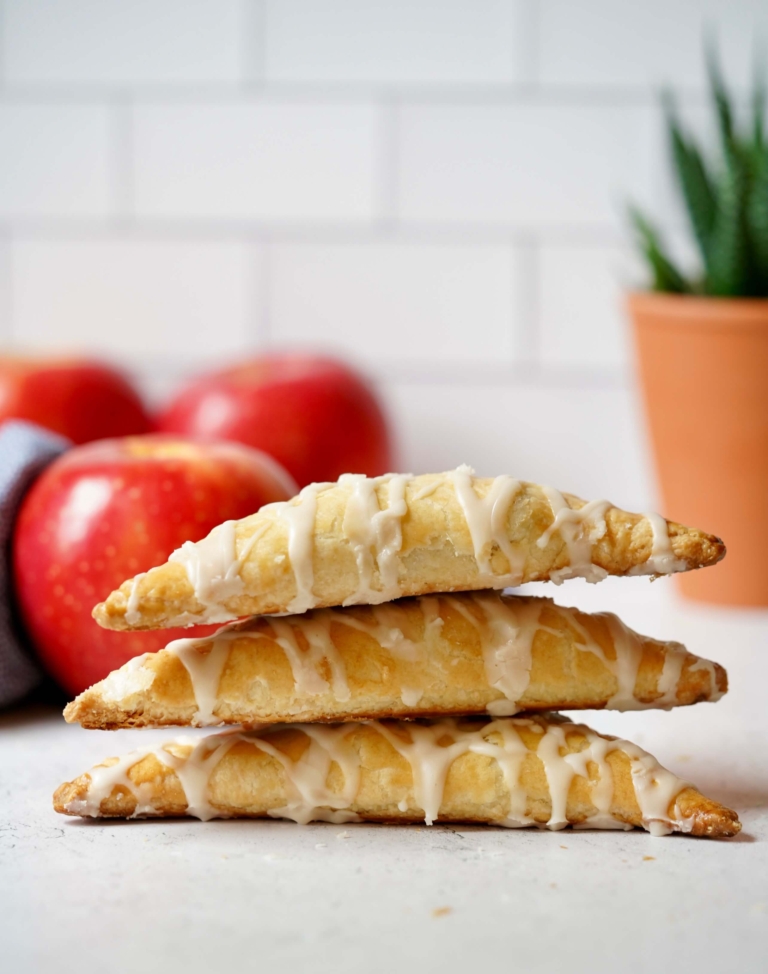
While the classic apple turnover recipe has remained relatively unchanged throughout the years, there are plenty of variations to suit different tastes. The more traditional ones are made with apples and a few simple spices such as cinnamon and nutmeg, while others contain a richer filling such as brandy-poached fruit with dried fruit and nuts for a more complex flavor profile.
You can make these delicious apple turnovers using pie dough (as I do here) or puff pastry if you prefer a lighter, flaky pastry, both of which work perfectly. Whether you prefer your apple turnovers simple or with a twist, one thing is for sure, they are a timeless pastry that will continue to be enjoyed for generations to come.
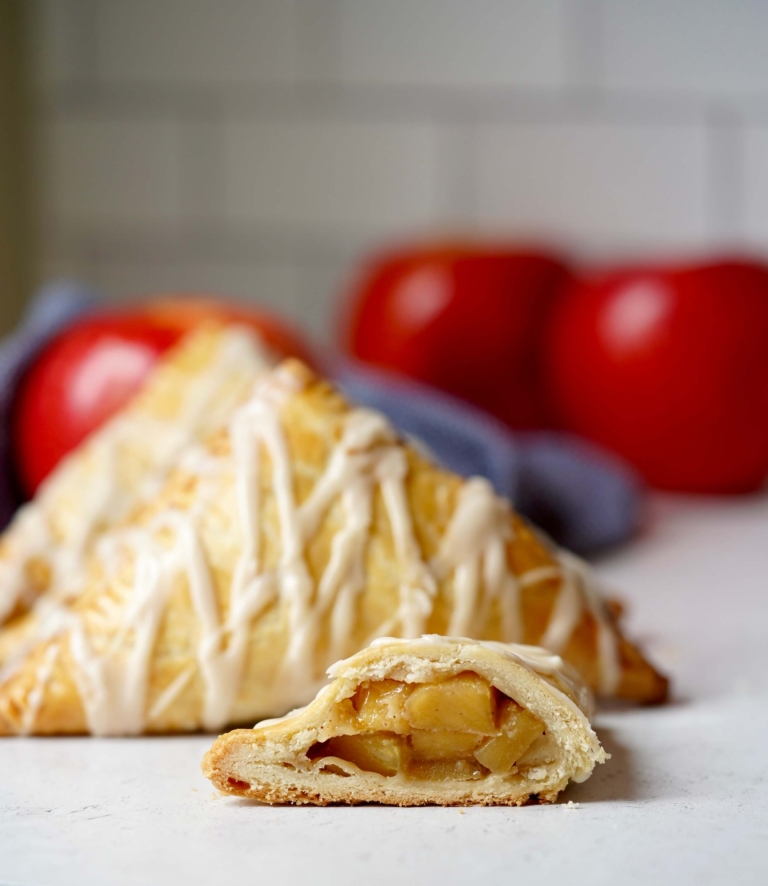
Apple Turnovers (Chaussons aux Pommes)
Ingredients:
For the Turnovers:
- 2x my pie dough (pate brisee) recipe
- 4 apples (I like SugarBee of Honeycrisp) peeled, cored, and small dice
- 2/3 cup brown sugar, packed
- 2 tablespoons unsalted butter
- 1 1/2 teaspoons cornstarch
- 1/2 teaspoon cinnamon
- 1 1/2 teaspoons vanilla extract
- Dash of salt
- 1 egg plus 1 teaspoon cold water, for the egg wash
For the Icing:
- 1 cup Confectioners' sugar
- 1-2 tablespoons milk
Directions:
- Preheat oven to 400 degrees F. Line two baking sheets with parchment paper and set aside.
- Make the pie dough and allow it to chill while you make the filling. For the apple filling: large saucepan add the apples, sugar, butter, cornstarch, cinnamon, and salt and place over medium-low heat. Cook, stirring frequently, until the butter is melted. Increase the heat to medium and continue to cook, bringing the mixture slowly to a simmer. Simmer for about 5 minutes, while continuing to stir occasionally until the mixture has thickened slightly. Remove from heat and stir in vanilla extract. Allow mixture to cool.
- For the turnovers: Divide the pie crust in half and roll out one half onto a clean, lightly floured surface. Roll into a rectangle between 1/8-inch-1/4-inch in thickness.
- Using a chef's knife, cut the dough into 4 1/2-inch squares and transfer to a parchment paper-lined baking sheet. Repeat with the remaining half of the dough, gathering the scraps and re-roll as needed to make 10 turnovers in total.
- Mix the egg wash ingredients and use a pastry brush to lightly brush each turnover. Place about 1 1/2-2 tablespoons of filling just off center of each square. Using your hands, gently fold over one corner to touch the other to envelop the apple filling. Use the tines of a fork to press and seal the turnovers. Repeat with remaining turnovers.
- Brush the outside of each turnover lightly with egg wash. Use a sharp paring knife to cut 2-3 small slits to vent on top of each turnover. Transfer to the oven and bake for 25 minutes, rotating halfway through, until the pastry is beginning to turn golden brown.
- Allow the turnovers to cool before topping with the icing. Drizzle glaze over cooled turnovers, and enjoy.
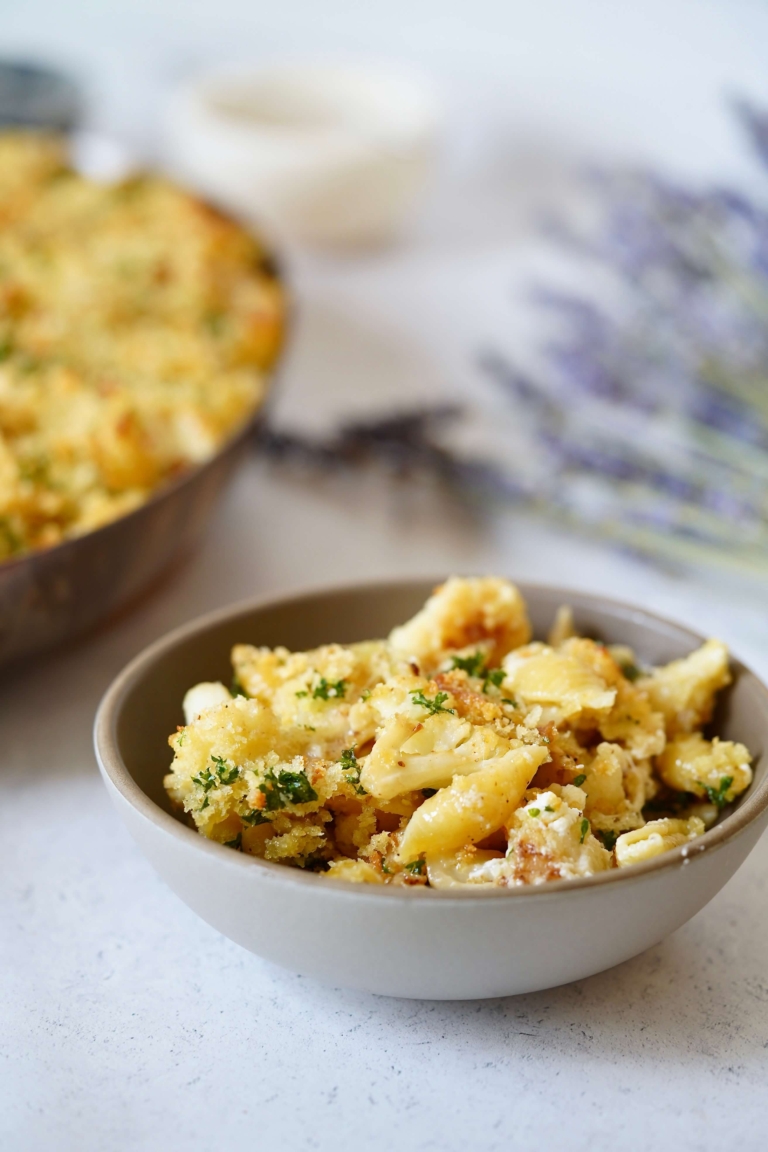
This baked pasta with cauliflower is my latest and greatest easy meal and I can’t praise it enough. Baked pasta is a classic comfort food that’s been around, in some form, for centuries. Food historians can trace baked pasta dishes to the ancient Greeks, who would toss cooked pasta with eggs and cheese before baking it in the oven. Over time, different regions and cultures developed their variations of this simple yet hearty comfort food, incorporating different ingredients such as vegetables, meats, and spices.
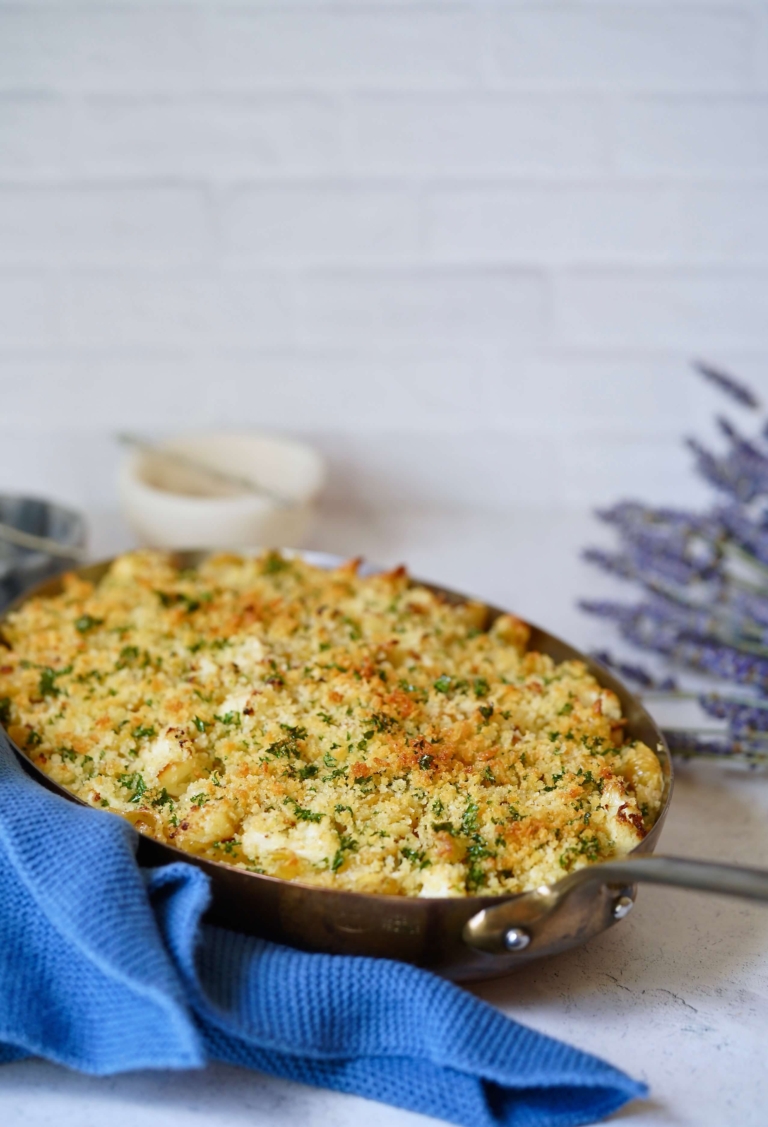
This incredibly simple baked pasta with fontina and cauliflower combines the creamy goodness of pasta with the earthy flavor and nutritional benefits of cauliflower. This dish is not only delicious but also simple to prepare, even better, prep beforehand and bake off later. Pre-cook the pasta and the cauliflower, toss everything together with some cheese and seasoned breadcrumbs, and bake until golden and bubbly. This dish has become a recent favorite of my older son, and the more cauliflower in it, the better, if you ask him.
Lets Talk Cauliflower
In addition to being a tasty and satisfying meal, this dish is also a great way to get some extra veggies into your diet. Cauliflower is a cruciferous vegetable that is not only low in calories but also packed with vitamins, minerals, and other beneficial nutrients. Here are some of the health benefits of this remarkable vegetable.
- High in fiber: Cauliflower is an excellent source of dietary fiber, which can promote healthy digestion.
- Rich in antioxidants: Cauliflower is a good source of antioxidants, including vitamin C, beta-carotene, and quercetin, which can help protect your cells from oxidative stress and inflammation.
- Lowers cancer risk: The antioxidants in cauliflower have been shown to reduce the risk of certain types of cancer, including lung, breast, and colon cancer.
- Boosts heart health: The fiber, potassium, and other nutrients in cauliflower can help lower blood pressure and possibly reduce the risk of heart disease.
- Supports brain health: Cauliflower contains choline, a nutrient that is essential for brain health and development.
- Helps with weight management: Cauliflower is low in calories and high in fiber, making it a great food for weight loss and management.

Truth be told, baked pasta cauliflower is a wonderful, hearty quick meal. If you swap out regular pasta and use whole-grain pasta, you combine the best of both worlds – comfort food and good nutrition. This is the perfect meal to add to your winter repertoire and it works any day of the week when cozy vibes are what you’re seeking.
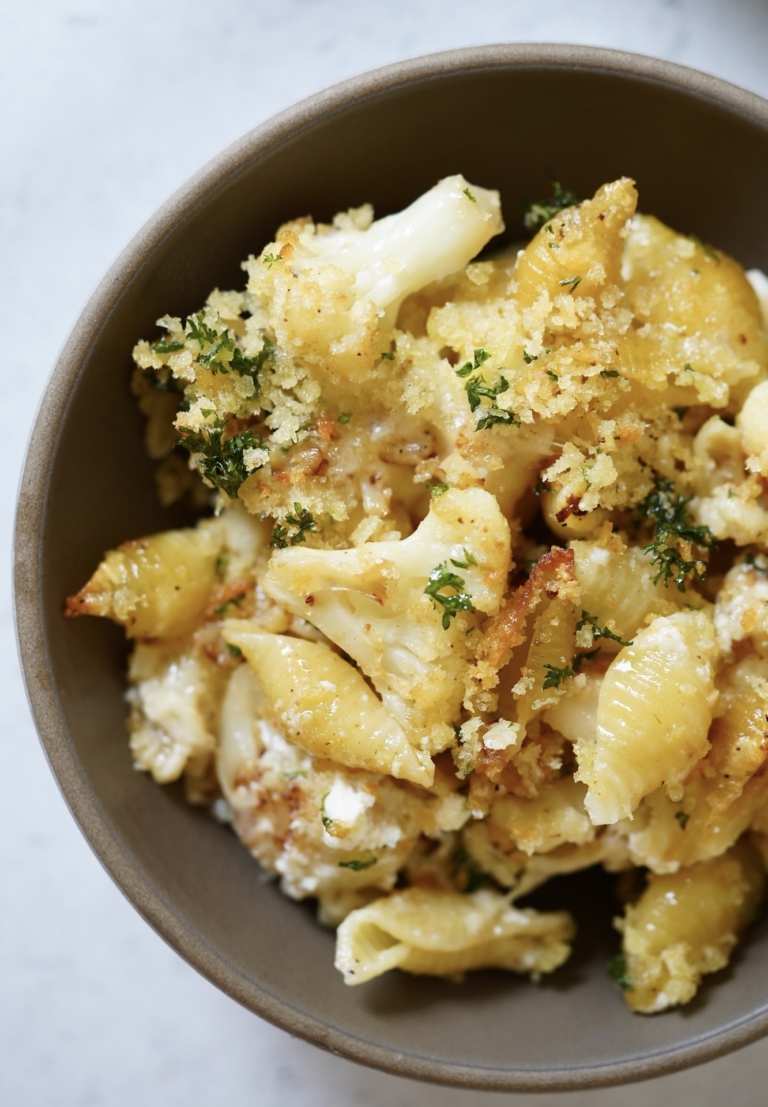
Baked Pasta With Fontina And Cauliflower
Ingredients:
- Kosher salt
- Freshly ground black pepper
- 3/4 pound medium shells
- 5 tablespoons Extra virgin olive oil, divided
- 2 pounds cauliflower, cut into small florets
- 3 garlic cloves, minced
- 1 1/2 cups Italian Fontina cheese, grated
- 1 cup whole-fat Ricotta cheese
- 1/2 cup panko bread crumbs
- 6 tablespoons Italian Parmesan cheese, grated
- 2 tablespoons parsley leaves, roughly chopped
Directions:
- Preheat the oven to 400 degrees F. Lightly grease a 10 x 13 x 2–inch rectangular baking pan and set it near your workstation.
- Fill a large pot with salted water and bring to a boil. Add the pasta and cook until al dente, according to the instructions on the package. Drain in a colander, place in a large mixing bowl, and set aside.
- In a large sauté pan add 3 tablespoons of olive oil and place over medium-high heat. When hot, but not smoking, add the cauliflower and sauté for 5 to 6 minutes, tossing occasionally, until lightly browned and tender. Add the garlic and cook 30 seconds longer, until fragrant. Add the cauliflower to the bowl with the pasta. Season to taste with salt and black pepper. Mix in the Fontina. Transfer half of the mixture to the prepared pan. Spoon the ricotta evenly on top of the pasta. Pour the remaining pasta mixture on top.
- In a small mixing bowl add the panko bread crumbs, Parmesan cheese, parsley, and 2 tablespoons of olive oil and mix well. Sprinkle the breadcrumb mixture on top of the pasta. Place in the oven and bake for 25 to 30 minutes, until browned and crusty on top. Serve hot.
As the days grow shorter and the air turns brisk, there’s nothing quite like a bourbon maple smash to warm the soul. This delightful cocktail marries the rich, caramel notes of bourbon with the velvety sweetness of pure maple syrup, creating a symphony of flavors that dance on the palate.
What is a Smash?
Smashes are an icy cocktail that often highlights the best of the cocktail season with your spirit of choice. Typically, vodka, bourbon, and whiskey work well in this style of drink. Smashes have been incredibly popular for over a century.

The beauty of the bourbon maple smash lies in its perfect alignment with the cooler months. The robust, smoky undertones of bourbon blend seamlessly with the comforting embrace of maple, evoking the essence of a crackling fire and a cozy blanket. It’s a sip that transcends mere refreshment; it’s an experience that beckons you to slow down and savor the moment.

This seasonal concoction is more than a drink; it’s an invitation to embrace the comforts of fall and winter. Whether gathered around a bonfire with friends or curled up with a good book, the bourbon maple smash is your faithful companion, offering warmth and cheer with every sip. So, let the cool winds blow, and let this cocktail be your steady source of comfort in the heart of the colder months.

Bourbon Maple Smash
Ingredients:
- 2 ounces good quality bourbon
- 5 large mint leaves
- 1 lemon wedge
- 1 ounce good quality maple syrup
- Soda water, for serving
- Crushed ice, for serving
- Lemon slice, for garnish
- Mint sprig, for garnish
Directions:
- Place a good amount of crushed ice lowball glass and set aside.
- Place the lemon wedge and mint leaves in a cocktail shaker. Using a muddler, muddle a few times to extract oil and flavor.
- Add the bourbon and maple syrup and fill the shaker with a handful of ice. Shake vigorously until cold and strain into the prepared glass. Top with soda, and garnish with a lemon slice and mint sprig.
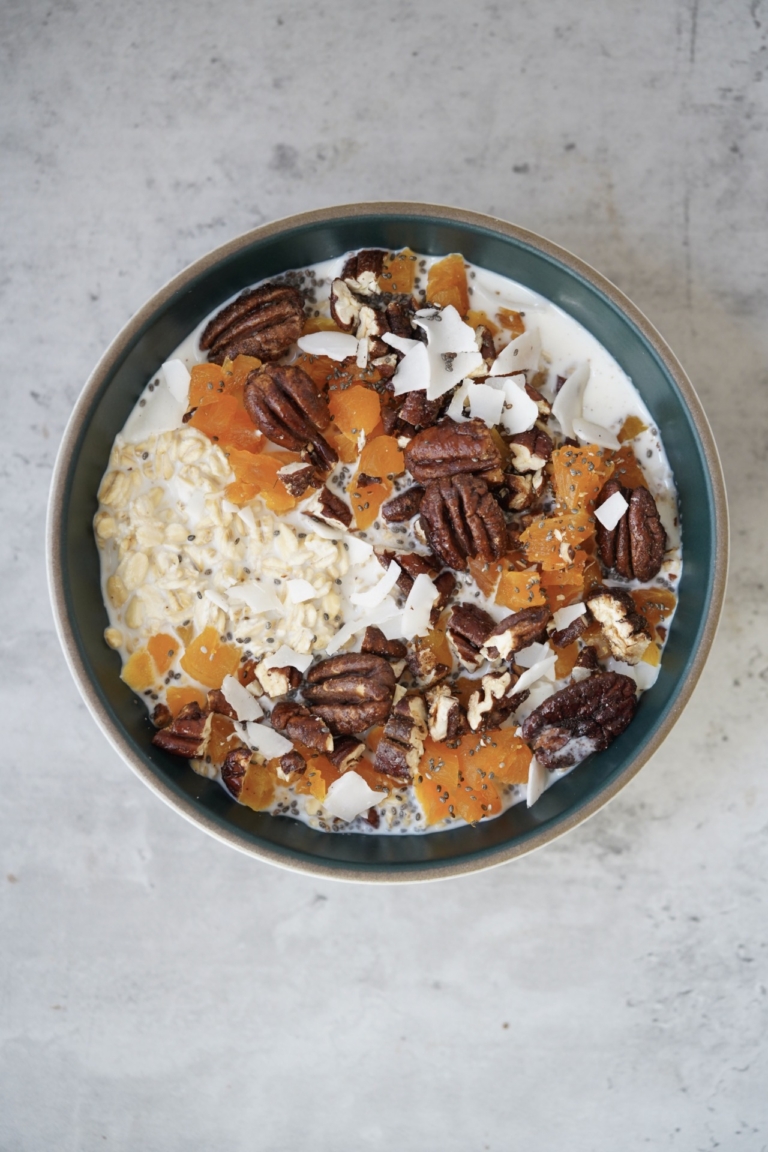
As the air turns crisper and leaves paint the world in warm hues, it’s time to embrace the comfort of a hearty fall breakfast. Enter creamy buttermilk oatmeal with dried apricots and spiced pecans– a dish that epitomizes the essence of cozy autumn mornings.
Whole grain oatmeal, the star of this recipe, is a powerhouse of nutrition. Packed with fiber, it helps regulate cholesterol levels and keeps you full and satisfied. Its complex carbohydrates provide sustained energy, making it the perfect start to your day. Buttermilk adds a creamy tang, imparting a unique richness that elevates the dish.
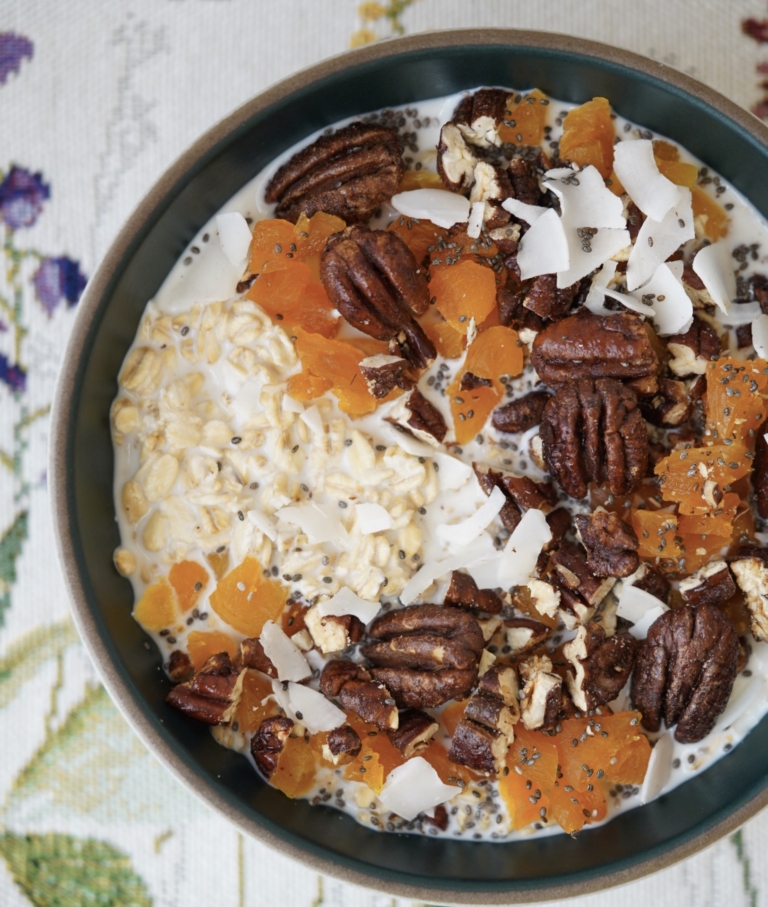
Dried apricots, plumped in the cooking process, offer a sweet contrast and a burst of chewy texture. Meanwhile, a drizzle of pure maple syrup adds a touch of liquid gold, creating a symphony of flavors that dance on your palate.
Beyond their delectable taste, pecans offer a plethora of health benefits. Packed with heart-healthy monounsaturated fats, fiber, and an array of essential nutrients, these nuts are a nutritional powerhouse. They’re also a natural source of antioxidants, aiding in cellular health and bolstering the immune system.
One of the greatest virtues of this dish is its adaptability. Customize it with your favorite toppings – be it toasted nuts, fresh berries, or a sprinkle of warming cinnamon. Plus, it’s a breeze to prepare, making it an excellent option for busy mornings.
So, as you welcome the golden season, let buttermilk oatmeal be your go-to breakfast, wrapping you in a warm embrace and setting the tone for a day filled with autumn’s simple pleasures.

Buttermilk Oatmeal With Spiced Pecans
Ingredients:
For the Spiced Pecans:
- 1/2 teaspoon cinnamon
- 1/8 teaspoon ground ginger
- 1/8 teaspoon ground cloves
- Generous pinch of ground nutmeg
- 1 cup whole pecans
- 2-3 tablespoons pure maple syrup
For the Oats:
- 2 cups water
- 1/4 teaspoon salt
- 2 cups old-fashioned rolled oats
- 1 1/2 cups buttermilk
- 1 cup whole milk, plus more for topping
- 2 tablespoons pure maple syrup, plus more for drizzling
- 3/4 cup dried apricots, roughly chopped
- 1/3 cup unsweetened coconut flakes
- 2 tablespoons chia seeds
Directions:
- Preheat the oven to 325 degrees F. Line a baking sheet with parchment paper and set aside.
- For the Pecans: In a small bowl add the cinnamon, ginger, cloves, and nutmeg and mix to blend. In a second small mixing bowl add the pecans and maple syrup, and toss well to coat. Sprinkle the pecans evenly with the spice mixture. Spread the pecans on the prepared baking sheet in one layer. Place in the oven and bake until fragrant, mixing once, for about 15 minutes. Remove from the oven and allow to cool. Once cool enough to handle, roughly chop about half the pecans.
- For the Oatmeal: In a medium stockpot or Dutch oven, add the water, buttermilk, milk, and salt and bring to a boil. Once boiling, reduce the heat to medium-low and add the oats, maple syrup, and half the apricots. Mix to blend and cook, stirring occasionally for about 10 minutes until creamy.
- To Serve: Divide the oatmeal between 4 serving bowls. Top each with the remaining apricots, chopped and whole pecans, and a sprinkling of chia seeds. Drizzle with additional milk and maple syrup as desired.
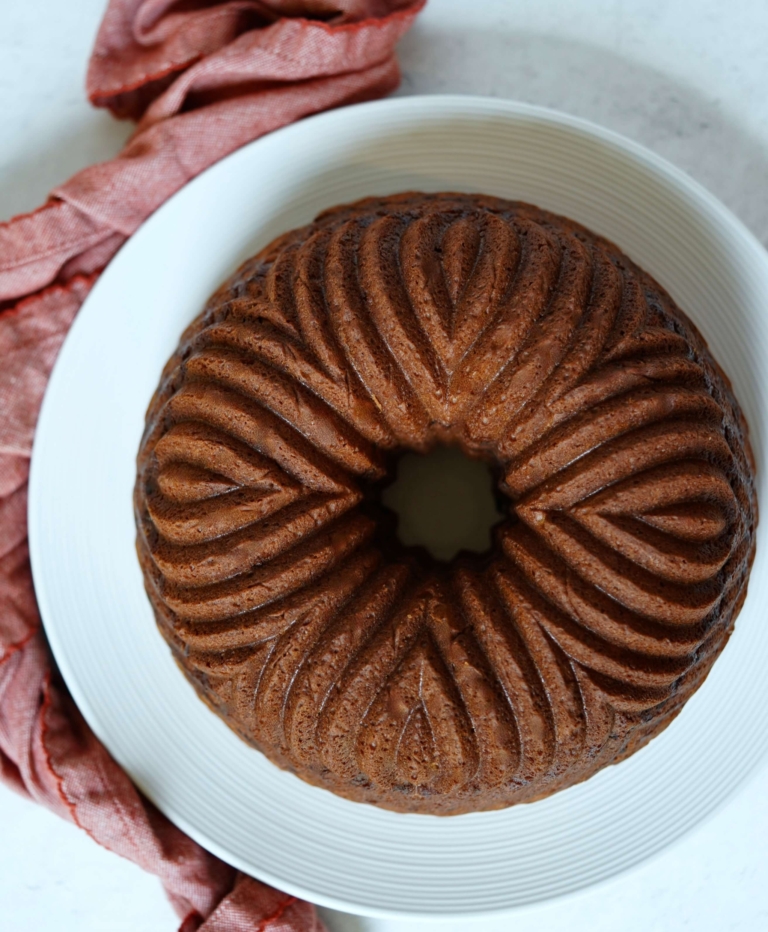
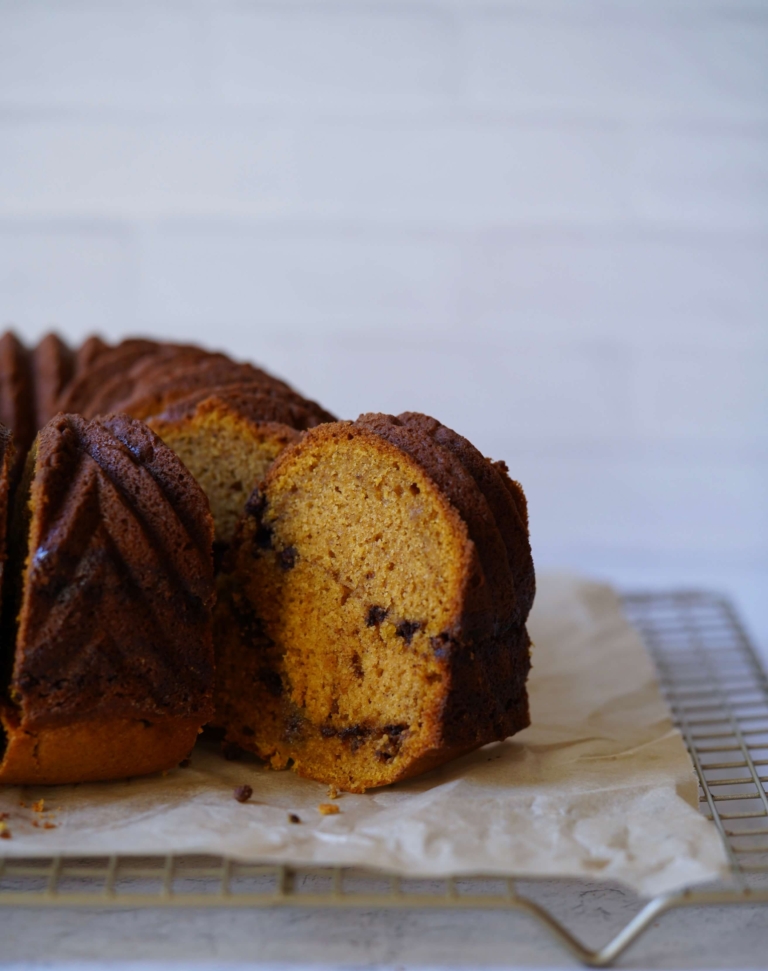
Pumpkin season has arrived and is in full swing so here’s my favorite pumpkin recipe this year, a pumpkin bundt cake with a chocolate-cinnamon swirl. I find it fascinating that pumpkin goes practically unspoken about for 10 months out of the year, only to creep up in September and hit hard in October. From pumpkin-spiced lattes to pumpkin-laced baked goods, the pumpkin craze is everywhere. I do get it, pumpkin and Halloween go hand-in-hand. But for all the love of pumpkin out there (and by love, I mean slight obsession), I’m a bit surprised that it all but disappears for the rest of the year.
The name “pumpkin” originated from the Greek word for “large melon” which is “pepon.” The French changed “pepon” to “pompon.” The English changed “pompon” to “pumpion.” American colonists changed “pumpion” to “pumpkin.” Pumpkin seeds themselves have origins that date back to 7500 BC, although these first pumpkins did not resemble the pumpkins we have come to love. The first pumpkins were actually small, hard, and had a more bitter flavor. Sometime around the 1800’s, the modern-day pumpkin pie became a tradition, but even then the pies were made from the pumpkin shells seasoned with ginger-spiced milk and roasted–not the flesh.

As a pumpkin lover, I had to throw my hat into the ring with this pumpkin bundt cake with a chocolate-cinnamon swirl. This is a fantastic seasonal cake that is perfect for breakfast or brunch. A moist, fluffy pumpkin bundt laced with just the right amount of spices hit the mark for flavors of the season. The chocolate-cinnamon swirled within this rustic cake complements the pumpkin flavors without overwhelming it. When paired with a cup of good coffee, a slice of this seasonal bundt cake is deeply satisfying any day of the week.
Fun Facts About Pumpkins
- Pumpkins are a member of the Cucurbita family, which includes squash and cucumbers.
- Pumpkins contain potassium and Vitamin A.
- Pumpkin flowers are edible.
- The largest pumpkin pie ever made was over five feet in diameter and weighed over 350 pounds. It used 80 pounds of cooked pumpkin, 36 pounds of sugar, 12 dozen eggs, and took six hours to bake.
- Pumpkins were once recommended for removing freckles and curing snake bites.
- The largest pumpkin ever grown weighed 1,140 pounds.
- The Connecticut field variety is the traditional American pumpkin.
- Pumpkins are 90% water.
- 80% of the pumpkin supply in the United States is available in October.
- Native Americans flattened strips of pumpkins, dried them, and made mats.
A slice of this seasonal pumpkin bundt cake hits the spot with its comforting, autumnal flavors. The tender crumb, enriched with warm spices and velvety pumpkin, evokes a sense of nostalgia and coziness, something I personally welcome this time of year.
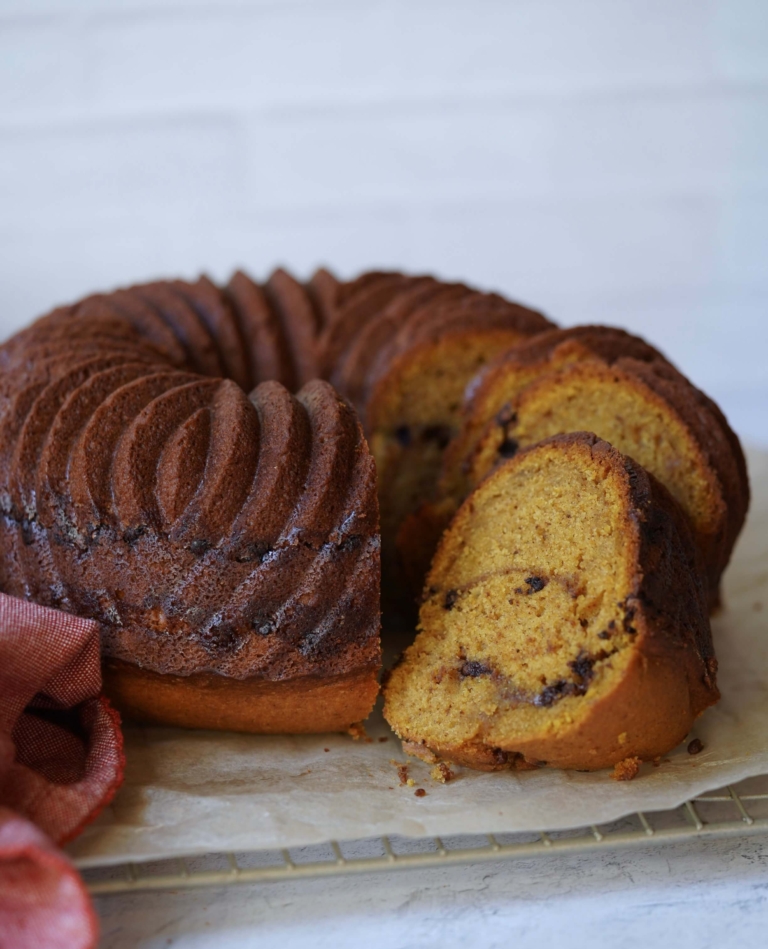
Pumpkin Bundt Cake With Chocolate-Cinnamon Swirl
Ingredients:
For the Cake:
- 2 cups pumpkin purée
- 3 large eggs
- 3/4 cup vegetable oil
- 3/4 cup light brown sugar, packed
- 1 cup sugar
- 2 teaspoons vanilla extract
- 2 cups all-purpose flour
- 2 teaspoons baking powder
- 1/2 teaspoon baking soda
- 1/4 teaspoon salt
- 2 teaspoons cinnamon
- 1/2 teaspoon ginger
- 1/2 teaspoon nutmeg
- 1/8 teaspoon ground cloves
For the Filling:
- 1/3 cup light brown sugar, packed
- 1 teaspoon cinnamon
- 3/4 cup semi-sweet mini chocolate chips
- Confectioners' sugar, for dusting (optional)
Directions:
- Preheat the oven to 350 degrees F. Generously oil a 10-cup bundt ban and set aside.
- For the Cake: In the bowl of a kitchen mixer, such as a KitchenAid, fitted with a paddle attachment, add the pumpkin puree, eggs, oil, both sugars and vanilla extract and mix on medium until well blended.
- In a medium mixing bowl add the flour, baking powder, baking soda, salt, cinnamon, ginger, nutmeg, and cloves mix until completely blended. With the mixer on low, slowly add the flour mixture and mix until blended.
- For the Filling: In a small mixing bowl add the brown sugar, cinnamon, and chocolate chips, mix to blend, and set aside.
- For Assemble: Spoon one-third of the cake batter into the bottom of the prepared pan. Sprinkle half the filling on top. Spoon another third of the batter into the pan and sprinkle with the remaining filling. Spread the remaining batter on top. Use a spatula to smooth out the top.
- Place the bundt cake in the oven and bake for 45-50 minutes, or until a cake tester inserted in the center comes out clean. Remove the cake from the oven, and allow it to cool in the pan for about 15 minutes before turning it out onto a rack to cool completely.
- Serve the bundt as is or lightly dusted with Confectioners' sugar.