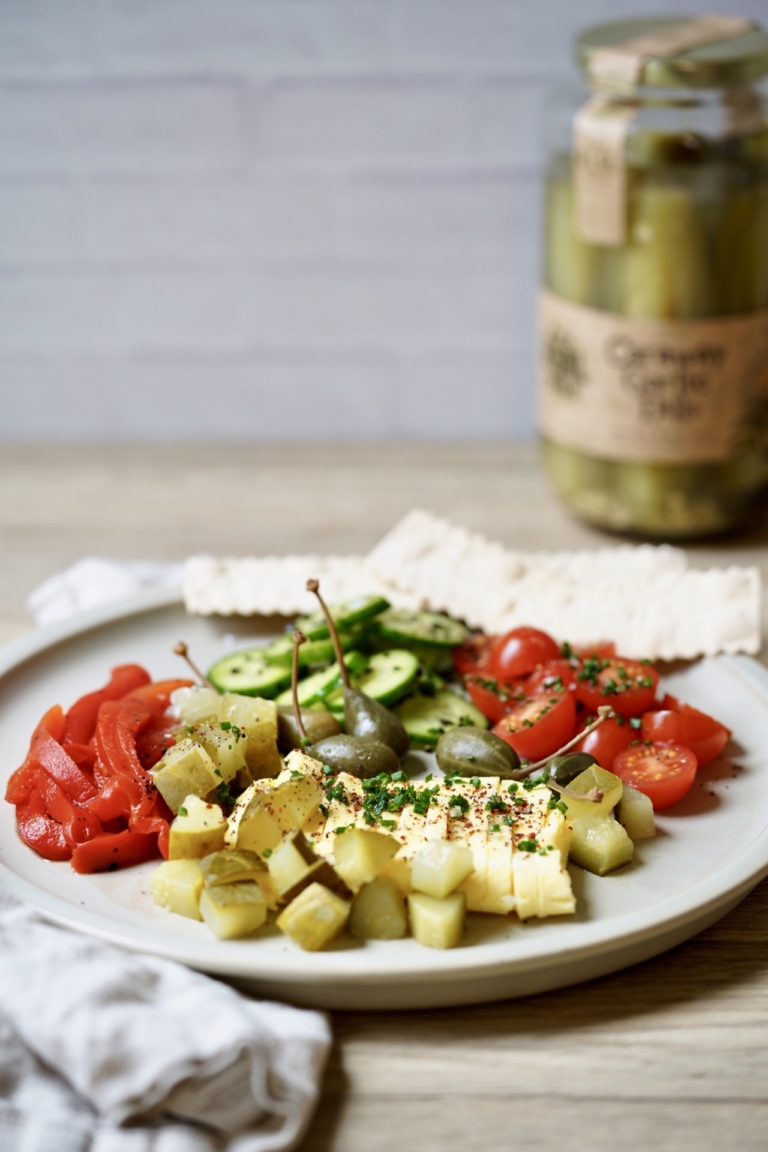
Indulge in the vibrant and flavorful Israeli breakfast, a delightful spread that combines a variety of ingredients for a satisfying start to the day. An Israeli-style breakfast has become immensely popular both in Israel and around the world, known for its freshness, simplicity, and bold flavors that blend harmoniously together on one plate.
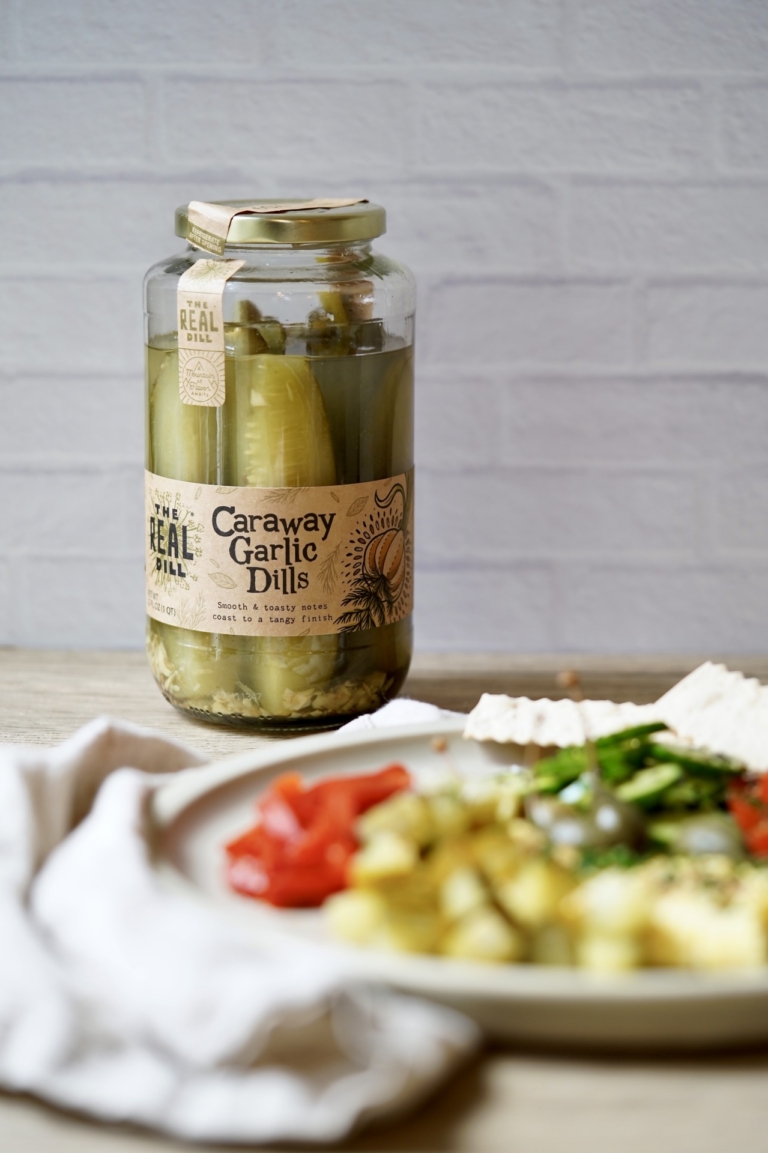
At the heart of an Israeli breakfast is the humble egg often prepared in a simple folded, soft-boiled, or sunny-side-up fashion, providing a protein-packed centerpiece. Accompanying the eggs is an array of vibrant and savory elements that are only limited by your imagination. My version of an Israeli breakfast features tangy The Real Dill (my go-to), roasted peppers bursting with smoky sweetness, and refreshing cucumber slices dusted with sumac, and Aleppo pepper, adding a zesty kick.
History of Israeli Breakfasts
This style of breakfast gained popularity in Israel due to its perfect blend of Mediterranean flavors and its focus on fresh, locally sourced ingredients. The combination of salty, sour, and spicy elements creates a symphony of taste that leaves you craving for more.
The Israeli breakfast, with its emphasis on wholesome and hearty ingredients, was a mainstay in kibbutz living. Kibbutzim, or communal settlements, placed great importance on self-sufficiency and shared meals. The breakfast spread provided a nutritious and satisfying start to the day for the kibbutz members, energizing them for their daily tasks.
Recreating an Israeli breakfast at home is a wonderful way to experience the vibrant flavors of the Mediterranean. Straight up or if you’re a carb lover, paired with warm homemade pita bread, creamy labneh or hummus, and a steaming cup of coffee or tea–trust me, there’s nothing better.
Why Pickles?
Pickles have become a beloved part of the Israeli breakfast for several reasons. Here are a few factors that contribute to the love of pickles in Israeli breakfast culture:
- Cultural Influence: Israeli cuisine is heavily influenced by Jewish Eastern European and Middle Eastern traditions. Pickles, particularly the brine-cured or lacto-fermented varieties, have a long history in Eastern European cuisine. They were traditionally served as a condiment or side dish, and this tradition carried over to Israeli cuisine.
- Palate Cleanser: Pickles have a refreshing, tangy flavor that can help cleanse the palate and awaken the taste buds. In the morning, they provide a vibrant and invigorating contrast to the richness of other breakfast components.
- Digestive Aid: The acidic nature of pickles can aid in digestion, especially when consumed before or alongside a heavier meal. Pickles’ natural acidity can help stimulate the production of digestive enzymes, promoting better digestion and overall gut health.
- Nutritional Benefits: Pickles are a low-calorie food that can contribute to the nutritional value of a meal. They are a source of dietary fiber, vitamins, and minerals, depending on the specific type and preparation method. Including pickles in breakfast adds a nutritious element to the meal.
- Flavor Enhancer: The tangy, briny flavor of pickles adds a burst of taste to the breakfast plate. They provide a pleasant contrast to other ingredients like eggs, roasted peppers, and bread, elevating the overall flavor profile of the meal.
Think outside the breakfast box and indulge in the creative, savory possibilities an Israeli breakfast has to offer. Allow the flavors to transport you to the sun-drenched shores of the Mediterranean, where each bite is a celebration of fresh, vibrant ingredients. So, what are you waiting for, embark on a culinary journey and savor the delightful Israeli breakfast that has captured the hearts and palates of people around the world.

Israeli Breakfast

Ingredients:
- 4 large eggs
- 2 tablespoons whole milk
- 1 teaspoon tahini paste
- 1 teaspoon Extra Virgin olive oil
- 2 Persian cucumbers, sliced
- 3 tablespoons dill pickle juice
- 1 teaspoon black sesame seeds
- 1 cup grape tomatoes, halved
- 6 ounces jarred roasted red bell pepper thinly sliced
- 3 good quality dill pickles, small dice, plus juice, I use The Real Dill Caraway Garlic Dill)
- 2 tablespoons chives, thinly sliced
- 1/4 teaspoon cumin
- 1/4 teaspoon sumac
- 8 caper berries
- 1/4 Aleppo pepper
- salt and black pepper, to taste
- Flatbread, crackers, or pita, for serving (optional)
Directions:
- In a small mixing bowl add the eggs, milk, and tahini and blend. Season with salt and set aside.
- In a small mixing bowl add the cucumbers, pickle juice, cumin, and sumac. Toss well and reserve.
- Place a medium sauté pan over medium heat. Add the olive oil and when hot, but not smoking, add the egg mixture. Allow the egg to cook without stirring for 1 minute. Remove from the heat and use a rubber tip spatula to fold the egg in half. Next, gently fold each egg half into a third, like you would an envelope. Place the egg on a cutting board and thinly slice. Transfer the eggs to two serving plates. Top the eggs with Aleppo pepper, salt, and black pepper.
- Next divide the tomatoes, cucumbers, roasted pepper, and pickles. Add the caper berries, garnish with chives and serve with flatbread, crackers or pita bread.
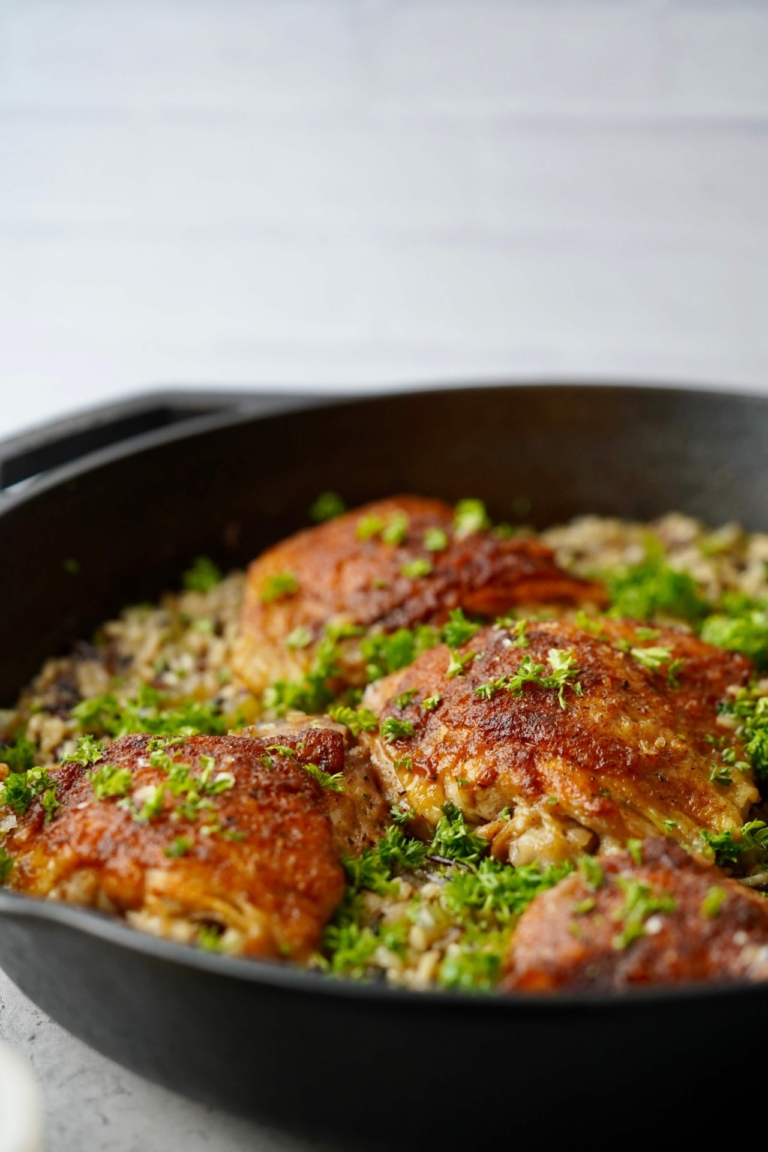
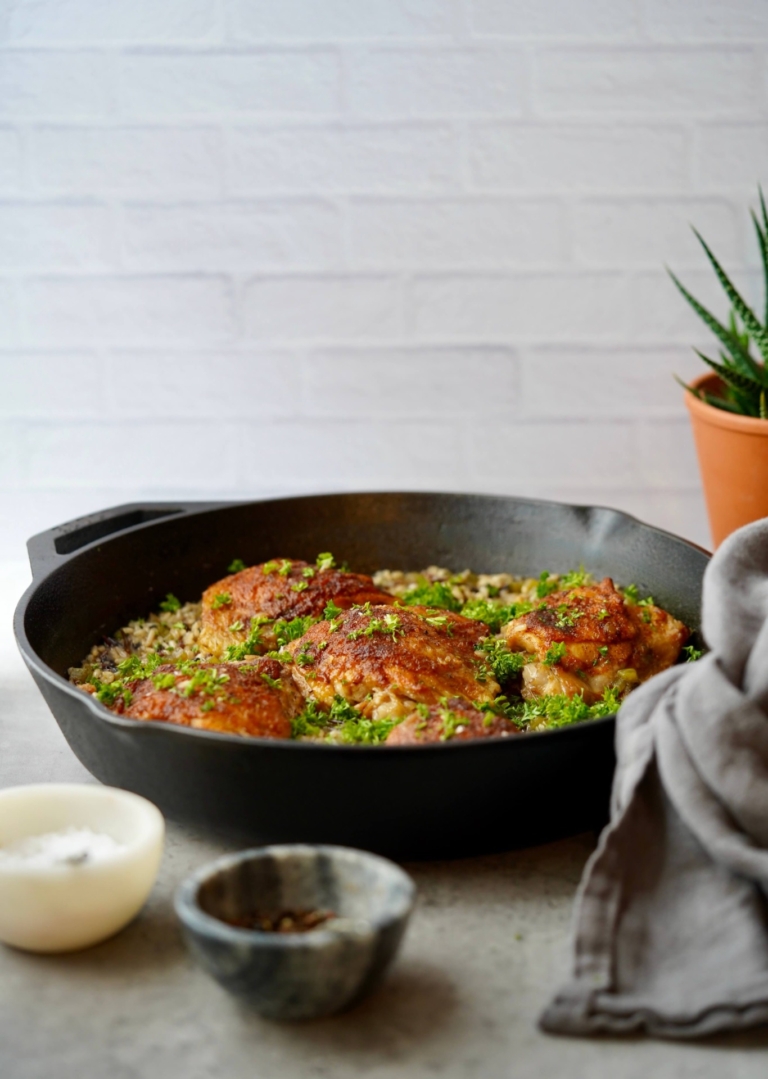
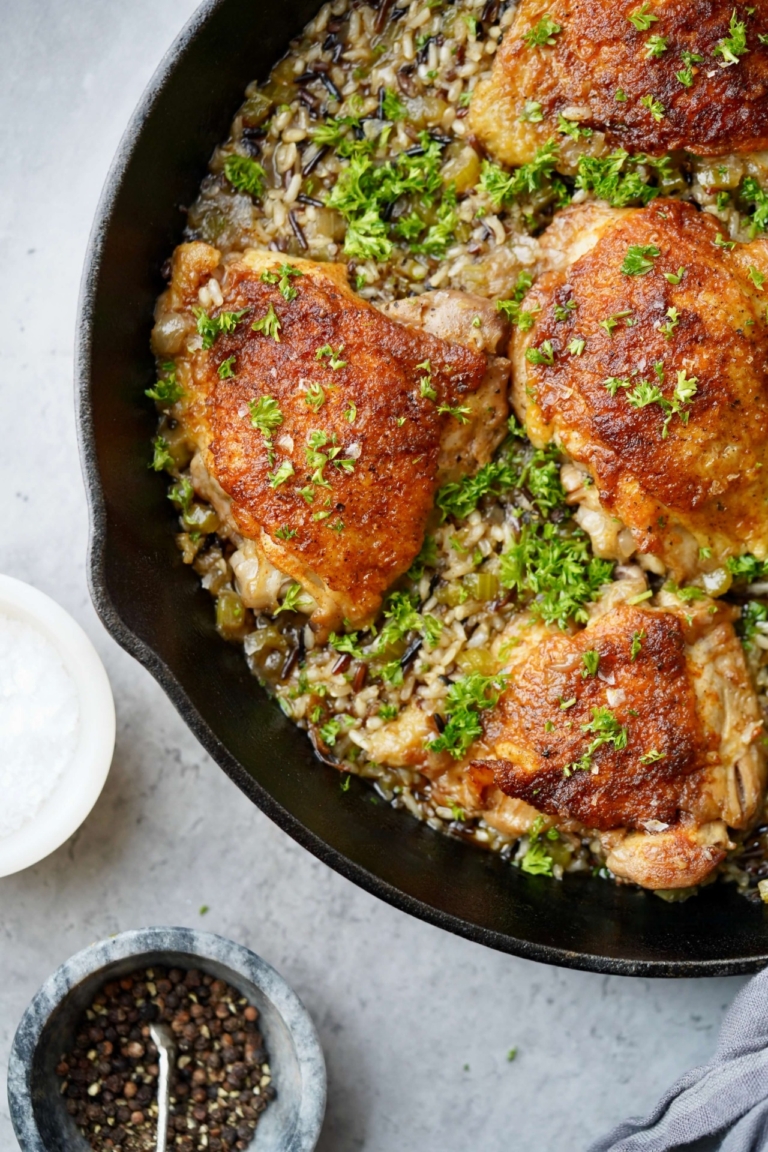
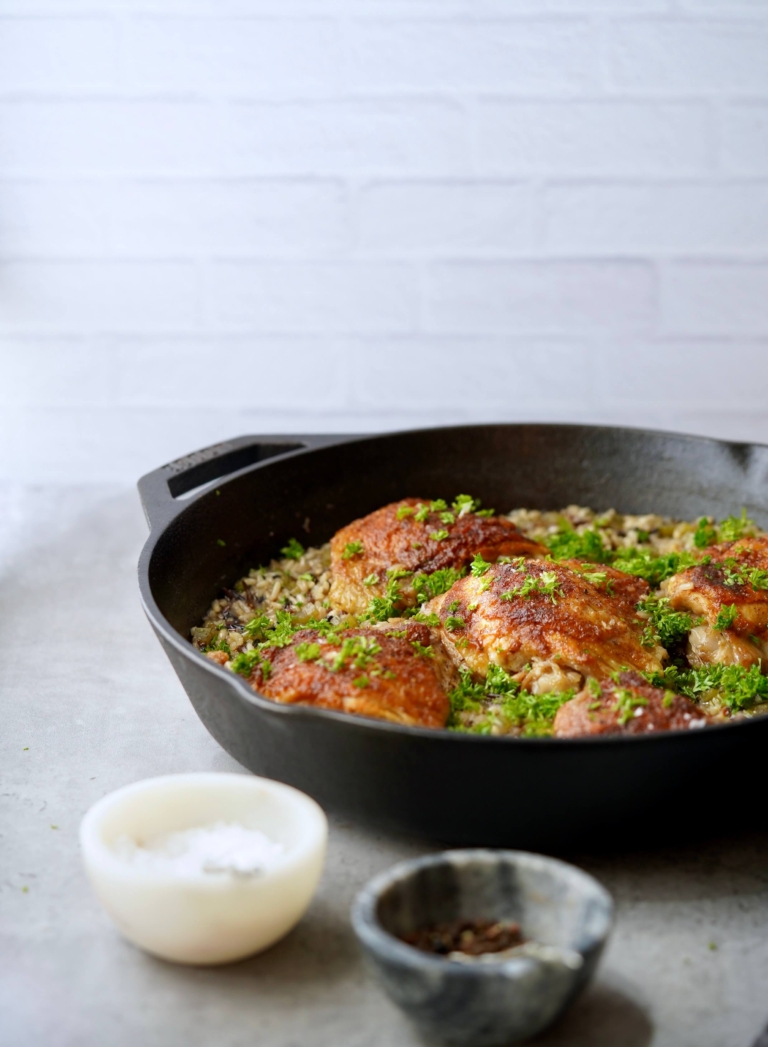
The colder months settle in, there’s nothing quite like a comforting and satisfying meal to warm the soul. This cast iron chicken with wild rice is just what you’ve been missing. A simple, yet hearty dish, that embodies the true essence of comfort food. This recipe brings together succulent, perfectly seasoned roast chicken and flavorful nutty wild rice, but it also harnesses the magic of cooking in a cast iron pan.
Cast Iron Cooking
Cooking in a cast iron pan imparts a unique flavor and texture to dishes. The even heat distribution and retention capabilities of cast iron ensure that, in this recipe, your chicken turns out juicy and tender while creating a beautiful, crispy exterior. The natural non-stick properties of a well-seasoned cast iron pan make cooking effortless, making it a reliable and versatile kitchen companion.
Wild Rice
In addition to its delectable taste and texture, the addition of wild rice offers numerous health benefits. Wild rice is a rich source of dietary fiber, essential minerals like magnesium and zinc, and vitamins such as B vitamins and vitamin E. Wild rice also contains antioxidants that contribute to overall well-being and immune support.
Caring for Your Cast Iron Pan
To ensure the longevity of your cast iron pan, it’s important to provide proper care. After each use, clean the pan with minimal soap (none is preferred), hot water, and a gentle brush. Thoroughly dry it to prevent rusting. Regularly seasoning your cast iron pan with oil helps maintain its non-stick surface and prevents sticking. Avoid using harsh detergents or abrasive materials that can damage the seasoning.
The Truth About Dark Meat
While dark meat chicken is often considered to be higher in fat and calories compared to white meat, it also offers several health benefits. Here are some of the advantages of consuming dark-meat chicken:
- Rich in Iron: Dark meat chicken, particularly the leg and thigh portions, contains more iron compared to white meat. Iron is crucial to producing red blood cells and the transportation of oxygen throughout the body.
- High in Zinc: Dark meat chicken is a good source of zinc, a mineral that plays a vital role in immune function, wound healing, and cell growth. Zinc also supports proper taste and smell sensation and is involved in the metabolism of carbohydrates, proteins, and fats.
- More Flavorful and Moist: Dark meat chicken is known for its richer flavor and juiciness compared to white meat.
- Vitamin B12: Dark meat chicken contains higher amounts of vitamin B12 compared to white meat. Vitamin B12 is essential for maintaining healthy nerve cells, producing DNA, and supporting the formation of red blood cells.
- Source of Selenium: Dark meat chicken provides selenium, an essential trace mineral with antioxidant properties. Selenium plays a role in immune function.
It’s important to note that while dark meat chicken has its nutritional benefits, moderation and balance are key. Additionally, remember to choose cooking methods that minimize added fats and remove the skin to reduce saturated fat content.
The cast iron chicken with wild rice is an easy dinner option for cooler months. The combination of the robust flavors from cooking in cast iron and the wholesome goodness of wild rice creates a meal that is both satisfying and nourishing. Embrace the cozy vibes of the season, savor every bite, and don’t forget to give your cast iron pan the care it deserves.
Cast Iron Chicken with Wild Rice
Ingredients:
For the Seasoning Mix:
- 2 teaspoons paprika
- 2 teaspoons dried thyme
- 1 teaspoon lemon zest
- 1 teaspoon onion powder
- 1 teaspoon garlic powder
- 1 teaspoon kosher salt
- 3/4 teaspoon freshly ground black pepper
For the Chicken and Rice:
- 8 bone-in and skin-on chicken thighs
- 2 tablespoons unsalted butter, divided, plus more if needed
- 1 yellow onion, small dice
- 3 celery stalks, finely diced
- 4 cloves garlic cloves, grated
- 3/4 teaspoon kosher salt
- 1 cup wild blend rice, such as Lundberg
- 1 3/4 cups chicken stock
- 2 tablespoons fresh, finely chopped
Directions:
- Preheat oven to 350 degree F.
- For the Seasoning Mix: In a small bowl add the paprika, thyme, lemon zest, onion powder, garlic powder, salt, and pepper, mix to blend, and set near your workstation.
- For the Chicken and Rice: Add 1 tablespoon of butter to a 12-inch cast iron pan and place over medium-high heat. When hot, add the chicken pieces, skin side down, and sear till just golden brown. Flip and sear the other side, about 3-4 minutes per side. Transfer the chicken to a plate and set aside.
- Return the skillet to the heat and add the onion and celery. Sauté over medium heat till just starting to soften. Add the garlic and salt and cook for 30 seconds longer.
- Once the chicken has cooled slightly, pat it with a paper towel to dry. Next, rub the seasoning mix into all sides of the chicken pieces.
- Add the rice and remaining butter to the onions and celery and stir well to coat. Place the seasoned chicken pieces evenly over the rice. Pour the chicken broth around and between the chicken pieces. Bring the liquid to a simmer on the stove. Cover the pan with a lid or seal tightly with foil, place in the oven, and bake for about 35-40 minutes.
- Remove the foil or lid and bake for an additional 10 minutes, or until all the liquid is absorbed.
- If serving from the skillet, gently fluff up the rice around the chicken. Garnish with fresh parsley.
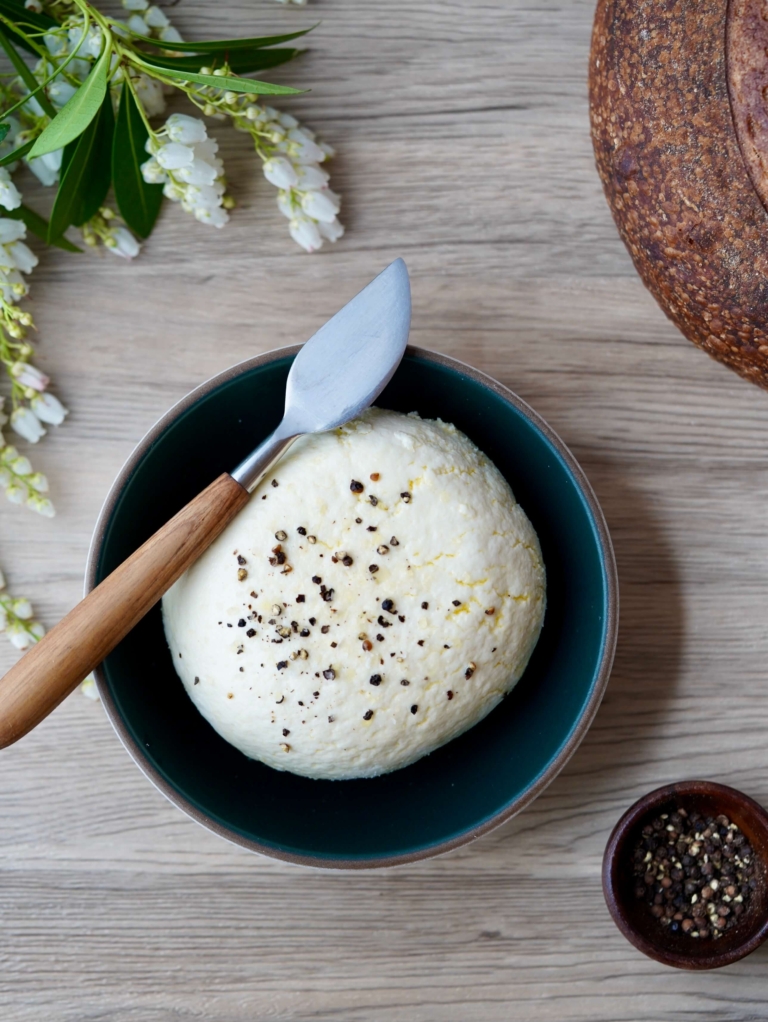
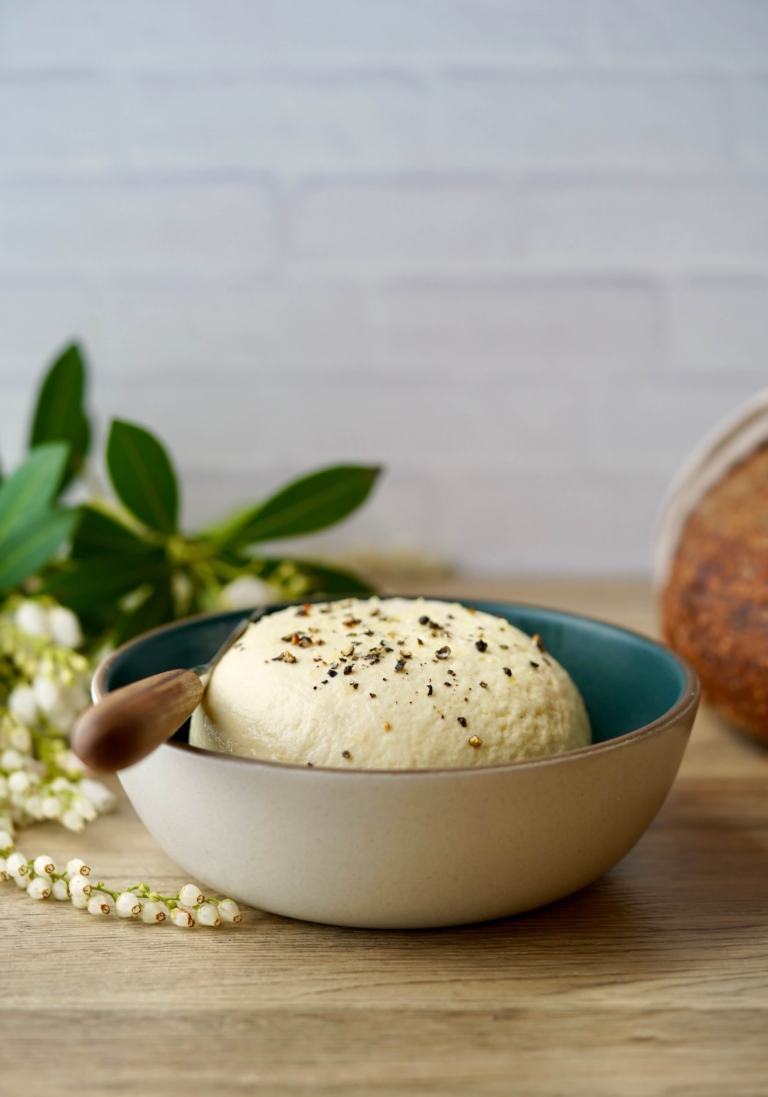
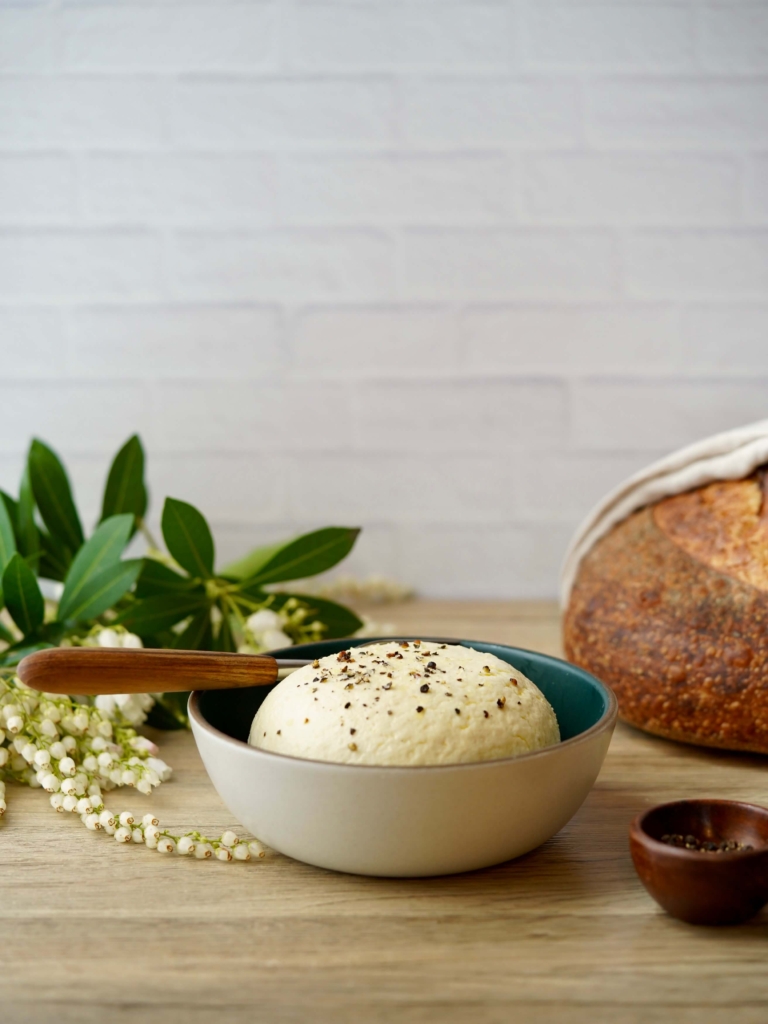
Making homemade ricotta cheese is a rewarding and surprisingly easy endeavor. Cheese-making at home allows you to indulge in the pure pleasure of creating your own creamy, fresh cheese. And the best part, it’s ready in under an hour. Ricotta, which means “recooked” in Italian, is a soft and luscious cheese that has been enjoyed for centuries. This is a recipe my husband recently started making for my older son and it’s become a family favorite.
Origin of Ricotta
Originating in Italy, ricotta was traditionally made by heating the whey leftover from cheese production. Today, homemade ricotta can be easily crafted by combining milk, acid (such as vinegar or lemon juice), with salt. The mixture is gently heated, causing the milk proteins to curdle and form curds that can be strained to obtain the silky ricotta cheese.
Versatility
One of the reasons ricotta is beloved by many is its incredible versatility in both sweet and savory dishes. Its mild, slightly sweet flavor and creamy texture make it an excellent addition to lasagnas, stuffed pastas, cheesecakes, and even pancakes. It can be used as a spread, filling, or topping, adding richness and depth to countless recipes.
If you’re a ricotta cheese lover already, consider making fluffy ricotta pancakes drizzled with honey, savory ricotta, and spinach stuffed shells, or even a velvety lemon ricotta cake. The possibilities are truly endless when it comes to incorporating homemade ricotta into your culinary adventures.
Making your own ricotta cheese allows you to experience the satisfaction of transforming simple ingredients into a delectable, artisanal treat. So why not embark on a homemade ricotta cheese-making adventure and savor the luxurious and versatile nature of this beloved cheese, it’s easier than you may think.
Homemade Ricotta Cheese
Ingredients:
- 1 gallon whole milk (do not use ultra-pasteurized milk)
- 4 cups heavy cream
- 1 cup distilled white vinegar
- 2 teaspoons kosher salt
- Cheesecloth
- Thermometer
Directions:
- In a large stockpot heat the milk and cream over low heat until it reaches 200 degrees F. Whisk the mixture occasionally while heating to prevent scorching.
- Once the desired temperature has been reached, remove the mixture from the heat. Whisk the mixture in a clockwise direction, and add the salt. Next, add in the vinegar and stir in one full rotation. Cover the pot and allow the mixture to sit, undisturbed for 10 minutes. Note: the mixture will start to coagulate immediately. White curds will begin to float in the whey, it is very important to not mix during this process.
- Meanwhile, line a colander with fine cheesecloth or a 200-count cotton cloth about 36 inches x 36 inches. Remove the lid from the pot and gently ladle the curds out and into the prepared colander. Scoop the curds from the center to the sides. Gently pour the remaining mixture into the cloth around the edges allowing the cheese to drain.
- Allow the cheese to drain undisturbed in the colander for up to 30 minutes, depending on the desired consistency. Next, gently lift and fold the cheesecloth, twisting it closed to allow more liquid to drain while carefully pressing the liquid from the cheese. The more pressure you apply, the more firm the cheese will be. If you prefer a more spreadable ricotta, simply drain less of the whey once in the cheesecloth.
- Remove the cheese from the cheesecloth and either serve at room temperature or refrigerate and serve chilled when desired. Note: You can press the ricotta firmly into a small serving bowl to help shape it like I did above. Store the ricotta in an airtight container in the refrigerator for up to 5 days.
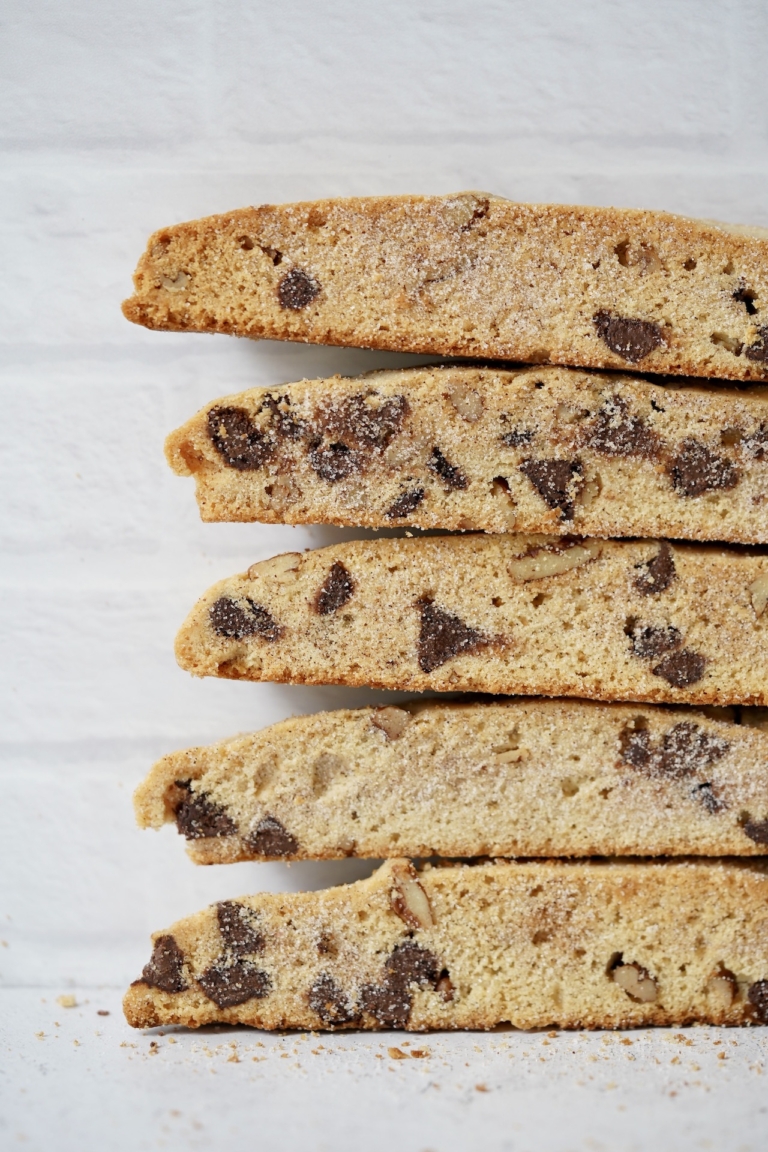
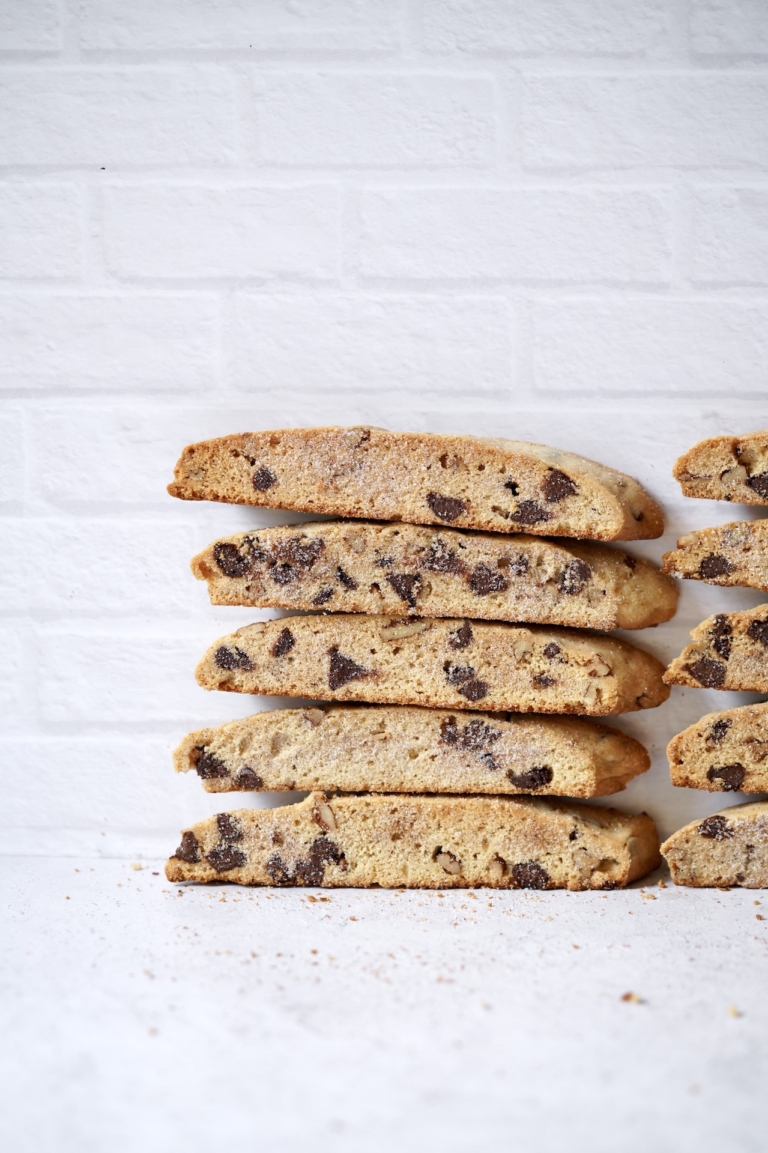
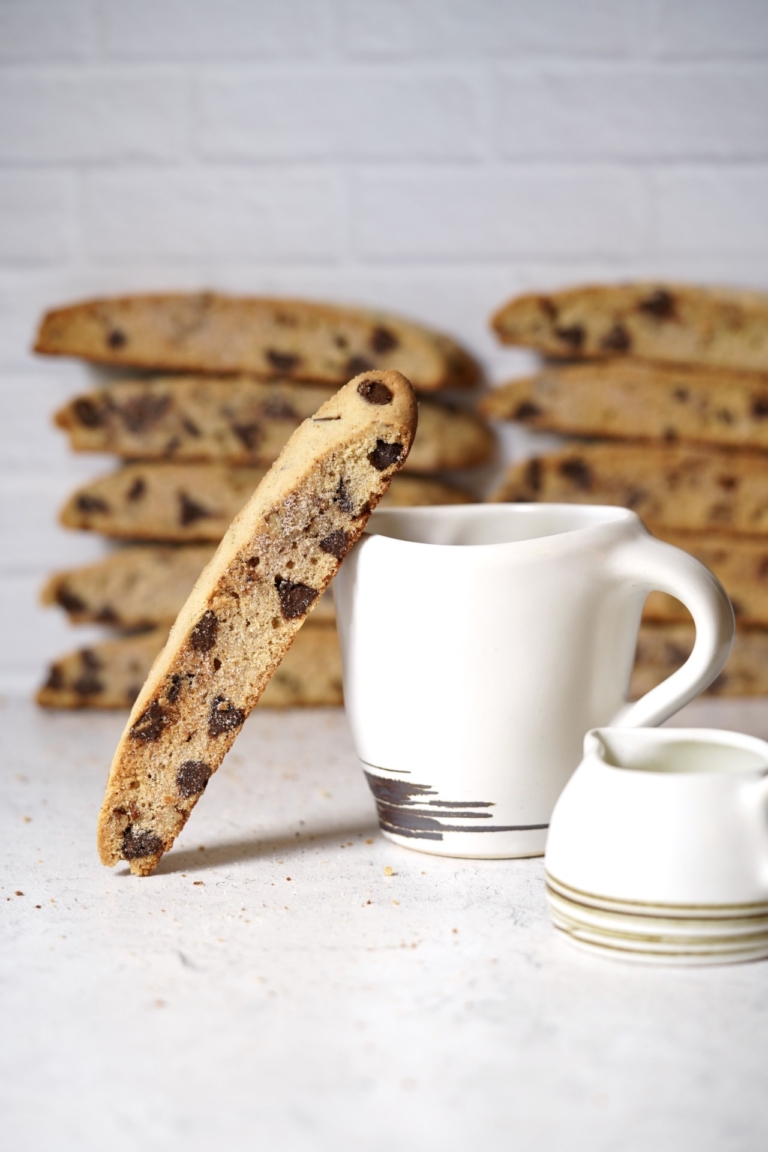
Mandel bread, also known as Mandelbrot, is a traditional twice-baked Jewish cookie similar to biscotti. Like biscotti, Mandel bread is crunchy, however, it’s made with more fat than biscotti, so the resulting cookie is a bit richer and less dry. These cookies were popular throughout the 19th century among Eastern European Jews, often consumed by rabbis, merchants, and other Jewish community members. They grew in popularity, known to be a dessert that kept well and traveled easily.
The History of Mendel Bread
Mandelbrot cookies are an Ashkenazi Jewish dessert that has been around for centuries. The word “Mandelbrot” means almond “Mandel” and bread “brot” in both German and Yiddish. Since Mandelbrot literally means “almond bread”, the most traditional add-in would be chopped or slivered almonds although other nuts can be just as wonderful as is the case with this chocolate-pecan version.
According to Gil Marks, author of the “Encyclopedia of Jewish Food,” Mandel bread is thought to have originated in Germany and traveled Eastward. In the early Middle Ages, Italians created the original biscotti by partially baking the dough, slicing it, and then returning the pieces to a cooler oven to crisp up. The second time in the oven extracts the moisture which in turn, lengthens the shelf life of the cookie.
Ashkenazi Jews
When these cookies got adopted by Ashkenazi Jews is unknown, though Mandel bread’s easy preparation made it ideal for the Sabbath, as they could be cooked ahead of time. Once baking powder was added, Mandel bread became much lighter and softer in comparison to biscotti. Over time, Jewish cooks began to add dried fruit, nuts, and chocolate chips. I like making Mandel Bread in the Fall for Rosh Hashanah. During Passover, it is common to make Mandel bread with matzah meal instead of flour.
My chocolate-pecan Mendel bread comes together easily in just one bowl. Chilling time is required to help the flavors blend and make the dough easier to work with. You can make in two or more logs depending on the size desired and it can be sliced thick or thin after their first round in the oven. The cinnamon-sugar dusting on the outside is perhaps my favorite part which adds to their texture and complexity.

Jewish or not, Mandel bread is a wonderful cookie for dipping, dunking, and enjoying any time of year, and flavor-wise, the options are truly limitless.
Chocolate-Pecan Mandel Bread
Ingredients:
- 3 cups all-purpose flour
- 2 teaspoons baking powder
- 1/4 teaspoon salt
- 1 1/2 teaspoons cinnamon, divided
- 1 cup unsalted butter, melted and slightly cooled
- 1 cup, plus 1 tablespoon sugar, divided
- 2 teaspoons vanilla extract
- 3 eggs
- 1 cup semi-sweet chocolate chips
- 1 cup pecans, finely chopped
Directions:
- In a medium bowl, whisk together the flour, baking powder, salt, and 1 teaspoon of the cinnamon. Set aside.
- In the bowl of an electric mixer, such as a KitchenAid, fitted with a paddle attachment, add the melted butter, 1 cup of sugar, and the vanilla extract. Beat on medium speed until combined. Add the eggs and continue beating on medium speed until well blended and pale yellow, about 1 to 2 minutes. With the mixer on low, slowly add the flour mixture and mix until just incorporated.
- Using a rubber spatula, gently fold in the chocolate chips and the pecans. Cover the bowl with plastic wrap and place in the refrigerator to chill until firm, about 1 hour.
- Preheat the oven to 350 degrees F and set two oven racks in the centermost positions. Line two baking sheets with parchment paper and set aside.
- Lightly dust a clean work surface with flour. Divide the dough into two equal pieces. Using your hands, divide the dough into 2 logs about 2 inches wide, 12 inches long, and 1 inch tall.
- Transfer the logs to the prepared baking sheets. Place in the oven and bake for about 25 minutes, or until lightly golden, rotating the pans from top to bottom and front to back midway through.
- Remove the pans from the oven and allow the logs to cool for 10-15 minutes. Lower the oven temperature to 250 degrees F.
- In a small bowl, mix together the remaining 1 tablespoon of sugar and 1/2 teaspoon cinnamon and set near your workstation.
- Once the logs have cooled, cut them diagonally into 3/4-inch-thick slices and place them back onto the baking sheets on their side. You should have approximately 30 in total). Sprinkle half of the cinnamon sugar over the top. Flip the cookies and repeat with the remaining cinnamon sugar. Place the pans back in the oven and bake until slightly golden and crisp, 25-30 minutes.
I adore tomato salads of any kind and make them often when tomatoes are in season. If the tomatoes are farm fresh, the flavor is so intoxicating, that very little even needs to be added flavor-wise to make a great side dish to just about any entrée. But toss some beans in and you turn a simple vegetarian salad into a protein-packed dish that oozes healthy eating. This lovely tomato, bean, and feta salad has been on repeat in my house recently and it’s a keeper. This is not my recipe, it is from The Kitchn, I have only lightly adapted it, but the original can be seen here.
Beans
Beans are seeds from the Fabaceae family, more commonly known as the legume, pea, or bean family. They are an affordable source of protein, fiber, iron, and vitamins that offer many health benefits almost too long to list.
Many beans grow in pods or capsules that develop from flowers. Other legumes include peas, peanuts, and lentils. These beans are available dry, canned, or frozen. All of these beans differ nutritionally from green beans or wax beans where a person eats the entire pod. Beans contain amino acids, which are the protein building blocks that the body uses to heal and to make new tissues, such as bone, muscle, hair, skin, and blood.
Types of Beans
There are numerous types of beans. It is estimated that there are well over 400 different types or varieties of dry beans grown throughout the world. Most beans are consumed in local diets and don’t find their way onto our Western grocery shelves. Dried beans require a bit more effort and need cooking to make them tender enough to eat but they are worth the effort. Canned and frozen beans are typically ready to eat after warming on the stove or in the microwave making them a great easy option. Some of the most popular bean varieties include:
- lima beans
- black beans
- black-eyed peas
- soybeans
- kidney beans
- garbanzo beans
- navy beans
- pinto beans
- red beans
Protein Power
Protein is a vital nutrient that plays a key role in maintaining and repairing the body. Beans are high in amino acids, the building blocks of protein. There are sources and nine of these are essential. There are also two types of protein sources: incomplete and complete.
Animal products, soy, and quinoa are all complete proteins, which means they contain all nine essential amino acids. However, of all the types of beans, only soybeans contain all nine amino acids. People can combine incomplete proteins with nuts, seeds, dairy products, or grains at a single meal or throughout the day to make complete proteins. Beans make an excellent source of protein for vegetarians and vegans, but truthfully everyone should be eating beans in some capacity. Beans are also lower in calories and saturated fat than some other protein sources, such as meat and full-fat or low-fat dairy products.
Health Benefits of Beans
- Folate: Beans contain several vital nutrients, including folate. Folate is essential for overall health, to make healthy red blood cells.
- Antioxidants: Beans are rich in polyphenols, which are a type of antioxidant. Antioxidants fight off free radicals, which are damaging chemicals that the body produces during metabolism and other processes. Antioxidants help the body remove free radicals. In this way, antioxidant-rich foods, such as beans, can help protect the body from disease.
- Heart Health: It is believed people who consume beans regularly may be less likely to die of a heart attack or other cardiovascular problems. Research suggests that one reason for the decrease in cardiovascular risk was that people had replaced higher-fat animal meat proteins with beans.
- Reduced Risk of Cancer: Some studies have shown that beans act as antioxidants and anti-inflammatory agents. These effects could reduce the risk of cancer. Research published in 2015 analyzed whether beans might have antioxidant properties that fight intestinal cancer. The results suggested that black beans had the highest antioxidant activity.
- Diabetes and Glucose Metabolism: Some believe beans may also help stabilize blood glucose levels or even prevent diabetes. Beans are high in fiber, which can help lower blood glucose. Consuming a high-fiber diet may help reduce the risk of type 2 diabetes.
Two out of three in my family love beans of any kind, one is still what I call a work in progress. I’ll keep chipping away at him with recipes like this tomato and bean salad, and I think eventually I’ll penetrate that teenage fortress.
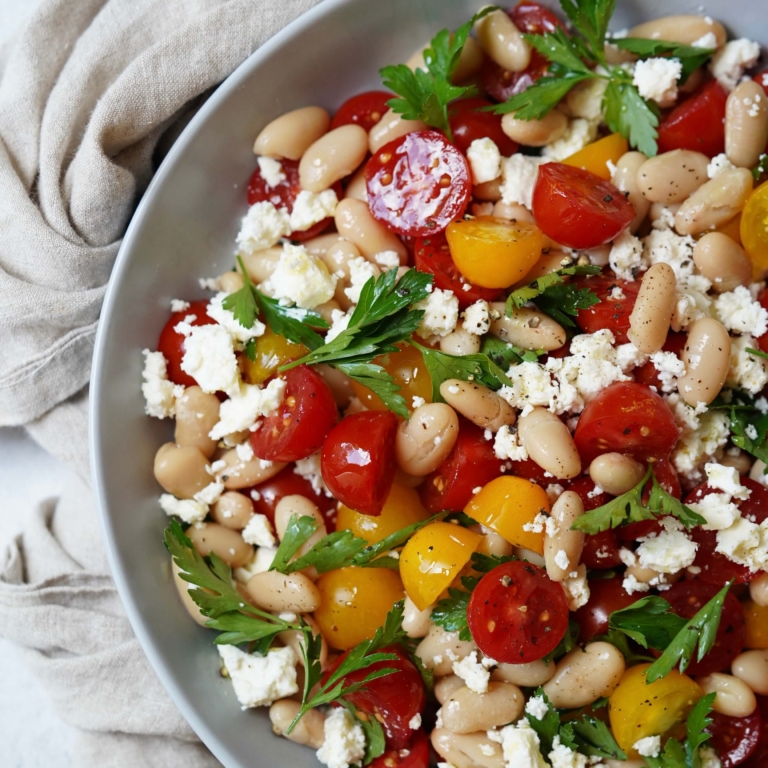
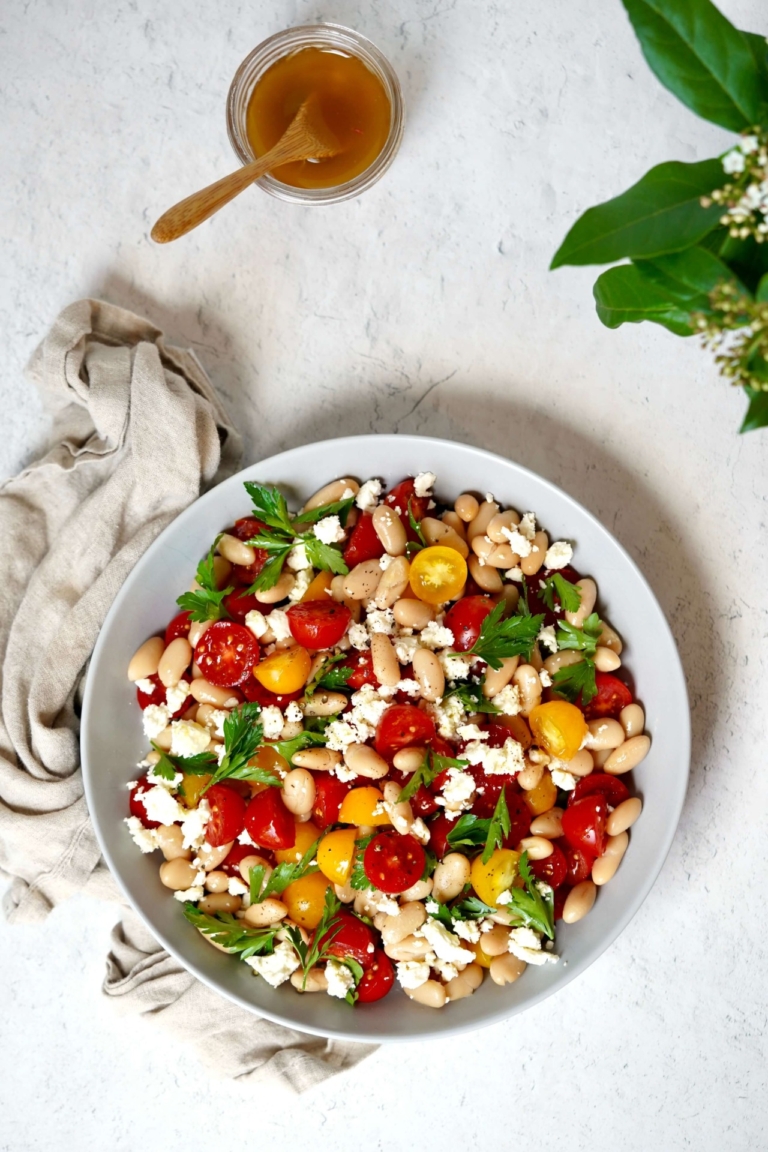
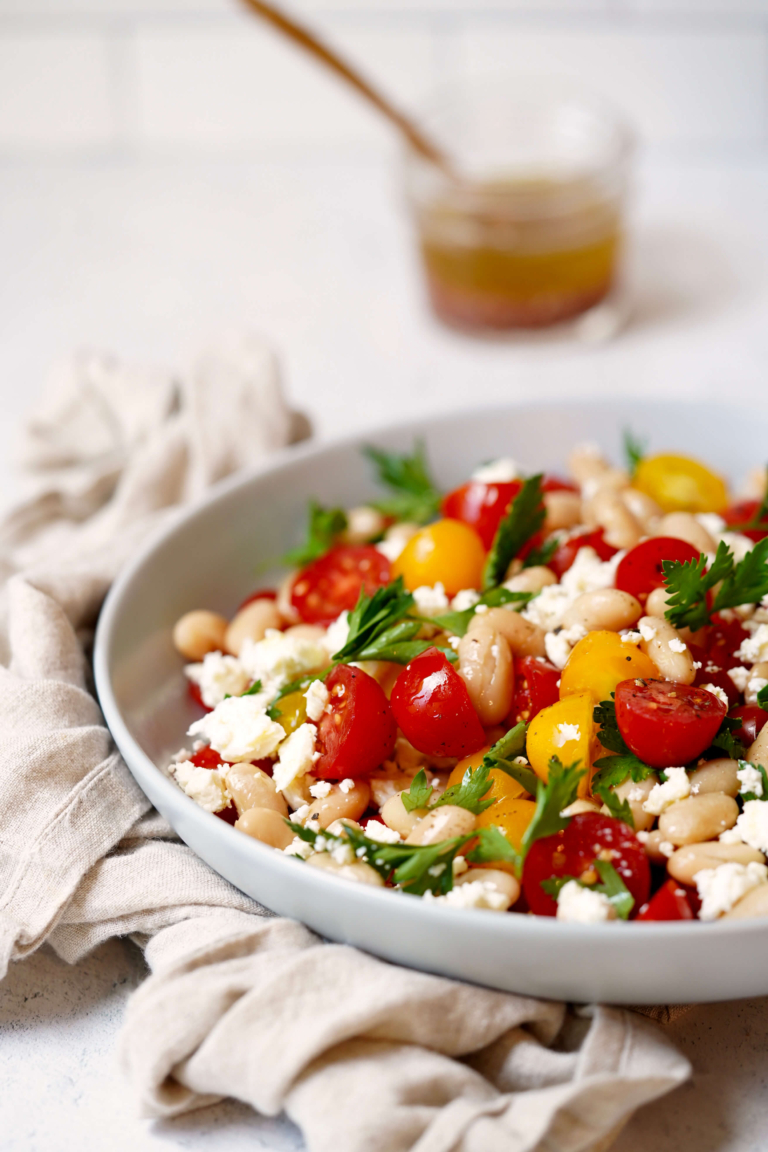
Tomato, Bean And Feta Salad
Ingredients:
For the Vinaigrette:
- 3 tablespoons Extra Virgin olive oil
- 1 1/2 tablespoons red wine vinegar
- 1 teaspoon shallot, minced
- Kosher salt, to taste
- Freshly ground black pepper, to taste
For the Salad:
- 1 (15-ounce) can white beans, drained and rinsed
- 2 cups red and/or yellow grape tomatoes, halved
- 3 ounces feta cheese, crumbled
- 1/2 cup fresh parsley leaves, whole or coarsely chopped
Directions:
- In a small bowl add the oil, vinegar, shallot, salt, and black pepper to taste, whisk well, and set aside.
- In a large serving bowl add the beans, tomatoes, feta, parsley, and toss to combine. Drizzle with the vinaigrette or serve on the side.
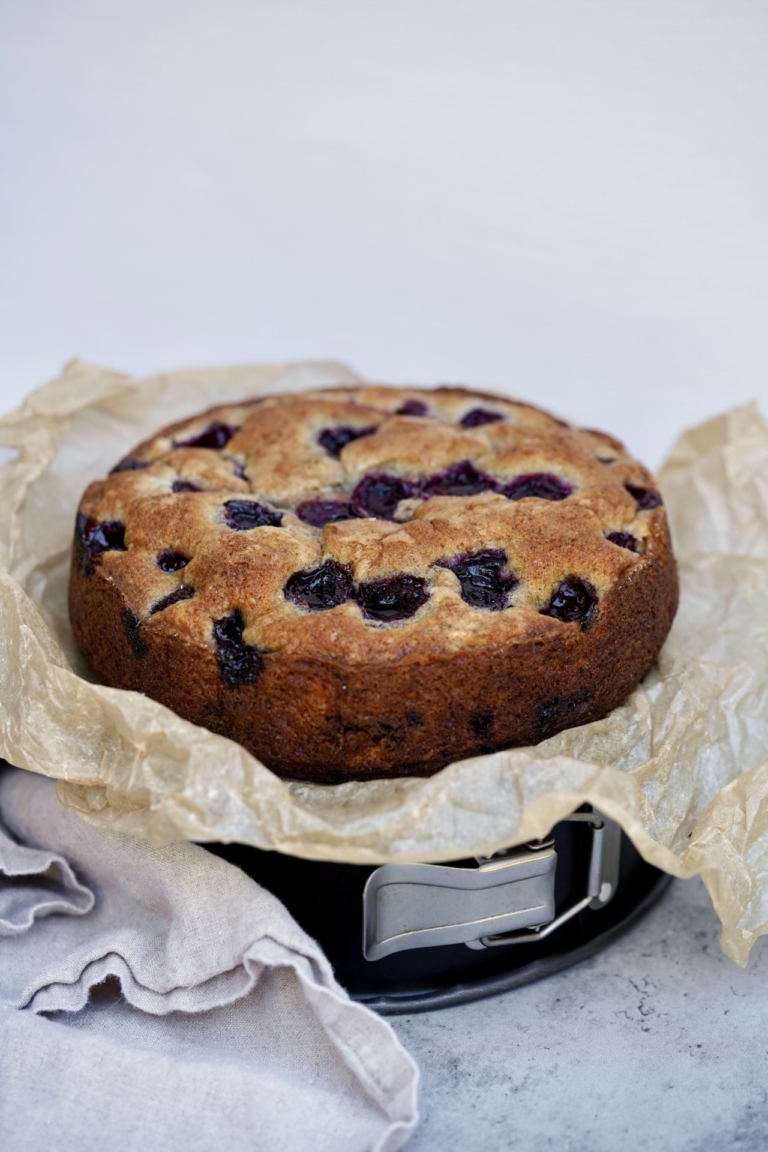
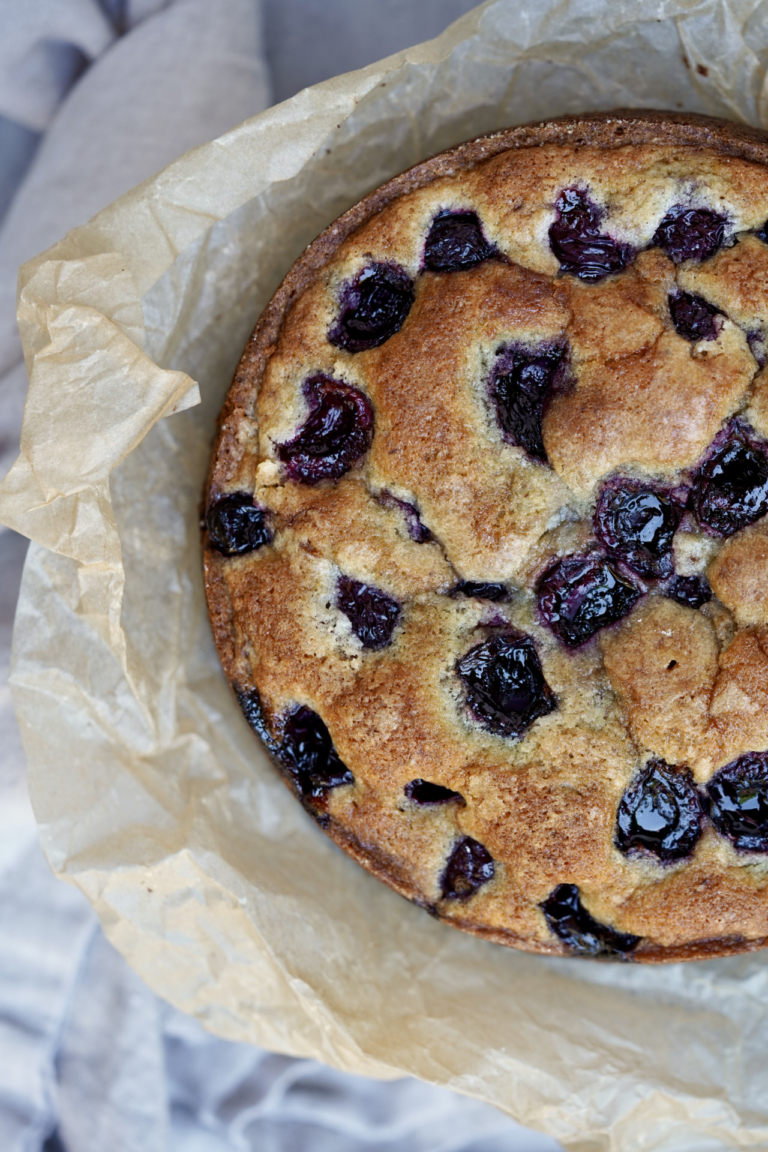
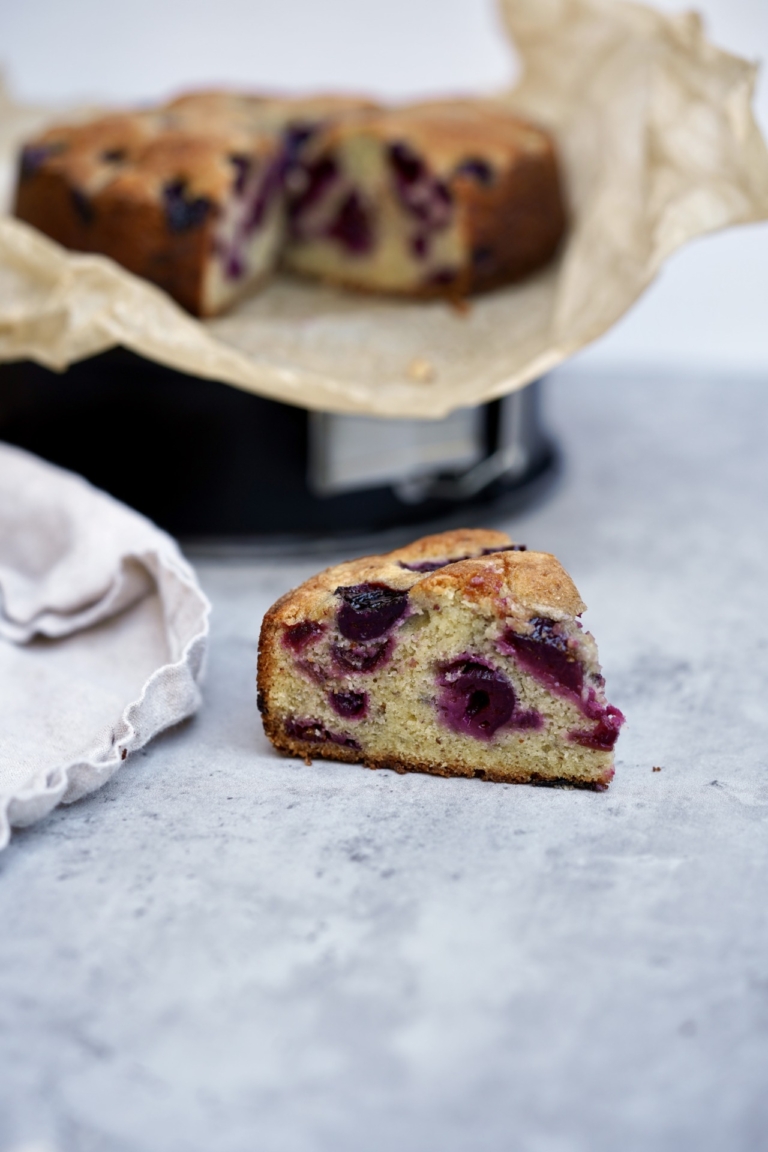
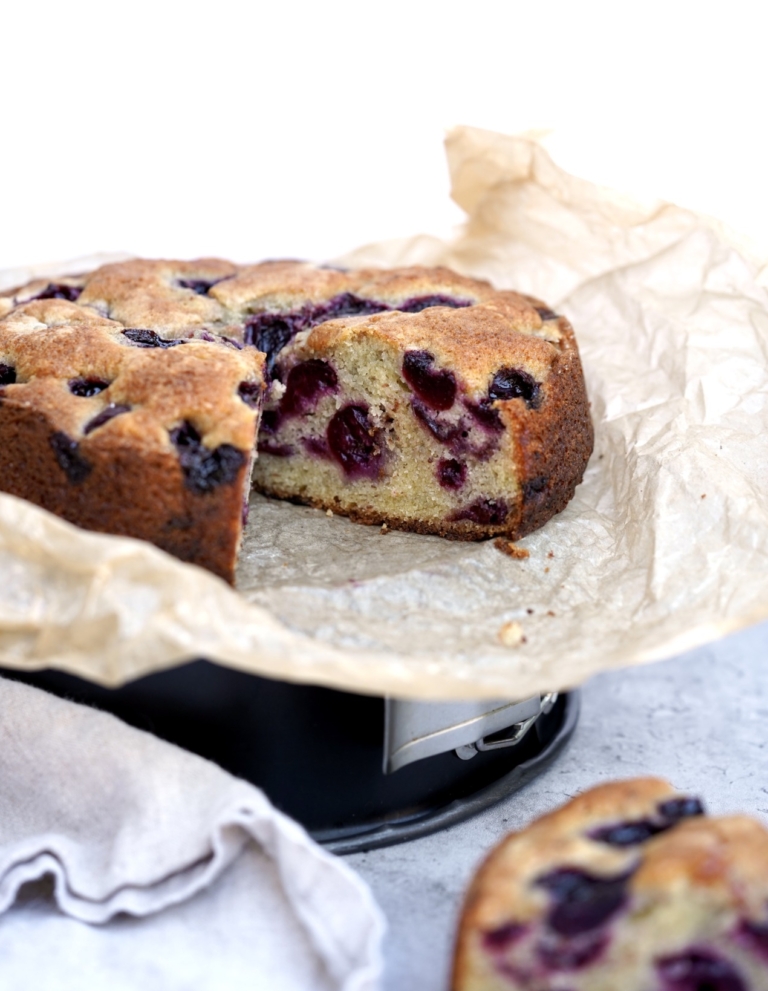
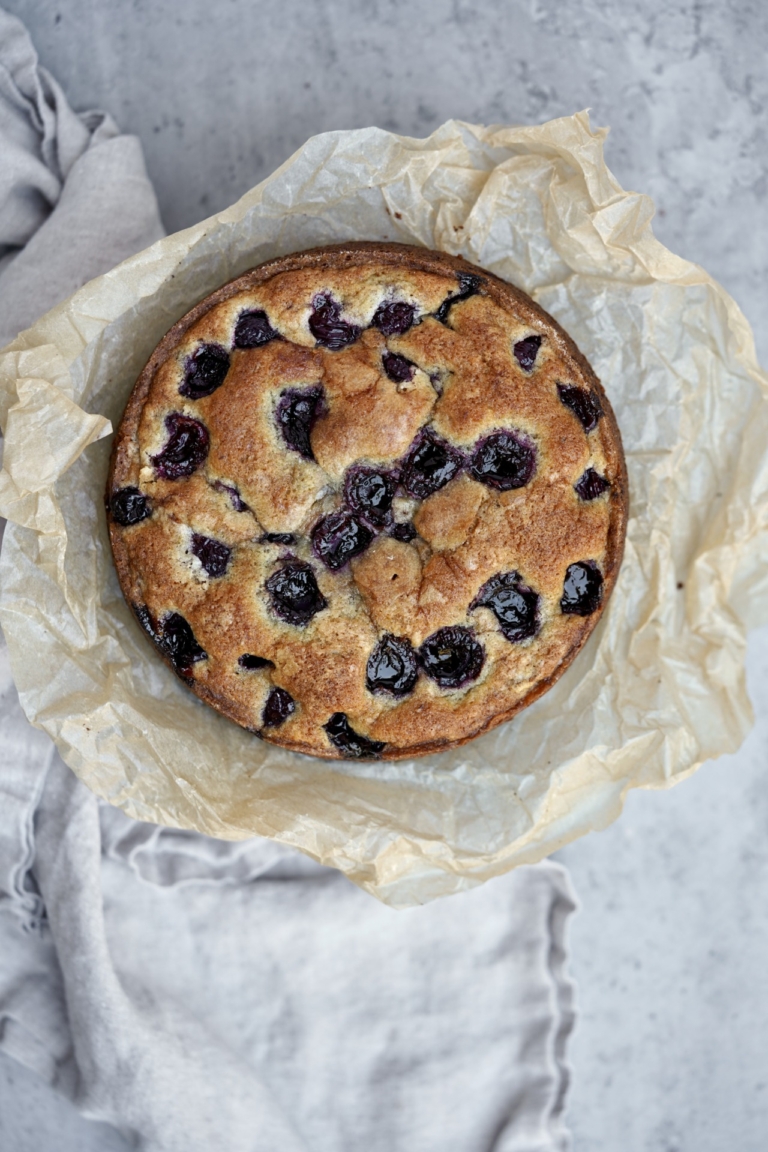
Inspired by my plum cake, this sweet cherry snacking cake is tender with a light crumb. And the best part, it’s also gluten-free. This simple cake features slightly sweet-slightly tart fresh summer cherries and makes the perfect sweet treat anytime. Enjoy for breakfast with a cup of coffee or on a warm summer evening with a generous scoop of vanilla ice cream. This lovely snacking cake can quickly become a showstopper and a great way to use up those delicious end-of-season cherries.
Northwest Cherry Season
The Northwest cherry season typically runs from June through August. Cherries are known to be one of the freshest produce items available. Most don’t know this fun fact, but once ripe on the tree, cherries are typically harvested, packed, and on the retail shelf within 2 days. Growing regions scattered throughout Washington, Oregon, Idaho, Utah, and Montana offer slight differences in microclimate which allow cherries throughout the region to ripen at different times through the season.
Buying Cherries
Tasting a cherry first before buying it used to be the gold standard. This is not conducive to post-pandemic life. Taste nothing, just use your eyes. Sweetness can vary from farm to farm, tree to tree, and from week to week. My advice is to look for shiny, plump cherries with fresh green stems and dark coloring for their variety.
Storing Cherries
Keep cherries, unwashed and stems attached, in a paper bag, loosely-covered container, or loosely closed plastic bag in the refrigerator until you’re ready to use them. Or you can pit and freeze them for usage in baked goods later.
Cherry Nutrition
I bet you didn’t know cherries are good for you. Sour cherries are loaded with vitamin A, vitamin C, fiber, manganese, and copper. Sweet cherries contain vitamin C, anthocyanin antioxidants, and melatonin. Cherries are also a good source of fiber, which helps keep your digestive system healthy by fueling beneficial gut bacteria.
Gluten-Free Flour
Not all gluten-free baked goods have great taste and texture. Your flour choice when making gluten-free recipes can make all the difference in the world. Gluten-free flour can be made from various grains, starches, and nuts. It’s free of wheat, which is what gives standard flour its gluten, and gluten is what provides structure, chewiness, and texture to baked goods.
When liquid is added to wheat flour, the proteins in the wheat come alive, adhere to one another, and make gluten. Gluten-free baked goods tend to be crumblier than their wheat-based predecessors, so many gluten-free flours contain xanthan gum, a binder that helps batters and doughs stay together. Xanthan gum also helps mimic gluten’s signature chew. In this recipe, I simply use a combination of Bob’s Red Mill 1-to-1 baking flour and almond flour which works perfectly together and gives this cherry snacking cake the ideal texture and crumb if you ask me.

Gluten-Free Cherry Snacking Cake
Ingredients:
- 2 cups sweet cherries, divided
- 1/2 cup unsalted butter
- 3/4 cup, plus 1 tablespoon sugar, divided
- 1 teaspoon vanilla extract
- 1/8 teaspoon almond extract
- 2 eggs
- 3/4 cup gluten-free all-purpose flour
- 1/4 cup almond flour
- 1 teaspoon baking powder
- 1/8 teaspoon Kosher salt
Directions:
- Preheat the oven to 350 degrees F. Lightly grease a 7-inch spring form or cake pan. Line the bottom with parchment. Lightly grease the parchment paper and place it on a baking sheet, set aside.
- Using your fingers, a paring knife, or a cherry pitter, pit the cherries. Cut about 1/3 cup of cherries in half and set aside, they will be used for the top. Roughly chop the remaining cherries that will be folded into the batter.
- In a small mixing bowl add the all-purpose flour, almond flour baking powder and salt and mix well to blend.
- In the bowl of a stand mixer, such as a KitchenAid, add the butter and 3/4 cup sugar and beat on medium until light and fluffy, scraping down the sides as needed, for about 3-4 minutes.
- With the mixer on low, add the extracts and the eggs, all at one time, and mix until blended. The mixture will look a little broken, but that's normal. With the mixer running, slowly add the flour mixture and blend until just combined. Using a large rubber tip spatula, fold the chopped cherries into the batter.
- Spoon the batter into the prepared pan and use the spatula to evenly smooth out the top. Next, arrange the halved cherries on top of the cake. Sprinkle the top of the cake with the remaining 1 tablespoon of sugar.
- Place the cake in the oven and bake the cake for 30-35 minutes or until a cake tester inserted in the center comes out clean, and the top is golden and springs back.
- Allow the cake to cool completely before removing it from the pan. Serve with vanilla ice cream or a dollop of fresh whipped cream.
Have you heard of mezcal? Mezcal was predicted to be one of the biggest food trends of 2018, yet despite its popularity, many still have not tried it. Mezcal, which means “oven-cooked agave“, is known for its distinct smoky flavor, which is unlike any other spirit, but mezcal is much more than just that. Often described as incredibly complex with a full spectrum of flavors, mezcal is a true testament to the involved process required to make it. Surprisingly, this unique spirit is more similar to wine in its flavor spectrum than other spirits.
What is Mezcal?
Mezcal, like its cousin tequila, is made from agave and hails from Mexico, but that’s where their similarities end. What most don’t know is that tequila is classified as a mezcal. By definition, mezcal is any blue agave-based liquor that is made in specific regions of Mexico. This flavorful spirit can be made from over 30 varieties of agave, the most common varieties of agave used in making mezcal are tobalá, tobaziche, tepeztate, arroqueño , and espadín. Espadín is the most common agave varietal of mezcal and accounts for about 90% of mezcal on the market.
Tequila and mezcal are both made from the harvested core of the agave plant, called the “piña.” But unlike tequila, which is typically produced by steaming the agave inside industrial ovens before being distilled in copper pots, mezcal, is cooked inside fire pits lined with lava rocks and filled with wood and charcoal before being distilled in clay pots. This artisanal production of mezcal is what makes the distinct smokiness of this popular spirit.
Labeling
For labeling, tequila is classified in three varieties: “blanco” (silver or plato, aged 0-2 months), “reposado” (aged 2-12 months) and “anejo” (aged 1-3 years). Mezcal categorizes itself only slightly differently; “joven” (blanco or abacado aged 0-2 months), “reposado” (aged 2-12 months) and “anejo” (at least one year).
This mezcal margarita is rich and flavorful but light and refreshing at the same time. But I’ll warn you, it is not your typical margarita by any means. The deep smokiness of mezcal is what truly shines in this cocktail and one must anticipate it to fully enjoy it. Fresh citrus juice mellows that smoky intensity making this drink smooth yet memorable when sipping. My husband, an avid tequila lover, was extremely hesitant about the whole mezcal craze. For him, the unique smoky flavor was questionable and he shied away from it for years. But this simple recipe of mine is what swayed him. This is the perfect cocktail for warm or cool evenings and may be just what you need as we slowly begin to close out summer.
Already a mezcal fan, below are some higher-end suggestions of the good stuff.
- Wahaka Mezcal Joven Espadín
- Del Maguey Tobalá
- Pierde Almas Tobaziche Mezcal Joven
- Mezcalero Release No. 5, a blend of espadín and tepeztate (can be a bit hard to find)
- Los Siete Misterios Arroqueño
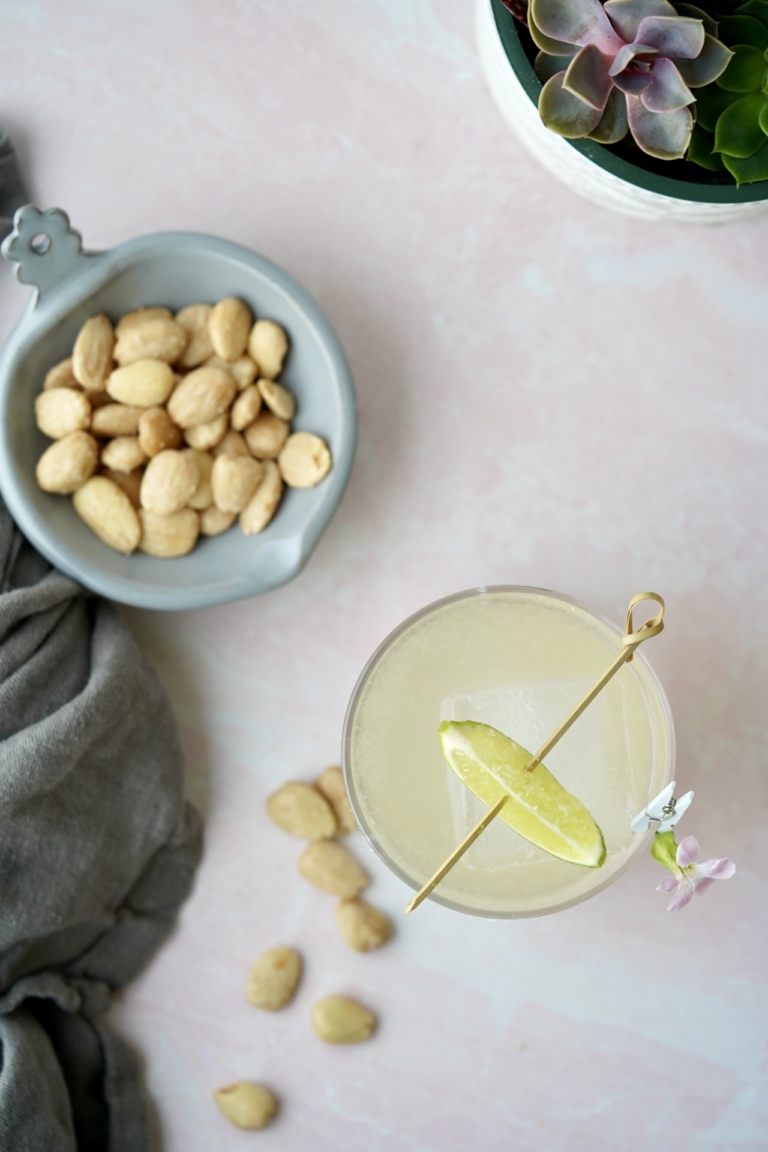
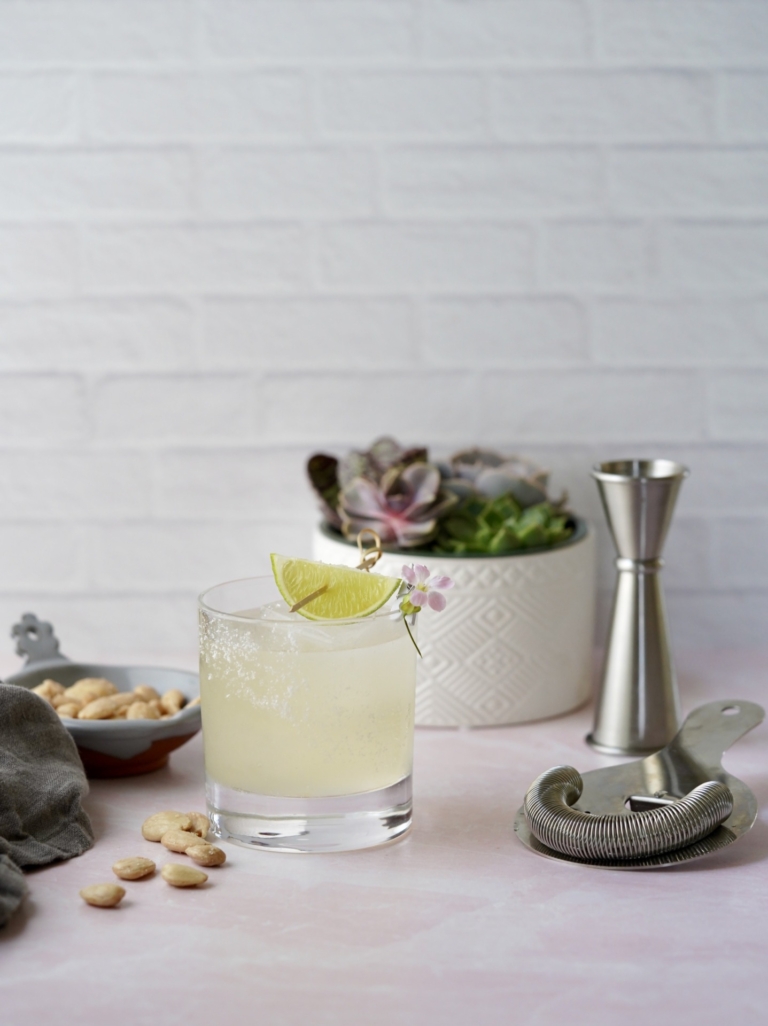
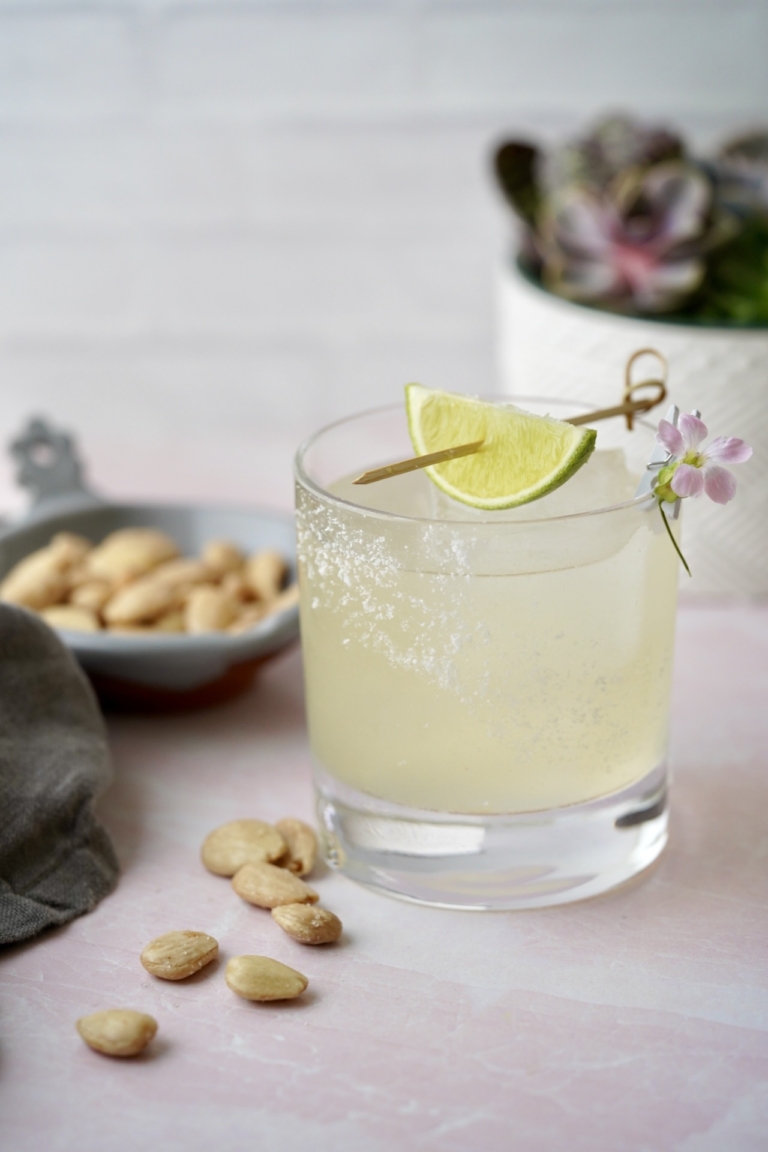
Mezcal Margarita
Ingredients:
- 2 ounces mezcal
- 2 ounces Triple Sec
- 1 ounce freshly squeezed lime juice
- 1 ounce freshly squeezed lemon juice
- 1 teaspoon agave
- coarse salt, for garnish
- lime wedge, for garnish
Directions:
- Place a good amount of coarse salt on a small plate.
- Use the lime wedge to wet the rim of a low-ball class. Gently dip the glass in the salt to coat.
- Fill the glass halfway with crushed ice. Set aside.
- Using a cocktail shaker add the mezcal, Triple Sec, lime juice, lemon juice and agave. Shake vigorously for 30 seconds.
- Pour into the prepared glass and garnish with a lime wedge.
In India, “chaat” is a word describing a category of food that hits almost every component that makes something crave-able—sweet, sour, tangy, spicy, and crunchy. Chaat is commonly a snack but is satisfying enough to take the place of lunch or dinner. This well-known street food can be served hot or cold and is typically sold roadside or from food carts. Chaat is incredibly popular not only in India, but in South Asia, Pakistan, Nepal, and Bangladesh. This is my modern, slightly Americanized, spicy corn chaat with a flavorful tomato chutney and it is completely addictive.

Chaat Defined
How chaat got its name is somewhat unclear. Some say the word “chaat” originated from its literal meaning “to lick“. It was so delicious that people licked their fingers (and the bowl) made of peepal leaves, called “donas”, in which it is often served. Others think it originated from the term “chatpati” (meaning tangy). However, both of these are merely speculation.

Essential Chaat Elements
Some say there are over 500 different kinds of chaat, each with proper methods for how to actually eat them. But at its core, one thing with all chaat dishes remains the same: each chaat is a combination of a five essential elements, all of which contribute to creating an addictive blending of flavors and textures:
- Base: This is usually a carb
- Sauces: Commonly, cilantro-mint chutney and tamarind chutney
- Crunch: Often spicy fried potato or chickpeas
- Vegetables: Frequently, onions and tomatoes
- Umami: Almost all chaat includes a chaat masala
Summer is corn season and although this is not a traditional chaat, it’s a flavorful fusion of Indian and Mexican elements I think you’ll adore. This easy-to-make spicy corn chaat makes a fantastic accompaniment to almost any warm-weather meal you can think up.
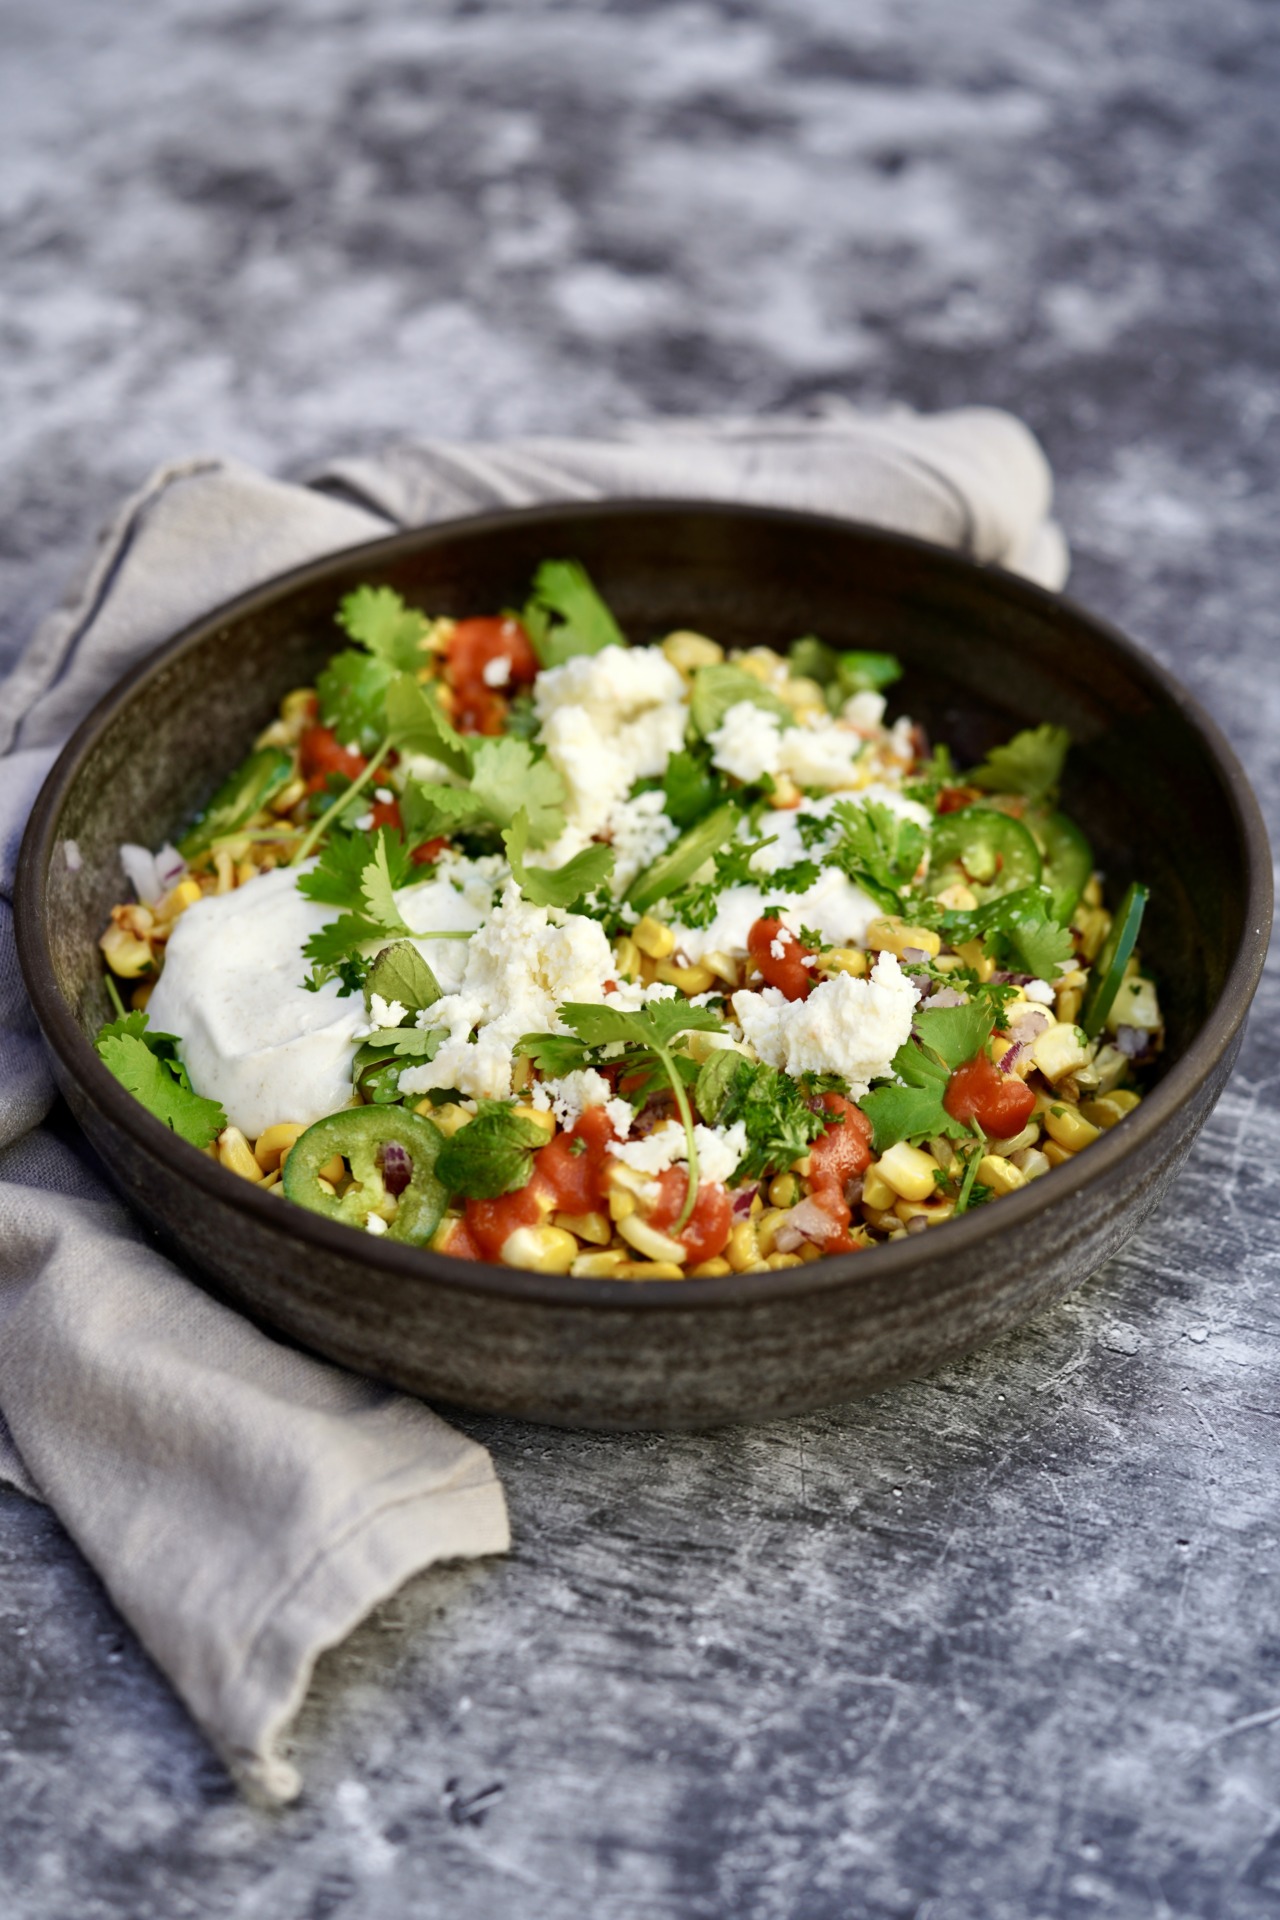
Spicy Corn Chaat With Tomato Chutney
Ingredients:
For the Chutney:
- 1 tablespoon Extra Virgin olive oil
- 1 teaspoon fresh ginger, peeled and minced
- 1 dried red chile (such as chiles de árbol)
- 1/4 teaspoon black peppercorns, cracked
- 2 whole cloves
- 6 plum tomatoes, cored and chopped
- 1 teaspoon brown sugar
- 1/2 teaspoon salt
For the Chaat:
- 1/2 cup sour cream
- 1/4 teaspoon ground cumin
- 2 tablespoons plus 2 teaspoons fresh lemon juice, divided
- 1 teaspoon kosher salt, divided
- 6 ears fresh sweet corn, shucked
- 2 tablespoons Extra Virgin olive oil
- 1/4 cup fresh cilantro, chopped
- 1/4 cup chopped fresh mint
- 1/2 cup red onion, minced
- 1 jalapeño, thinly sliced
- 1/4 cup Cotija cheese, crumbled
Directions:
- For the chutney: In a medium saucepan, add the oil and place over medium-high. When hot, but not smoking, add the ginger, chile, peppercorns, and cloves. Cook, stirring frequently, until the ginger is soft and the spices are fragrant about 1 minute. Add the tomatoes, sugar, and salt and bring to a boil, stirring and breaking up tomatoes with a wooden spoon. Cook, stirring often, until the tomatoes have broken down and the sauce has thickened, about 15-20 minutes.
- Allow the chutney to cool slightly. Next, pour the mixture into a food processor, such as a Cuisinart, fitted with a blade attachment. Process on high until smooth, about 1 minute. Next, strain the mixture through a strainer into a bowl. Cover with plastic wrap and refrigerate until needed.
- For the Corn Chaat: In a medium mixing bowl, whisk together the yogurt, cumin, 2 tablespoons lemon juice, and 1/2 teaspoon salt. Mix until smooth and set aside.
- Place a large cast-iron skillet over high heat until smoking. Add the corn, in one layer, and cook, without moving, until kernels are slightly charred, about 4 minutes. Stir in the olive oil, remaining 2 teaspoons lemon juice, and remaining 1/2 teaspoon salt and mix well to blend. Add the cilantro, mint, and red onion, and toss to combine.
- To serve, Place corn mixture in a serving bowl, and top with chutney and yogurt mixture. Sprinkle the sliced jalapeño and Cotija on top.
You know what they say about ice cream; “I Scream, You Scream, We All Scream for Ice Cream“. This tagline phase is cross-generational, eliciting childhood memories of hot summer days and that sought-after cone or a scoop of ice cream that helped keep the heat at bay. That memorable line is actually from a popular novelty song, first published in 1927, with words and music by Howard Johnson, Billy Moll, and Robert A. King. The phrase quickly became a pop culture saying still referenced today because, despite all the health food hype, ice cream still reigns supreme.
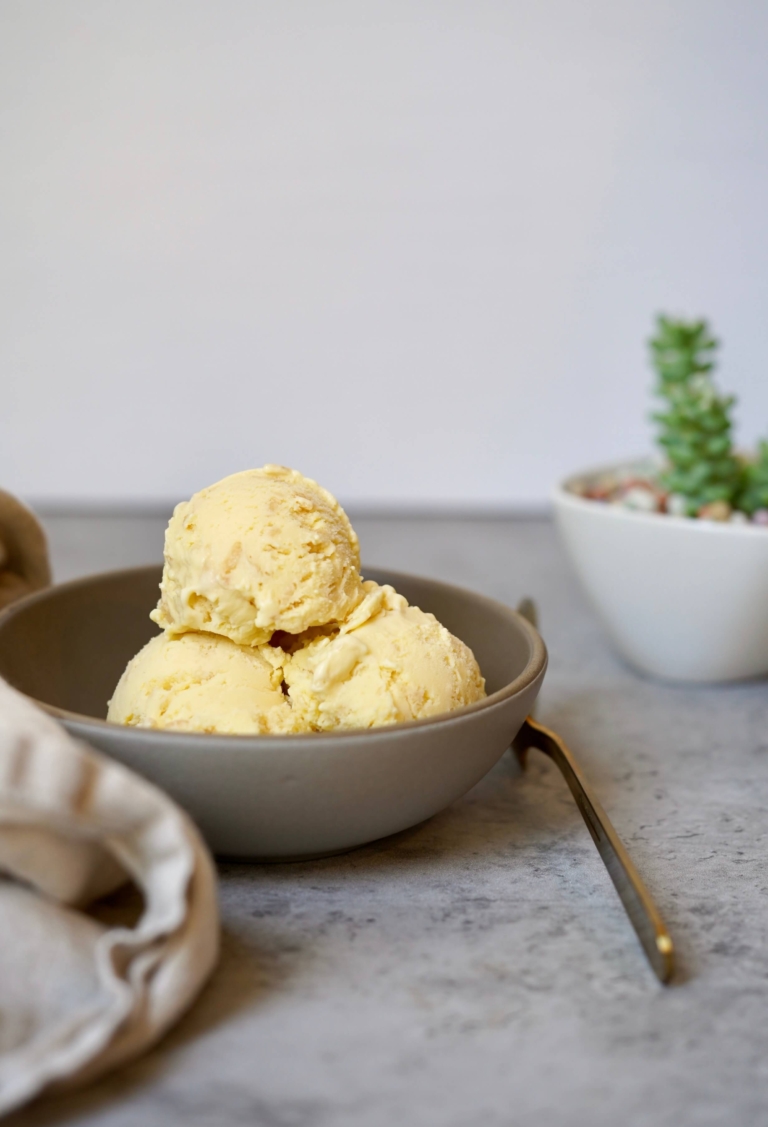
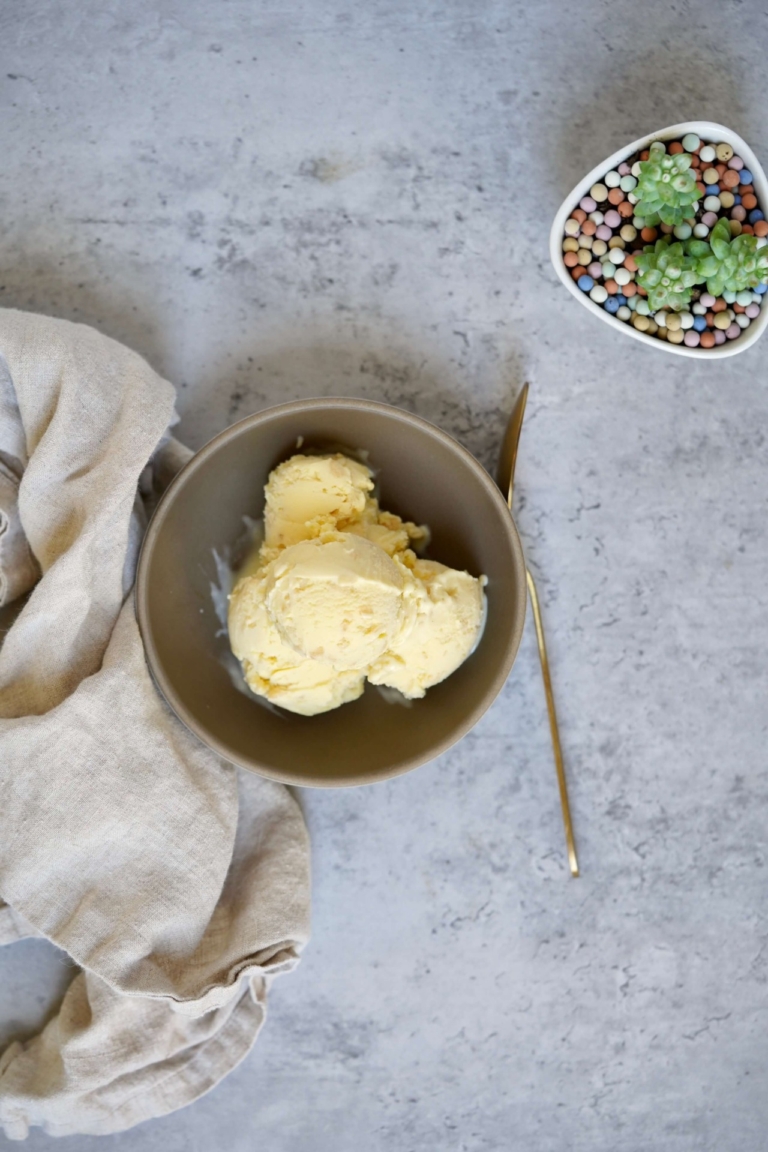
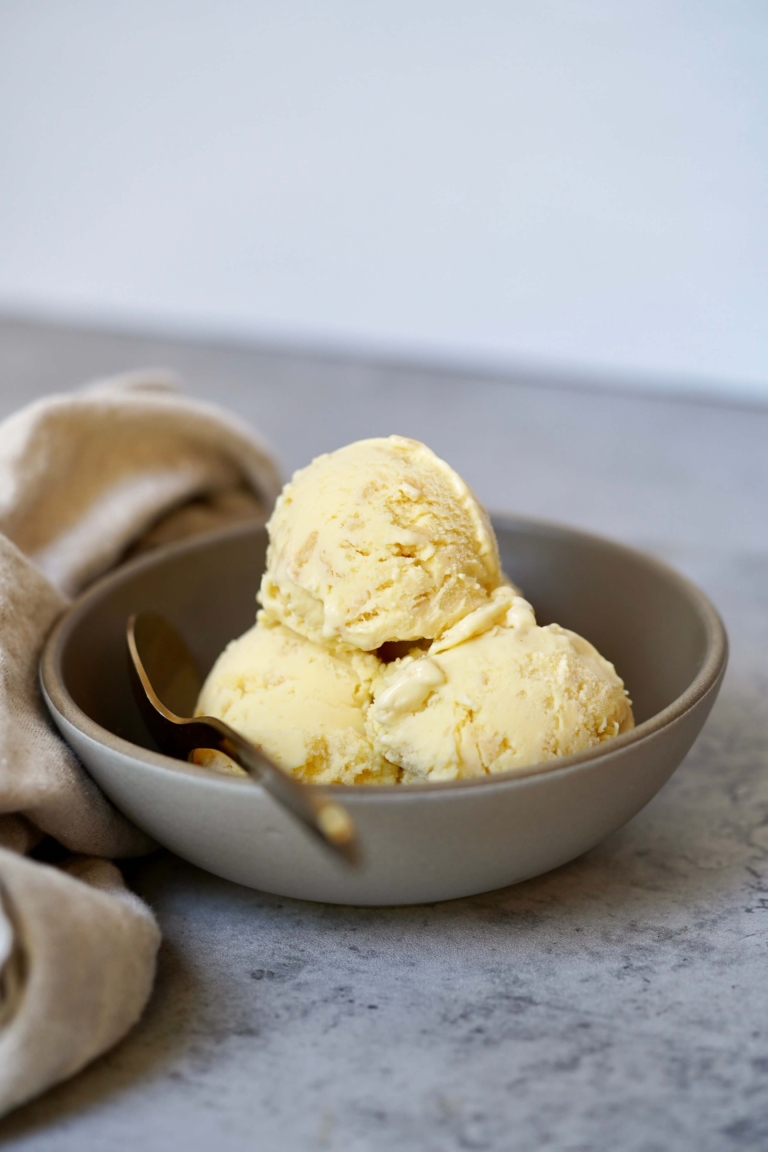
This vanilla rice krispy ice cream is a copycat recipe based on Salt & Straw‘s flavor that rocked my world recently. Truth be told, my older son, typically a chocolate ice cream guy, swooned over this creamy, cereal-studded vanilla that surprises you with great flavor and texture, despite its simplicity.
Salt & Straw
Salt & Straw is an artisanal ice cream shop that popped up in Palo Alto a few years ago. Even today it maintains long lines at all hours, for those in search of that memorable scoop, with unusual flavor pairings. The story behind this ice cream is a great one.
Owner/founder Kim Malek had a dream about creating a community gathering place. A place where you could run into neighbors, spend time with family, or treat yourself. Her answer to that was an ice cream shop. Tyler, her cousin, wanted to help. Tyler bought used ice cream makers and got to work. He began testing and developing ice cream recipes in his own personal “Wonka-verse” in Kim’s basement. Meanwhile, Kim bought a push cart. They then turned to their community, asking friends—chefs, chocolatiers, brewers, and farmers—for advice. The two found inspiration everywhere they looked. And that’s how Salt & Straw came to be. Their tagline is simple and sweet; “if you ever stop believing in magic, eat some ice cream“. Now that’s now that’s a keeper if you ask me.
Cereal in Ice Cream
Despite not being a cereal person, I seem to be drawn to cereal in ice cream. Not that long ago I developed another copycat cereal ice cream recipe based on Humphry Slocombe‘s boozy Secret Breakfast ice cream. That one was made with bourbon and caramelized corn flake “cookies“. That recipe won a contest award for its flavor profile and similarity. Adult cereal and milk ice cream is clever, unique, and playful which inspired me to copy it. This vanilla rice krispy ice cream recipe, for similar reasons, was just as appealing.
Rice Krispy Magic
Unlike the cornflake cookies I make for the bourbon ice cream, in this recipe the cereal is not sweetened or baked which is how the magic happens. The cereal, after resting, takes on a slightly chewy texture similar to that of a marshmallow rice krispy treat. For me, this was the hook, and I fell in love quickly with that unique mix-in texture. This playful ice cream has been a favorite this summer and a great way to help beat the heat.
Vanilla Rice Krispy Ice Cream
Ingredients:
- 6 large egg yolks
- 1/2 cup sugar
- 2 cups heavy cream
- 1 cup half and half
- 1 tablespoon vanilla extract
- 1 cup rice Krispy cereal
Directions:
- In advance, freeze the ice cream maker bowl, ideally overnight.
- For the ice cream: In a large mixing bowl add the egg yolks and sugar, and whisk until pale yellow. Set aside.
- In a medium saucepan add the heavy cream, half and half, and vanilla, and bring to a simmer over medium heat. Once hot, remove from the heat and slowly whisk in the warm milk mixture into the egg mixture. Do not pour the warm liquid in too quickly or you will "cook" the eggs. Pour the mixture back into the pot and place over medium heat. Cook, while continually stirring, until thickened. The mixture should reach 170 degrees F.
- Remove from heat, strain through a fine strainer, and into a medium mixing bowl. Cover the surface with plastic wrap and cool slightly on the counter. Wrap well and refrigerator until well chilled, about 2 hours, or overnight.
- Once the base is cold, pour it into the ice cream maker. Churn, per the machine instructions, until it's the thickness of soft serve ice cream, about 20-25 minutes. Turn the machine off. Fold in the Rice Krispies.
- Transfer the ice cream to a container, cover it with parchment paper, and freeze for at least 4 hours or longer for a firmer texture.
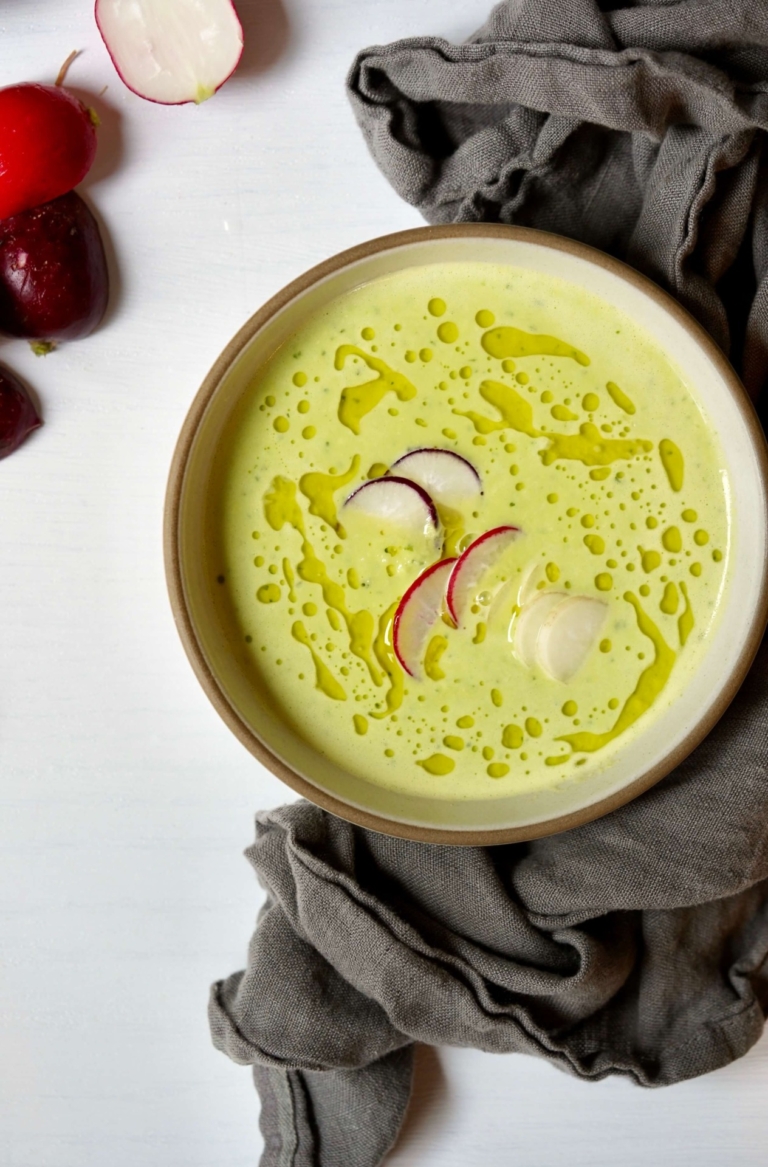
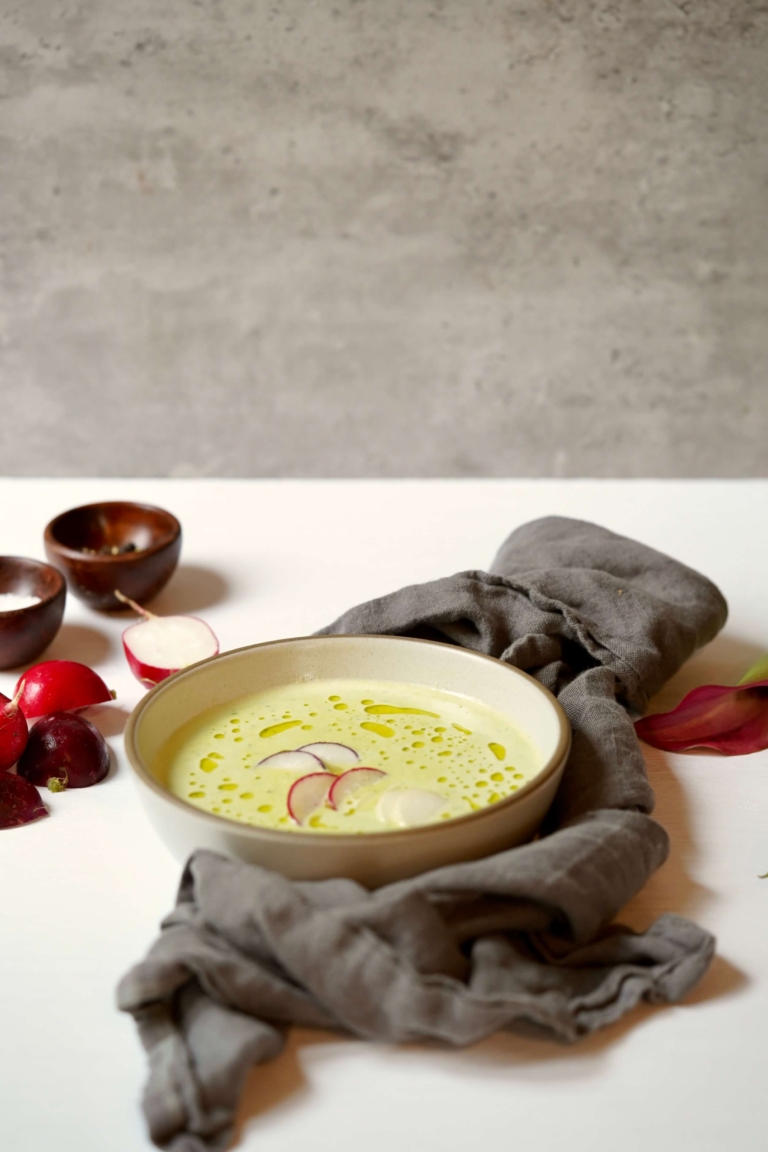
Many people love soups but find them difficult and often time-consuming to make. But I’ve got you covered– blender soups are the answer. Here is an incredibly easy and flavorful chilled corn and basil soup and it is perfect for summer.
No-cook, chilled blender soups are so effortless to make, it almost feels like cheating. This seasonal soup highlights sweet summer corn and farm-fresh basil and if you have these two basic ingredients, your soup will not fail. While I wouldn’t consider the extra step of straining this soup to be essential, I prefer a partial strain so some texture and character remain in the body.
Blender Soups
Blender soups are so great because, often, you just need a few simple ingredients and a good blender. It’s fresh, seasonal ingredients like corn, broccoli, or asparagus that become the show-stopper. Beyond that, perhaps an onion, some broth or water, a few herbs or spices, and boom – you’ve got what you need to make a beautiful, silky, blended soup. Time-consuming soup-making skills are not required, no clarifying, skimming, or sautéing needed.
This corn and basil soup is not my recipe, it’s from the New York Times. I have adapted the recipe slightly, but the original can be seen here. This lovely chilled soup comes together in under fifteen minutes making it a true favorite on a warm summer day or night.
Blending
If you don’t have a traditional blender, a hand blender/immersion blender works just as well. A hand blender is particularly helpful if you’re one of those people who avoids dealing with a blender because of the clean-up. A high-speed blender can give an extra smooth, beautiful texture, but a hand blender can work with soups like these just the same.
Basil
Basil is a flavorful, leafy green herb that originated in Asia and Africa that I feel is meant for more than just pesto sauce. A member of the mint family, basil has many different varieties. Popular as a food seasoning, this aromatic herb is also used in teas and supplements believed to provide a range of health benefits.
The scientific name of the basil commonly purchased for cooking is Ocimum basilicum. There are many different basil varieties, but here are the ones you hear about the most:
- Sweet Basil: The most widely grown, popular basil, renowned for its use in Italian dishes. Commonly sold dried in supermarkets. Has a licorice-clove flavor.
- Bush or Greek Basil: Has a strong aroma with a mild flavor that can be a sub for sweet basil. Forms a compact bush with small leaves and grows well in a pot.
- Thai Basil: Has an anise-licorice flavor and is commonly used in Thai and Southeast Asian dishes.
- Cinnamon Basil: Native to Mexico. Has a cinnamon-like flavor and scent. Commonly served with legumes or spicy, stir-fried vegetables.
- Lettuce Basil: Features large, wrinkled, soft leaves with a licorice-like flavor. Works well in salads or tossed with tomatoes and olive oil.
Corn and basil are a wonderful pairing that complements and enhances each other in all the best ways. The tanginess of the buttermilk is a light and refreshing base that adds creaminess in addition to flavor. One sip encapsulates the essence of summer. I typically serve this soup chilled, but note, that it can also be served warm without losing flavor, it just requires a bit more effort.
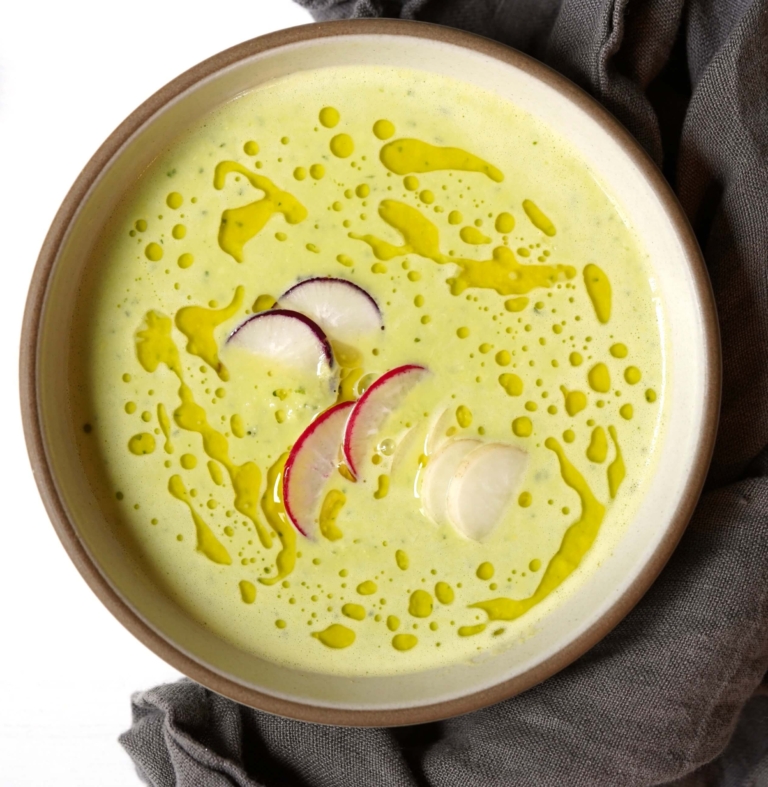
Chilled Corn And Basil Soup
Ingredients:
- 6 ears fresh corn, shucked
- 3 cups buttermilk
- 1 cup basil leaves
- 6 scallions, roughly chopped
- 1 1/2 tablespoons fresh lime juice, more to taste
- 6 garlic cloves, roughly chopped
- 1 1/2 teaspoons kosher salt
- 2/3 cup ice
- Radish slices, for garnish
- Extra-virgin olive oil, for garnish
Directions:
- Slice kernels off corn cobs. Discard the cobs and place the kernels in a blender. Add the buttermilk, basil, scallions, lime juice, garlic, salt, and ice cubes to the blender and purée until very smooth.
- Strain about 2/3 of the mixture through a sieve, pressing down hard on the solids. Discard the solids. Mix the strained soup with the reserved unstrained soup and blend well. To serve, garnish the soup with sliced radishes and a drizzle of olive oil.
This beauty is a rosé wine slushy, a social media darling known more playfully as a “Frosé“. This fun, prep-ahead wine cocktail is made by blending and freezing fresh fruit, rosé wine, and sweetener and is an absolute winner. These refreshing grown-up slushies come together in minutes and are perfect for warm summer days. There are lots of frosé recipes out there, but truthfully, most tend to be way too sweet. This recipe has just a touch of sweetness and is a blend between a fun frozen cocktail and a glass of wine, without the calorie bomb.
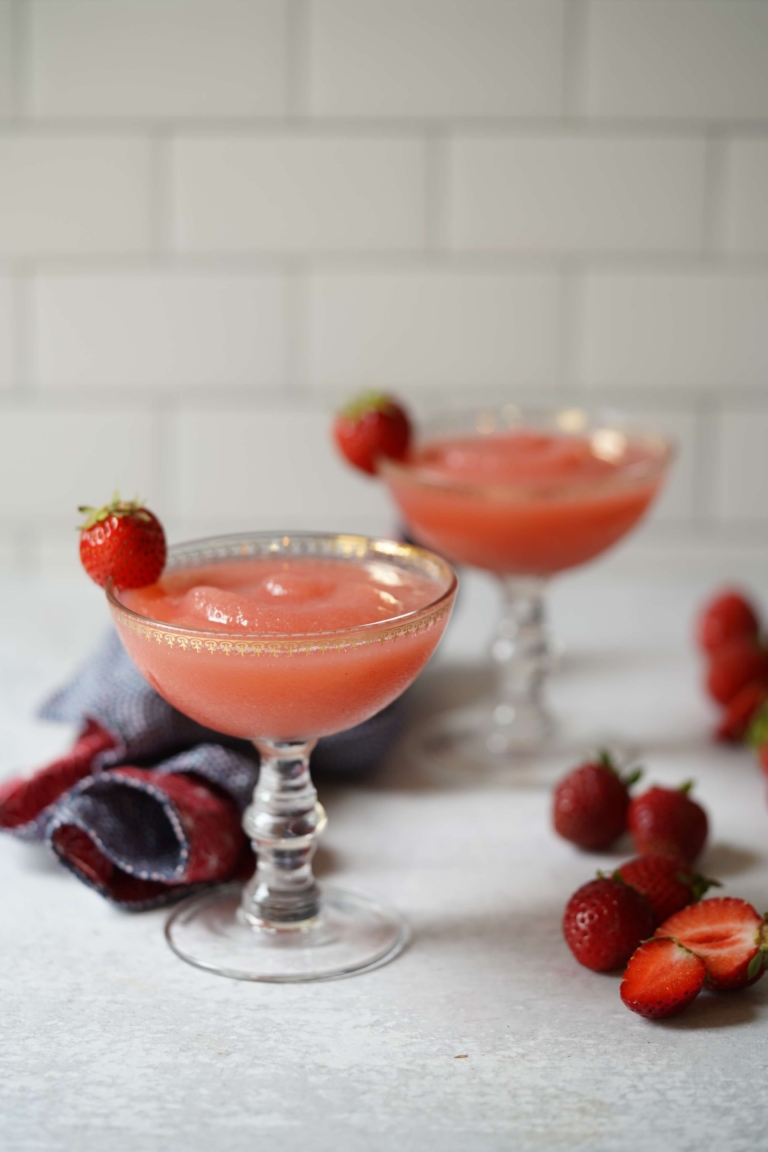
Wine Selection
This recipe calls for a dry rosé wine, but it can easily be made with a sauvignon blanc, pinot grigio, and a Moscato. Since it’s a summer cooler, I suggest going with something light and fruity.

Fruit Options
Ripe, juicy strawberries are my go-to for making wine slushies, but this recipe is completely adaptable. Like making a lovely bowl of overnight oats, the add-ins are limitless so go ahead and get creative by adding other fruit or by blending fruits for an unexpected flavor punch. Watermelon, sweet cherries, raspberries, peaches, mangoes, and blackberries are all wonderful fruit options. The amount of agave can easily be adjusted to taste so if you switch out the fruit, or perhaps prefer a sweeter profile, simply add more as desired.
Topping-Off
I like to top my wine slushy with a splash of wine because this is a wine drink, not a frozen cocktail. But this too can be omitted or altered, based on your preferences. Alternative options include adding sparkling wine or even sparkling juice. The addition of a little carbonation is lovely as well.
This rosé wine slushy is refreshing, has minimal ingredients, and is incredibly easy to make. This is the drink of the summer if you ask me. The bonus with wine slushies, you can make and keep them frozen for a few days before serving. This makes them a great option for friends who drop in unexpectedly.
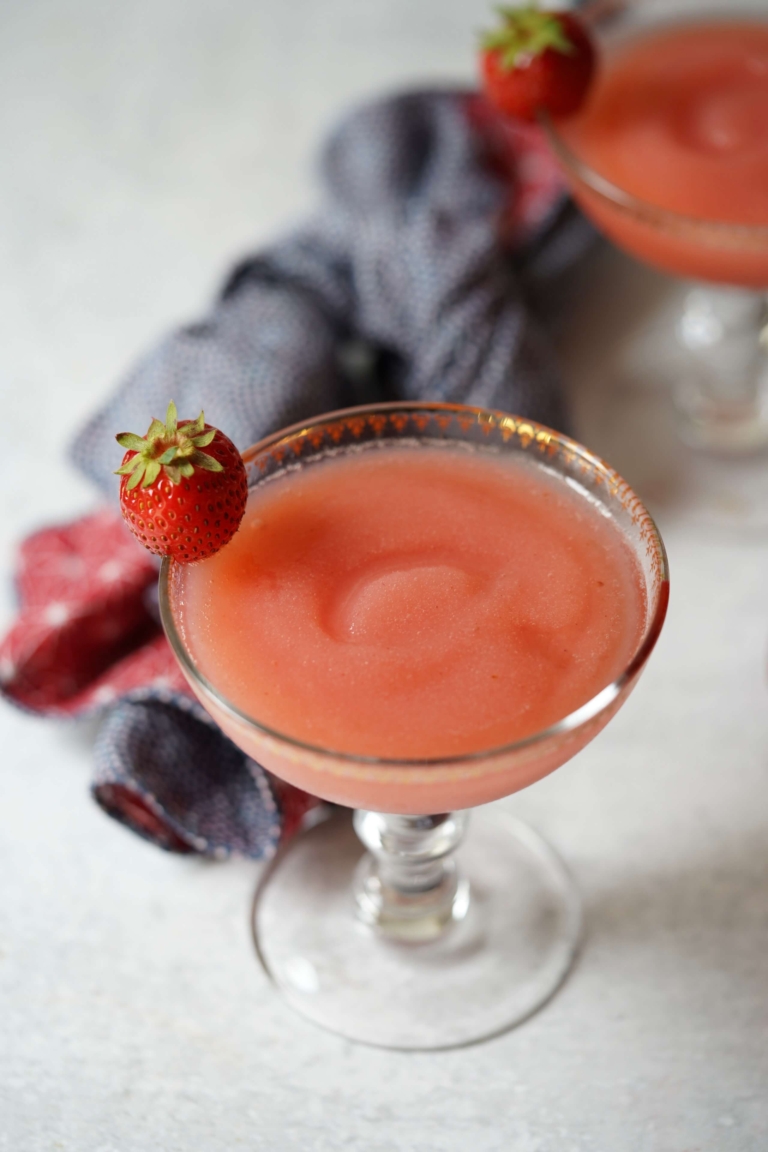
Rosé Wine Slushy
Ingredients:
- 1 bottle dry rosé wine, divided
- 1 1/2 cups fresh strawberries, quartered
- 1 1/2 tablespoons agave
- 4 whole strawberries, for garnish
Directions:
- Reserve 1/2 cup of wine for serving.
- Place the remaining wine, strawberries, and agave in a kitchen blender and blend on high until very smooth. Strain the mixture into a freezer-friendly container. Freeze for at least six hours or overnight if possible.
- To serve, place the frozen wine mixture back in the blender and blend on high until smooth and almost creamy. Divide the mixture into serving glasses. Top with a splash of the reserved rosé wine. Garnish with a strawberry and serve at once.
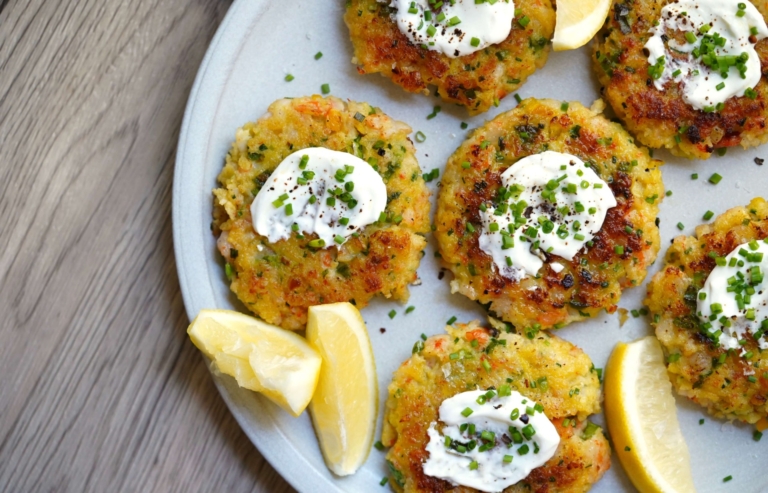
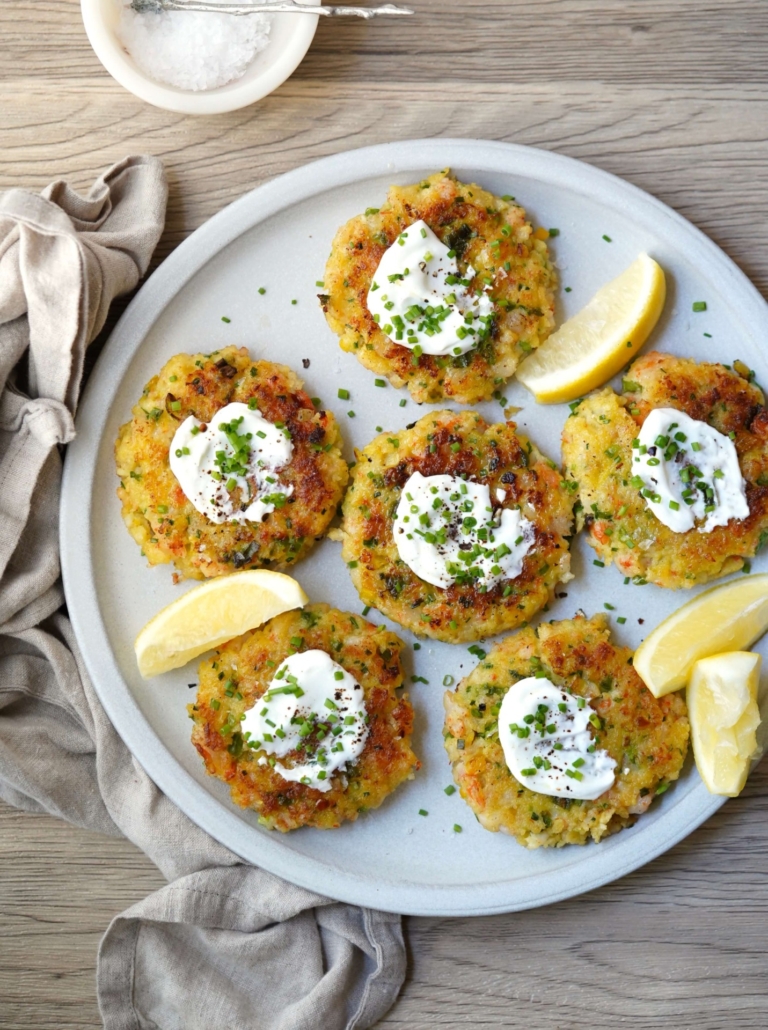
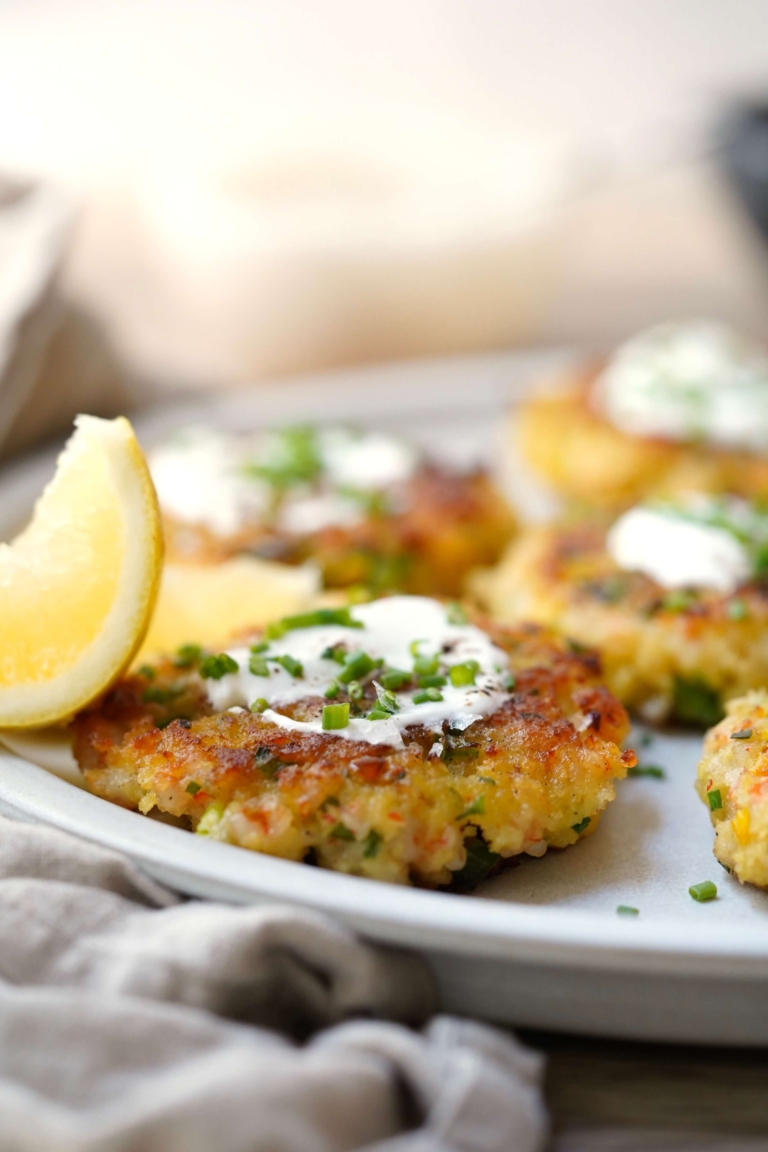
When it comes to whipping up a delicious, hassle-free meal, shrimp cakes are the way to go. So if you’re hosting a casual summer gathering or simply looking for a quick and satisfying weekday dinner option, these flavorful shrimp cakes are sure to impress just about anyone.
Shrimp cakes offer a stress-free culinary adventure for your taste buds. In just a few simple steps, you can transform fresh shrimp into a lovely and satisfying meal. Pan-fried until golden brown, resulting in a crisp exterior and a tender, juicy center. Whether enjoyed as an appetizer or the main course, shrimp cakes are versatile and effortless to whip up.
Fresh vs. Frozen
When making shrimp cakes, using fresh shrimp is preferable and can make a remarkable difference in both flavor and texture. Fresh shrimp possess a sweet and delicate taste, yielding a succulent bite compared to their frozen counterparts. That said, depending on your location, fresh shrimp may not always be readily accessible. In such cases, frozen shrimp can provide a reliable alternative, allowing you to enjoy shrimp cakes regardless of the season or location without losing too much flavor-wise. When using frozen shrimp, it’s important to thaw them properly before cooking to ensure even cooking and optimal texture. Follow the instructions on the packaging for thawing methods, or place them in a bowl of cold water for a quick thaw.
Tips for Buying Fresh Shrimp
When purchasing fresh shrimp, look for shrimp with firm, translucent flesh and a mild, slightly salty, oceanic aroma. Avoid any shrimp with a strong, ammonia-like smell. The shrimp flesh should not have any black spots or discoloration. Fresh shrimp should be stored properly in a cold environment and used within a day or two for the best taste and quality.
Health Benefits of Shrimp
Apart from their mouthwatering taste, shrimp also pack a nutritious punch. They are an excellent source of lean protein, low in calories, and contain essential vitamins and minerals such as selenium, vitamin D, and omega-3 fatty acids. Incorporating shrimp into your diet can contribute to heart health, boost brain function, and support overall well-being.
As the summer heat rolls in, shrimp cakes are an excellent choice for a light non-fussy meal for the family or when entertaining. Both shrimp cakes and cod cakes are two extremely popular dishes in my home year-round.
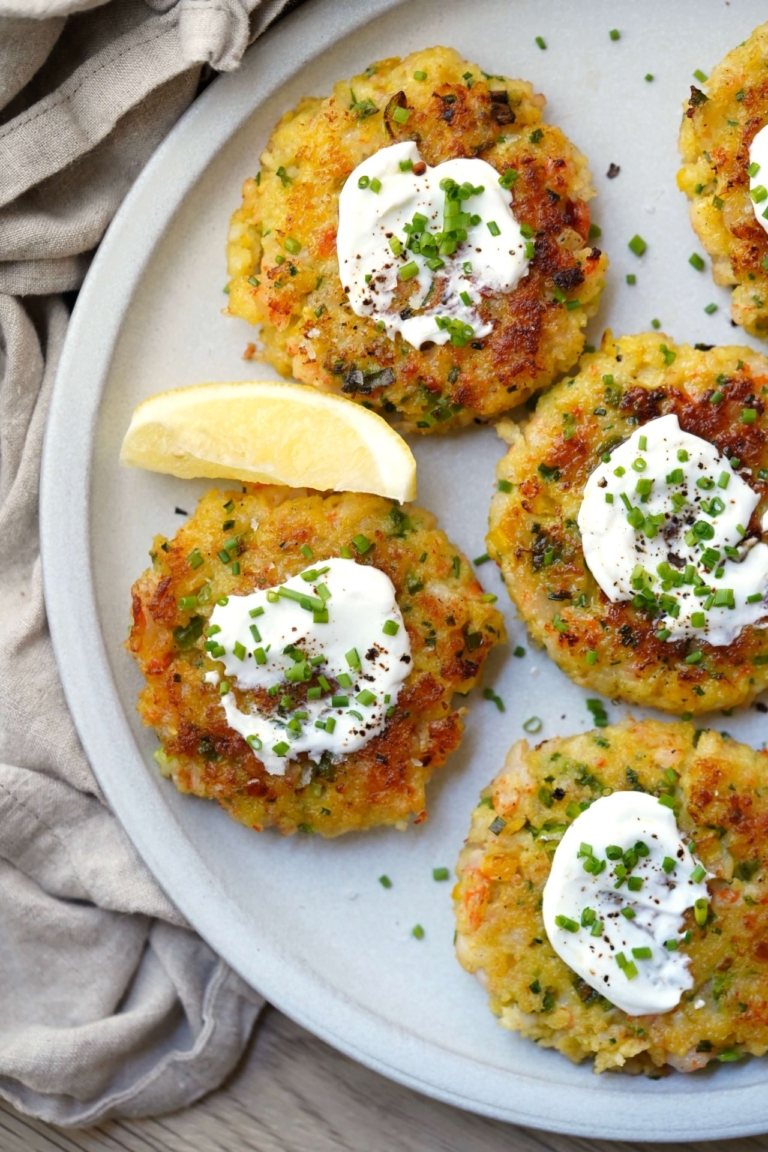
Shrimp Cakes
Ingredients:
- 1 pound raw shrimp peeled and deveined
- 3/4 cup panko breadcrumbs
- 1/3 cup finely diced yellow bell pepper
- 2 scallions, thinly sliced
- 2 teaspoons (or to taste) jalapeño pepper, seeded and finely chopped
- 3 tablespoons sliced chives plus more for garnish
- 3/4 teaspoon Kosher salt
- 1/8 teaspoon ground white pepper
- 2 eggs
- 1 teaspoon lemon zest
- 4 tablespoons Extra Virgin olive oil
- 1/4 cup sour cream
- lemon wedges, for garnish
Directions:
- To a large stock pot add 8 cups water, place over high heat, and bring to a boil. Once boiling, add the shrimp and simmer until pink, about 2-3 minutes depending on the size of the shrimp. Drain and transfer cooked shrimp to a bowl of cold water to stop the cooking process and let cool. Drain and pat dry.
- Place the cooked shrimp in the bowl of a food processor, fitted with a blade attachment. Pulse until coarsely chopped, do not grind into a paste. Transfer the shrimp to a large bowl and add the panko breadcrumbs, yellow pepper, scallions, jalapeño, chives, salt, pepper, eggs, and lemon zest. Stir gently to combine. Place a baking sheet lined with paper towel near your workstation.
- Using your hands, form the shrimp mixture into 8 patties. Place a large cast iron pan over medium-high heat. Add the oil and when hot but not smoking, add the shrimp patties in a single layer and cook for 4-5 minutes on each side or until golden brown. Place the cooked shrimp cakes on the prepared baking sheet to drain.
- Serve immediately, topped with sour cream and additional chopped chives. Garnish with lemon wedges
Sundays are a time for cake in Germany. Many Germans enjoy cake with their afternoon coffee on this day. Although Germans drink coffee during the work week, typically in the late afternoon, Sundays are different. Sundays are a day of rest and even mowing your lawn is forbidden on this day. According to Ladenöffnungszeitengesetz (the German laws governing the hours of trading), even most retail stores must remain closed. So with time on one hand, cakes often get baked on Sundays.
German lemon cake (Zitronenkuchen), is a staple in German bakeries throughout the country. And if you ask anyone who’s German, they will likely tell you their Oma (grandmother) had a special recipe they grew up eating. This classic German lemon sheet cake is moist and airy, topped with a thin irresistible lemon glaze. And perhaps the best part is it comes together effortlessly in less than one hour. This cake is similar in taste to another popular German favorite called a Bee Sting Cake, minus the rich cream filling and almond topping.
The Secret Ingredient
The unexpected ingredient in this fluffy cake is seltzer water. The tiny bubbles that make seltzer such a fantastic beverage, are what makes it a great ingredient in both cooking and baking. Bubbles can do amazing things. Seltzer bubbles create pockets of air which expand when heated, resulting in lighter, fluffier, and airier foods. In the baking world, that translates to a more delicate crumb that is memorable.
Summer is a natural time to begin baking, cooking and even bartending with more citrus. Lemon desserts, of all kinds, with their sweet yet tart notes, are a bright, refreshing way to welcome warmer sunny days ahead, Sundays or otherwise.
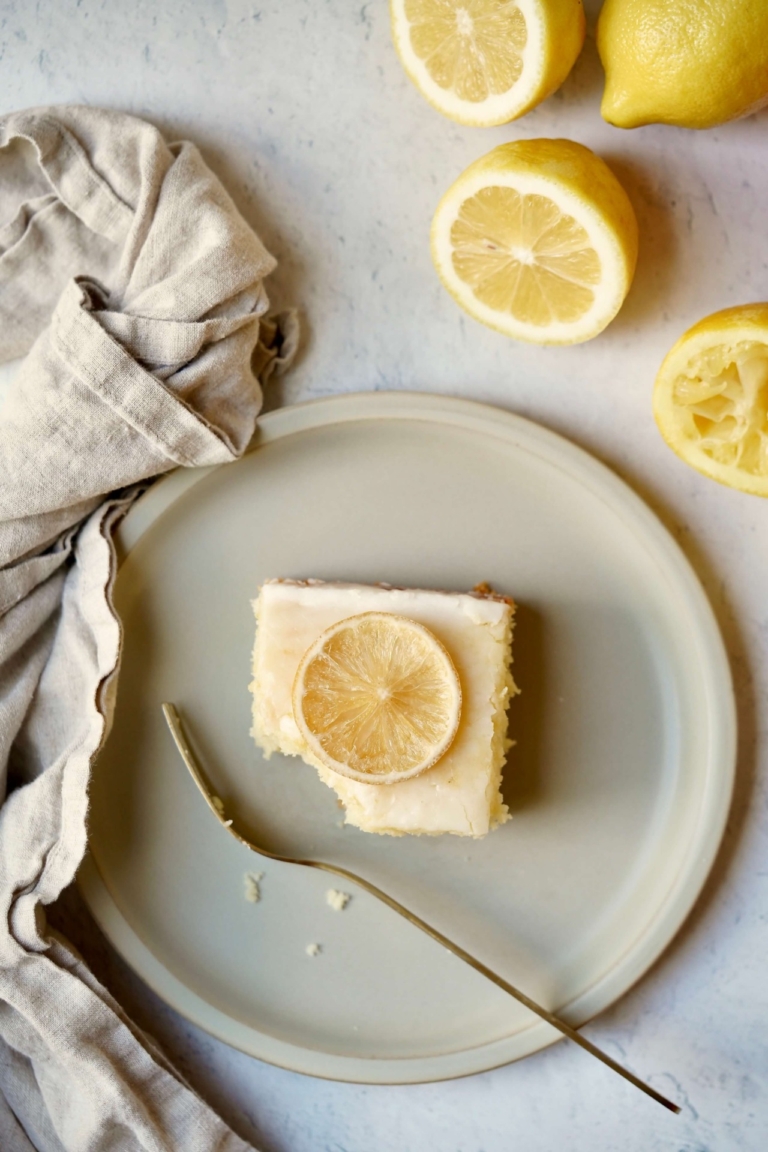
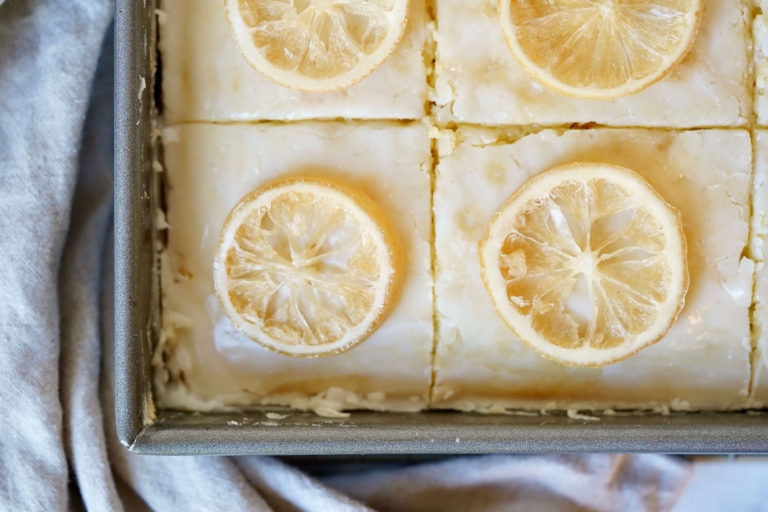
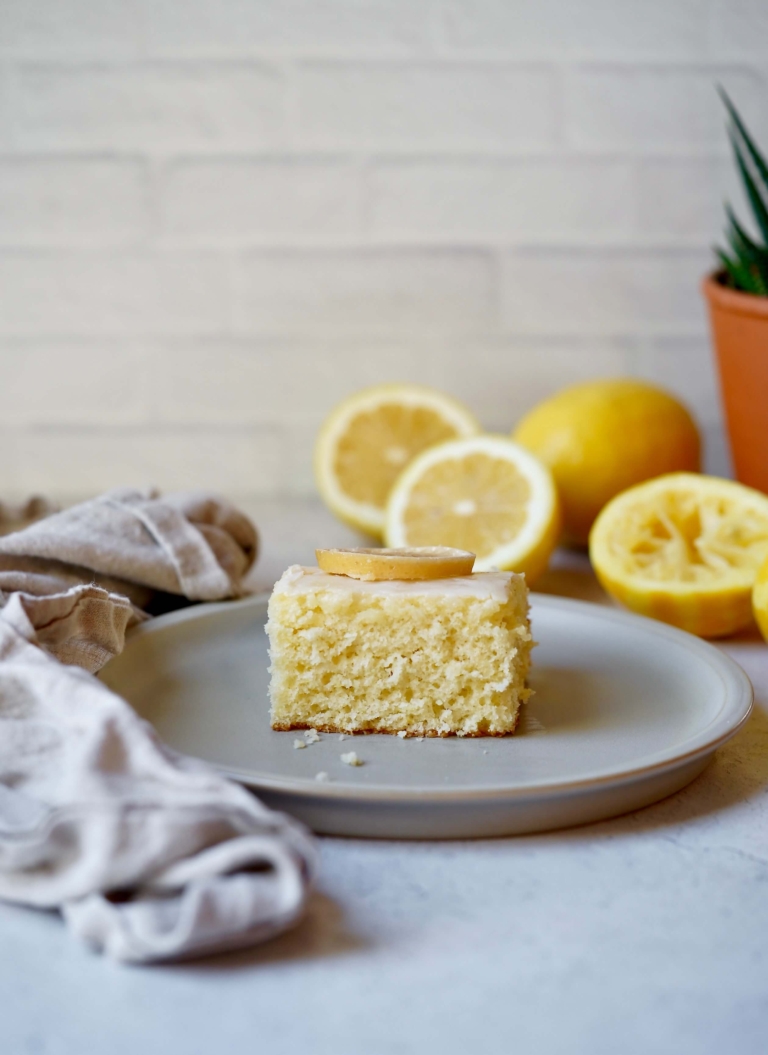
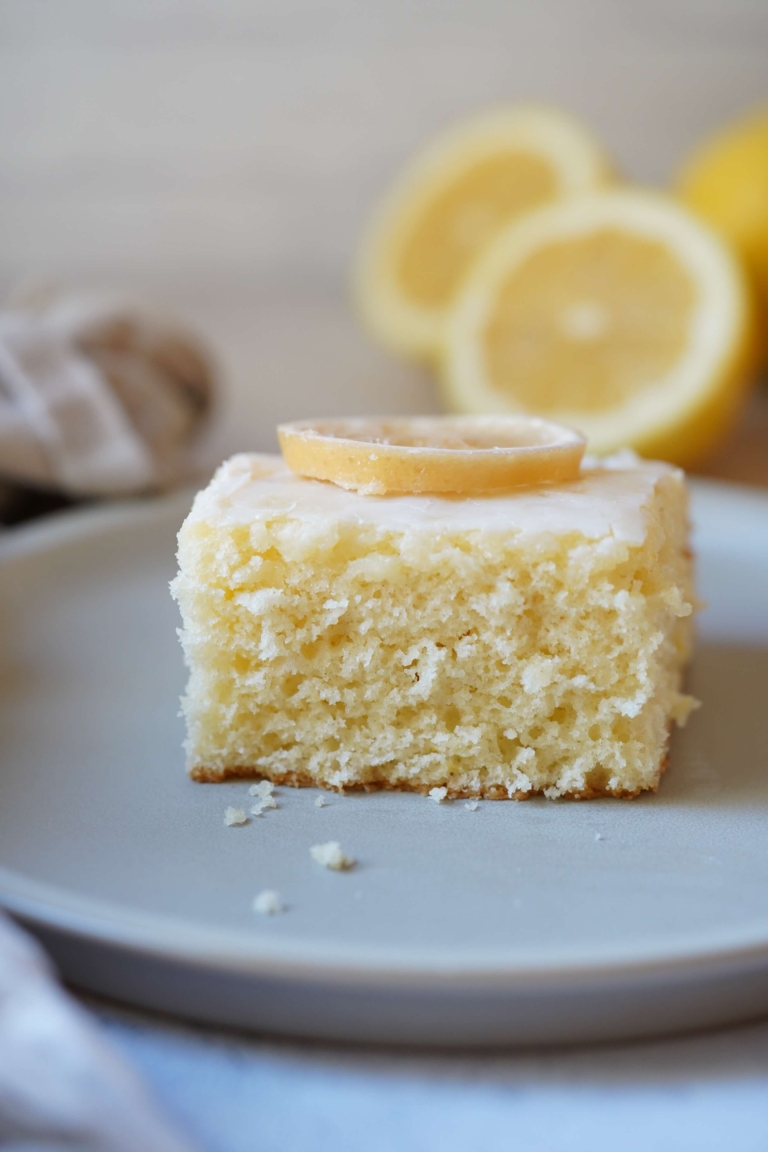
German Lemon Cake (Zitronenkuchen)
Ingredients:
For the Cake:
- 2 1/2 cups all-purpose flour
- 1 tablespoon baking powder
- 1 1/2 cups sugar;4 eggs
- 2/3 cup vegetable oil
- 2/3 cup seltzer water
- 1 lemon zested
- 2 tablespoons freshly squeezed lemon juice
For the Lemon Glaze:
- 1 1/2 cups Confectioners' sugar
- 2 tablespoons freshly squeezed lemon juice, more as needed
Directions:
- For the cake: Preheat the oven to 350 degrees F. Position the rack in the center of the oven. Grease and lightly flour a 9x9-inch square baking pan, and set aside.
- In a large bowl, add the flour, baking powder, and sugar, whisk to blend, and set aside.
- In the bowl of a kitchen mixer, such as a KitchenAid, fitted with a paddle attachment, add the eggs, oil, seltzer, lemon zest, and lemon juice and blend on low. With the mixer running, slowly add the flour mixture. Mix until combined.
- Pour the cake batter into the prepared baking pan. Gently tap the pan on the counter to flatten. Place in the oven and bake for 25 minutes, or until a cake tester comes out clean. Remember to rotate the cake halfway through the baking process. Remove the cake from the oven and quickly make the glaze.
- For the lemon glaze: In a medium mixing bowl add the Confectioners' sugar and lemon juice, and whisk to blend. Immediately pour the lemon glaze over the top of the cake. Use an offset spatula to spread the glaze evenly over the surface. Allow the cake to cool completely before serving.
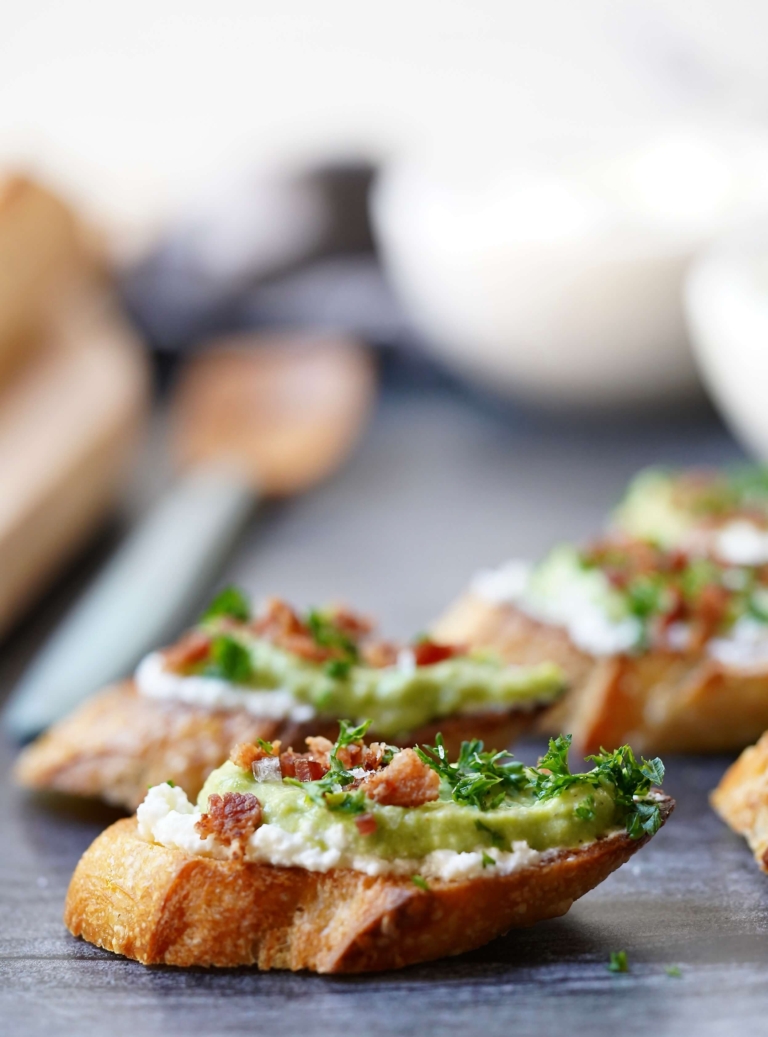
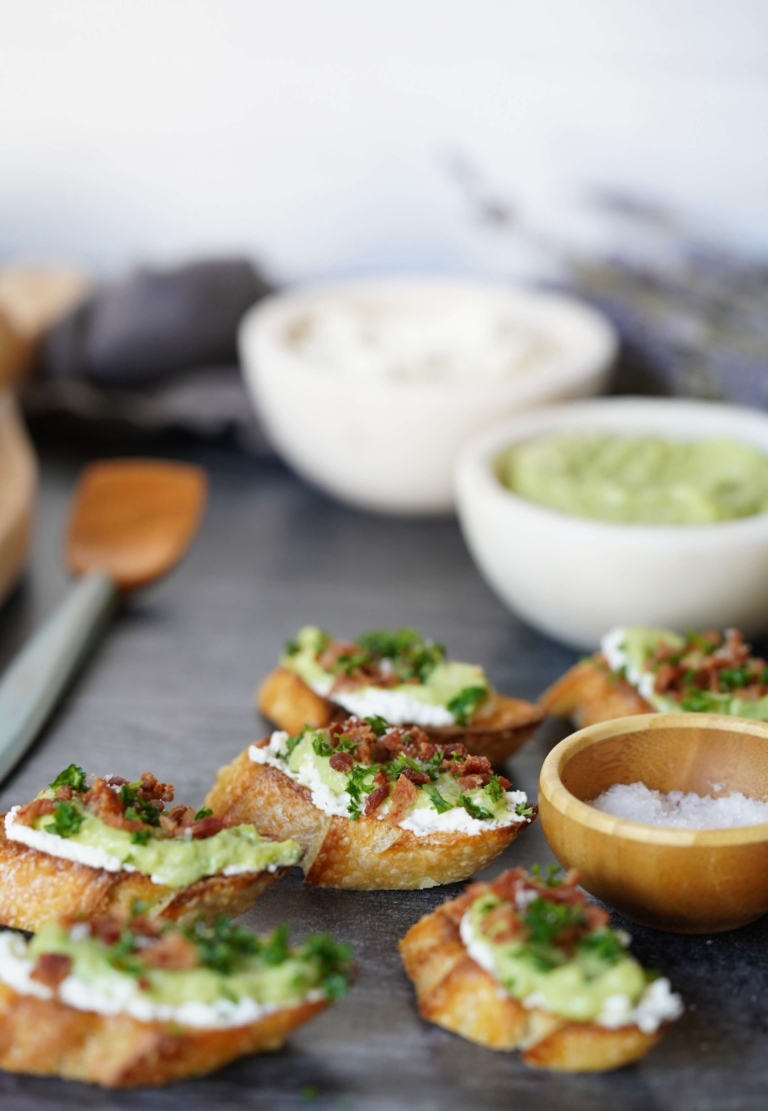
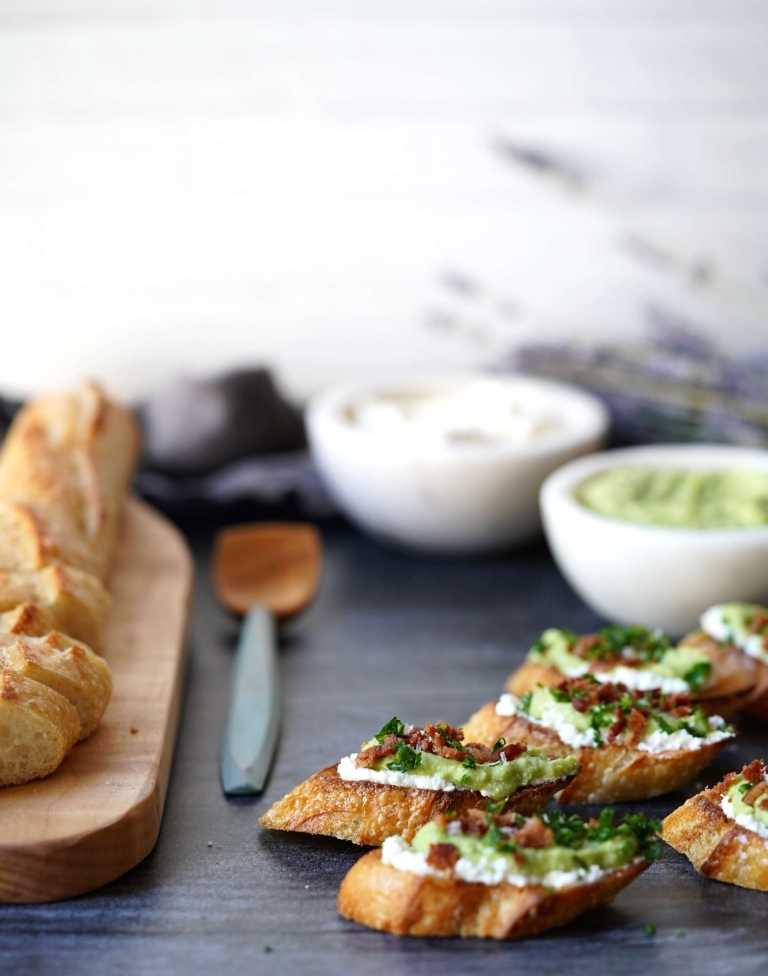
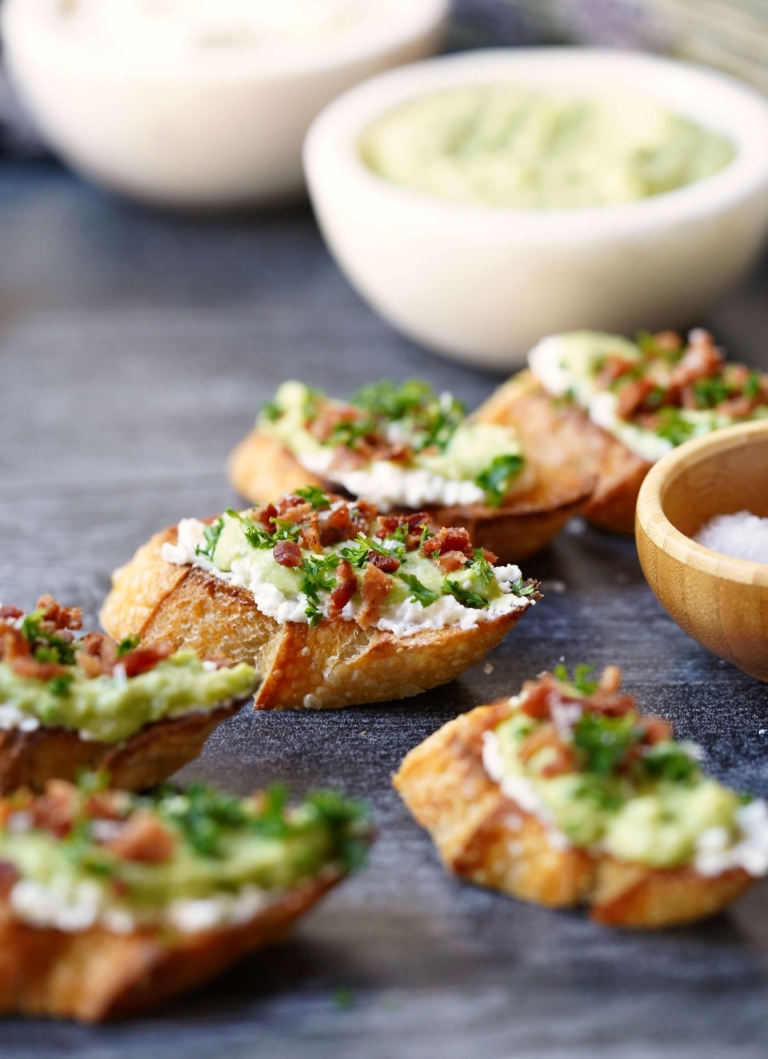
When it comes to hosting summer gatherings, this sweet pea and ricotta crostini is a versatile and elegant choice. This delectable appetizer combines the rustic charm of crostini with the vibrant flavors of sweet peas and creamy ricotta cheese. Embrace the summer season and the abundance of healthful vegetables and fruits that come along with it. This is a recipe my husband absolutely adores, so in his honor (and in recognition of our 21st wedding anniversary today), I’m sharing it.
History of Crostini
Crostini, meaning “little toasts” in Italian, dates back to medieval times when stale bread was in need of use. Over time, this humble dish transformed into a beloved appetizer served at formal and casual gatherings. Today, crostini is synonymous with toasted baguette slices, topped with various sweet and savory ingredients that tantalize our taste buds.
Fresh vs. Frozen
Sweet peas are a spring and summertime delight, that are not only delicious but also offer numerous health benefits. These vibrant green gems are loaded with fiber as well as vitamins A, C, and K. Peas are also a great source of essential minerals like iron and potassium. In addition, they also contain powerful antioxidants that promote overall well-being.
- Fresh Green Peas: Fresh peas are harvested at peak ripeness to retain their optimal nutrient content. They are known for their beautiful vibrant color, crisp texture, and sweet taste. The downside is fresh peas have a shorter shelf life and may require more preparation time, such as shelling.
- Frozen Green Peas: Frozen peas are harvested at peak freshness and frozen immediately to preserve their nutrients. Freezing helps retain the vitamins, minerals, and antioxidants present in the peas. The best part, frozen peas are readily available year-round.
Ultimately, the choice between fresh and frozen peas really depends on personal preference, availability, and convenience and each works perfectly with this recipe.
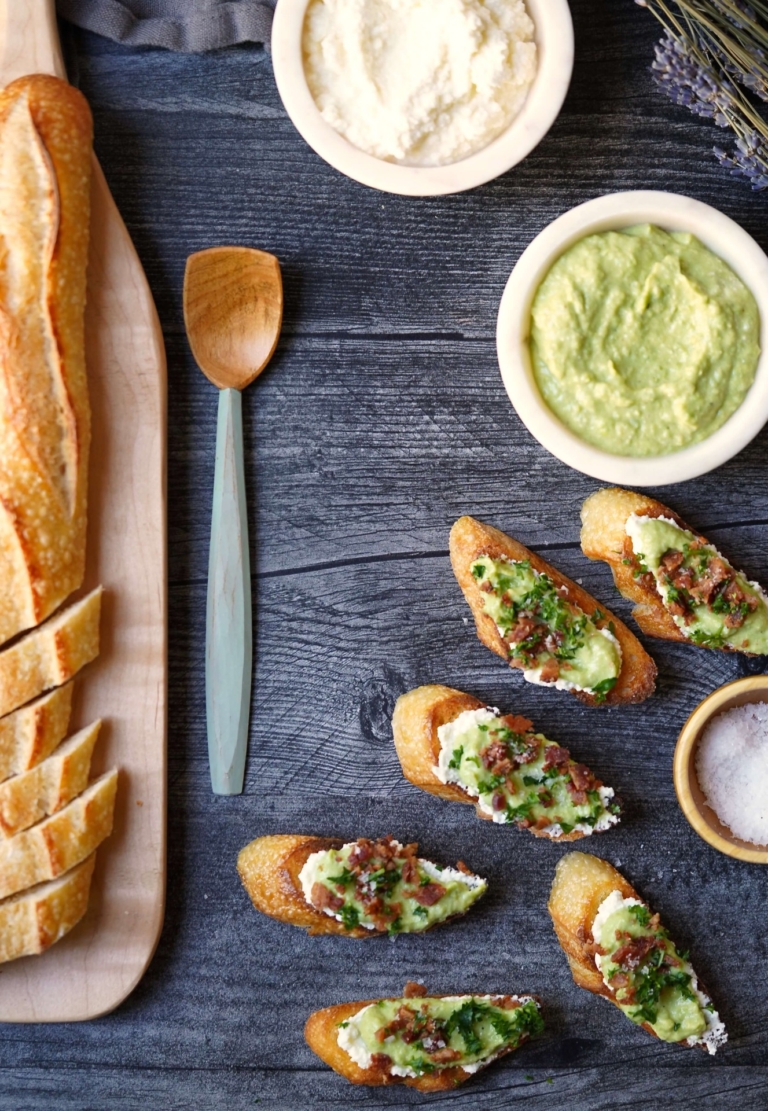
Summer Simplicity
One of the many charms of sweet pea crostini is its simplicity. With just a handful of ingredients and a few minutes in the kitchen, you can create a visually stunning and flavor-packed appetizer. The vibrant green color of the pea spread atop crispy bread is an instant eye-catcher. Moreover, the delicate sweetness of peas pairs beautifully with the creamy ricotta cheese and crispy salty bacon crumble.
Sweet pea crostini is a wonderful appetizer that combines the historical tradition of crostini with the delightful flavors and health benefits of sweet peas. With its simplicity and versatility, this dish is perfect for entertaining guests or simply treating yourself to a delightful snack. So, gather your loved ones, toast some baguette slices, and savor the fresh and vibrant taste of sweet pea crostini.
Sweet Pea And Ricotta Crostini
Ingredients:
- 1 sourdough (or other) baguette, sliced diagonally 1/2-inch thick
- 5 tablespoons extra virgin olive oil, divided
- 1/2 teaspoon salt
- 1/4 teaspoon black pepper
- 1 cup fresh or frozen organic sweet green peas
- 1/2 tablespoon fresh mint, finely chopped
- Zest of 1 lemon
- 1 1/2 tablespoons freshly squeezed lemon juice;1 cup ricotta cheese, divided
- Dash of cayenne pepper
- 4 slices thick slab bacon, cooked until crispy and roughly chopped
- 2 tablespoons parsley, finely chopped
- Flaky sea salt, for garnish
Directions:
- Preheat the oven 350 degrees F. Line a baking sheet with parchment paper and set aside.
- Lay the bread on the prepared baking sheet without overlapping. Using a pastry brush, lightly brush one side of the bread with three tablespoons of olive oil. Place in the oven and bake until lightly golden, about 8-10 minutes.
- Fill a small saucepan halfway with water and place over high heat. When boiling, add the peas and blanch until the peas are a vibrant green, about 1 minute. Drain the peas and run them under cold water to stop the cooking process, set aside.
- Using a food processor, such as a Cuisinart, fitted with a blade attachment, add the peas, salt, pepper, mint, lemon zest, lemon juice, 1/2 cup of ricotta cheese, and a dash or two of cayenne pepper. Blend on high, scraping down the sides as needed, until smooth, about 1-2 minutes. Add the 2 remaining tablespoons of olive oil and pulse until combined.
- To assemble the crostini, spread a generous tablespoon of the pea-ricotta puree on the toasted crostini. Top with some additional ricotta, crispy bacon, parsley, and flaky sea salt.
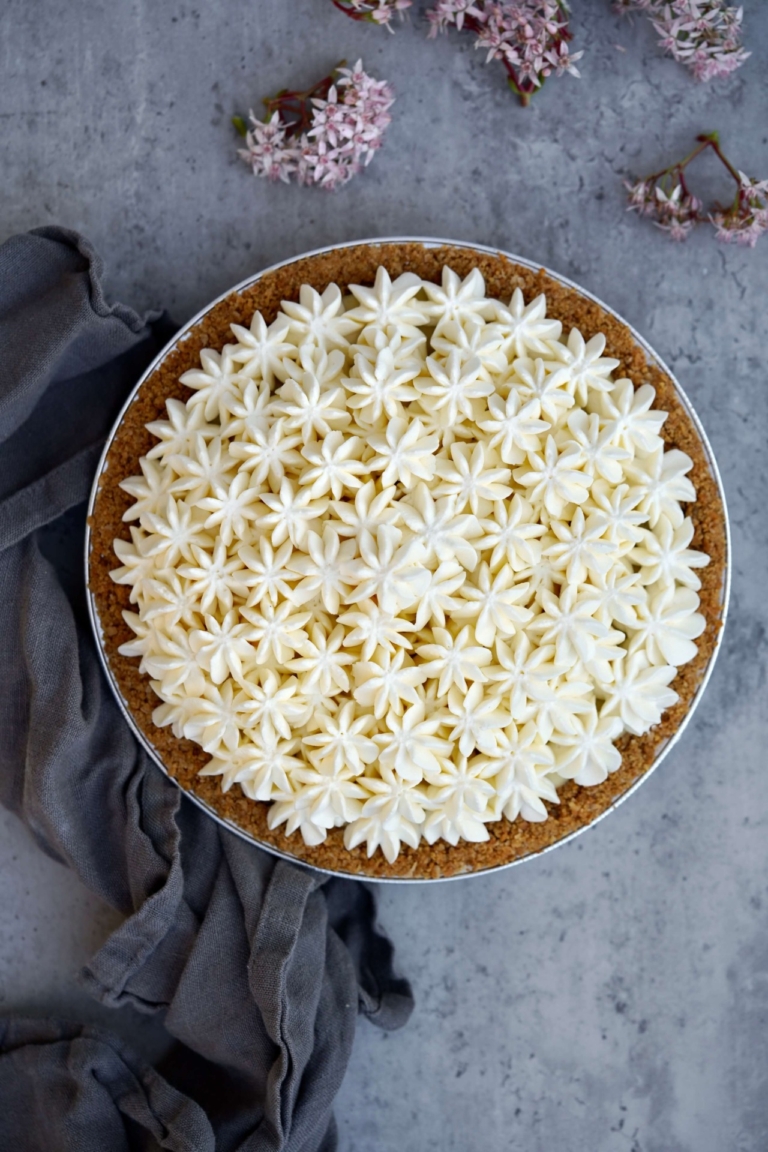
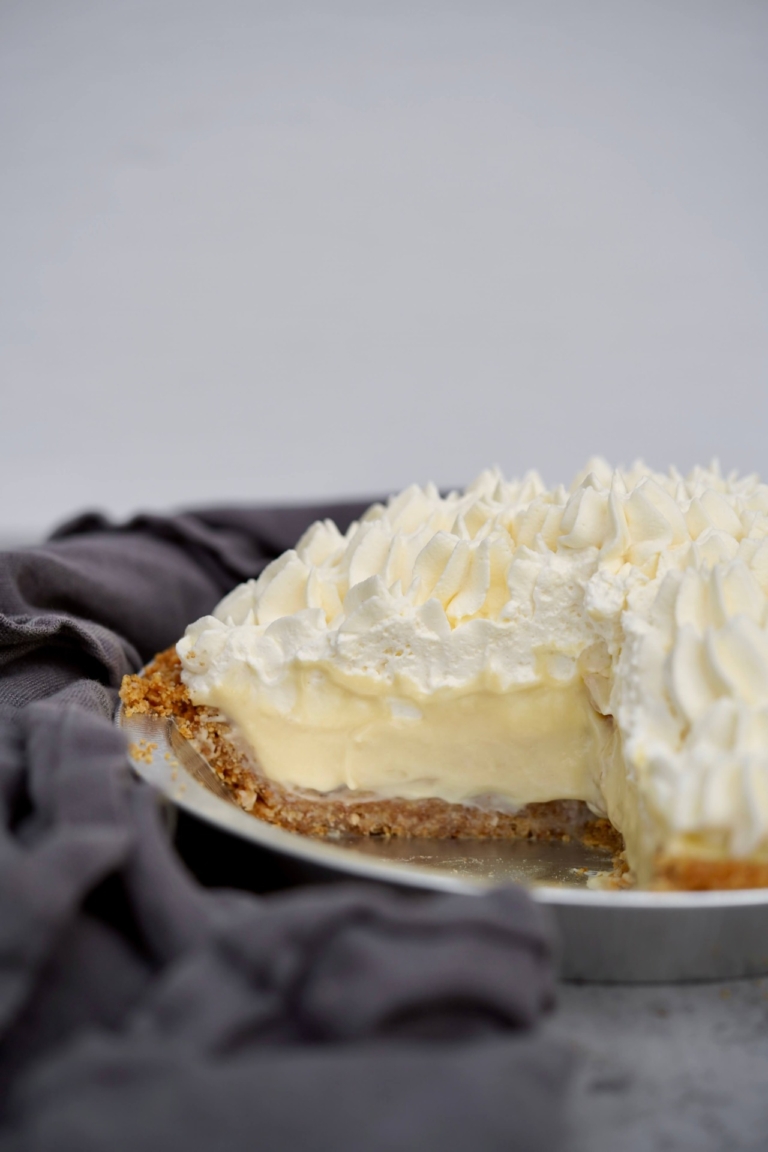
A cream pie, of any kind, is a variation of an old-fashioned custard pie. But to me, a banana cream pie is a culinary work of art. It is a magical combination of creamy vanilla custard, bananas, and whipped cream all layered together. This dreamy filling is set in an irresistible coconut graham cracker crumble crust that compliments the banana flavor perfectly. Some add chocolate, others butterscotch, but to mine, I toss in some sweetened shredded coconut and bourbon. And if you ask me this outrageously delicious chilled dessert is what you should be making this Memorial Day weekend to help kick off the summer season we’ve all waited so patiently for.
What is a Cream Pie?
In actuality, a cream pie can mean many things. A cream pie contains a rich cooked custard, made with a combination of milk, cream, sugar, flour, and eggs. Common flavors of a cream pie are; banana, lemon, vanilla, lemon, lime, coconut, chocolate, or peanut butter. The custard filling is considered similar to French pasty creme, crème patissière, which is commonly used in French cakes, and tarts. But the pie’s decadent whipped cream topping is perhaps the most notable. A cream pie is always a one-crust pie and can be made of a traditional American pie crust, a cookie crumble, or a graham cracker crumble.

The Origin of Banana Cream Pies
Like many famous foods, banana cream pie’s origin is somewhat unknown. Many believe it comes from the Midwest, where pies generally have always been popular. Adding bananas to the pie happened around the end of the 19th century when bananas went from exotic to commonplace. Until then, most Americans had never seen, let alone eaten, a banana.
Banana Cream Pie Fun Facts
- March 2nd is National Banana Cream Pie Day.
- A 1951 US Armed Services survey, ranked banana cream pie as a favorite dessert among soldiers.
- A black-bottom banana cream pie means that it has a layer of chocolate on the bottom.
- “Banoffee pie” is the English banana cream variation and is a merger of banana and toffee.
Pie-ing
Comedians have used cream pies as gimmicks in their routines for decades. “Pie-ing” is the act of throwing a pie at a person or people for laughs. These mock cream pies are, however, typically made with just whipped cream (sometimes shaving cream). Most believe pie-ing first began in the early 1900s during the silent comedy film days.
The Female Chaplin
Mabel Normand, the first woman comic in movies, threw the first movie pie at “Fatty” Arbuckle in the 1913 comedy, “A Noise from the Deep”. But the most notable pie fight was in Laurel and Hardy’s 1927 film, “The Battle of the Century”. This scene remains the biggest ever staged in a motion picture. It’s estimated, that about 4,000 Los Angeles Pie Company pies were used in the pie-throwing scene making it legendary in the pie-ing arena.
Pie-throwing aside, cream pies, like this bourbon banana cream pie with a flavorful coconut graham cracker crust, make a great summer pie, but one that’s overshadowed by the more traditional summer fruit pies. Cream pies make for a welcome and refreshing change in the warmer months when backyard BBQs are in full swing. A crumb crust also makes this pie an easier option for anyone who dislikes making their pie dough. The whipped cream topping can be as elaborate or as simple as you like. I like to pipe mine in a pastry bag using a simple star time to keep it playful. But you can also simply spread it out using a rubber spatula and have it taste just as spectacular.
Bourbon Banana Cream Pie
Ingredients:
For the Coconut Graham Cracker Crust:
- 1 1/2 cups graham cracker crumbs
- 3/4 cup sweetened shredded coconut, toasted
- 10 tablespoons unsalted butter, melted
For the Filling:
- 2 cups milk
- 4 egg yolks
- 1/2 cup sugar
- 1/4 cup cornstarch
- Pinch of salt
- 1 tablespoon bourbon
- 2 teaspoons vanilla extract
- 1 tablespoon unsalted butter, cut into small pieces
- 1 large, or two small, ripe bananas, sliced
For the Topping:
- 2 cups heavy cream
- 1/4 cup Confectioners’ sugar
- 1/2 teaspoon vanilla extract
Directions:
- For the Crust: Preheat your oven to 325 degrees F. Spread the coconut on a baking sheet, place in the oven and bake, stirring once, until lightly toasted, about 5-7 minutes. Remove from the oven and cool slightly.
- In the bowl of a food processor, such as a Cuisinart, fitted with a blade attachment, add the graham crackers and pulse on and off till ground. Place the graham crackers in a medium mixing bowl and set aside. Once the coconut is cool, grind it in a food processor add it to the bowl of graham cracker crumbs, and blend. Add the butter and mix to combine.
- Pour the mixture into a 9-inch pie plate. Using your hands, press the mixture up the sides of the pie plate. Evenly press the remaining mixture on the bottom of the dish. Place in the oven and bake for about 10 minutes to set. Remove from the oven and let cool while you make the filling.
- For the Filling: In a large saucepan, whisk the egg yolks, sugar, cornstarch, and salt until well combined and thick. Set it near your workstation. In a small saucepan add the milk, place over low heat, and bring to a simmer. Once heated through, remove from the heat. Slowly whisk the warm milk into the egg mixture.
- Place the saucepan back over medium, and bring to a boil while whisking. Once hot, the mixtures will begin to thicken quickly. Cook the filling to a custard-like consistency about 3-4 minutes. Remove from the heat and stir in the bourbon, vanilla, and butter, stirring until well combined. Set aside.
- Next fan the banana slices out over the bottom of the cooked pie crust. Pour the filling into the prepared pie crust and smooth the top. Cover with plastic wrap (touching the filling) and refrigerate for 6 hours, until set.
- Once set and you're ready to serve, make the whipped cream topping. In the bowl of a kitchen mixer, fitted with a whisk attachment, add the heavy cream and whip on high till stiff peaks form. Reduce the speed to low and slowly mix in the confectioners’ sugar and vanilla extract.
- Evenly spread the whipped cream over the pie filling. Alternatively, pipe the whipped cream using a pastry bag and decretive tip as I did here. You can garnish the pie with additional sliced bananas if desired