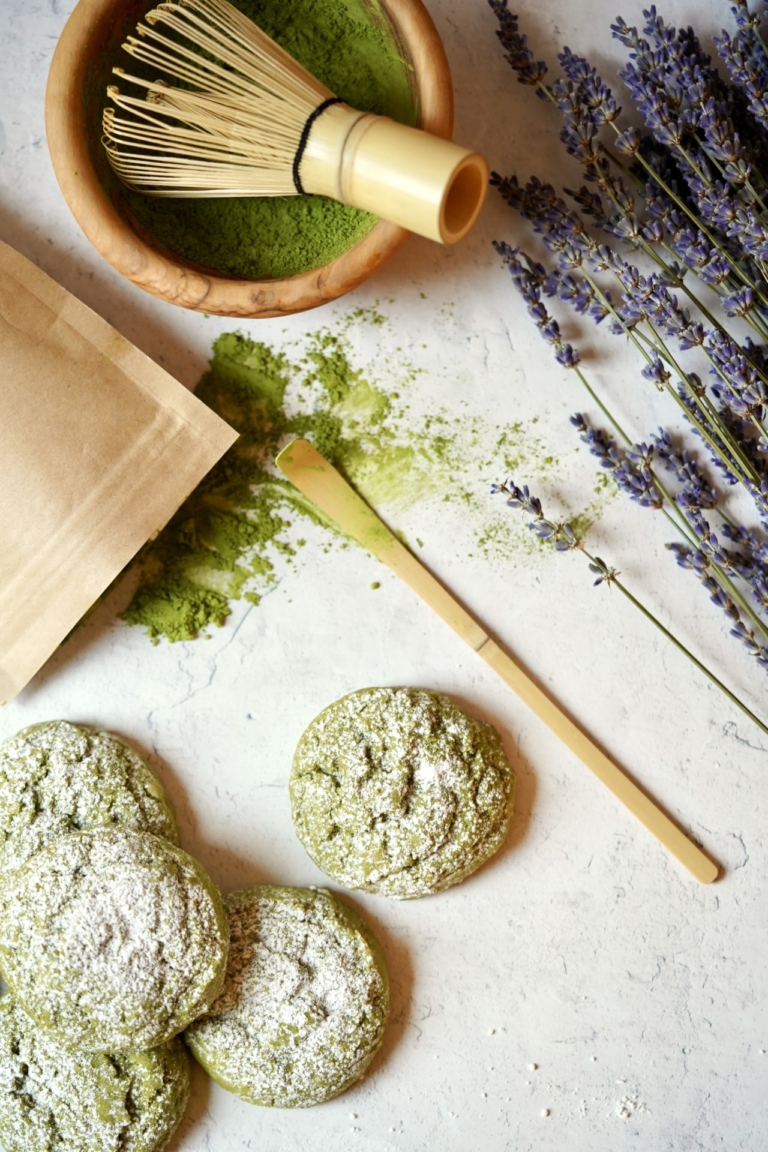
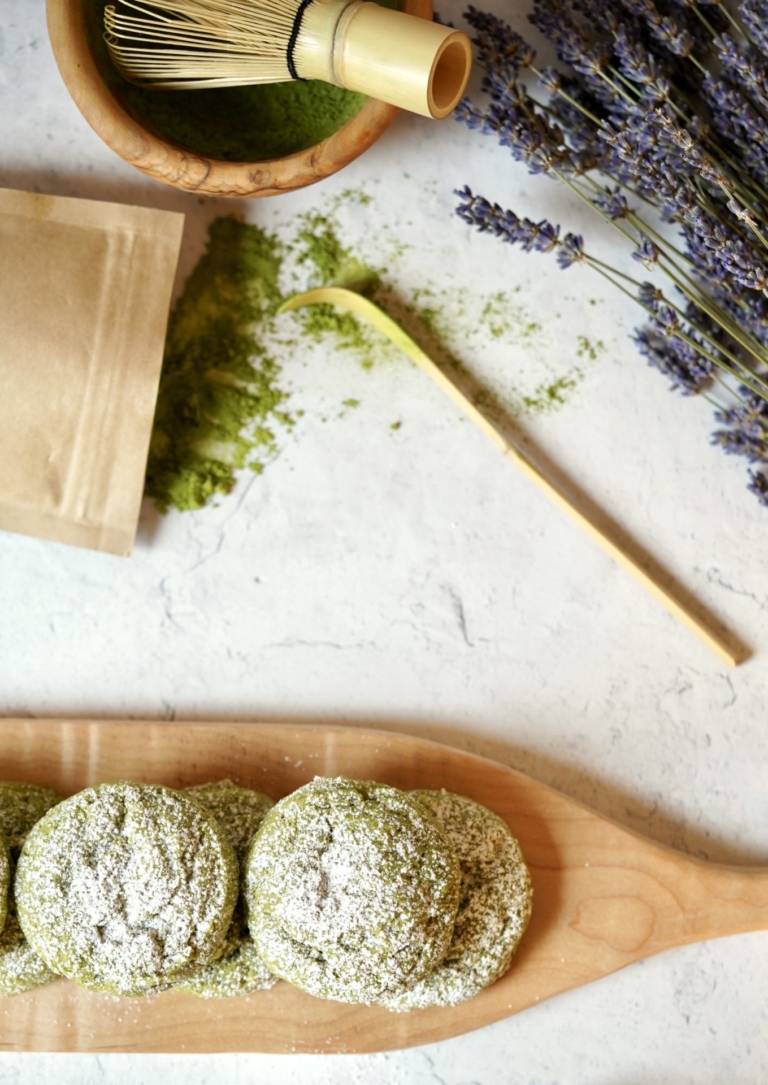
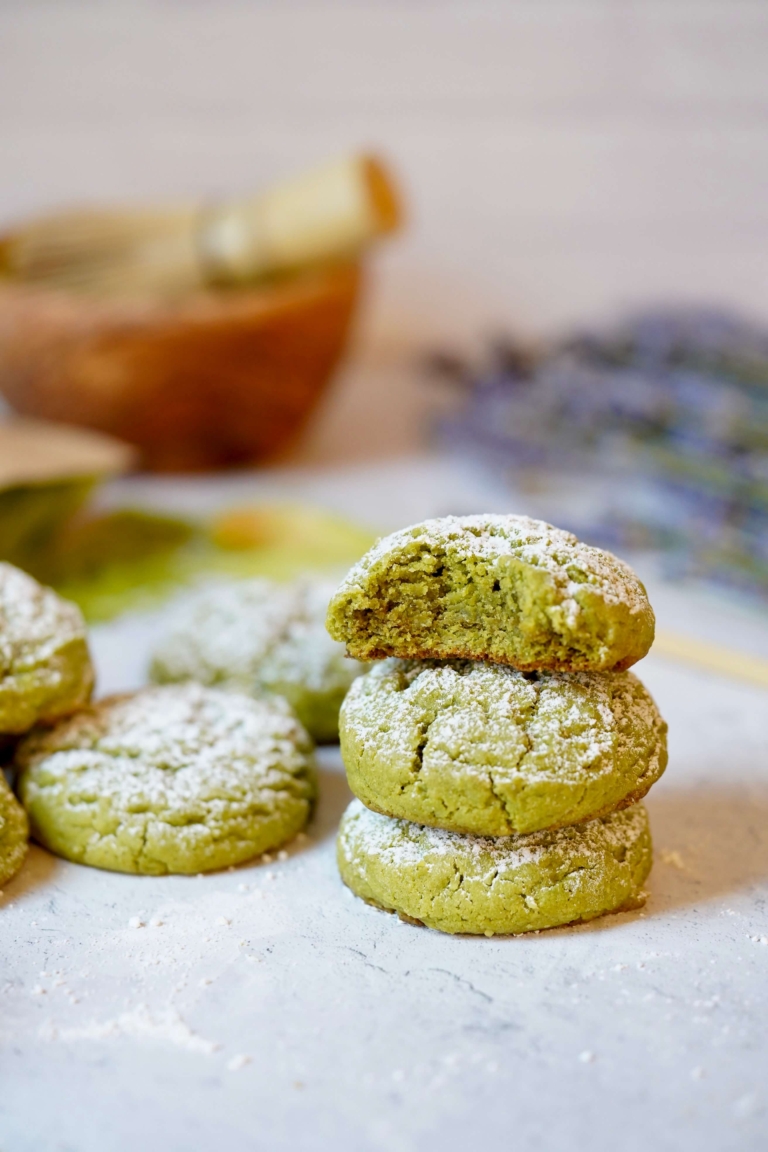
Most who read my blog already know I’m a cookie fanatic. These matcha-coconut tea cookies are my latest and when I say make, eat, and repeat, I’m not kidding around. These soft, pillowy matcha cookies are truly unforgettable.
Matcha
Matcha has been a traditional drink in Japan for over 800 years and used in tea ceremonies for centuries. But matcha’s popularity has in recent years exploded throughout the Western world, particularly in the United States. Matcha, in its most basic form, is a finely ground powder made from shade-grown green tea leaves. This traditional Japanese tea has gained popularity in recent years mainly due to its unique flavor and numerous health benefits. But not all matches are the same, in-fact there are different grades of matcha, including; ceremonial grade, premium grade, and culinary grade.
- Ceremonial grade matcha is the highest quality and is typically used in traditional Japanese tea ceremonies.
- Premium-grade matcha is also high quality, but it’s usually used for drinking or in recipes that require a strong matcha flavor.
- Culinary-grade matcha, on the other hand, is more affordable and is often used in cooking and baking.
Health Benefits of Matcha
Matcha is believed to have several health benefits due to its high concentration of antioxidants, vitamins, and minerals. Some of these benefits include improved cognitive function, increased energy, and enhanced metabolism. Matcha has also been shown to reduce inflammation, lower cholesterol levels, and support overall immune function.
Many health-conscious consumers have embraced matcha as a healthier alternative to coffee or other sugary beverages. Additionally, social media platforms, like Instagram, have helped to spread the trend. Matcha’s vibrant green color and unique preparation have made it a visually appealing drink, and many influencers and bloggers have shared photos and recipes featuring matcha.
The popularity of Japanese culture and cuisine has also played a role in matcha’s rise in popularity. As Japanese restaurants and food trends have become more mainstream, matcha has become more widely available in cafes and grocery stores.
But despite the numerous health benefits and booming popularity, not everyone is a matcha drinker and I can respect that. But I got you covered. One delicious way to incorporate matcha into your diet is by making these irresistible (and effortless) matcha-coconut tea cookies. This recipe combines the unique flavor of matcha with the sweetness of coconut to create a delicious and dare I say, nutritious treat.
A Cookie Is An Incredible Thing
Back briefly to my obsession with cookies. With the very first bite of a cookie, you’re hit with sweetness, followed by the satisfaction of a perfect texture – whether it’s crisp and crunchy, soft and chewy, cakey or tender. Cookies evoke joy and the aroma of the cookie fills your senses, and the experience becomes a sensory delight. The joy of eating a great cookie lies in its ability to bring comfort, nostalgia, and pleasure. A cookie is a simple treat that can brighten up anyone’s day and leave a lasting impression.
Matcha-Coconut Tea Cookies

Ingredients:
- 2 1/2 cups all-purpose flour
- 2 tablespoons matcha powder (culinary-grade), sifted
- 1 teaspoon baking soda
- 1/2 teaspoon baking powder
- 1/8 teaspoon kosher salt
- 1 cup unsalted butter, room temperature
- 1 cup sugar
- 2 teaspoons vanilla extract
- 1 egg
- 1/2 cup sweetened shredded coconut, finely chopped
- 1/4 cup confectioners' sugar, for dusting
Directions:
- Preheat the oven to 350 degrees F. Line two baking sheets with parchment paper and set aside.
- In a large mixing bowl, whisk the flour, matcha powder, baking soda, baking powder, and salt and set aside.
- In the bowl of a kitchen mixer, such as a KitchenAid, fitted with a paddle attachment, add the butter and sugar and beat on high until smooth and fluffy, about 1 to 2 minutes. Add the vanilla and egg and mix until combined. Use a spatula and scrape down the sides as needed.
- With the mixer on low, slowly add in the dry ingredients and mix until just combined. Do not over-mix.
- Use a small ice cream scooper, or tablespoon to scoop the dough into 24 dough balls. Place the dough balls on the prepared pans. Leave 1 1/2-2 inches between each cookie to allow for spread.
- Place in the oven and bake, rotating once, for 10-12 minutes. The cookies should be soft in the middle with slightly golden edges. Let the cookies rest for 5 minutes on the baking sheet then transfer to a cooling rack. Dust with confectioners' sugar before serving
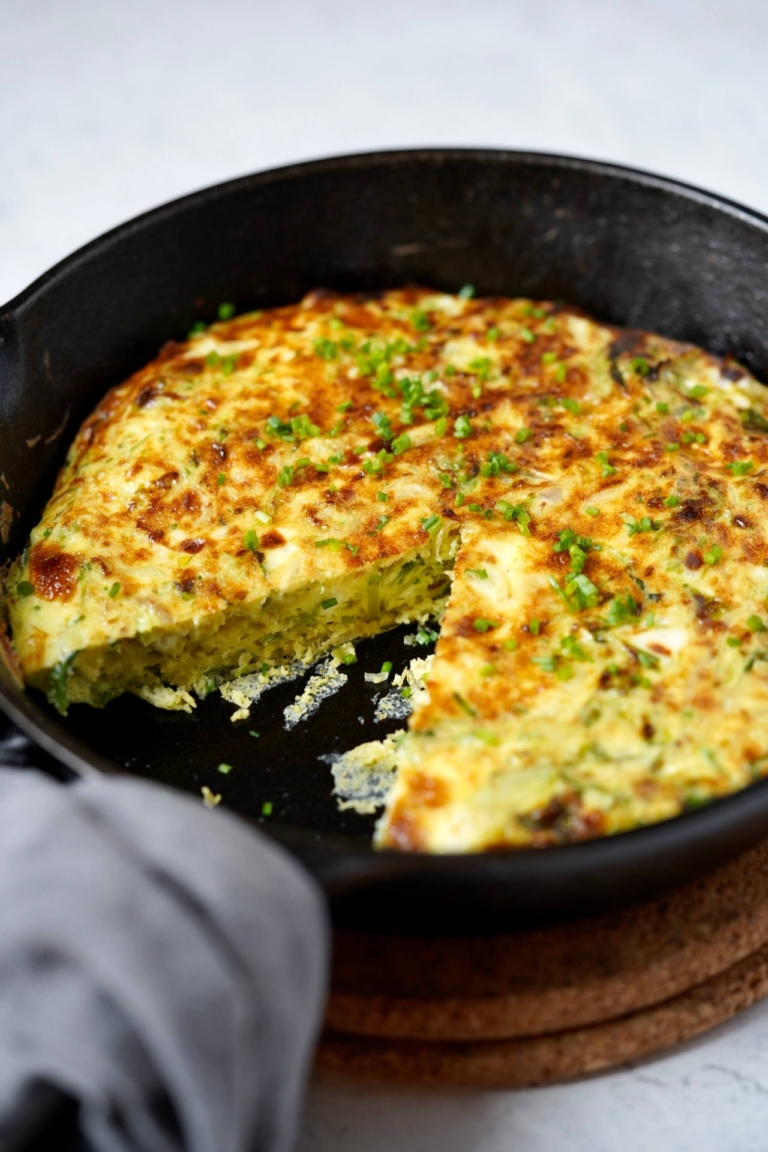
A shredded Brussels sprout and feta frittata may seem fancy and complicated, but the truth is, it’s not. It’s also the perfect dish for mom if breakfast in bed is on the menu for Mother’s Day. For those unfamiliar, a frittata is an Italian open-faced omelet, often made in a cast iron pan, featuring a variety of ingredients. You can think of frittata as a crustless, low-carb quiche but don’t make the mistake of thinking it’s an omelet because it’s not.
Omelets
There are two types of omelets: a French omelet and an American omelet. And it was not until culinary school that I learned the actual difference.
- French omelets are the most popular variety available throughout Europe. A French omelet is difficult to cook correctly due to the constant stirring motion to cook and set the eggs properly. The ideal French omelet is simply eggs and butter cooked to have a soft and tender texture. The outside should be uniform in color and just hardened enough to stop the inside, slightly loose egg from leaking. Americans sometimes consider French omelets undercooked due to their slightly liquid inside. I have come to prefer it. Getting the proper French omelet texture was one of the most difficult things to master in culinary school. But I was fortunate to have been taught by master chefs, Jacques Pépin and André Soltner. If you’re interested in mastering this classic technique yourself, check out this link.
- American omelets are simple to make and often defined by their ability to host a variety of fillings. Unlike the French omelet, there is no “perfect” American omelet; however, some basics like shape and texture tend to be universal. In comparison, an American omelet is substantially easier to make than a French one. American omelets require less movement and advanced techniques and are fairly difficult to overcook since they lack a loose center.
Frittatas
A frittata is an egg dish that can be served for breakfast, lunch, or dinner; tastes as good room temperature as it does warm; and can be packed with just about anything. Unlike an omelet’s filling (which is rolled or just sprinkled on top of the egg) the frittata’s ingredients typically get mixed in with the egg and milk before cooking. The frittata can be cooked either in the oven or on the stovetop, but no matter which method is used it is almost always placed under the broiler to be finished off.
The Differences
In the strictest sense, the difference between the omelet and the frittata boils down to a matter of folding the cooked egg around the filling versus mixing the filling into the raw egg mixture. But there are a few other distinctions as well.
- Both sides of the frittata get cooked while just the underside of the omelet touches the pan.
- A frittata is cooked slowly over low heat while an omelet is cooked quickly over higher heat.
- Omelets are served hot straight from the stove, frittatas can be served hot or at room temperature.
In my Brussels sprout and feta frittata, I stray from the traditional frittata-making method and don’t incorporate all the ingredients into the egg and milk mixture. In this recipe, I simplify the method by reducing steps. I prefer to sauté the shallots and spouts beforehand. I like to finish my frittata in the broiler to obtain some nice coloration on top. Frittatas are an easy breakfast that is often overlooked but deserves rediscovery as they are simpler than either version of omelets and can serve more than one at a time.

Brussels Sprout And Feta Frittata
Ingredients:
- 2 tablespoons Extra Virgin olive oil
- 2 shallots, halved and thinly sliced
- 3/4 pound Brussels sprouts, thinly shaved
- Kosher salt
- Freshly ground black pepper
- 8 large whole eggs
- 3 tablespoons whole milk
- 1 cup feta cheese, crumbled
- 1/4 cup chives, finely chopped
Directions:
- Preheat the broiler and position a rack 6 inches from the heat.
- Place a 12-inch cast iron or nonstick ovenproof skillet, over medium-high heat. Add the oil and when hot, but not smoking, add the shallots and shredded sprouts, cook, stirring occasionally, until softened, 5 minutes. Season with salt and pepper and cook, tossing occasionally, until crisp-tender and lightly browned, about 3 more minutes.
- Meanwhile, in a large bowl, beat the eggs with the milk, 1 teaspoon of salt, and 1/4 teaspoon of pepper. Add the feta cheese and chives, and mix well. Pour the egg mixture into the skillet and cook over moderate heat, stirring gently, until the eggs start to set about 5 minutes.
- Place the skillet in the oven and broil for about 3 minutes, until the center is set. Run a rubber spatula around the edge of the frittata and slide it onto a serving plate. Cut to serve.
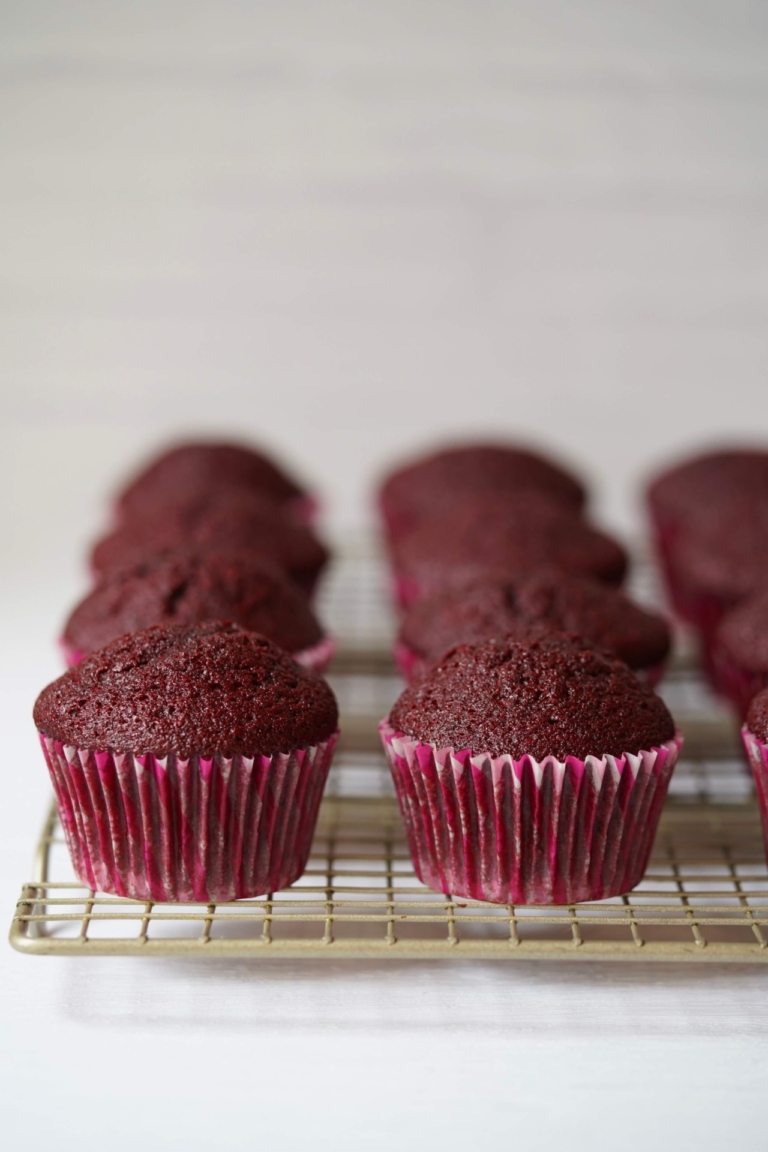
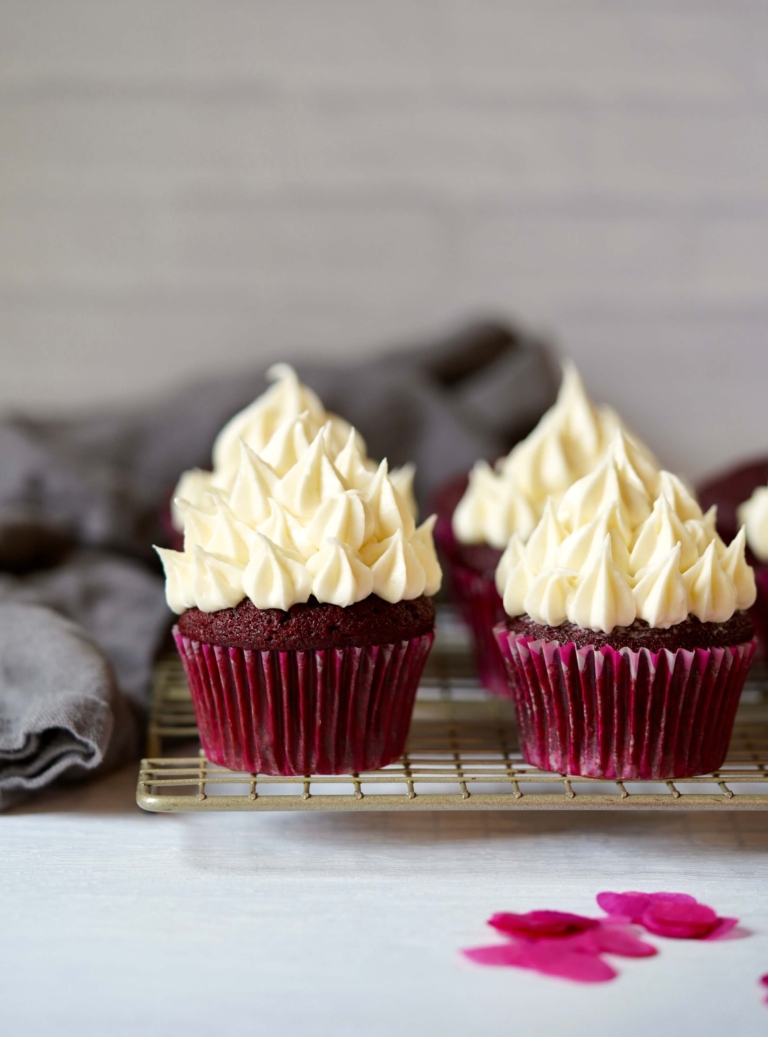
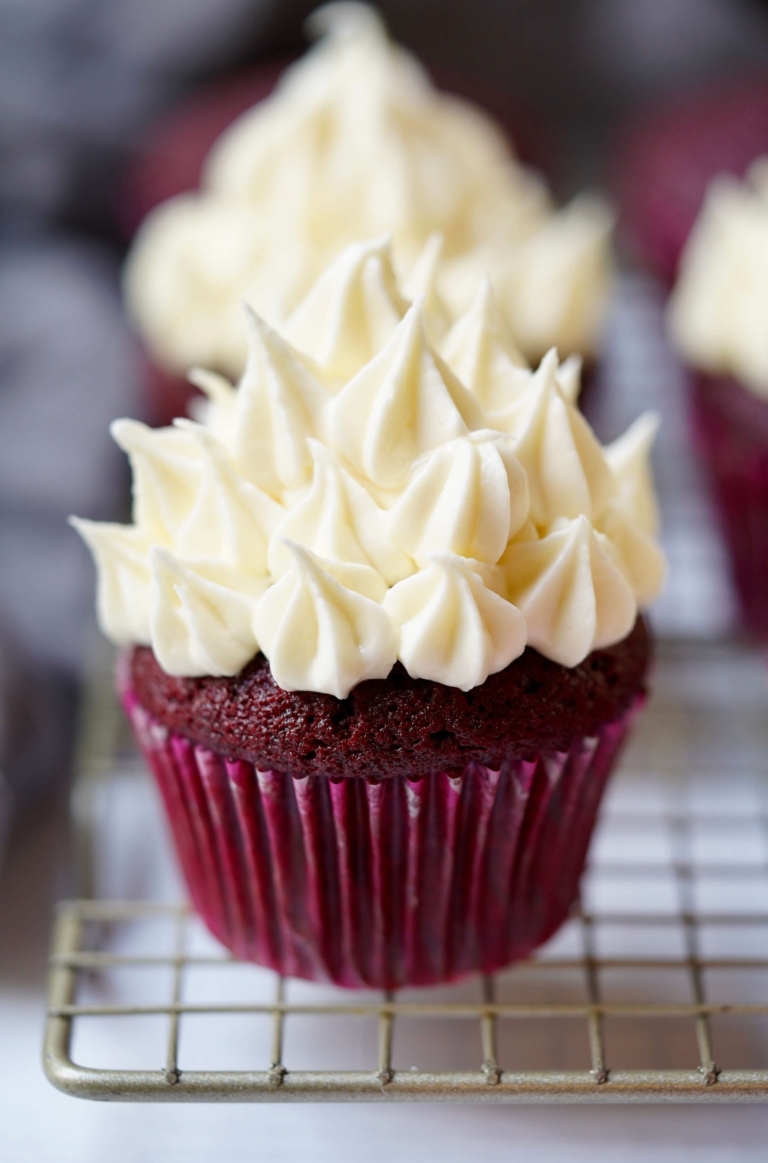
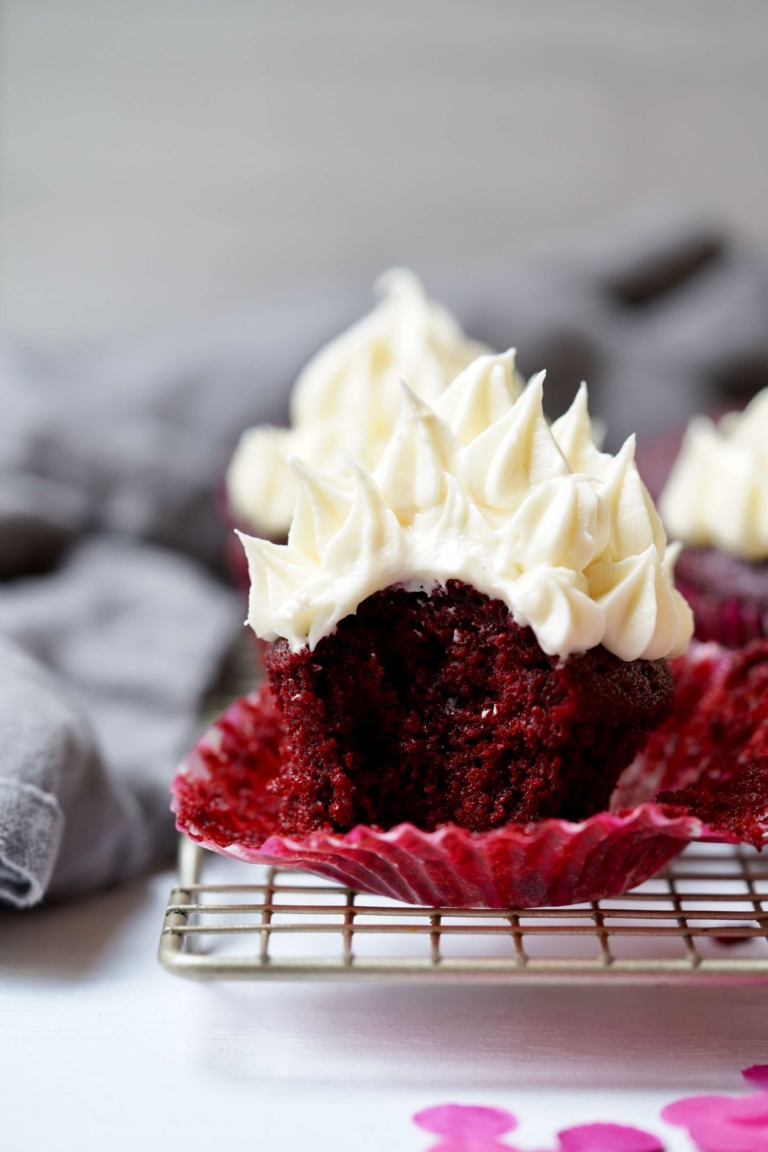
Red velvet cupcakes (or cakes) are traditionally red, crimson, or scarlet-colored colored cakes, with fluffy white ermine icing. And aside from my classic coconut layer cake, red velvet has become a recent obsession of my older son. The deep red hue of this popular flavor is visually striking and immediately draws attention. For my kid, it was love at first bite.
What Makes Red Velvet So Special?
The uniqueness of red velvet is not just because of its color, but rather its texture and slightly tangy flavor. Both moist and dense, with a fine crumb, is what makes red velvet so incredibly satisfying. The addition of cocoa powder to the batter is what adds a rich, subtle chocolatey flavor that is so memorable.
Red Velvet in History
In the 19th century, “velvet” cake, was a soft and velvety crumb cake served as a fancy dessert. This was in contrast to what had been the more common, coarser-crumbed cake. Around the turn of the 20th century, devil’s food cake was introduced, which many say is what led to red velvet’s invention. The key difference between the two cakes is that Devil’s Food Cake uses chocolate and red velvet cake uses cocoa.

Chemical Reaction
Before the use of food coloring, the vibrant red velvet color was achieved by a chemical reaction between acidic ingredients (buttermilk) and cocoa powder. The reaction caused the anthocyanin pigments present in the cocoa to develop a reddish hue, giving the cake a distinctive color. However, this reaction alone will not produce the vibrant red color typically associated with red velvet desserts today.
To further enhance the color, some recipes add vinegar or lemon juice to the batter. The additional acid intensifies the reaction between the cocoa powder and buttermilk, resulting in a brighter, more vibrant red color.
Natural Coloring Agents
When foods were rationed in the US during World War II, bakers used natural ingredients such as boiled beet juices to enhance the color of their cakes. Beets were, and often still are, used to help retain moisture. Adams Extract (and Sterling Crim an executive from the South) are credited with popularizing red velvet cakes during the Great Depression era because they were the first to sell red food coloring.
Southern Favorite
In the 1930s, the Waldorf-Astoria, a well-known hotel in NYC, was one of the first to begin serving red velvet cake and thus credited for its invention. But in actuality, they likely only capitalized on a cake already popular throughout the country at the time. The cake itself is not very old, and truthfully, not all that Southern, except for the addition of buttermilk. But invention aside, red velvet is a big flavor favorite in the South and considered a go-to at Christmas and Juneteenth celebrations.
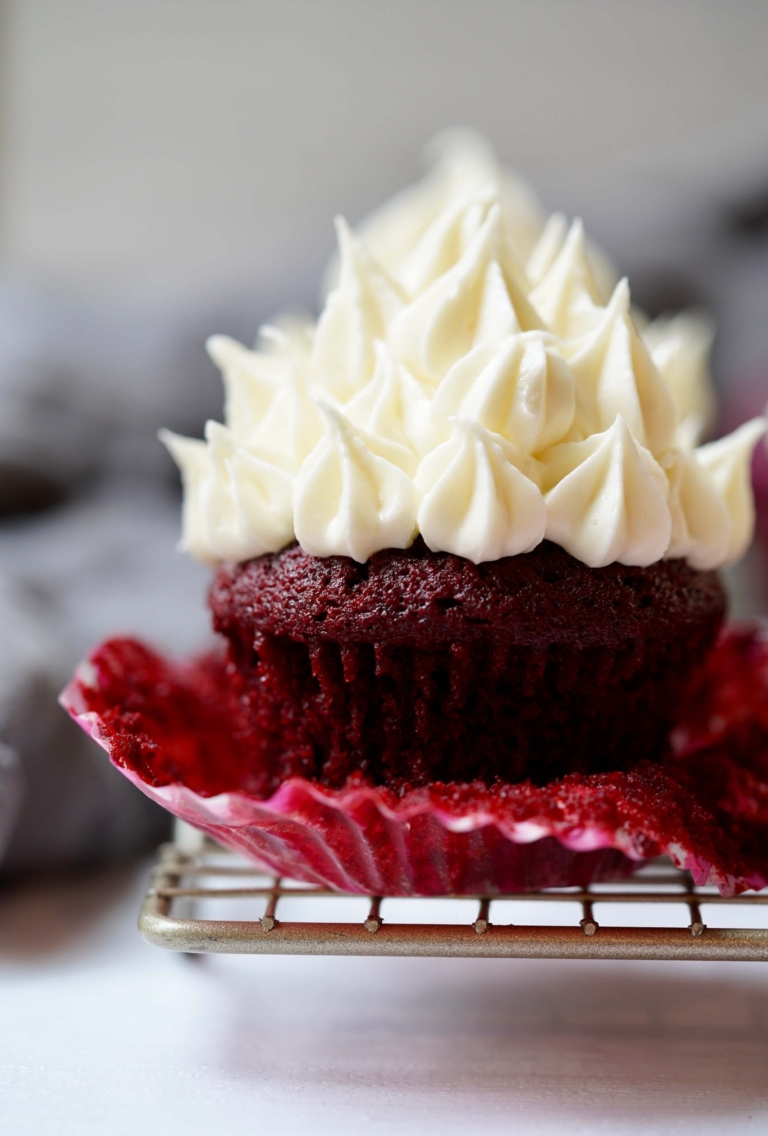
In Honor of Eli
Cream cheese frosting on modern red velvet cupcakes (and cakes) is also a factor in the flavors’ popularity. The tangy, yet sweet frosting pairs perfectly with the slightly chocolatey flavor of the cake. The rich, indulgent topping adds yet another layer of visual interest. I developed this recipe for my son in honor of his 18th birthday today (May 4th). Just a few weeks from now we have his high school graduation. These are some happy, emotional, bitter-sweet, celebratory times. Happy birthday, happy graduation, happy everything E!
Red Velvet Cupcakes
Ingredients:
For the Cupcakes:
- 1/2 cup boiling water
- 1/4 cup good quality, unsweetened cocoa powder
- 2 1/4 cups all-purpose flour
- 1 teaspoon baking soda
- 1/2 teaspoon baking powder
- 1/4 teaspoon salt
- 1/4 teaspoon cinnamon
- 2 cups sugar
- 1/2 cup vegetable oil
- 1/2 cup unsalted butter, melted
- 2 eggs, room temperature
- 1 egg yolk, room temperature
- 1 cup buttermilk
- 1 tablespoon vanilla extract
- 1 1/2 tablespoons red food coloring (or less if desired)
- 1 teaspoon distilled white vinegar
For the Cream Cheese Frosting:
- 16 ounces cream cheese, room temperature
- 1 cup unsalted butter, room temperature
- 2 teaspoons vanilla extract
- 4 cups Confectioners' sugar, sifted
Directions:
- Preheat the oven to 325 degrees F. Line 18 cupcake molds and lightly oil. Set aside.
- For the cupcakes: In a small bowl whisk the hot water and cocoa powder together till blended. Cover and let stand for about 5 minutes.
- In a medium mixing bowl add the flour, baking soda, baking powder, salt, and cinnamon and blend. Set it near your workstation.
- In the bowl of a kitchen mixer, such as a KitchenAid, fitted with a paddle attachment, add the sugar, vegetable oil, and melted butter and beat on low. Add in the eggs and yolk and mix until incorporated. With the mixer running, slowly add in the buttermilk, vanilla, and red food coloring. Next, add the vinegar and hot water-cocoa mixture. Slowly add the flour mixture and mix to blend, scraping down the sides with a rubber spatula as needed.
- Divide the batter equally between the prepared cupcake molds. Tap the pan gently against the counter to release any air bubbles. Place in the oven and bake for about 25 or until a cake tester comes out clean. Allow the cupcakes to cool completely before frosting.
- For the frosting: In the bowl of a kitchen mixer, fitted with the paddle attachment, add the cream cheese and butter and beat on medium-high speed until light, creamy, and very smooth. Add in the vanilla and beat until combined. With the mixer on low, slowly add in the sugar and beat until fluffy, about 3 minutes. Frost the cupcakes with an offset spatula or use a piping bag and pastry trip to make a more decorative frosted cupcake. Store cupcakes in the refrigerator for up to three days.
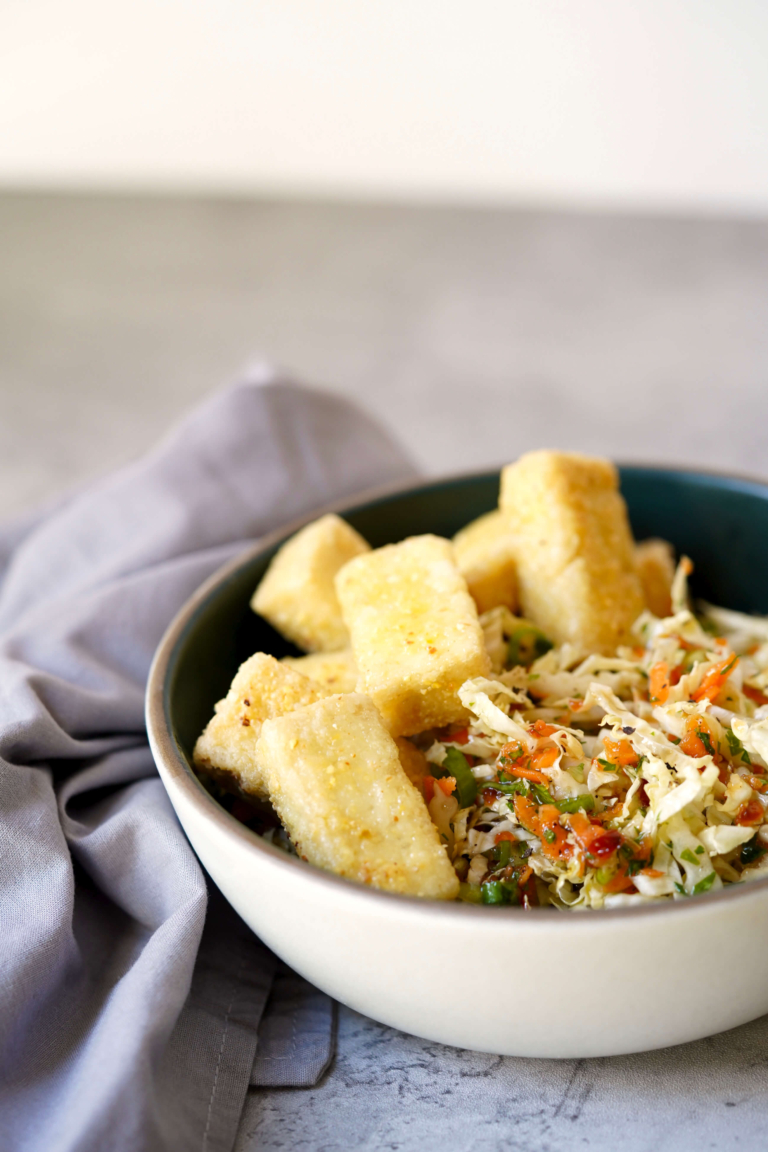
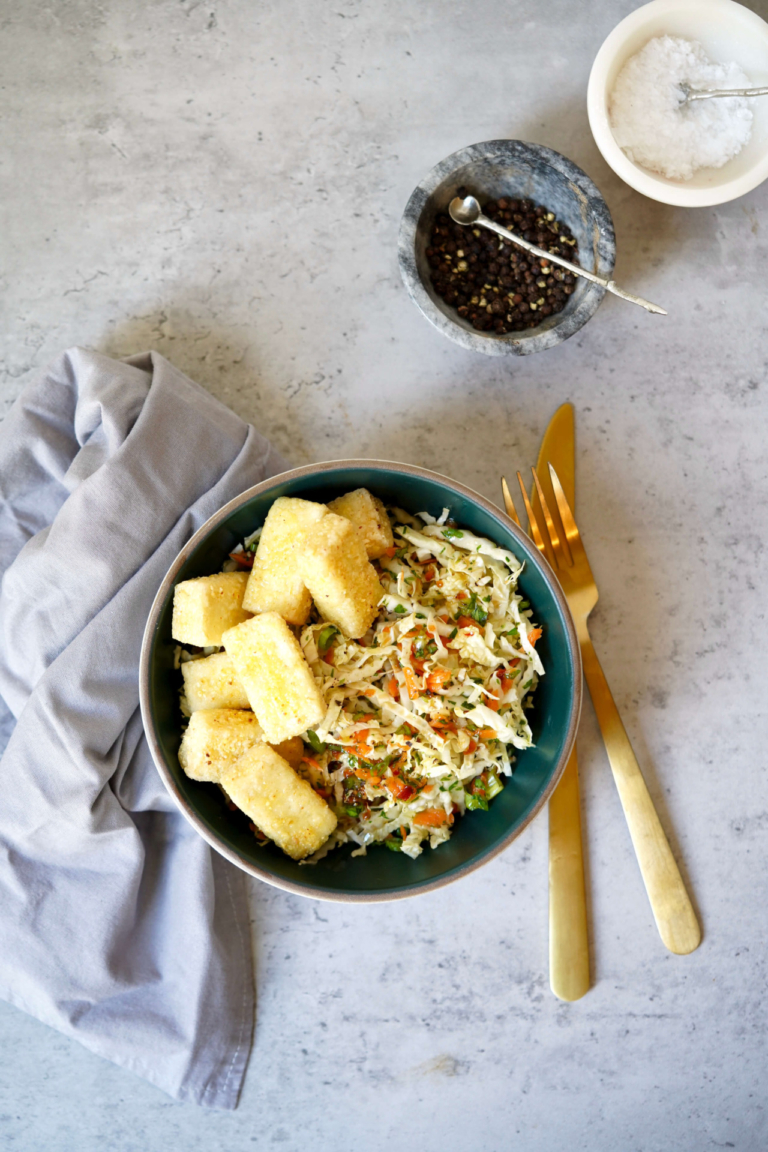
Crispy tofu with Napa cabbage slaw is a tried and true family favorite. Dredging the tofu in cornmeal and cornstarch, before lightly pan frying, creates a crunchy exterior with a soft, pillowy texture inside. This is not my recipe, it’s from Cook’s Illustrated magazine. I have adapted this recipe a little over the years, but it’s a winner either way. (Note: Unfortunately, at this time, there is no online link to the original recipe).
What is Tofu?
Tofu is made by curdling fresh soy milk, pressing it into a solid block, and then cooling it, in much the same way that traditional dairy cheese is made by curdling and solidifying milk. It is naturally gluten-free and low in calories. Another bonus, tofu has no cholesterol and is an excellent source of both iron and calcium.
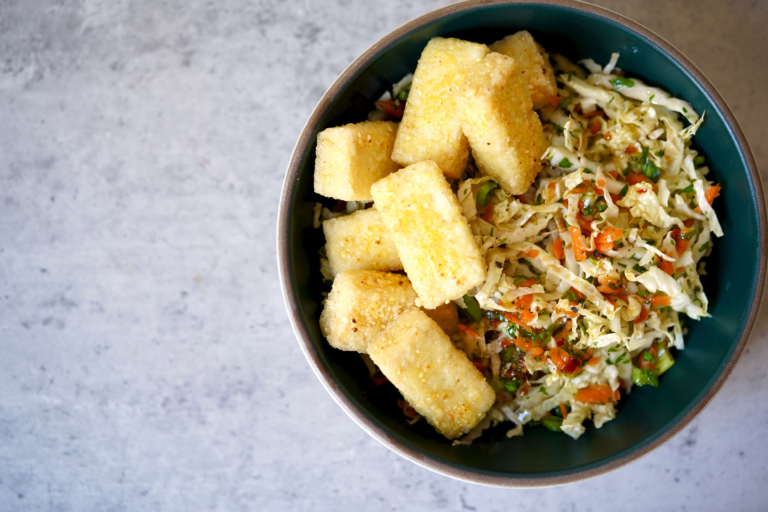
I have always been a big tofu fan, as have my boys. Tofu was a favorite of the bento-style lunches I packed for them in grade school. What I love most about tofu is its versatility, from sweet to savory, it is a wonderful ingredient to work with. A good, flavorful marinade or sauce is what any great tofu dish needs to make it delicious. Asian flavors such as sesame oil and oyster sauce tie the crispy tofu and the raw cabbage together brilliantly in this flavorful dish.
Do You Have To Press Your Tofu?
Many crispy tofu recipes, including this one, don’t require formal tofu pressing. But depending on the size of the tofu or the method of cooking, it may help. Pressing is often the best way to remove excess moisture. Pressing can help create firmer tofu that better holds its shape during cooking. Instead of pressing, I drain the tofu. First, in block form, for about 20 minutes. And second, slice it on paper towel-lined baking sheets before cooking it. This is a great prep-ahead technique. I drain and slice the tofu in the morning or early afternoon and refrigerate it. Later, when I’m ready to cook it, the tofu has drained naturally and is ready to go.
How to Prevent Sticking
Stainless steel and tofu do not work well together and often cause sticking. When making this crispy tofu I use a large, well-seasoned cast iron. Alternatively, people get nervous about pan frying in a non-stick pan and get concerned about the pan withstanding high heat. But the truth is, a non-stick pan can take it, so this works just as well as a cast iron pan.
The real trick when you pan-fry something is only using enough oil to swirl around and coat the pan. Deep frying would mean you need to completely submerge the tofu in oil and you are not doing that here. Also important to prevent sticking–don’t flip it too soon! Let the tofu sit and sear to get crispy. People often flip food before it’s ready. It takes longer than one expects to get food crispy.
So, if you’re a tofu lover already this crispy tofu dish is probably a no-brainer and thanks to the cabbage slaw, it falls into the healthy-ish and quick meal categories which is a double bonus. And if you’re new to tofu, I hope you give this simple little recipe a whirl, you may just fall in love.
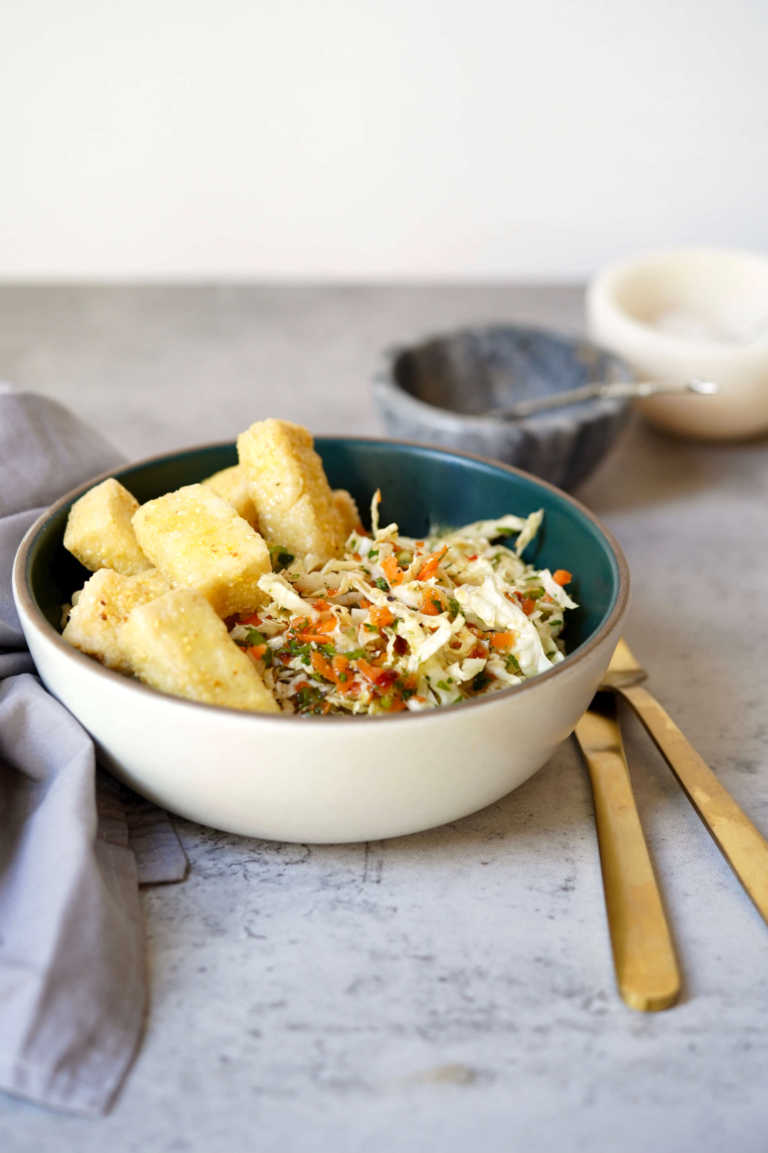
Crispy Tofu With Napa Cabbage
Ingredients:
For the Tofu:
- Two packages of medium-firm tofu sliced into 2x1-inch-pieces
- 1 cup cornstarch
- 1/3 cup cornmeal
- Salt and ground black pepper
- 3/4 cup vegetable oil
For the Cabbage:
- 1 medium head Napa cabbage, shredded
- 2 medium carrots, peeled and grated
- 4 scallions, thinly sliced
- 1/2 cup fresh cilantro leaves
For the Dressing:
- 3 tablespoons sesame oil
- 1 medium garlic clove, grated
- 5 tablespoons rice vinegar
- 2 tablespoons oyster sauce
Directions:
- Before slicing the tofu wrap it in a paper towel and allow it to drain for about 20 minutes. Next, slice the tofu and lay the tofu on several layers of paper towels to drain further. I like to do this for at least 20 minutes, but often I prep the tofu to this point, wrap it, and refrigerate it until ready to cook it.
- Once the tofu has drained, adjust the oven rack to the middle position and heat to 200 degrees F. Place a wire rack over a paper towel-lined baking sheet and set it near your workstation. Toss the cornstarch and cornmeal together in a shallow dish. Season the tofu generously with salt and pepper. Working with a few pieces of tofu at a time, coat them thoroughly with the cornstarch mixture, pressing on the coating to adhere. Transfer the coated tofu to the wire rack.
- Heat the oil in a 12-inch cast iron or nonstick skillet over medium-high heat until shimmering. Carefully lay half of the tofu in the skillet and cook, turning the pieces occasionally with a spatula, until crisp and lightly golden on all sides, about 4 minutes. Using a spatula, gently lift the tofu from the oil, and transfer it to the prepared baking sheet. Repeat with the remaining tofu. Remove the paper towel from the baking sheet and place the pan of tofu in the oven to keep warm.
- For the Cabbage: In a large mixing bowl add the cabbage, carrot, scallions, and cilantro, and set aside.
- For the dressing: Add the oil to the skillet and return to medium heat until shimmering. Add the garlic and cook until fragrant, about 30 seconds. Whisk in the vinegar, oyster sauce, sugar, and chili sauce, and bring to a brief simmer, for about 15 seconds.
- Off the heat, measure out and reserve 2 tablespoons of the dressing. Pour the remaining dressing over the cabbage mixture and toss to combine. Divide the cabbage between four plates and arrange the warm tofu over the top. Spoon the reserved dressing over the tofu before serving
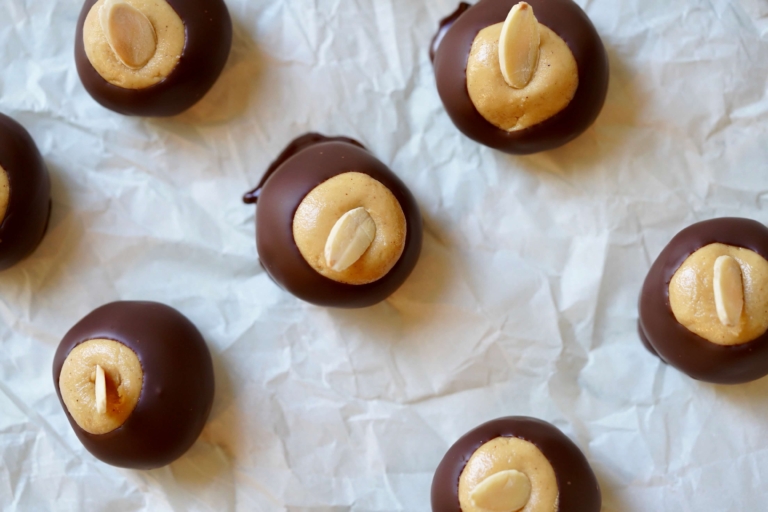
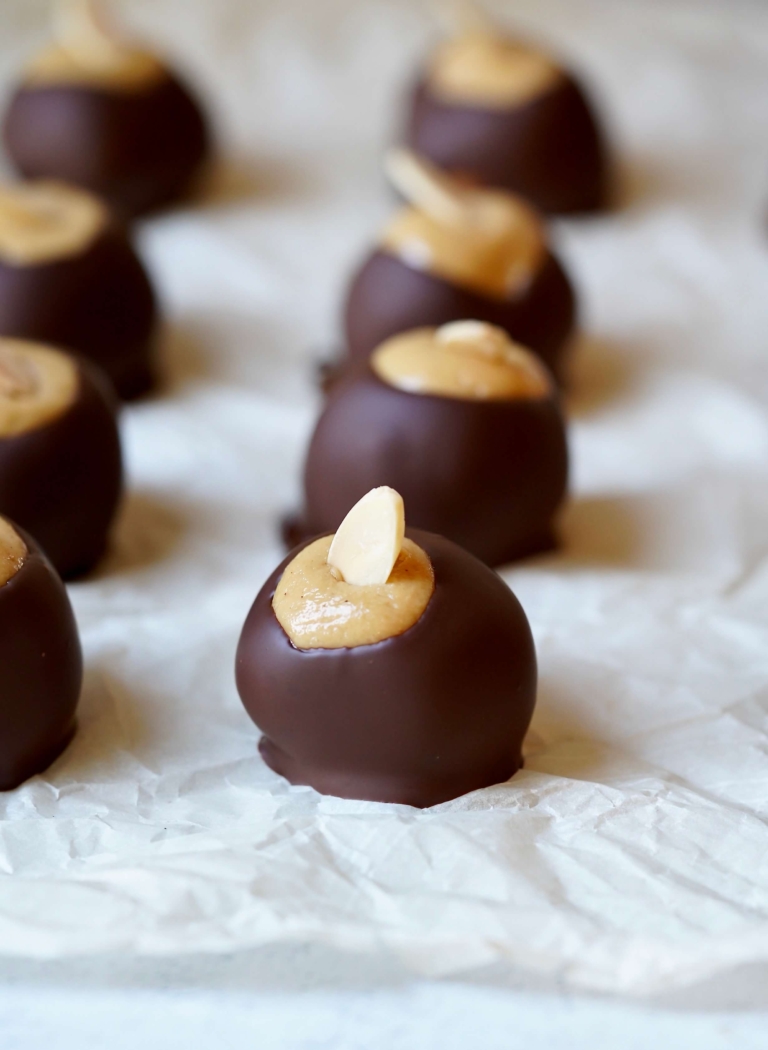
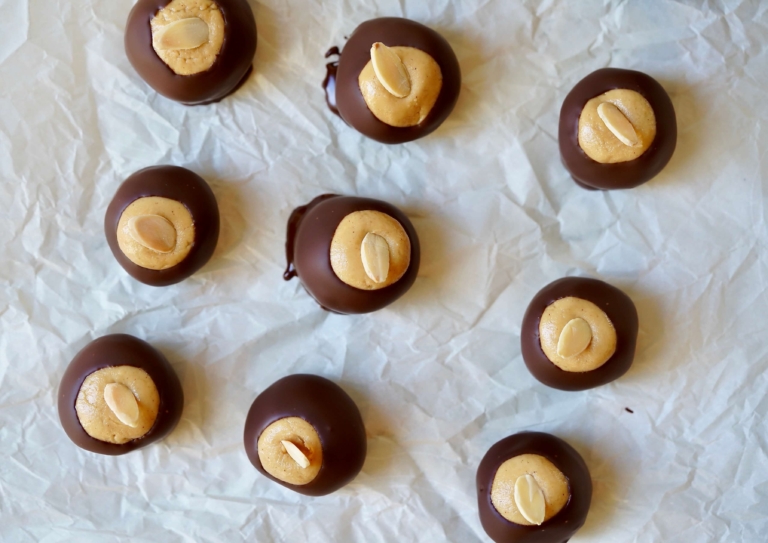
Almond butter buckeye balls are one of my latest obsessions. Buckeye balls are a beloved American confection that is easy to make and sure to please just about anyone. These delectable bite-sized balls have been around forever, but are typically made with a combination of peanut butter, chocolate, and powdered sugar, which creates a creamy, rich, and indulgent flavor. I’ve modernized these beloved favorites by swapping out the peanut butter and replacing it with creamy almond butter for a slightly healthier version I can’t seem to get enough of.
Where Buckeye Balls Got Their Name
The origins of Buckeye balls can be traced back to the Buckeye State, Ohio. Buckeye trees, which produce small brown nuts with a tan spot that resembles the eye of a deer, are abundant in the state. The name “Buckeye” was given to Ohioans as a nickname, and thus, the Buckeye ball was born.
There are many variations of Buckeye balls, each with its unique twist. Some recipes add rice cereal or graham cracker crumbs to the nut butter mixture for an added crunch, while others use different types of chocolate to coat the balls. Using almond butter makes buckeye balls a wonderful, easy sweet treat for those with peanut allergies or who simply aren’t peanut butter fans.
Peanut Butter vs. Almond Butter
Blame it on my age. Although I am team peanut butter with many things, these days I gravitate a bit more towards almond butter. One of the main differences between almond butter and peanut butter is their fat content. Almond butter contains more monounsaturated fats, which are considered healthy fats that can help lower cholesterol levels and reduce the risk of heart disease.
From a healthy fats perspective, peanut butter and almond butter aren’t identical. They contain different types of healthy fats. Peanut butter is known for its PUFAs, while almond butter is known for its MUFAs. Though both are good for you, PUFAs and MUFAs do different things for your health. MUFAs, in particular, have been getting lots of love from the wellness community recently. According to Women’s Health Magazine, Research suggests they might help support healthy cholesterol levels and overall heart health. Plus, according to the American Heart Association, foods rich in MUFAs also tend to be high in vitamin E, a nutrient most of us don’t get enough of.
Peanut butter, on the other hand, contains more saturated fats, which can increase cholesterol levels and the risk of heart disease when consumed in excess. People also are fearful of peanuts because of aflatoxins, a cancer-causing toxin that can contaminate certain crops, including peanuts. In terms of protein content, both almond butter and peanut butter are good sources. However, almond butter has slightly more protein per serving than peanut butter.
Buckeye balls are the perfect treat for any occasion, whether it’s a holiday party, summer picnic, or simply an afternoon sweet treat. With their rich flavor and creamy texture, they are sure to become a favorite in your household.
Almond Butter Buckeye Balls
Ingredients:
- 1 1/2 cups smooth almond butter
- 1/2 cup unsalted butter, room temperature
- 1 teaspoon vanilla extract
- 3 cups confectioners' sugar, sifted
- 1/4 teaspoon cinnamon
- 1 1/2 cups semi-sweet chocolate chip
- sliced almonds, for garnish
- toothpicks, to help with coating
Directions:
- In the bowl of a kitchen mixer, fitted with a paddle attachment, add the almond butter and the butter and blend on high until light and fluffy. Add the vanilla and blend.
- Reduce the speed to low, and slowly add the confectioners' sugar and cinnamon, and mix well to incorporate.
- Line a baking sheet with parchment paper and set it near your workstation. Using your hands shape the dough into small balls that are about the size of 1 1/2-2 tablespoons in size. Put the balls on the baking sheets in the freezer to firm for about 30 minutes.
- When the almond butter balls are sufficiently chilled, melt the chocolate in the microwave in 20-second intervals, stirring occasionally, until smooth.
- Use a toothpick to spear a frozen ball and dip it into the melted chocolate, coating each about 3/4's of it. Once all of the almond butter balls have been coated place the sheet pan back into the freezer for about 10 minutes until the chocolate has set.
- To serve, garnish with an almond slice and serve. Store the buckeye balls in the refrigerator for maximum freshness.
For as much as I love fruit, I have never loved grapefruit. I’ve always wanted to, but it’s been a struggle. When I was a little kid I thought that eating a halved, sectioned grapefruit, lightly sprinkled with sugar and topped with a maraschino cherry served with breakfast was considered an elegant side. I never ate it, but bless my mom, she always did when I served it to her. Even years later, grapefruits on their own are still not my thing, but I have come to love and appreciate their flavor, especially in mocktails and cocktails.
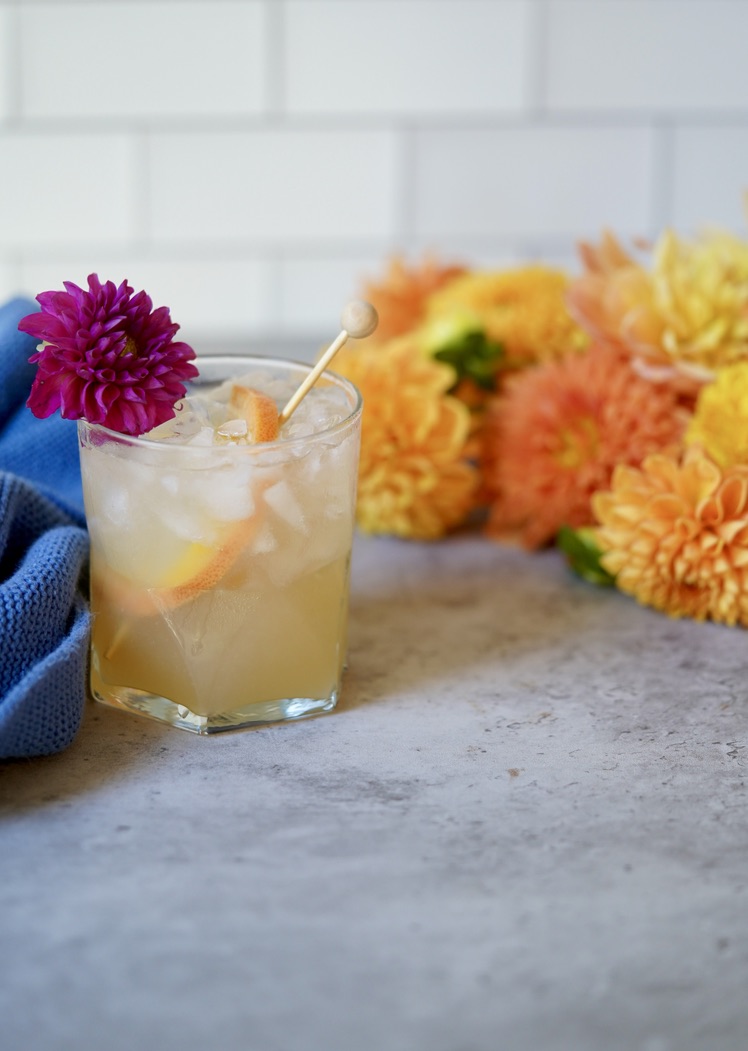
Back during my paralegal days, a good friend of mine got me to add a splash of fresh grapefruit to my gin and tonics, we named that cocktail “the Fresher” and I still make that to this day. This cocktail recipe is a nod both to my friend and my continued quest to love grapefruit more. This mocktail has a sweet-tart grapefruit flavor with a burst of lemon that’s refreshing and smooth for warm-weather sipping.

The grapefruit itself was bred in the 18th century as a cross between a pomelo and an orange. It was given the name “grapefruit” due to growing in clusters on trees, similar to grapes. Low in calories and loaded with nutrients, grapefruits are a whopping 92% water and are considered one of the highest water contents of any fruit. With that in mind, a grapefruit-lemon soda mocktail seemed appropriate, light, refreshing, and hydrating now that spring has finally arrived.
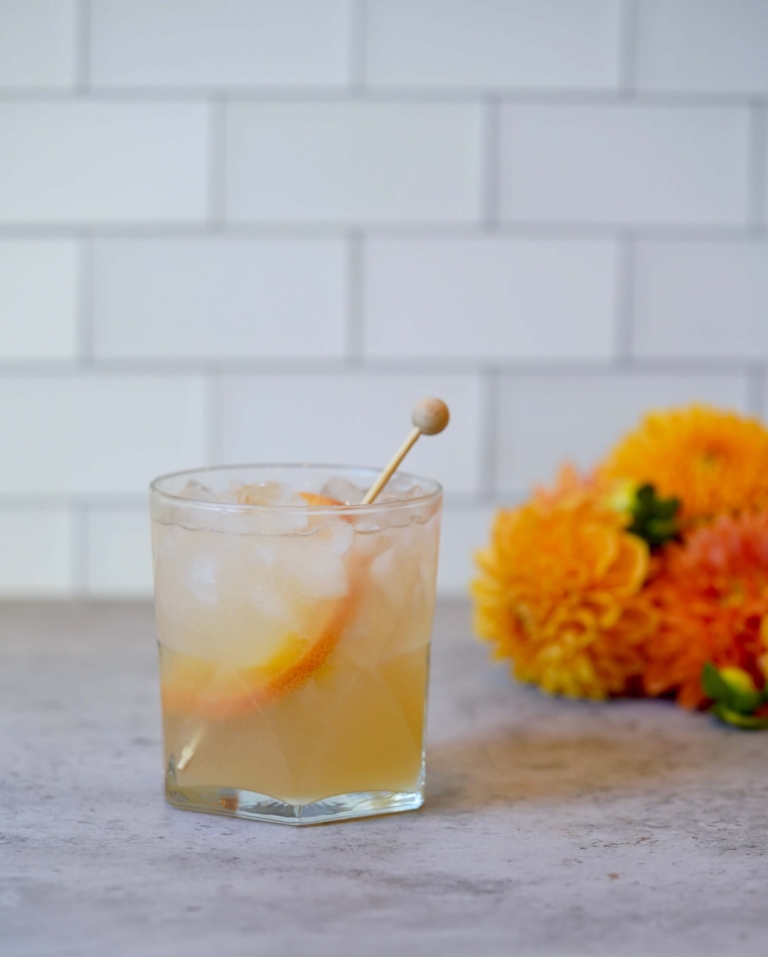
This mocktail has a touch of sweetness but is more on the tart side. It can, however, be easily adjusted if you want it more sweet and less tart. So if you love grapefruit or like me, are trying to embrace them more, this refreshing mocktail may be just the right thing to convince you.
Grapefruit-Lemon Soda Mocktail
Ingredients:
- 3 ounces freshly squeezed pink grapefruit juice
- 1/2 ounce freshly squeezed lemon juice
- 1-ounce simple syrup
- Good quality Tonic water
- Orange (or lemon) slice, for garnish
Directions:
- Place a good amount of crushed ice in a preferred glass and set aside.
- Using a cocktail shaker add the grapefruit juice, lemon juice, simple syrup, and a handful of ice cubes. Shake vigorously for 20 seconds.
- Strain the grapefruit mixture onto the prepared glass. Top with tonic water. Garnish with an orange slice
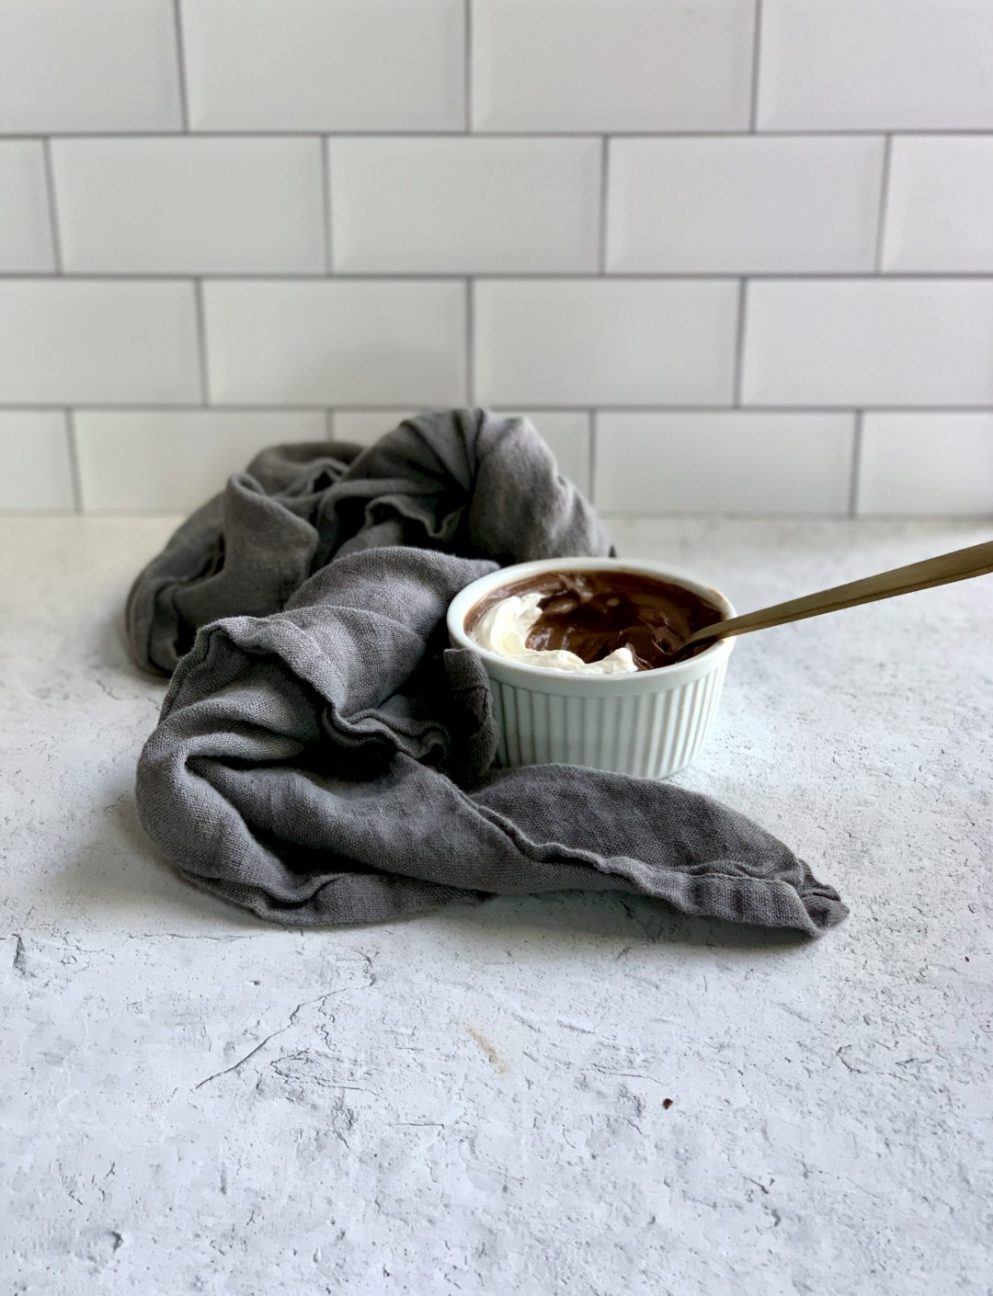
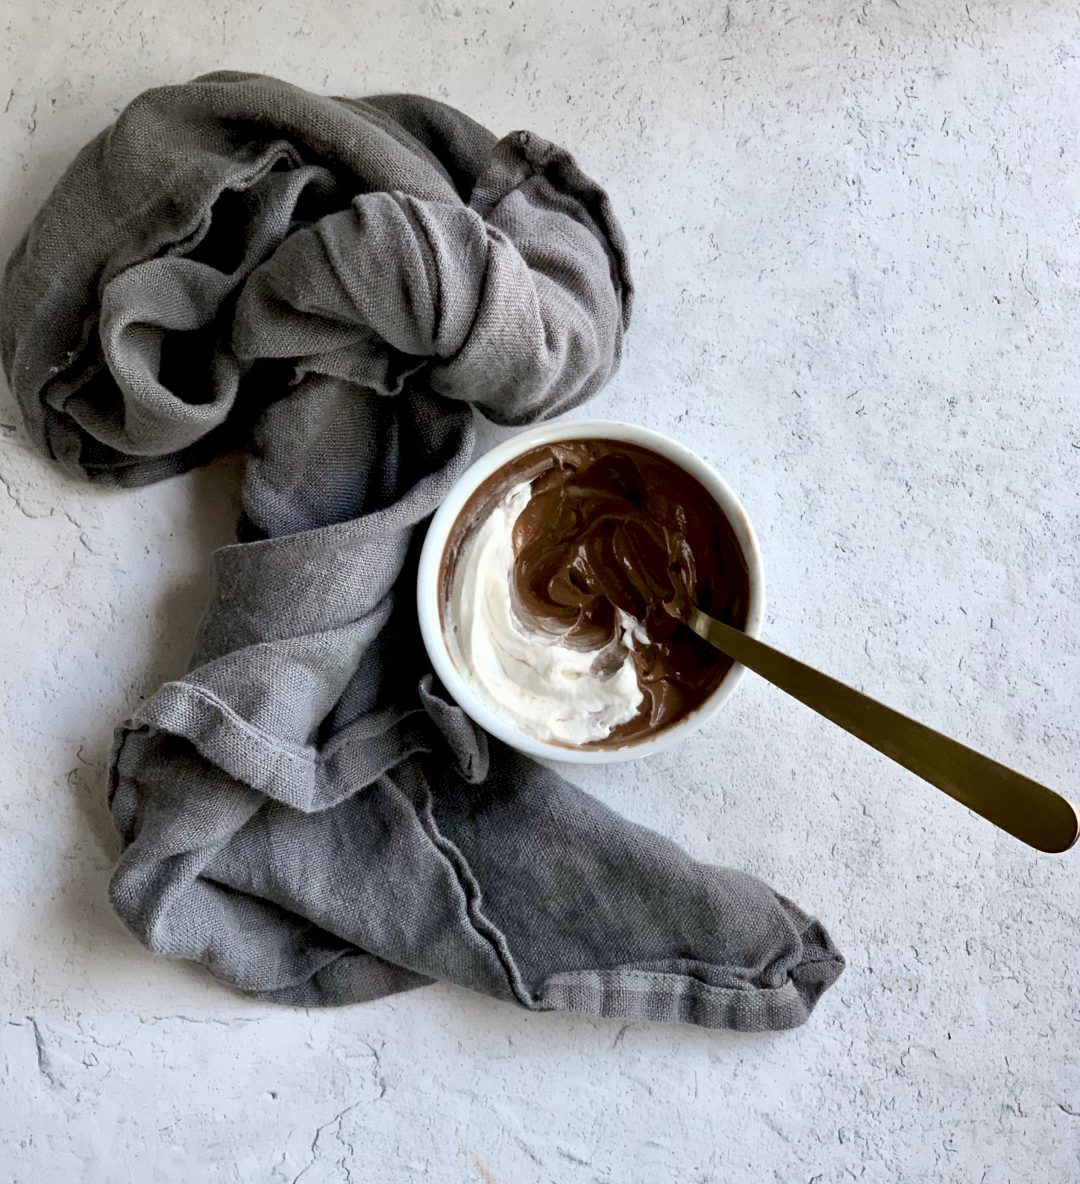
Although I am not a die-hard chocolate fanatic, many I know are. This recipe is for them. Chocolate can make many wonderful things, pudding is one of them. Chocolate pudding was a childhood treat that sometimes appeared in my school lunch box. But the kind I ate was not the homemade kind, it came in a plastic cup with a peel-back foil top. It was also associated with a catchy jingle and Bill Cosby, but I have since tried to erase that latter association from my mind completely.
Puddings vs. Custard
Many people get puddings and custards confused. Although similar in appearance, there are some subtle differences between the two. Pudding has a lighter consistency and looks more whipped than a custard which has a thicker texture. Pudding is a sweetened milk or cream-based mixture, thickened with starch (typically cornstarch or flour) that’s cooked on the stove. In contrast, custards are milk or cream-based, thickened with egg, that are typically firmer, and commonly baked with a water bath. Creme brûlée is the most well-known of all custards.
Pudding and Custards in History
Pudding’s history is a confusing one. Ancient Roman cooks discovered that eggs could bind ingredients. They are credited for creating several egg-based dishes including custards. The creamy rich dessert pudding we Americans know is more closely related to the custard of long ago. Medieval puddings were primarily savory and meat-based. The British claim pudding as part of their culinary heritage. 17th-century English puddings were either savory (meat-based) or sweet (made with nuts & sugar) and were often boiled. But by the end of the 18th century traditional English puddings no longer included meat. 19th-century puddings were still boiled, but started more cake-like, plum pudding is a good example.

In 19th century America, boiled pudding became less common to feed families because food was plentiful. Around the same time an English chemist named Alfred Bird introduced custard powder as an alternative to egg thickeners. Soon after Americans began using custard powder and other cornstarch derivatives as thickeners for a variety of custard and pudding-type desserts. This invention is credited for bringing dessert pudding into the modern day.

Most puddings are served cold, though a few are prepared warm. Both rice puddings and chocolate puddings are two puddings that can get away with being served warm or cold. Homemade chocolate pudding is a rich, flavorful, and decadent treat so popular it has earned its day, National Chocolate Pudding Day is June 26th, in case you were wondering, but if you’re a chocolate lover, no need to wait for that day to make this special treat.
Chocolate Pudding
Ingredients:
- 2 cups whole milk
- 6 egg yolks
- 3/4 cup sugar
- 3 tablespoons all-purpose flour
- 2 tablespoons good quality cocoa powder
- 6 ounces semisweet chocolate, finely chopped
- 2 ounces unsweetened chocolate, finely chopped
- 1 1/2 teaspoons vanilla extract
- Homemade whipped cream, optional
- Shaved chocolate, optional
Directions:
- In a medium saucepan add the milk and place over medium-high heat. When the milk just begins to simmer, remove it from the heat. Set aside.
- In a medium bowl add the egg yolks and sugar and whisk until smooth and pale yellow in color. Sift in the flour and cocoa powder and whisk to blend.
- Slowly and carefully pour the warm milk into the egg mixture while whisking continuously. Pour the mixture back into the saucepan, place over medium heat, and bring to a boil while stirring constantly. Reduce the heat to low and cook, while stirring until the mixture thickens, about 4-5 minutes.
- Place the chopped chocolate in a large mixing bowl. Pour the milk-egg mixture through a fine-mesh strainer and mix until all the chocolate has melted. Stir in the vanilla.
- Spoon the pudding into 6 ramekins or serving cups, place in the refrigerator, and chill for at least 2 hours. Serve with homemade, lightly sweetened, whipped cream and shaved chocolate
Truffled quail eggs have been a favorite of mine for many years. If you’ve been to a dinner party I’ve hosted, chances are you’ve had them. These flavorful, mini, deviled eggs, make phenomenal hors d’oeuvre at just about any gathering no matter what the occasion.
What Are Quail Eggs?
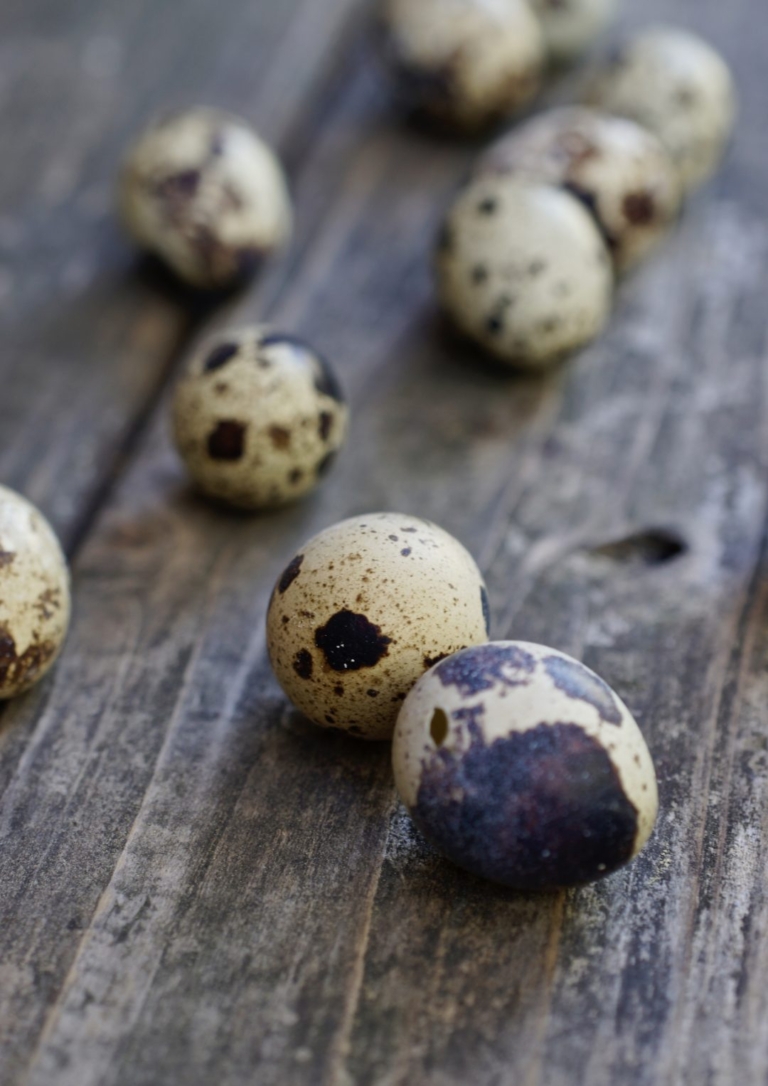
Quail eggs are, rather obviously, the eggs laid by various species of quail. Quails are medium-sized birds typically found in Europe, North Africa, the southern United States, as well as some parts of Asia. Quail eggs are notably smaller than your average chicken egg found in the grocery store and are typically white or tan(ish) in color with signature dark brown speckling.

Health Properties And Consumption
Quail eggs have a very mild, slightly gamey taste with an extra-rich, creamy yolk. These eggs have a higher yolk-to-white ratio than chicken eggs. Quail eggs are about the size of large olives. In addition to being adorable, quail eggs are also packed with nutrients. They are a great source of good cholesterol, as well as, vitamin B1, vitamin B2, and vitamin A. Interestingly, compared to chicken eggs, quail eggs may have six times more vitamin B1 and fifteen times more B2 vitamin.
Despite the prevalence of quail in the United States, consumption of these tiny eggs is dominated by the Asian market, where they are commonly used in Japanese bento boxes or sold as street food. However the rich, flavorful yolk has increased the demand for these eggs in many culinary preparations.
Usage And Storage of Truffle Oil
Truffle oil is good quality olive oil that has been infused with either white or black truffles. Both types of truffles have a seductive, earthy, mushroom flavor. Before commercial truffle oil was introduced in the 1980s, chefs in Italy and France traditionally made their own by steeping tiny bits of fresh truffles in olive oil.
Truffle oil is a finishing oil, it is not a cooking oil because heat adulterates their flavors. It is to be used sparingly to enhance the flavor of already prepared foods. Bottled truffle oil loses aroma over time as it is a truffle extract infusion. This delicate oil loses its characteristic aroma quickly, so to keep it fresh, it should be stored in the refrigerator.
Don’t be Fooled
Much of the truffle oils you see in the stores are actually fake, a chemical concoction that does not taste the same. When buying truffle oil, do your due diligence, and read the label to check the ingredients. If the label says “Truffle Essence” or “Truffle Aroma” or similar, it is synthetic and you should not waste your money. What you should look for when reading the label is “infused with truffles”, that’s the real deal.
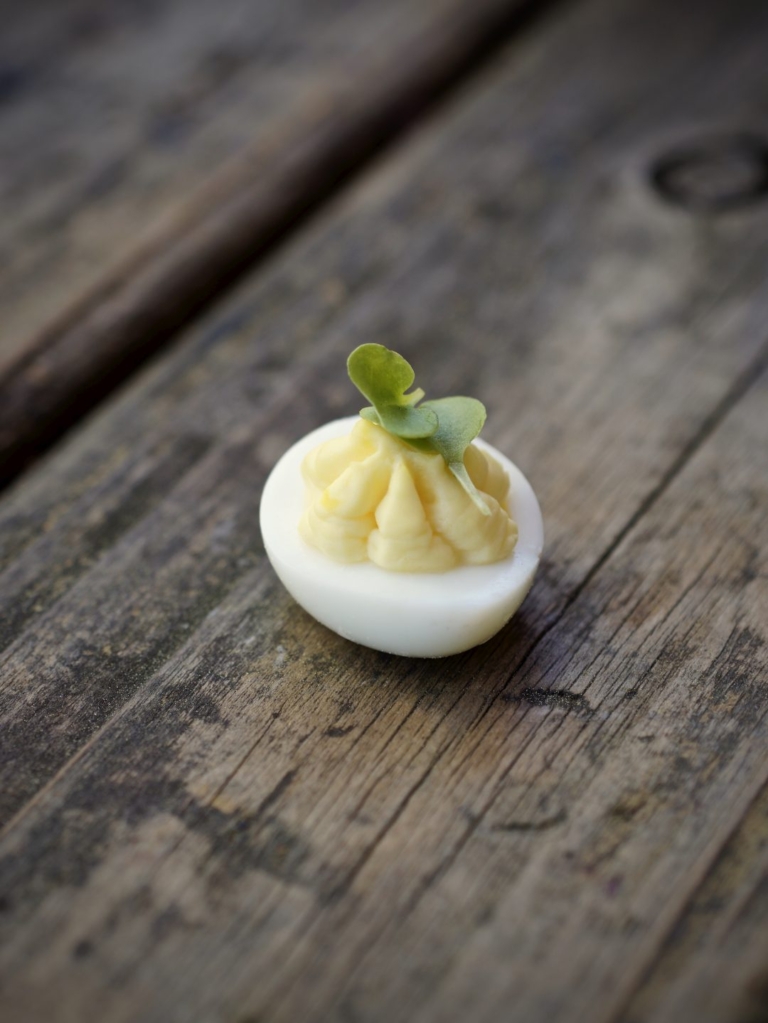
Truffled quail eggs are a modern twist on your mother’s favorite passed appetizer of the 50’s. Not many can argue that deviled eggs (traditionally made with mayonnaise, mustard, vinegar, and paprika) taste sinfully satisfying and fall under the comfort food category for many. So, wow your guests at any holiday gathering with these easy, yet memorable truffled eggs, trust me, they’re worthy.
Truffled Quail Eggs
Ingredients:
- 2 dozen fresh quail egg
- 3 tablespoons mayonnaise
- 2 teaspoons black truffle oil
- salt to taste
- Micro-greens or fresh chives, for garnish (optional)
Directions:
- Place the quail eggs in a small saucepan. Add 1/4 cup vinegar, then add enough water to just cover the eggs then bring the water to a boil. Reduce the heat and gently boil the eggs for about 5 minutes, then pour off the water. Add ice water to cool the eggs quickly and stop the cooking process.
- When eggs are cooled, gently peel them. Cut the eggs in half and remove the yolks. Mash the yolks in a small bowl until they are smooth. Add the mayonnaise, truffle oil, and salt. Mix until smooth, taste, and adjust the seasoning as needed.
- Put the filling in a pastry bag (or a small plastic bag with the corner cut off). Pipe the filling into the yolk wells. Refrigerate until ready to serve. Serve plain or garnish with some micro greens or chives
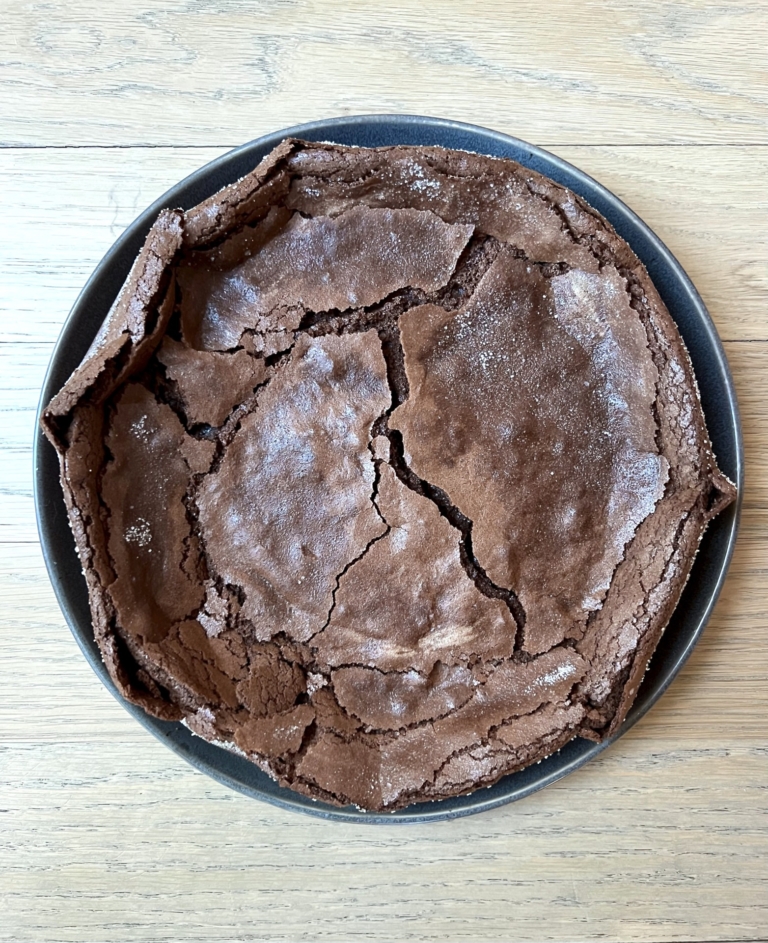
Not all cakes are created equal or considered beautiful, by modern-day standards. The fallen chocolate cake is the most well-known of all the “ugly” cakes. Despite that, I still find it remarkably intoxicating. The cake’s cracks are inviting and its uneven top is a curiosity. What lurks beneath that delicate sugary top layer is a question I want to know the answer to. And even as one who typically prefers vanilla cake, I’m lured in by it all.
Richard Sax
Fallen chocolate cakes have been a trendy thing for a long time and have shown no sign of slowing down. This lovely version is from the late Richard Sax. Sax, for those unfamiliar, was a celebrated food writer, cookbook author, and champion of home cooking. It is “classic home desserts“, like this one, that Sax is most famous for. And I can attest, that this cake is worthy of its fame, a delicate, cloud-like masterpiece that is incredibly satisfying.
A cake described as, “stunningly beautiful and ridiculously tasty”, which is the perfect description for this flour-less favorite. Never tasted a flourless cake before, think super chocolatey cake with the most amazing fudge-like center. This cake falls and crackles in the loveliest way, creating a tender and light texture underneath that’s truly irresistible.
Light as a Feather
The special handling of the eggs, in this type of cake, creates a soft, silky, and ethereally light texture but with substantial chocolate decadence. In this type of cake, eggs, (or a combination of egg whites and whole eggs or yolks) get blended together incorporating very little air.
As a result, the cake doesn’t rise much when baked and then falls once removed from the oven due to the absence of flour. This is often referred to as a “molten” (or “fallen”) chocolate cake, a cake made famous by master chef Jean-Georges Vongerichten.
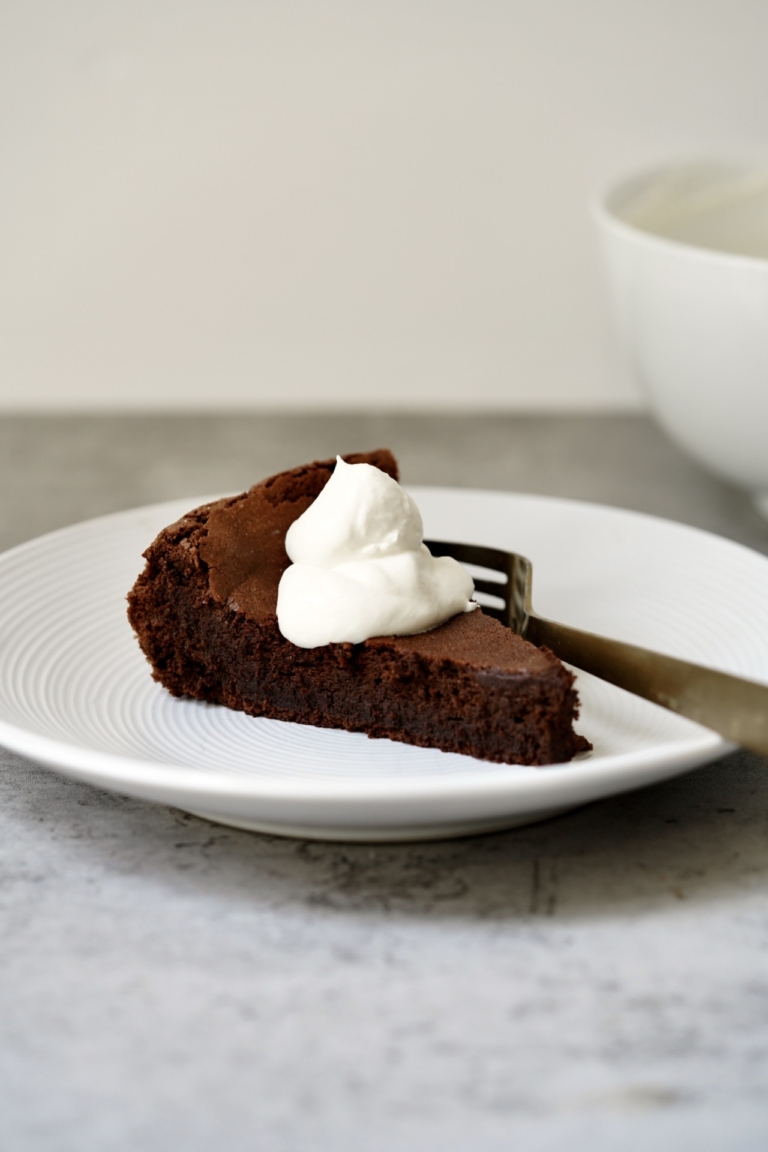
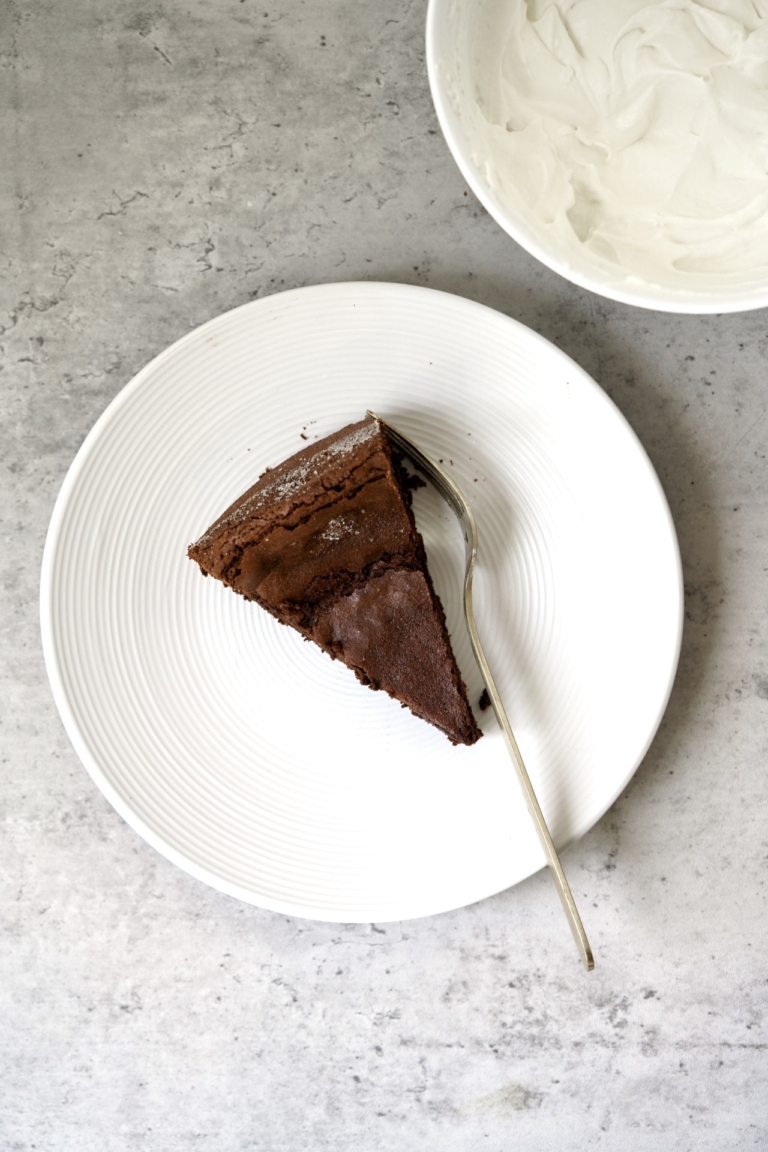
If you want to make this cake even better, there is only one thing to do, add fresh whipped cream. The cream offsets the richness of the cake in the most perfect way possible. This cake is a fantastic option for gluten-free individuals and a dessert I love to make for the Jewish holiday of Passover.

Fallen Chocolate Cake
Ingredients:
For the Cake:
- 1/2 cup unsalted butter, cut into 1-inch pieces, plus more, room temperature, for pan
- 3/4 cup, plus 2 tablespoons sugar, divided, plus more for pan
- 10 ounces semisweet chocolate, coarsely chopped
- 2 tablespoons vegetable oil
- 6 eggs
- 2 tablespoons unsweetened cocoa powder
- 1 teaspoon vanilla extract
- 1/4 teaspoon kosher salt
For the Whipped Cream:
- 1 1/2 cups chilled heavy cream
- 1/4 cup Confectioners' sugar
Directions:
- For the Cake: Preheat oven to 350 degrees F. Lightly butter the springform pan and dust it with sugar. Gently tap out any excess sugar and set aside.
- To a large heatproof bowl add the chocolate, oil, and 1/2 cup butter. Set the bowl over a saucepan of simmering water and heat, stirring often, until melted. Remove the bowl from the saucepan and set aside.
- Separate 4 eggs, placing whites and yolks in separate medium bowls. Add the cocoa powder, vanilla, salt,1/4 cup sugar, and remaining 2 eggs to bowl with yolks, and whisk until smooth. Gently whisk the yolk mixture into the chocolate mixture, and blend well.
- Place the egg whites in the bowl of a kitchen mixer, such as a KitchenAid, fitted with a whisk attachment. Beat on high until frothy. With the mixer running, gradually beat in 1/2 cup sugar and beat until firm peaks form.
- Using a large rubber tip spatula, gently fold the egg whites into the chocolate mixture in 2 additions. Fold just until incorporated between additions. Scrape the batter into the prepared pan. Smooth the top and sprinkle with the remaining 2 tablespoons of sugar.
- Place the cake in the oven and bake until the top is puffy, starting to crack, and pull away from the edge of the pan, 35-40 minutes. Transfer the cake to a wire rack and let cool completely in the pan. The cake will collapse in the center and crack further as it cools.
- For the Whipped Cream: Clean the bowl of the kitchen mixer and add the heavy cream. Use a splatter guard or kitchen towel to prevent splatter. Beat on high until soft peaks have formed. Reduce the speed to low and slowly add the confectioners' sugar. Beat until firm peaks have formed.
- To serve, remove the sides of the springform pan from the cake. Mound the whipped cream in the center of the cake or slice and serve individually.
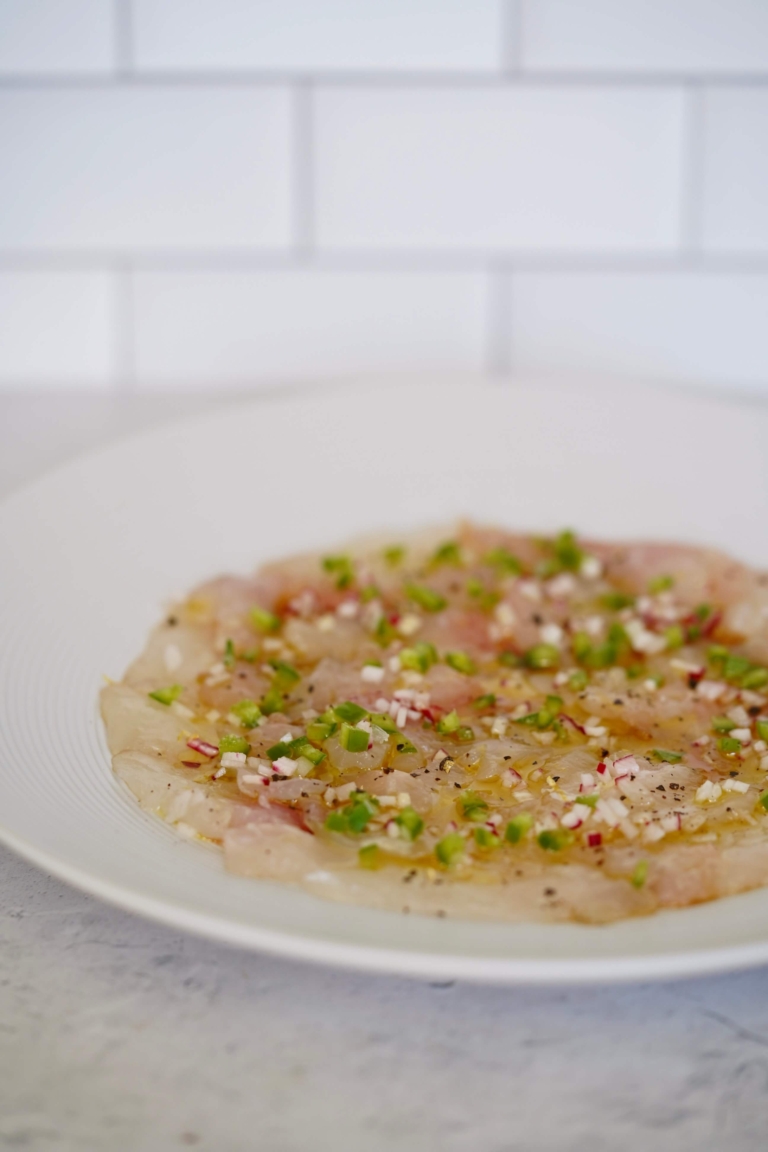
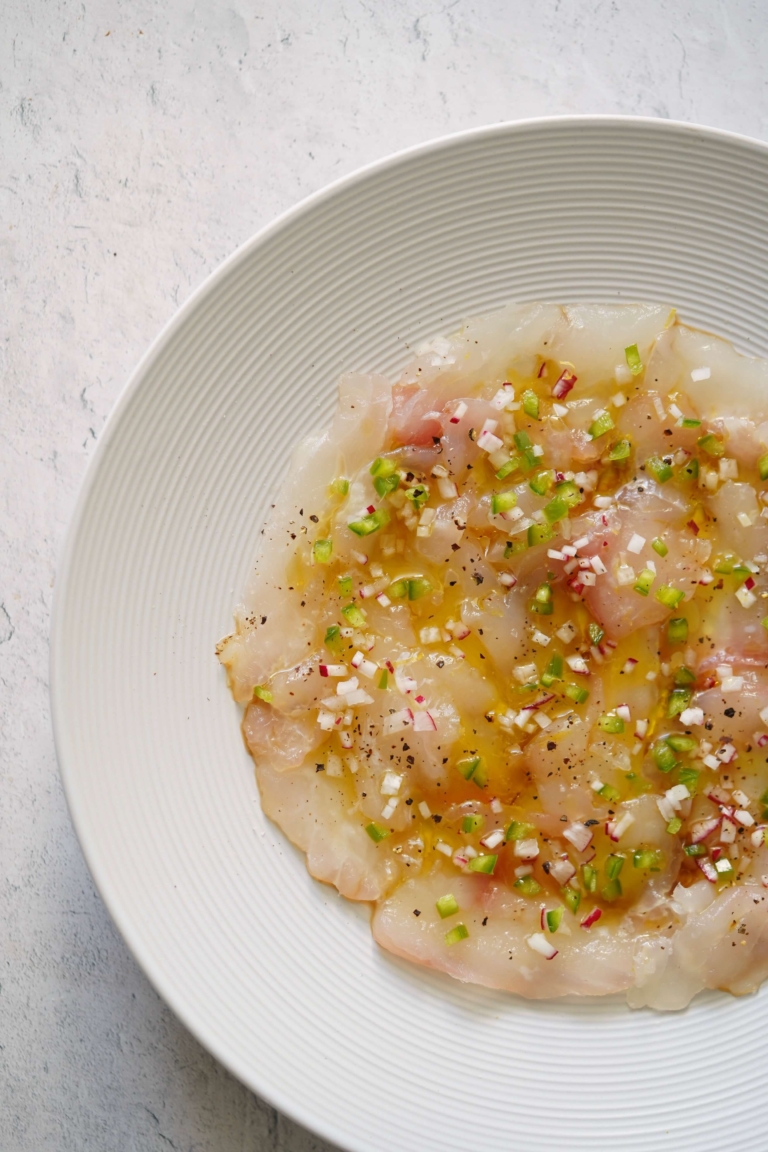
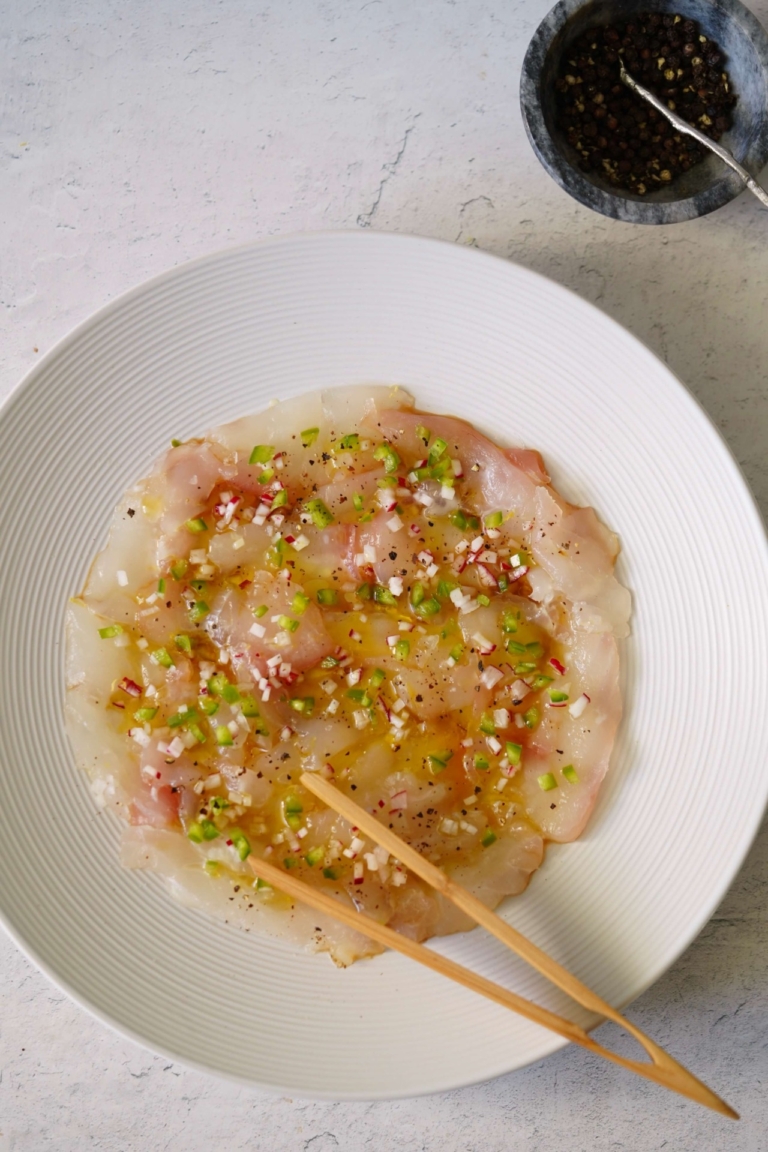
This halibut crudo is a fusion dish I developed inspired by my love for Japanese sashimi. “Crudo” is the Italian word for “raw,” and refers to a dish of uncooked fish, shellfish, (or sometimes meat) that is seasoned and dressed with an oil, some type of citrus juice, or, at times, a vinaigrette. Despite what you may think, crudo is simply a blanket term for anything raw and dressed. There is no required shape associated with a crudo dish and flavor-palette wise, skies the limit.
Carpaccio, Tartar, Ceviche & Sashimi
Carpaccio, another favorite of mine, is considered a type of crudo. With carpaccio, the fish, or more commonly meat, is left uncooked, sliced, or pounded very thin. Like a crudo, carpaccios are drizzled, typically with olive oil and lemon juice, and served with added garnish.
Another type of crudo is tartare, which is made of raw seafood or meat, chopped, and mixed with a sauce and seasonings. Like carpaccios, tartare is defined by a shape, which is most commonly minced or diced.
I’m also a big fan of ceviche, which consists of raw seafood that’s “cooked” in a citrus juice marinade, which cures it. Ceviche recipes require substantially more acid compared to a crudo or tartare, as the fish needs to cure, which transforms the texture of the raw fish.
What does not fall into the crudo category is sashimi. Sashimi is made of meticulously sliced raw fish typically without a marinade, sauce, or even garnish. Enjoying sashimi is about appreciation for the superior quality of the fish and the technique of the chef preparing it. Celebrity chef, Nobu Matsuhisa, made famous a dish he calls “new style sashimi” that incorporates sushi-grade fish with a warm citrus sauce. That lovely dish inspired me to create this halibut crudo drizzled with ponzu, and olive oil.
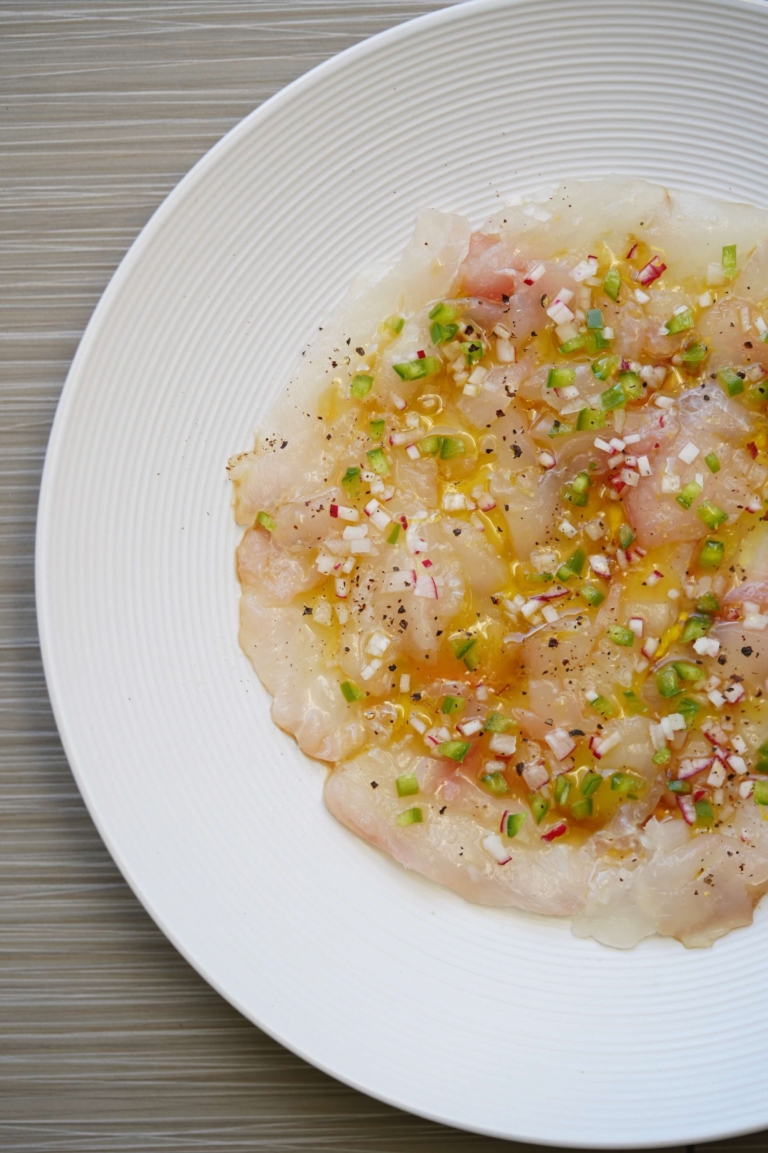
Halibut Crudo
Ingredients:
- 1 pound fresh, center-cut, skinless California halibut or fluke fillet
- 1/3 cup Ponzu sauce
- 2 tablespoons, good quality, Extra Virgin olive oil
- 1 teaspoon lemon zest
- 2 tablespoons freshly squeezed, lemon juice
- 1 teaspoon flaky sea salt
- freshly ground black pepper, to taste
- 4 red radishes, finely diced
- 1 jalapeño pepper, seeded, ribs removed, finely diced
Directions:
- With a sharp slicing knife, cut the halibut fillet into broad, paper-thin slices. As you work, arrange the slices, slightly overlapping, on a large serving plate. If the slices are thick, pound them slightly with your fist to flatten them.
- Drizzle the fish with the Ponzu sauce, followed by the olive oil, lemon zest, and lemon juice. Sprinkle with salt and pepper. Sprinkle the fish with the diced radish and jalapeño. Serve at once.
The saying chicken soup is good for the soul is one I’ve always loved. What’s funny about that phrase is that when you Google it what pops up the most in the search is Jack Canfield and Mark Victor Hansen, two motivational speakers who, in 1993, had the simple idea that people could help each other by sharing stories about their lives.

Canfield and Hanson took their stories and went on to write, Chicken Soup for the Soul. This book quickly became one of the most popular and cherished books ever published, selling millions of copies worldwide. Canfield and Hansen titled their famous book such because they simply wanted their book to “soothe and provide comfort, just like their grandmothers’ cooking”.
Many grandmothers I know have long preached the belief that chicken soup is great for healing a cold, but now research is backing up those claims. Researchers have frequently taken a closer look at the potential health benefits of chicken soup in an attempt to understand why it’s such an effective tonic for treating/healing the common cold. Below are some of those findings and it’s rather convincing.
- A 1990 report found that soup broth may help improve the function of cilia in the nose. The cilia are what help prevent contagions from getting into the body.
- Hot fluids have long been beloved to help relieve stuffiness and congestion.
- Chicken soup is also believed to help reduce inflammation, which often results as the immune system works to fight the cold virus.
Connected to the health benefits of chicken soup, studies, referenced in an issue of Psychological Science I stumbled upon recently, show that comfort food, like Canfield and Hanson believe, actually brings up associations of positive relationships and makes us feel comfortable and less alone.
In one study conducted volunteers who thought of chicken noodle soup as comfort food had greater access to relationship-related words when they ate a bowl of the soup. I found this fascinating. In a second experiment, volunteers who had secure attachment styles and wrote about comfort foods did not feel as lonely. Whether it’s chicken soup, mashed potatoes, or chocolate chip cookies straight from the oven, comfort food nourishes our hunger and fills our need to belong.

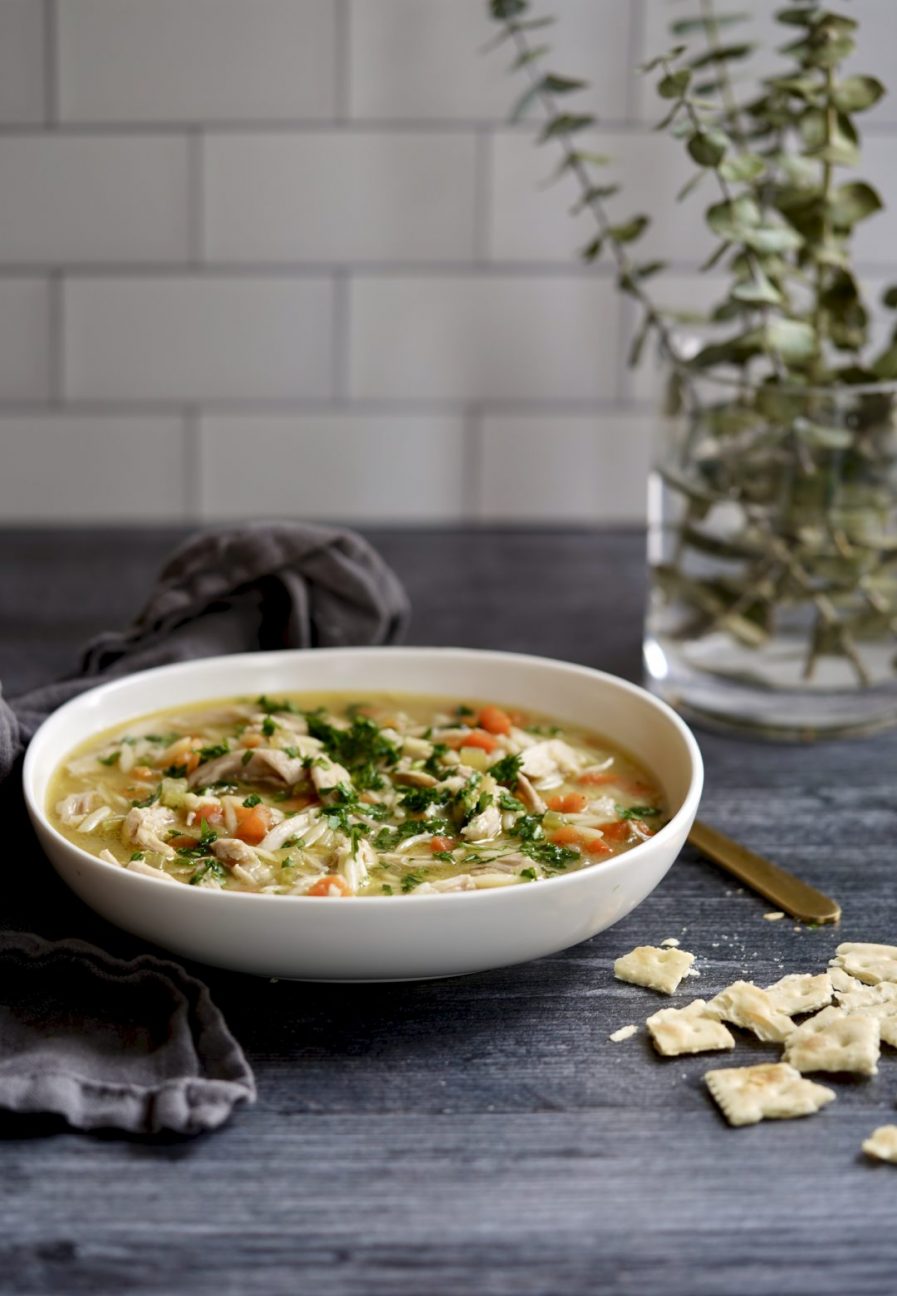
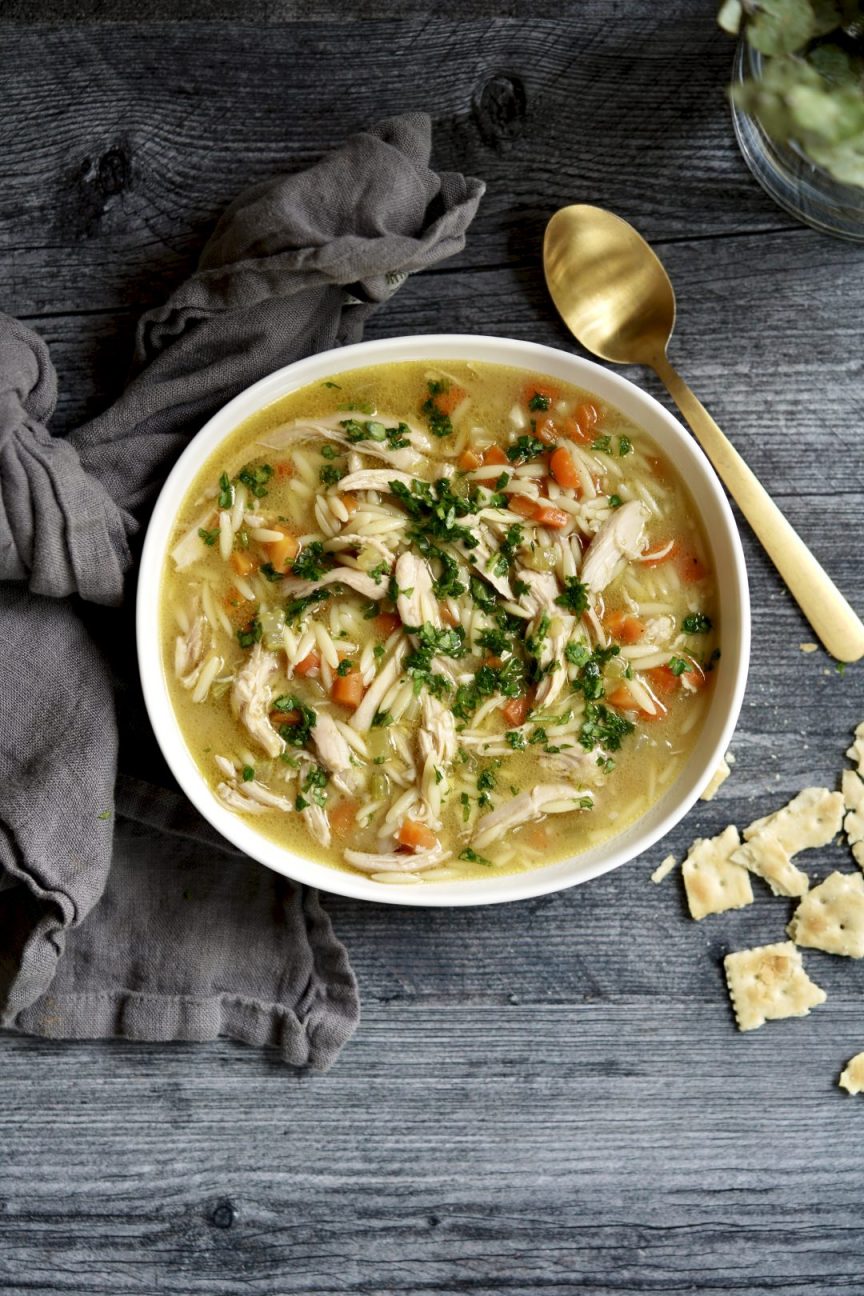
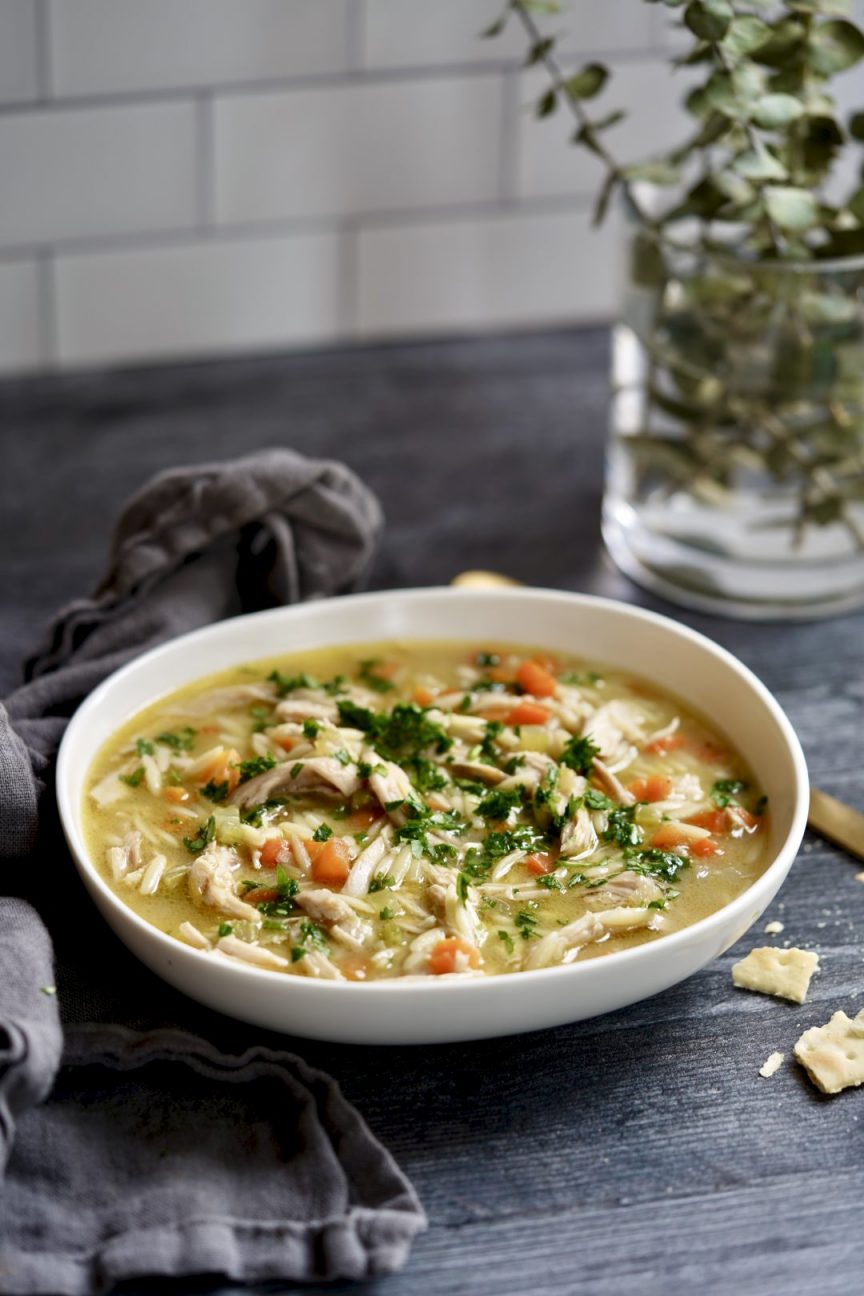
Truthfully, chicken orzo soup is one of my favorite healing soups that is soothing and comforting in the winter months. Like a great chocolate chip cookie, most people have their go-to chicken soup recipe, so trying another can often come with trepidation. But I encourage you to do it anyway. My chicken orzo soup is an uncomplicated one that delivers a sensational result. I add orzo to my soup as an alternative to large noodles which I feel creates a richer, almost creamier mouth feel from the pasta starch. Finishing this comfort food with a splash of lemon juice gives it a nice bright, slightly acidic flavor I love. Whether it’s comfort for seeking or a stubborn cold you just can’t shake, give this chicken orzo soup a go and feel the healing from inside.
Chicken Orzo Soup
Ingredients:
- 1 tablespoon butter
- 1 tablespoon Extra Virgin olive oil
- 1/2 cup celery, small dice
- 1/2 cup carrots, small dice
- 1/3 cup shallots, minced
- 4 cloves garlic minced
- 2 tablespoons flour
- 6 cups good quality chicken broth (I use my chicken matzo ball soup quick broth for this recipe )
- 1 pound chicken breasts, but into thin 2-inch long pieces
- 1/2 cup orzo
- Juice of 1/2 lemon
- 1 Tablespoon chopped parsley, for garnish
- Salt and pepper to taste
Directions:
- In a large Dutch oven add the butter and olive oil and place over a medium flame. When hot, add the celery, carrots, and shallots and sauté until tender, about minutes. Add the garlic and cook for about 30 seconds. Then add the flour and cook for another minute.
- Add the chicken broth and stir until the flour has dissolved, add the chicken. Bring the soup to a boil.;Cover the soup, reduce the heat, and simmer for about 15 minutes.
- Add the orzo and cook for another 10 minutes, stirring occasionally, until the orzo and chicken are cooked through.
- Add the lemon juice (you may want to add more than I suggest Season the soup to taste with salt and pepper. Garnish with parsley and serve right away.
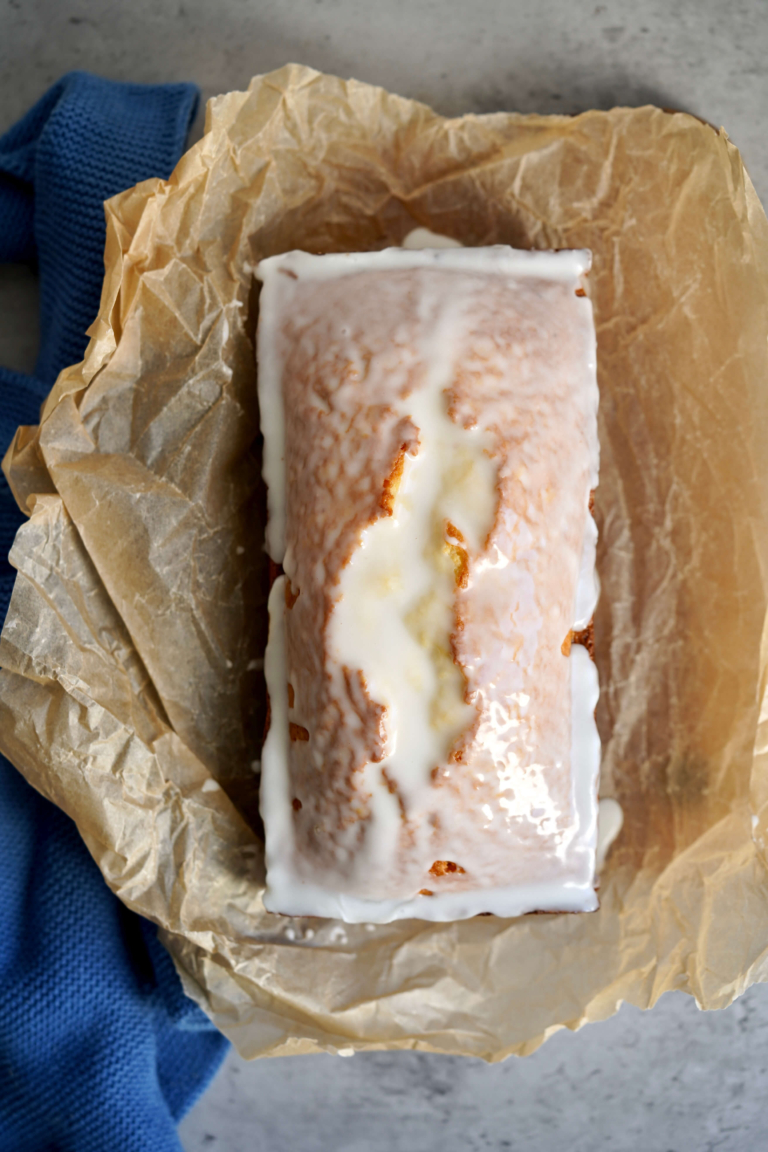
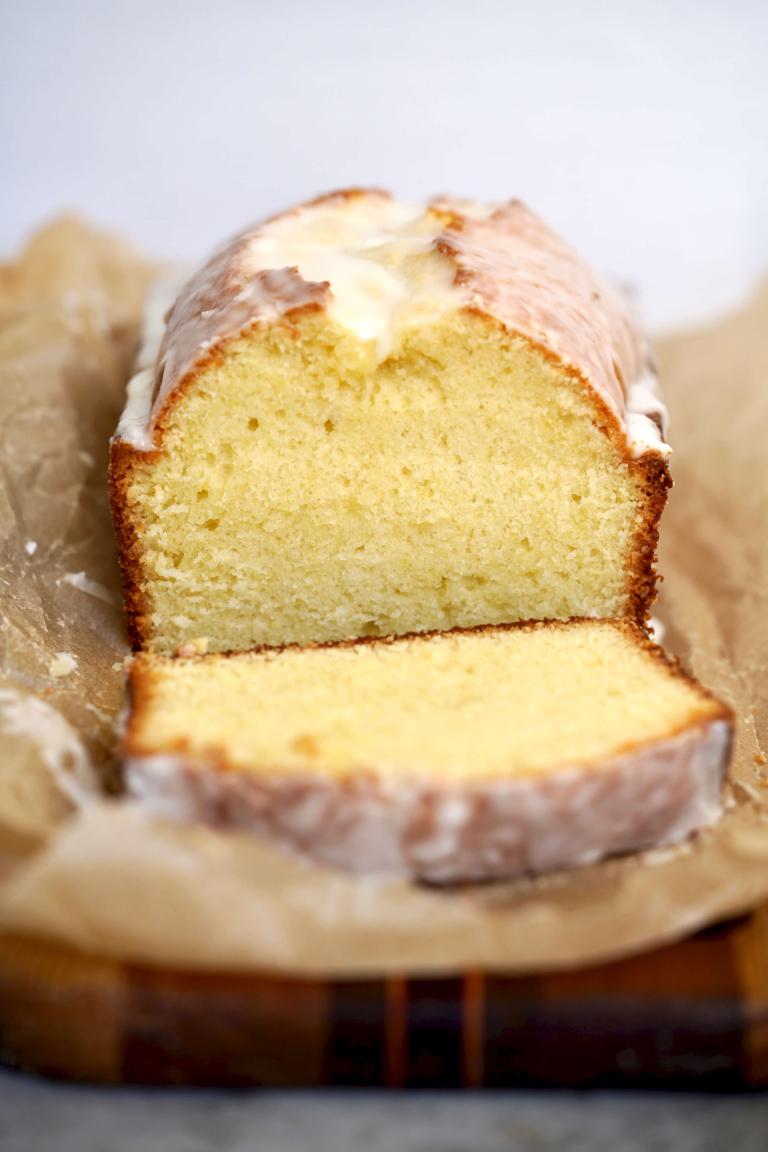
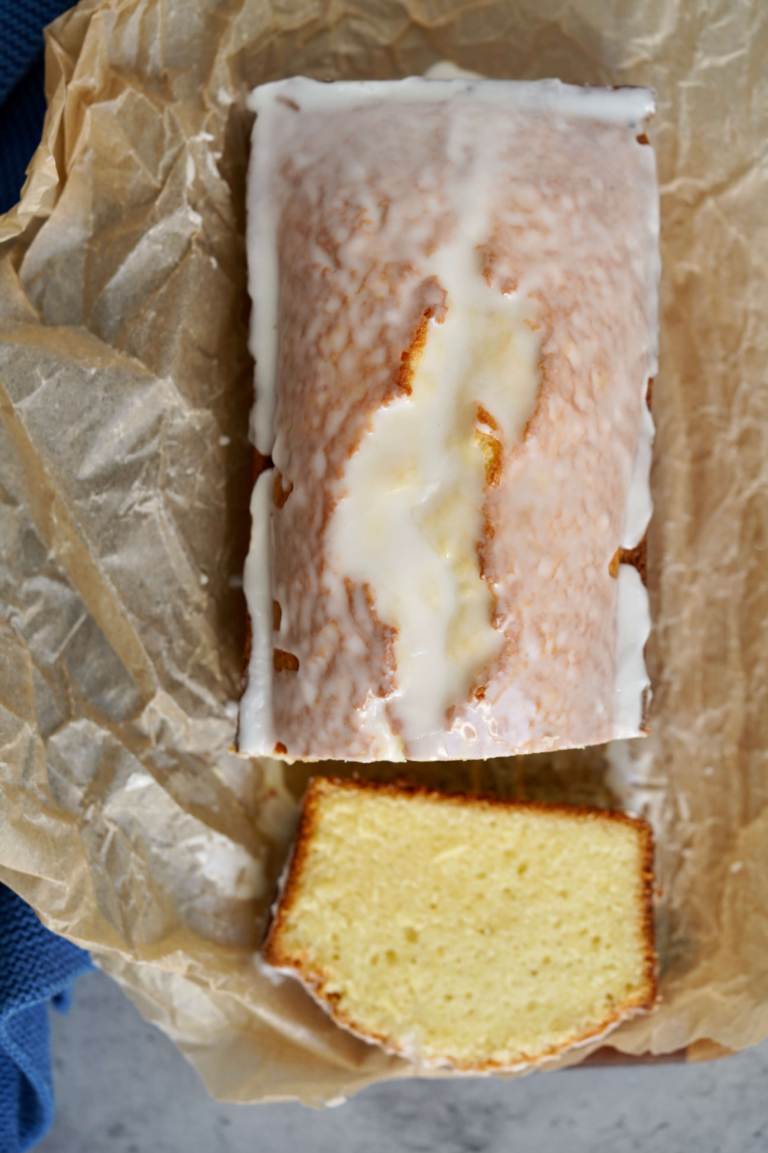
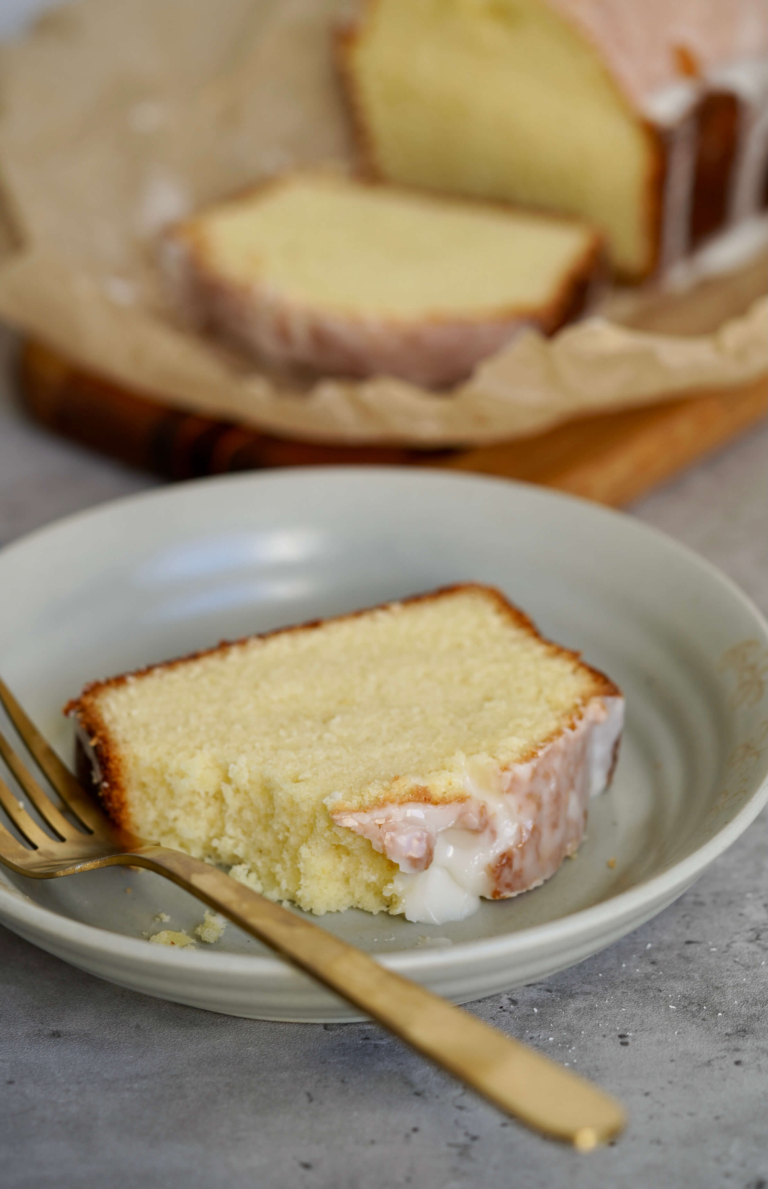
I can’t deny it, chocolate is a wonderful thing. And many of us crave rich chocolatey desserts or, at times, an eye-catching, cream cheese frosted red velvet cake. But the beauty and simplicity of a lemon pound cake can be just as wonderful. This lemon sour cream pound cake is one of my all-time favorite things. A dense, flavorful, buttery cake, dripping with a lemony glaze that’s truly unforgettable.
Pound Cake Ratio
The name “pound cake” is a nod to the original cake recipe that called for equal parts butter, flour, sugar, and eggs. Many pound cake recipes you’ll find still follow this classic ratio. But modern recipes have scaled down the quantities making them more manageable size-wise. Along with downsizing, came diverse, regional variations giving pound cakes their own distinct style, texture, and taste throughout the world.
Leaveners
Traditional pound cakes were made without leaveners, instead, air was “whipped” into the cake before baking. But things changed in the 1900s when artificial leaveners, such as baking soda and baking powder, began being added. Leaveners drastically reduced the density of pound cakes creating a fluffier and more delicate crumb.
Soon after flavoring agents such as vanilla and almond extracts, and dried fruits, such as currants and cranberries became popular. Americans were the ones who began incorporating sour cream yielding an even moister cake, with a slight tangy flavor. I have a go-to ricotta pound cake, I serve with fresh betters and whipped cream, that’s a family favorite. But this lemon sour cream pound cake is our latest obsession.
Pound Cake Around the Globe
Like Americans, the French are also pound cake fans, but they call it “quarts-quarts” or “four quarters”, as a play on the pound reference. In the Caribbean, rum is a popular ingredient as well as mashed bananas which is a popular dessert during the holiday season.
The Venezuelan and Colombian pound cake equivalent is called “ponque”. This popular version is a decadent wine-drenched cake with a cream and sugar coating. Similarly, the Mexican version, known as “panque”, but follows the traditional recipe of one pound each of butter, flour, sugar, and eggs.
As far as an “easy” dessert comes, a pound cake, of any flavor, fits the bill. It’s also a wonderful solution when baking a layer cake is not in our wheelhouse. Served straight up, or with berries and whipped cream, the variation and accouterments are truly limitless.
Lemon Sour Cream Pound Cake
Ingredients:
For the Pound Cake:
- 1 2/3 cups cake flour
- 1/4 teaspoon baking soda
- 1/4 teaspoon salt
- 9 tablespoons unsalted butter, room temperature
- 1/2 cup sour cream, at room temperature
- 1 1/2 cups sugar
- 3 eggs
- 1 teaspoon vanilla extract
- 2 tablespoons fresh squeezed lemon juice
- 1 teaspoon fresh lemon zest (optional)
For the Glaze:
- 3/4 cup Confectioners' sugar
- 1 tablespoon freshly squeezed lemon juice
Directions:
- Preheat oven to 350 degrees F. Line a 9x4 loaf pan with parchment paper. Lightly oil the parchments and set aside.
- In the bowl of a kitchen mixer, such as a KitchenAid, fitted with a paddle attachment, add the butter and sour cream and beat on medium until smooth, about 1 minute. Add the lemon zest and blend.
- Next, add the sugar, and beat until light and fluffy, about 3 minutes. Next, add the eggs, one at a time, and mix until incorporated. Stir in the vanilla and the lemon juice.
- In a small bowl add the flour, baking soda, and salt, and mix to blend. With the mixer on low, slowly add the flour mixture to the butter mixture in 2 additions, beating just until mixed. Do not overbeat.
- Pour the batter into the prepared pan. Gently tap the pan on the counter to flatten and release any air bubbles. Place in the oven and bake for about 50-55 minutes, or until golden and cracked on top and a cake tester inserted into the middle comes out clean. If the top is coloring too fast, cover it lightly with a piece of aluminum foil.
- Allow the pound cake to cool for 10-15, and then remove from the pan to finish cooling. Cool completely before glazing.
- For the glaze, In a small bowl mix the confectioners' sugar and juice until smooth. Put the cake on a wire rack with a piece of parchment underneath it. Slowly pour the glaze along the center of the cake letting it slide to the sides. Slice and serve
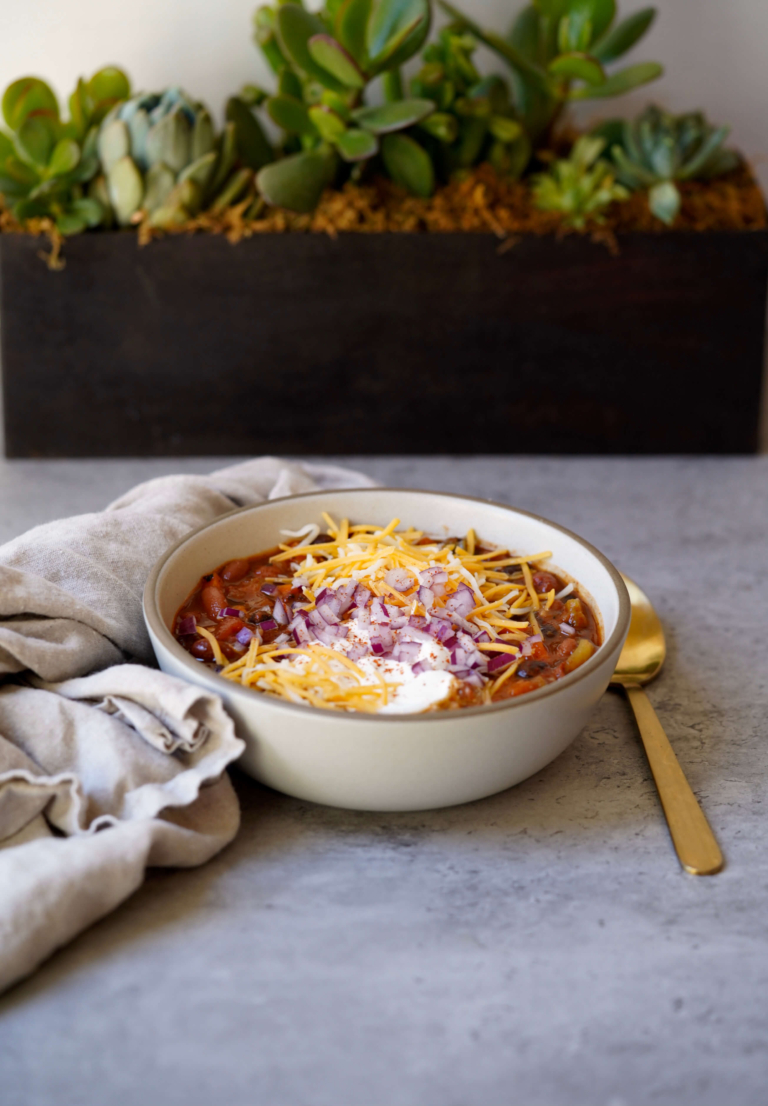
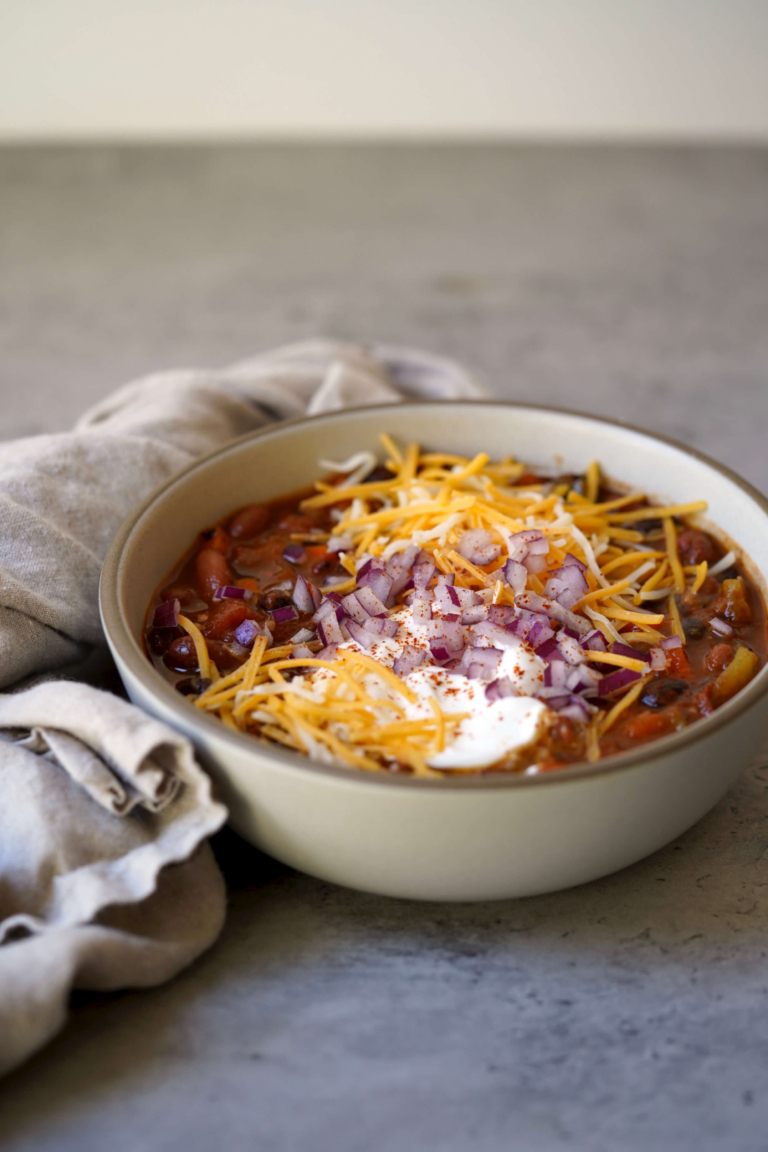
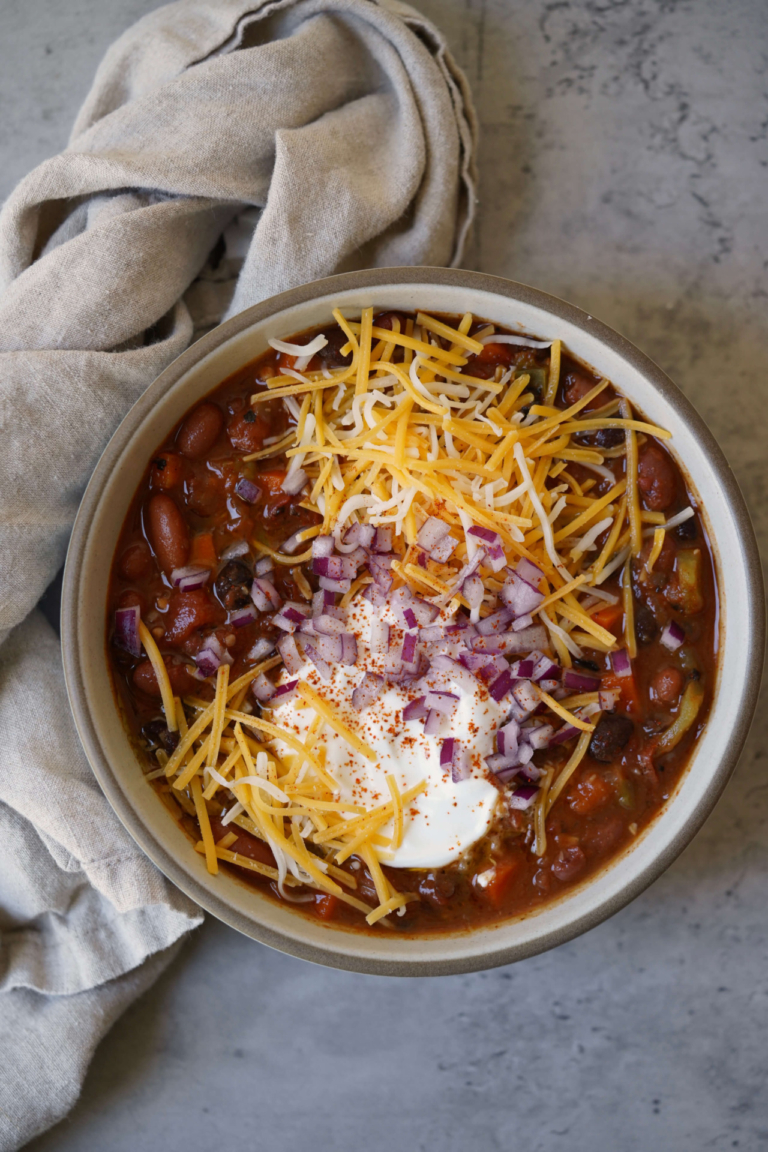
One-pot vegetarian chili is the perfect comfort meal to make, eat, and repeat all winter long. This simple dish is hearty, flavorful, and wholesome, and it could not be easier to make. Perhaps the best part, this chili recipe is loaded with plant-based protein, from red kidney beans and black beans, so you won’t even miss the meat. Made with punchy and savory flavors from a combination of pantry staple seasonings, this one-bowl meal is an easy, inexpensive winner the whole family will enjoy.
Why Vegetarian?
- Loaded with plant-based protein. This vegetarian chili packed with protein without the added fats or cholesterol of red meat, making it a healthy alternative for those who don’t eat or prefer to eat less of it in their diet.
- One-pot meal. Aside from the fact that chili is warm and filling, chili makes a great comfort food because it’s easy to make. After sautéing the veggies and adding the remaining ingredients, you bring the chili to a boil. Then, simmer for 35 minutes. Little effort for a great meal? Yes, please!
- Works for all dietary needs. This chili is perfect for a vegetarian or if you omit the garnish, vegan diets, but it’s also a great go-to if you are simply longing for another meatless-meal to add to your dinner repertoire.
- Loaded with flavor. This vegan chili has it all, it’s loaded with vegetables and spices creating that signature chili flavor we all love.
So when it’s cold and dreary outside and has been for days, make this vegetarian chili recipe a go-to in your house until Spring arrives. This recipe has become a favorite of mine and I think it tastes even better the next day, so making it a day ahead is a great trick of mine and a time-saving option during a busy week. Stay dry, safe, and warm out there, warmer weather will be here before you know it!
Vegetarian Chili
Ingredients:
- 1 tablespoon Extra Virgin olive oil
- 1 medium yellow onion, finely diced
- 1 tablespoon garlic, minced
- 2 medium carrots, small dice
- 2 celery, small diced
- 1 medium green bell pepper, ribs and seeds removed, small diced
- 1 teaspoon ground cumin
- 1 teaspoon chili powder
- 1/2 teaspoon smoked paprika
- 1 teaspoon dried oregano
- 1/2 teaspoon salt
- 2 (14.5-ounce) cans of fire-roasted, diced tomatoes
- 1 (15-ounce) can red kidney beans, rinsed and drained
- 1 (15-ounce) can black beans, rinsed and drained
- 2 cups vegetable stock
- 1/2 cup sour cream, for garnish
- 1/2 cup shredded cheddar cheese, for garnish
- 1/4 cup red onion, finely diced, for garnish
Directions:
- Place a medium Dutch oven or large pot over medium-high heat. Add the oil and when hot, but not smoking, add the onion, garlic, carrots, celery, and bell pepper. Sauté until tender, about 2-3 minutes.
- Mix in the cumin, chili powder, paprika, oregano, and salt and stir until combined. Add the tomatoes, kidney beans, black beans, and stock. Stir well and bring it to a boil. Once boiling, reduce the heat to low, cover, and cook for about 30-35 minutes until thickened.
- Serve the chili with a dollop of sour cream, some cheddar cheese, and red onion.
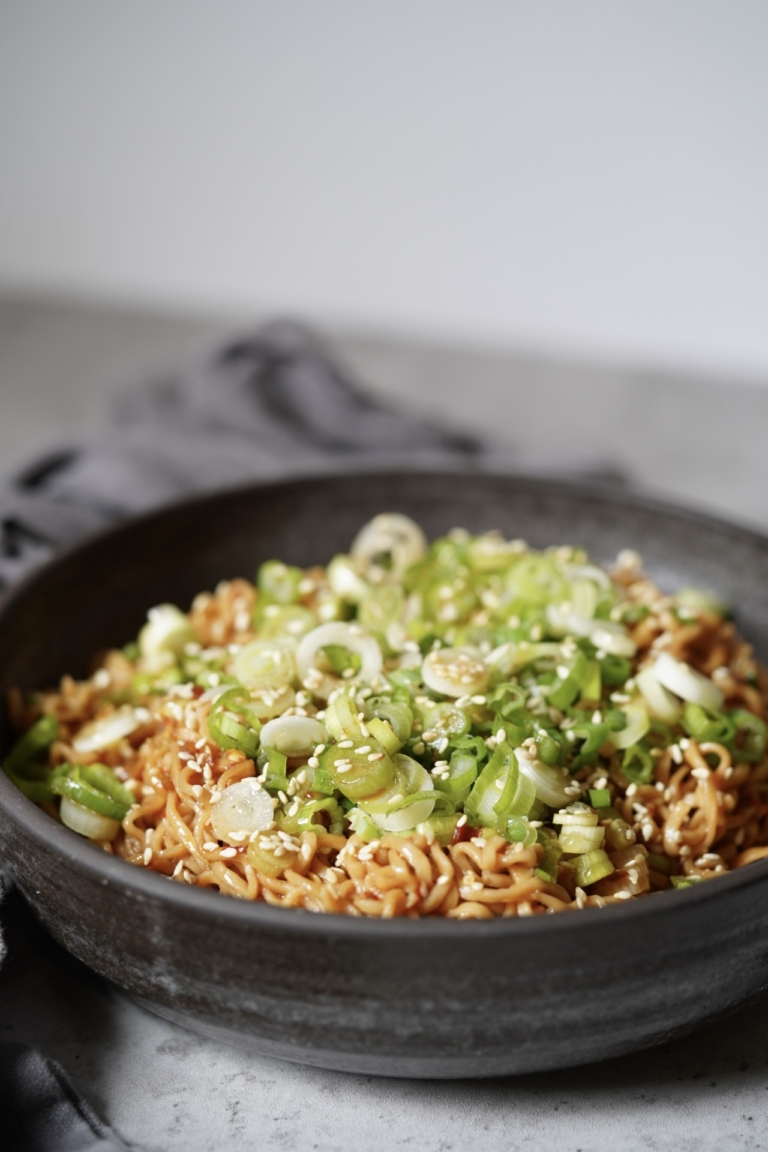
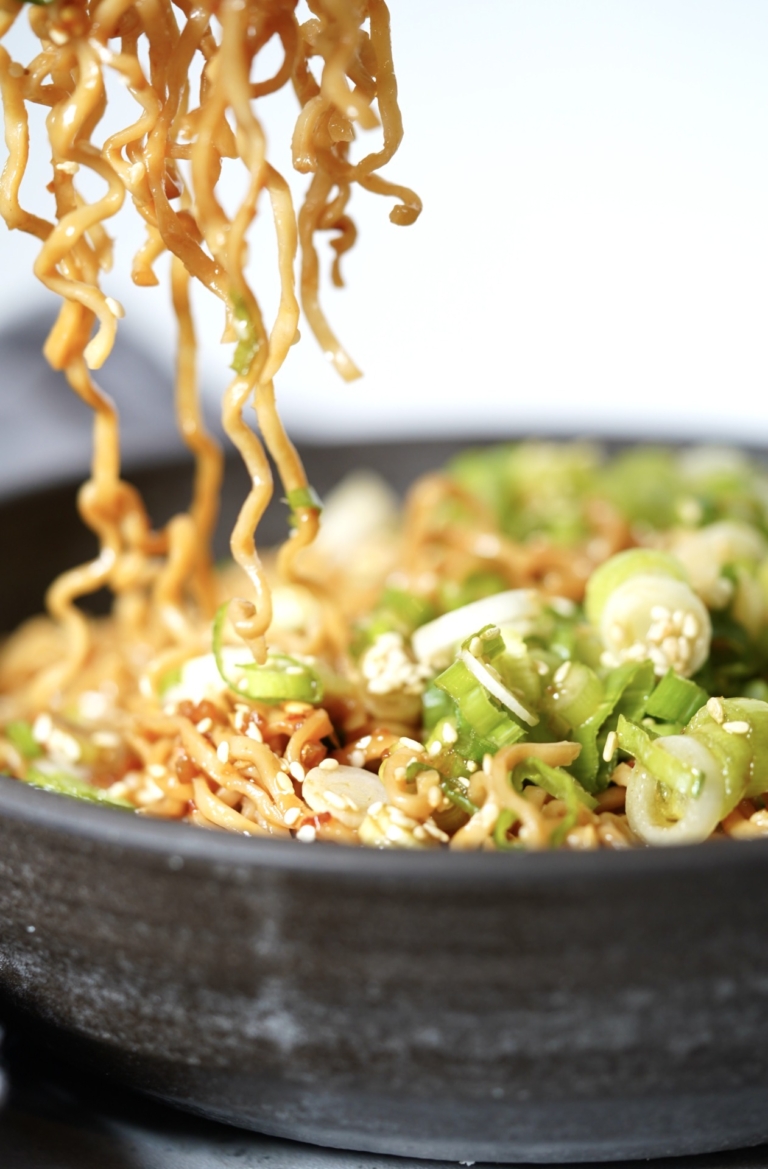
Garlic ramen noodles are a side dish that should be in your recipe rotation all year long. Fast, flavorful, and only a few simple ingredients are required. I keep instant ramen noodles in my pantry at all times for my cabbage salad, which is a family favorite. Those same noodles, minus the seasoning packets, are the base for this tasty noodle dish I could eat the entire bowl of myself.
Packets of instant ramen are super versatile and health-wise, they are not all that bad for you once you ditch the flavor packet. The noodles themselves are neutral, so you have a blank canvas to create something wonderful. These garlic ramen noodles are almost effortless to make and if you are a noodle lover like I am, they don’t disappoint.
Momofuku
Momofuku Ando is the man who invented ramen instant noodles and in doing so, has become an unlikely hero to foodies around the globe. In addition to inspiring a plethora of trendy restaurants, Ando has earned the adoration of a nation. In a 2000 poll, Japanese respondents said instant ramen was the country’s top invention of the 20th century. And I think we all would agree about that.
Instant Noodle Invention
Momofuku Ando was born Wu Baifu in Taiwan in 1910, and after World War II he emigrated to Japan and took his new name. It was not until his 40’s that ramen inspiration struck. Ando claimed he was inspired by seeing people huddled around a ramen stall in postwar Osaka. With food shortages rampant, he believed noodles could be the cure to world hunger.
Ando founded Nissin around 1958, and his product got its start as a relatively luxurious convenience food since the first “Chicken Ramen” sold in Japan cost more than fresh noodles did. Regardless of how the story began, it was Ando who invented flash-frying noodles so they could be quickly cooked in boiling water. Ando followed that with the 1971 invention of Cup Noodles, inspired by customers who reused coffee cups as ramen bowls. Instant noodles took off, and instant noodles became world-famous. Ando passed away in 2007 at the age of 96, with an estimated net worth of 300 million dollars and an everlasting legacy.
This quick ramen dish has become a favorite of my younger son and one he requests often. I like to serve this with fish or tofu but left to his own, my son likes them as is and claims they are just as delicious served hot or cold.
Garlic Ramen Noodles
Ingredients:
- Three (3-ounce) packages of instant ramen noodles, flavor packets discarded
- 1/4 cup low-sodium soy sauce
- 1/4 cup hoisin sauce
- 1 tablespoon rice vinegar
- 1 tablespoon garlic chili sauce
- 1/4 cup water
- 2 tablespoons toasted sesame oil
- 6 cloves garlic, minced
- 1 teaspoon freshly grated ginger
- 6 scallions, thinly sliced, for garnish
- 1 teaspoon toasted sesame seeds, for garnish
Directions:
- Fill a large stock pot of water, place over high heat, and bring to a boil. Once boiling, add the ramen and cook according to the package, about 3-4 minutes. Drain well and set aside.
- In a small bowl add the soy sauce, hoisin sauce, rice vinegar, garlic chili sauce, and water, whisk well to blend.
- In a large skillet, add the sesame oil and place over medium-high heat. When hot, but not smoking, add the garlic and ginger and cook, stirring frequently, until fragrant, about 1 minute. Stir in the sauce and simmer for 2-3 minutes. Add the cooked ramen noodles and gently toss to coat. Cook until the noodles are heated, about 3 minutes.
- Garnish the warm noodles with the sliced scallions and sesame seeds.
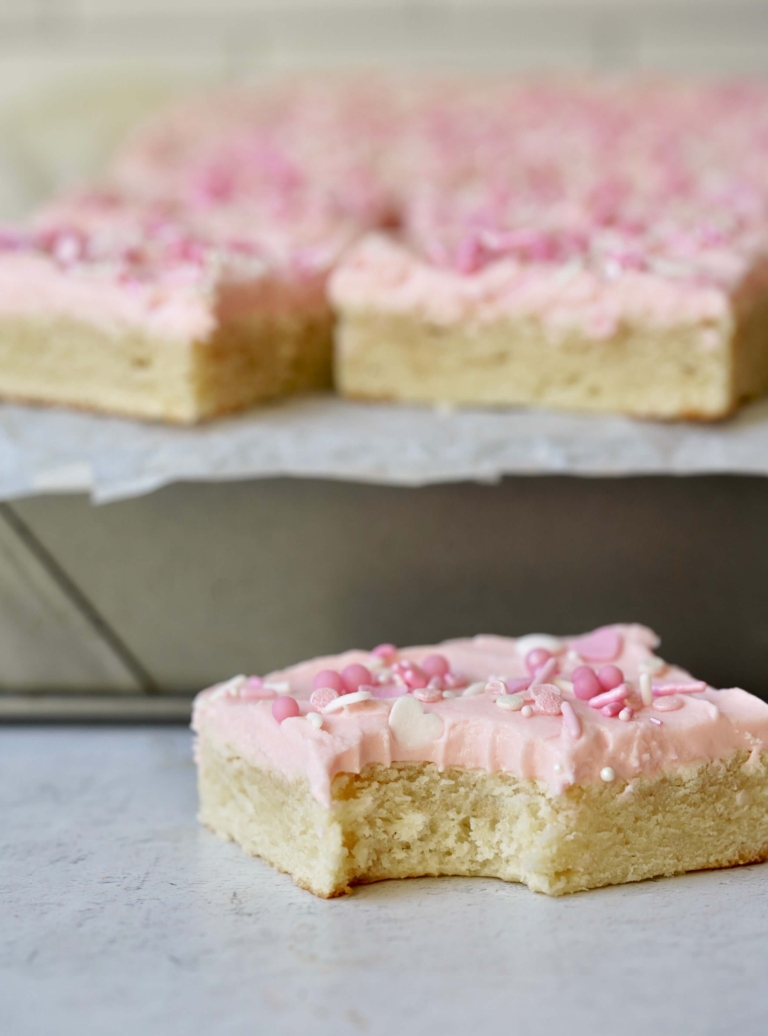
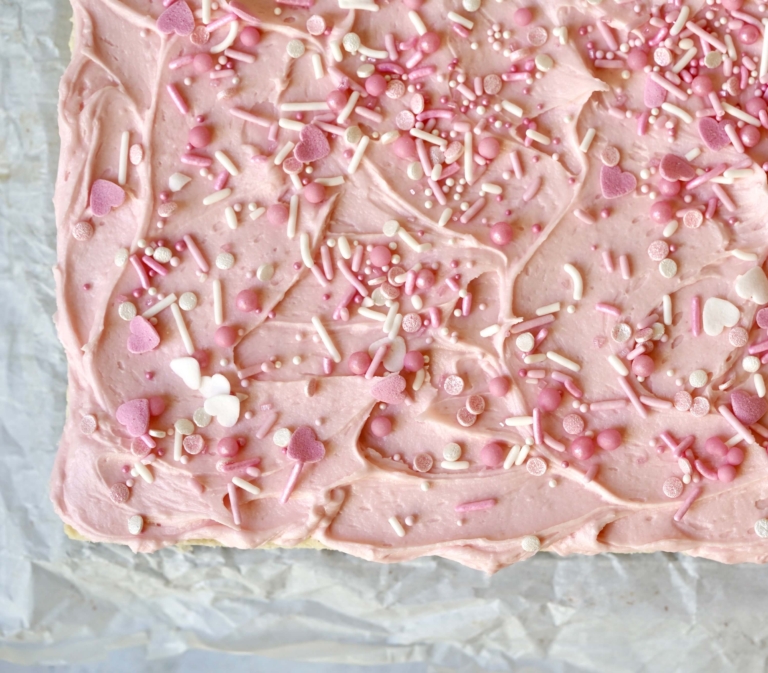
I am all about a soft pillowy cookie, so it is no surprise that I had to make (and can’t seem to stop making), these frosted sugar cookie bars. With a dense, yet incredibly soft center and a fluffy whipped frosting, these bars are truly addictive. I decorated these bars to the max with pink and white sprinkles in honor of Valentine’s Day, but these bars are what I like to call, “holiday adaptable“.
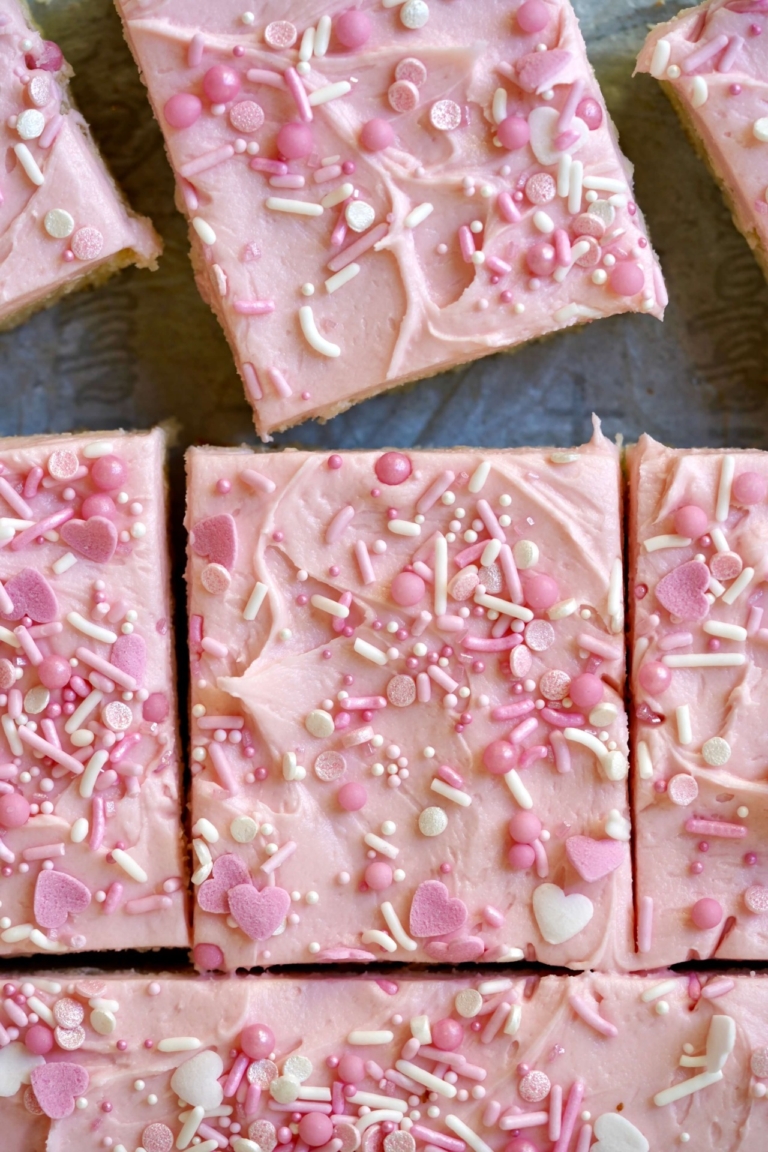
These frosted sugar cookie bars are just delightful, but I did not invent them. This recipe is from The New York Times, which adapted these heavenly cookies from “American Girl Cookies“. This is funny in so many ways. But in all honesty, I was a fan from day one. I have modified the Times recipe slightly, but the original one can be seen here.
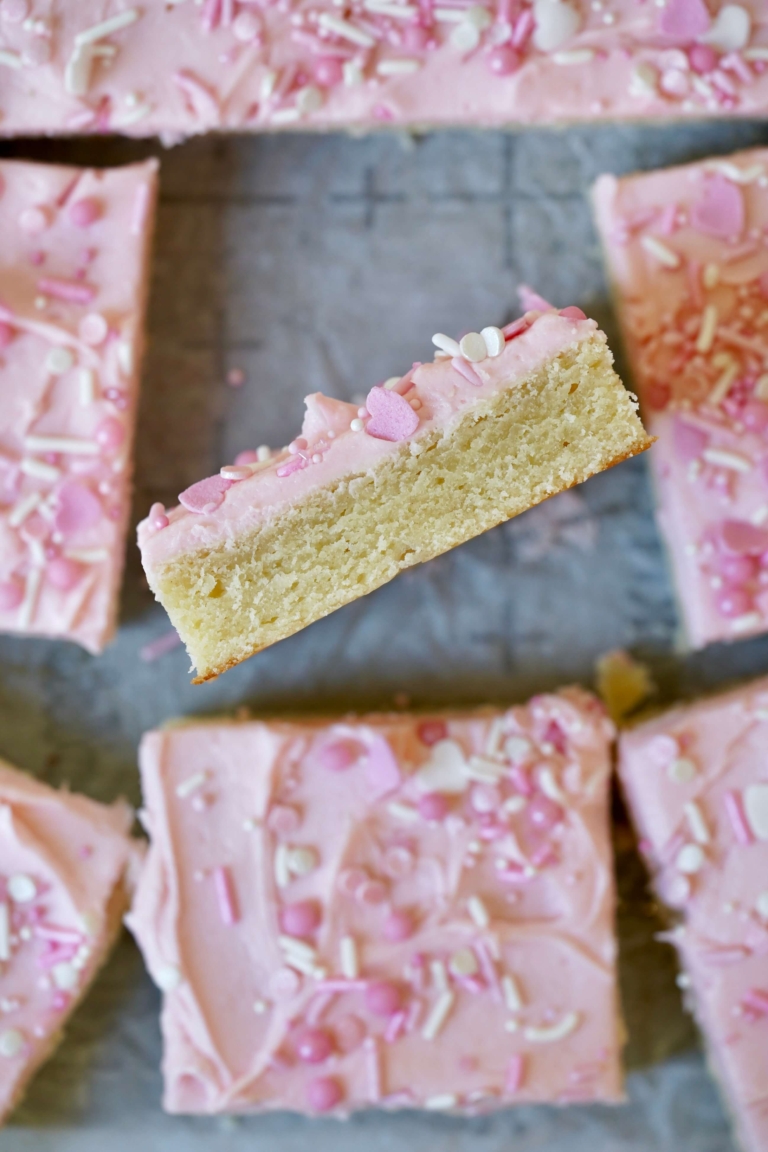
This fool-proof recipe channels everything there is to love about a wonderful sugar cookie but brings them to you in the form of a bar cookie. Topped with a pale pink frosting, festive heart-shaped sprinkles and you have the perfect treat for someone special.
Aluminum vs. Glass Baking Pans
Many people ask if the material of the baking pan matters or not when baking something like a cookie bar. And the truth is, yes, it does. Aluminum is a very good heat conductor, which means baked goods will brown evenly. Glass bakeware, in comparison, is heavier than aluminum and more expensive. And because glass is an insulator, it’s slow to heat. But once hot, glass retains heat for such a long time it can result in uneven baking.
Now, a tip, once you make these outrageously delicious cookie bars, be sure to save the recipe. These bars are so easy you will want to make them again for all those warm-weather holidays headed our way, from Memorial Day to the Fourth of July, these bars may just become your new go-to.
Frosted Sugar Cookie Bars
Ingredients:
For the Cookie Bar:
- 1 cup unsalted butter, room temperature
- 2 3/4 cups all-purpose flour
- 1/8 teaspoon salt
- One (8-ounce) package of cream cheese, at room temperature
- 1 1/2 cups sugar
- 1 egg
- 2 teaspoons vanilla extract
For the Frosting:
- 6 tablespoons unsalted butter, room temperature
- 2 cups Confectioners’ sugar
- 1 tablespoon milk, plus more as needed
- 1 1/2 teaspoons vanilla extract
- A drop or two of red gel food coloring (optional)
- Assorted sprinkles, for decorating (optional)
Directions:
- Preheat the oven to 350 degrees F. Lightly oil a 9-by-13-inch baking pan. Line the pan with parchment paper, running it up the two long sides of the pan and letting it extend past the rim by about 2 inches. Set aside.
- For the bars: In a medium bowl, add the flour and salt, and whisk to blend. In a large bowl with an electric mixer, fitted with the paddle attachment, add the butter and cream cheese and beat on medium speed until well blended, about 1 minute. Add the granulated sugar and beat until smooth, about 1 minute. Add the egg and vanilla and beat on low speed until well combined. Turn off the mixer and scrape down the bowl with a rubber spatula. Gradually add the flour mixture, mixing on low speed just until blended.
- Using a spatula, scrape the dough into the prepared baking pan and spread it into an even layer. Bake just until the edges are starting to turn light golden brown, and a toothpick inserted in the middle has moist crumbs, 20 to 25 minutes. (Do not over-bake. The bars should be moist, and slightly underbaked in the middle.) Remove the pan from the oven and set it on a wire rack. Let cool completely. When cooled, remove the bars from the pan using the overhanging parchment paper.
- For the frosting: Place the butter in the bowl of the kitchen mixer, fitted with the paddle attachment. Beat on medium speed until creamy, about 1 minute. Add 1 cup of confectioners’ sugar, beating on low speed until fully combined, then repeat with the remaining 1 cup of confectioners’ sugar. Next, add 1 tablespoon of milk (or cream), the vanilla, salt, and food coloring, if using, and beat on medium speed until the frosting is light and fluffy, scraping down the sides halfway through, about 4 minutes. Add more milk if needed to thin out the mixture. Add additional vanilla to taste.
- Using a spatula, spread the frosting on top, then decorate with sprinkles, if using. Cut into 20 bars and serve.