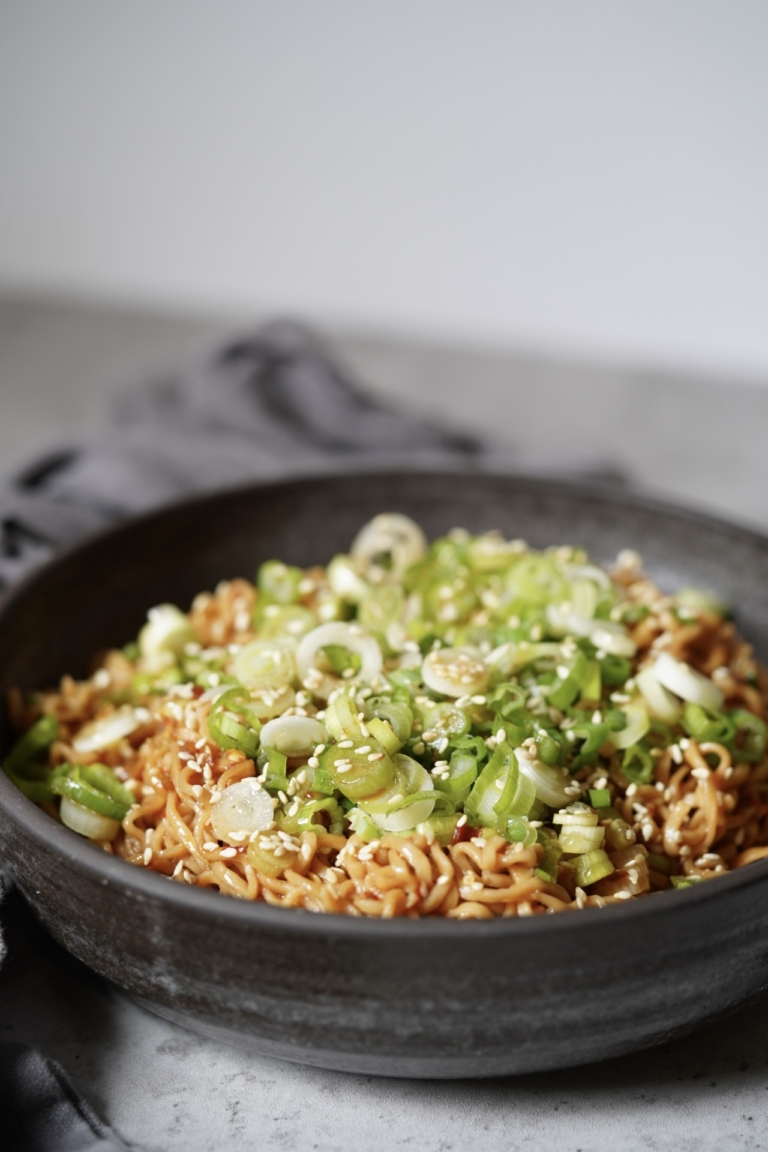
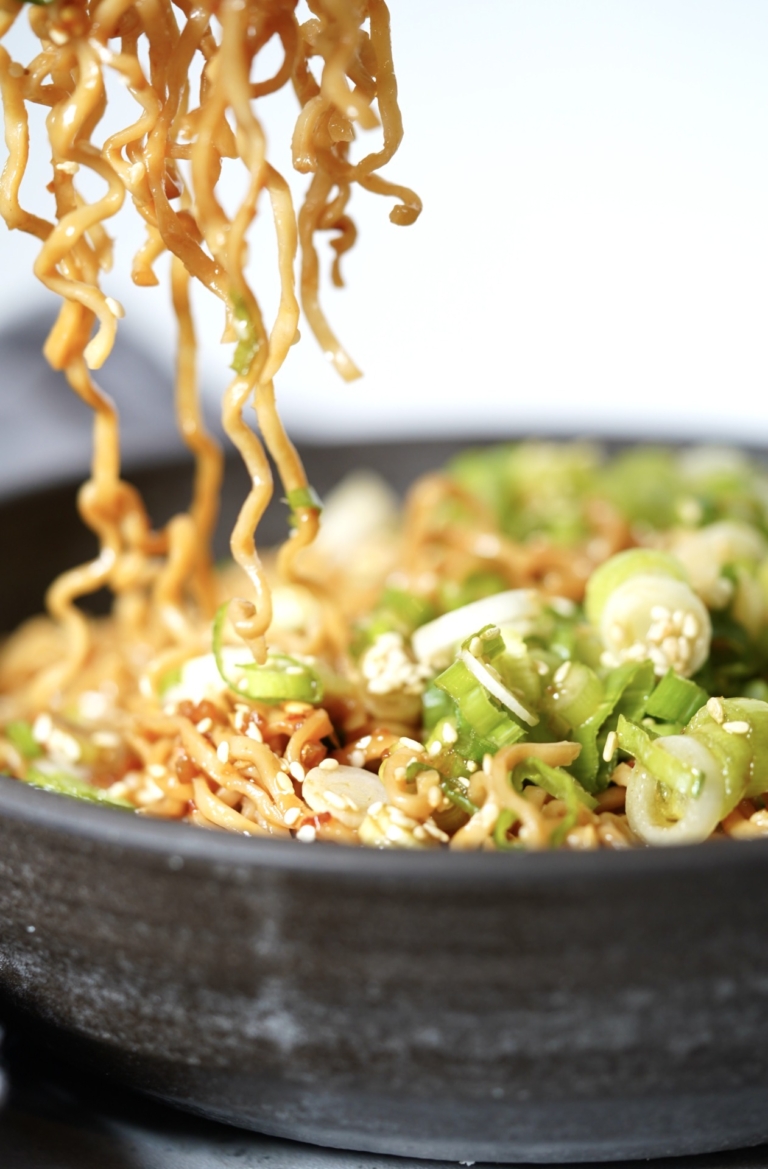
Garlic ramen noodles are a side dish that should be in your recipe rotation all year long. Fast, flavorful, and only a few simple ingredients are required. I keep instant ramen noodles in my pantry at all times for my cabbage salad, which is a family favorite. Those same noodles, minus the seasoning packets, are the base for this tasty noodle dish I could eat the entire bowl of myself.
Packets of instant ramen are super versatile and health-wise, they are not all that bad for you once you ditch the flavor packet. The noodles themselves are neutral, so you have a blank canvas to create something wonderful. These garlic ramen noodles are almost effortless to make and if you are a noodle lover like I am, they don’t disappoint.
Momofuku
Momofuku Ando is the man who invented ramen instant noodles and in doing so, has become an unlikely hero to foodies around the globe. In addition to inspiring a plethora of trendy restaurants, Ando has earned the adoration of a nation. In a 2000 poll, Japanese respondents said instant ramen was the country’s top invention of the 20th century. And I think we all would agree about that.
Instant Noodle Invention
Momofuku Ando was born Wu Baifu in Taiwan in 1910, and after World War II he emigrated to Japan and took his new name. It was not until his 40’s that ramen inspiration struck. Ando claimed he was inspired by seeing people huddled around a ramen stall in postwar Osaka. With food shortages rampant, he believed noodles could be the cure to world hunger.
Ando founded Nissin around 1958, and his product got its start as a relatively luxurious convenience food since the first “Chicken Ramen” sold in Japan cost more than fresh noodles did. Regardless of how the story began, it was Ando who invented flash-frying noodles so they could be quickly cooked in boiling water. Ando followed that with the 1971 invention of Cup Noodles, inspired by customers who reused coffee cups as ramen bowls. Instant noodles took off, and instant noodles became world-famous. Ando passed away in 2007 at the age of 96, with an estimated net worth of 300 million dollars and an everlasting legacy.
This quick ramen dish has become a favorite of my younger son and one he requests often. I like to serve this with fish or tofu but left to his own, my son likes them as is and claims they are just as delicious served hot or cold.
Garlic Ramen Noodles
Rate this recipe
|
4 ratings
Servings:
4
Prep:
10 minutes
Cook:
15 minutes
Total:
25 minutes
Ingredients:
Three (3-ounce) packages of instant ramen noodles, flavor packets discarded
Fill a large stock pot of water, place over high heat, and bring to a boil. Once boiling, add the ramen and cook according to the package, about 3-4 minutes. Drain well and set aside.
In a small bowl add the soy sauce, hoisin sauce, rice vinegar, garlic chili sauce, and water, whisk well to blend.
In a large skillet, add the sesame oil and place over medium-high heat. When hot, but not smoking, add the garlic and ginger and cook, stirring frequently, until fragrant, about 1 minute. Stir in the sauce and simmer for 2-3 minutes. Add the cooked ramen noodles and gently toss to coat. Cook until the noodles are heated, about 3 minutes.
Garnish the warm noodles with the sliced scallions and sesame seeds.
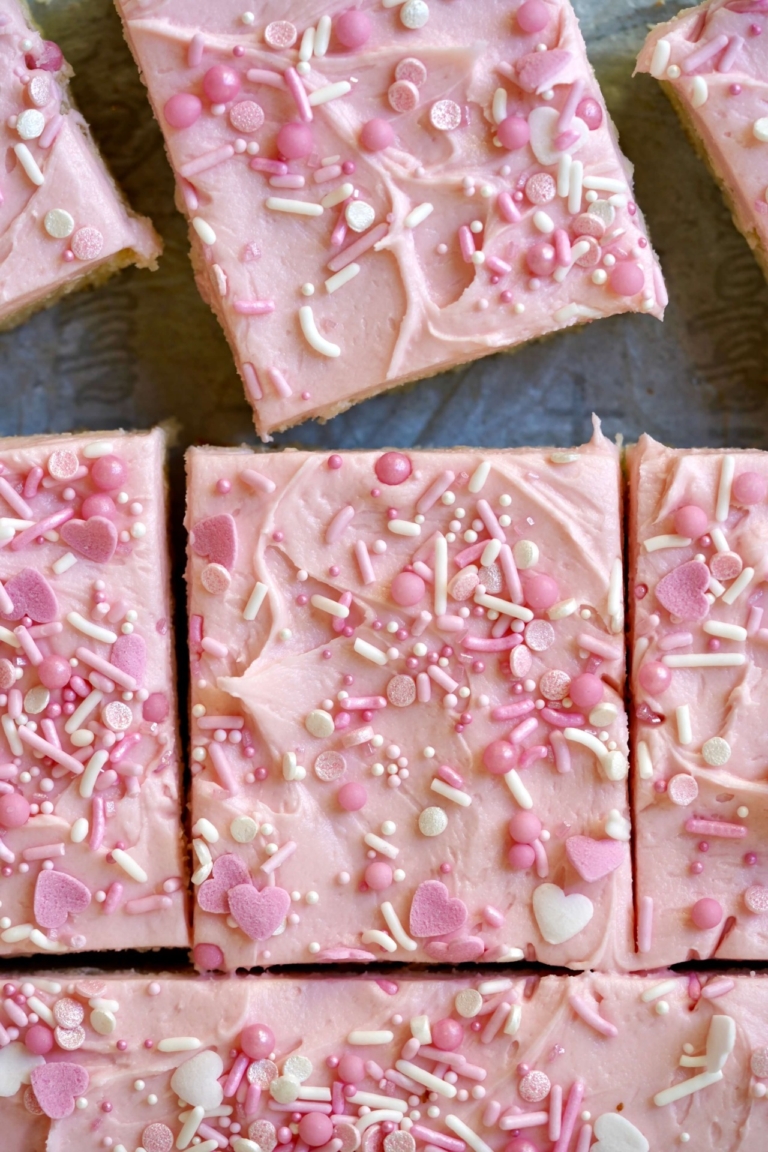
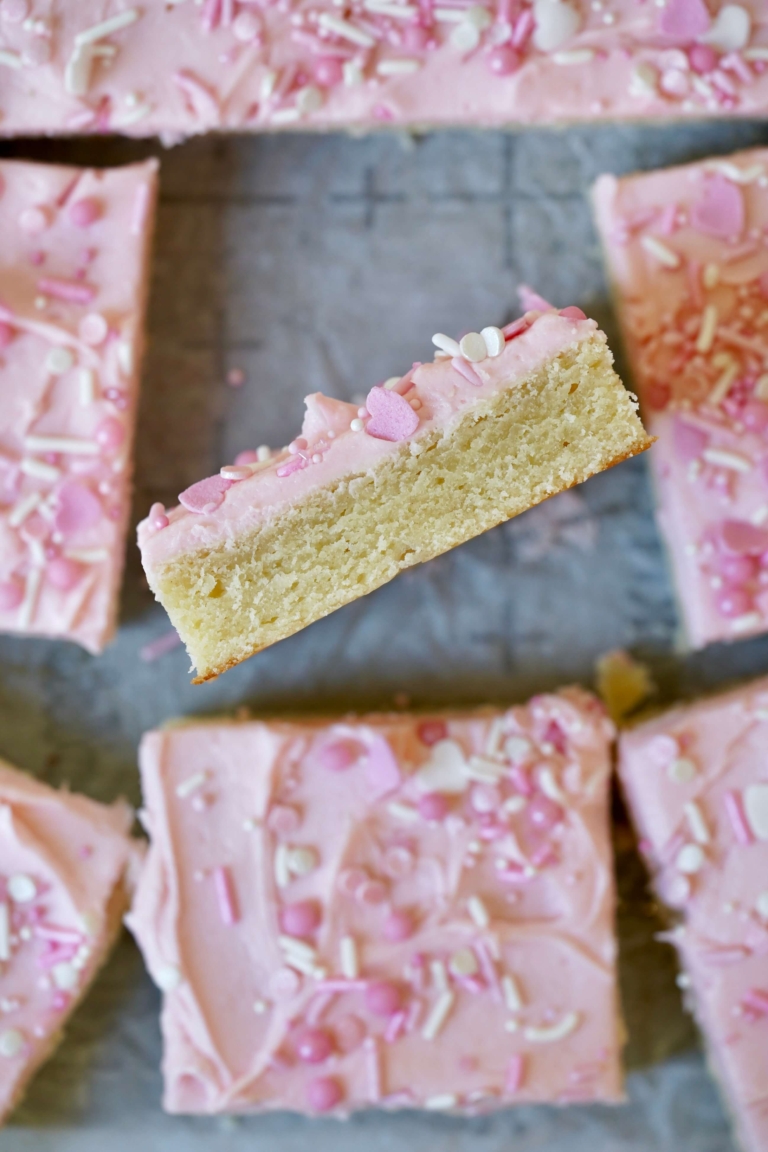
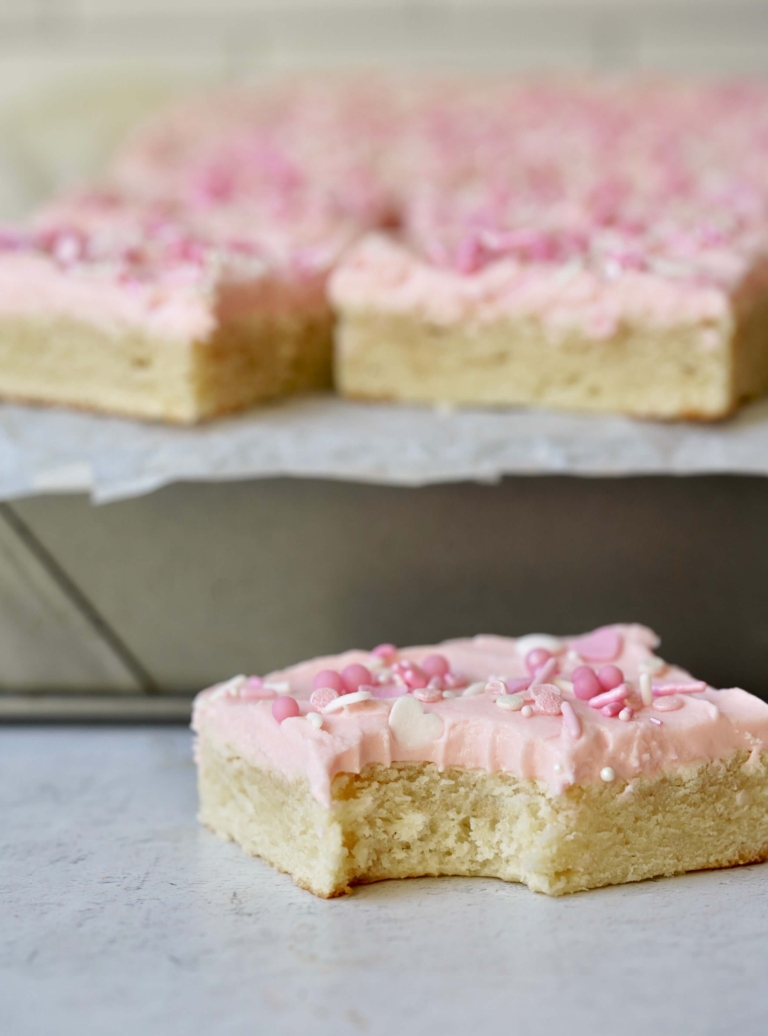
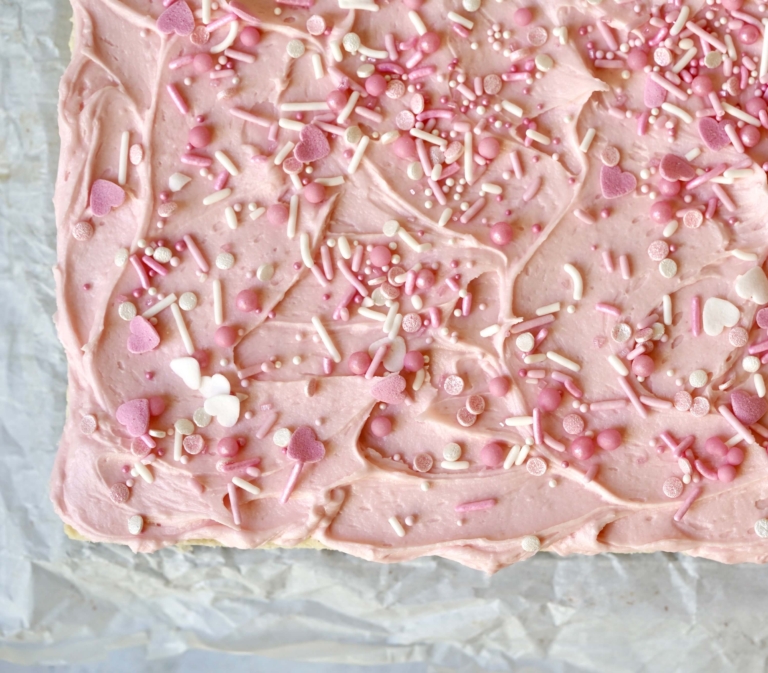
I am all about a soft pillowy cookie, so it is no surprise that I had to make (and can’t seem to stop making), these frosted sugar cookie bars. With a dense, yet incredibly soft center and a fluffy whipped frosting, these bars are truly addictive. I decorated these bars to the max with pink and white sprinkles in honor of Valentine’s Day, but these bars are what I like to call, “holiday adaptable“.
These frosted sugar cookie bars are just delightful, but I did not invent them. This recipe is from The New York Times, which adapted these heavenly cookies from “American Girl Cookies“. This is funny in so many ways. But in all honesty, I was a fan from day one. I have modified the Times recipe slightly, but the original one can be seen here.
This fool-proof recipe channels everything there is to love about a wonderful sugar cookie but brings them to you in the form of a bar cookie. Topped with a pale pink frosting, festive heart-shaped sprinkles and you have the perfect treat for someone special.
Aluminum vs. Glass Baking Pans
Many people ask if the material of the baking pan matters or not when baking something like a cookie bar. And the truth is, yes, it does. Aluminum is a very good heat conductor, which means baked goods will brown evenly. Glass bakeware, in comparison, is heavier than aluminum and more expensive. And because glass is an insulator, it’s slow to heat. But once hot, glass retains heat for such a long time it can result in uneven baking.
Now, a tip, once you make these outrageously delicious cookie bars, be sure to save the recipe. These bars are so easy you will want to make them again for all those warm-weather holidays headed our way, from Memorial Day to the Fourth of July, these bars may just become your new go-to.
Frosted Sugar Cookie Bars
Rate this recipe
|
8 ratings
Servings:
20
Serving Size:
1
Prep:
20 minutes
Cook:
25 minutes
Total:
45 minutes
Ingredients:
For the Cookie Bar:
1 cup unsalted butter, room temperature
2 3/4 cups all-purpose flour
1/8 teaspoon salt
One (8-ounce) package of cream cheese, at room temperature
1 1/2 cups sugar
1 egg
2 teaspoons vanilla extract
For the Frosting:
6 tablespoons unsalted butter, room temperature
2 cups Confectioners’ sugar
1 tablespoon milk, plus more as needed
1 1/2 teaspoons vanilla extract
A drop or two of red gel food coloring (optional)
Assorted sprinkles, for decorating (optional)
Directions:
Preheat the oven to 350 degrees F. Lightly oil a 9-by-13-inch baking pan. Line the pan with parchment paper, running it up the two long sides of the pan and letting it extend past the rim by about 2 inches. Set aside.
For the bars: In a medium bowl, add the flour and salt, and whisk to blend. In a large bowl with an electric mixer, fitted with the paddle attachment, add the butter and cream cheese and beat on medium speed until well blended, about 1 minute. Add the granulated sugar and beat until smooth, about 1 minute. Add the egg and vanilla and beat on low speed until well combined. Turn off the mixer and scrape down the bowl with a rubber spatula. Gradually add the flour mixture, mixing on low speed just until blended.
Using a spatula, scrape the dough into the prepared baking pan and spread it into an even layer. Bake just until the edges are starting to turn light golden brown, and a toothpick inserted in the middle has moist crumbs, 20 to 25 minutes. (Do not over-bake. The bars should be moist, and slightly underbaked in the middle.) Remove the pan from the oven and set it on a wire rack. Let cool completely. When cooled, remove the bars from the pan using the overhanging parchment paper.
For the frosting: Place the butter in the bowl of the kitchen mixer, fitted with the paddle attachment. Beat on medium speed until creamy, about 1 minute. Add 1 cup of confectioners’ sugar, beating on low speed until fully combined, then repeat with the remaining 1 cup of confectioners’ sugar. Next, add 1 tablespoon of milk (or cream), the vanilla, salt, and food coloring, if using, and beat on medium speed until the frosting is light and fluffy, scraping down the sides halfway through, about 4 minutes. Add more milk if needed to thin out the mixture. Add additional vanilla to taste.
Using a spatula, spread the frosting on top, then decorate with sprinkles, if using. Cut into 20 bars and serve.
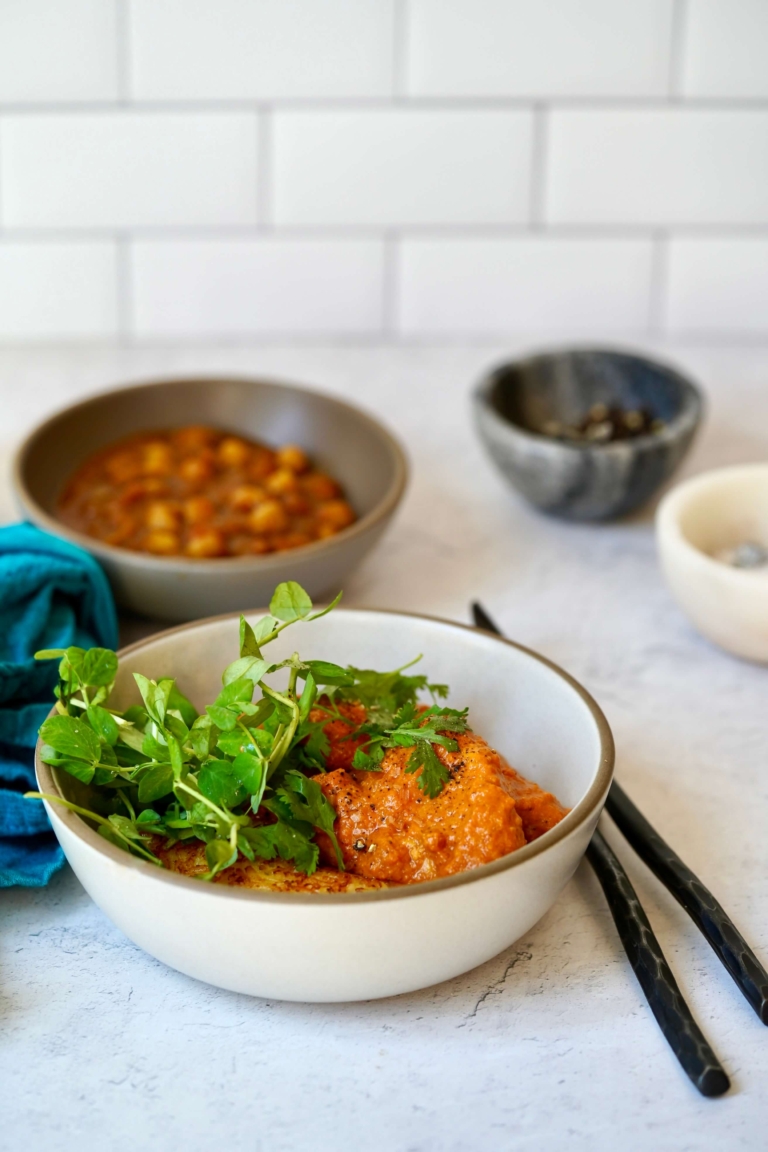
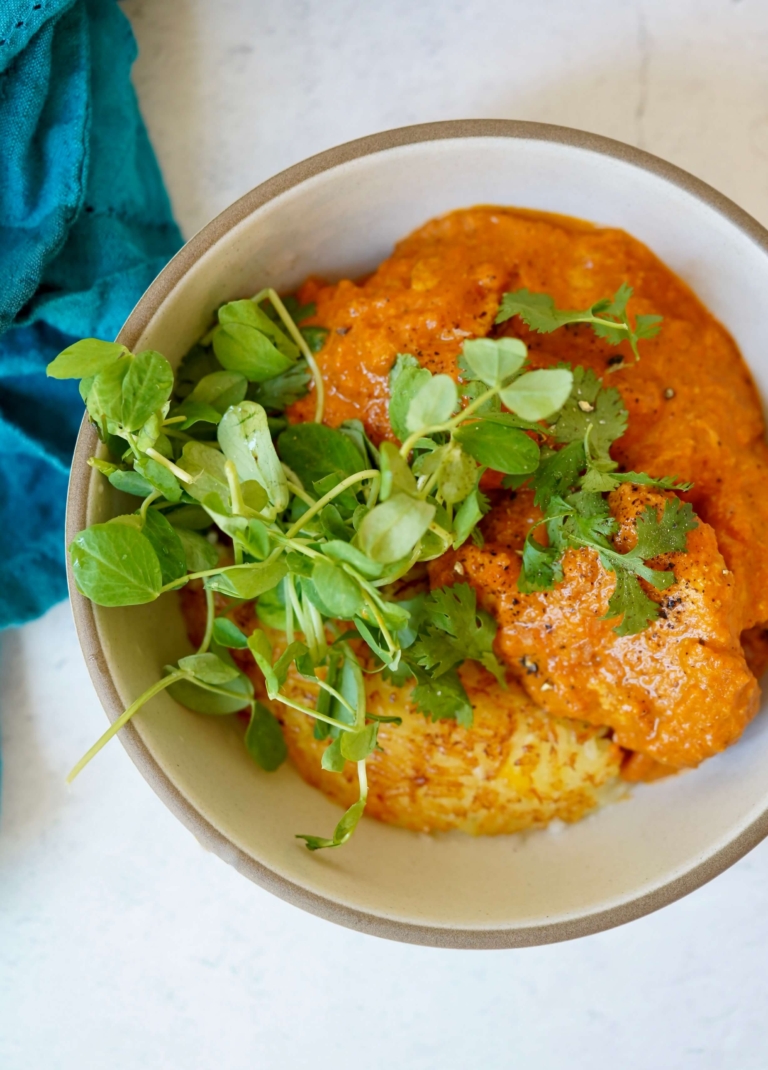
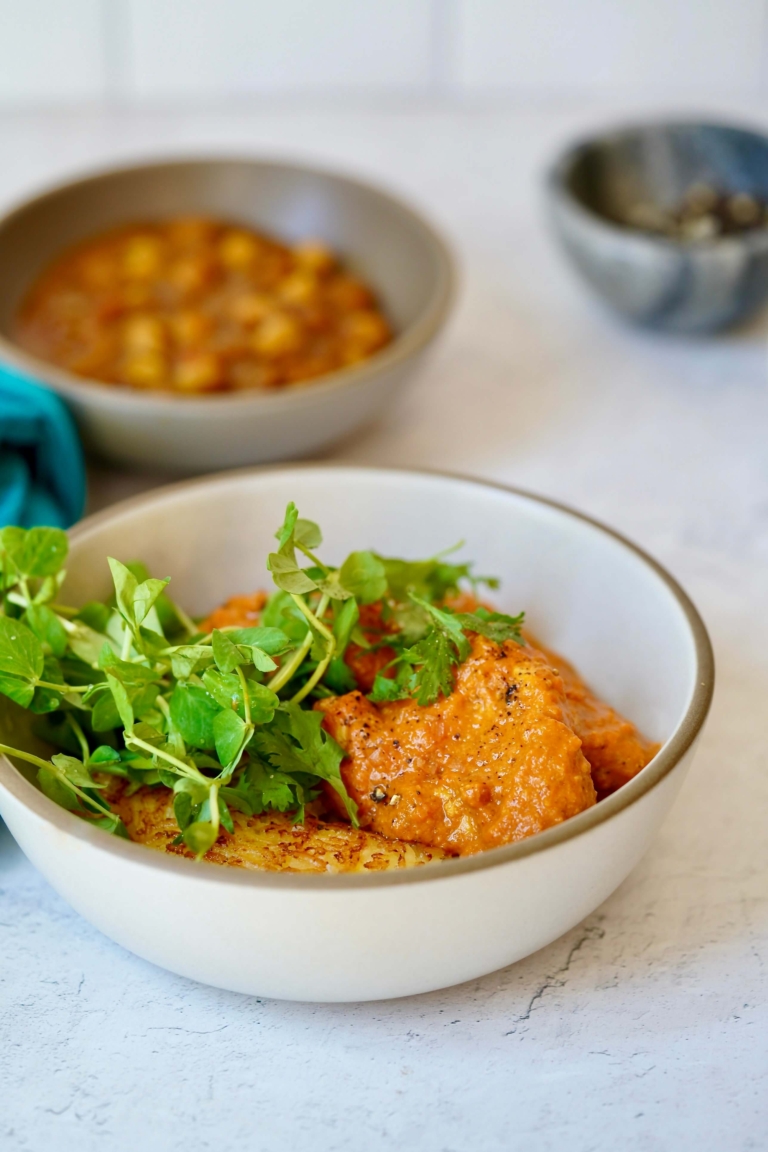
Butter chicken, also known as “murgh makhana”, is the most searched Indian dish on the internet. And I get it. Like chicken Tikka Masala, butter chicken is considered one of the most popular, cross-continental Indian dishes throughout the world, even in places you would least expect it. This is not surprising at all. Tender, golden chicken in a rich, flavorful butter sauce, served with rice or naan, what’s not to love? This iconic tandoori chicken dish has a lovely aromatic sauce with a silky texture unlike any other, and I adore it. This recipe is extremely popular in my house and besides for the prep-ahead marinade, it’s actually rather easy to make.
The Invention of Butter Chicken
Butter chickens’ invention remains somewhat debated. There are two families that claim it’s invention. Before the partition of India and Pakistan, Kundan Lal Gujral made tandoori chicken in a dhaba in Peshawar in the 1920s. After independence, he opened a restaurant, Moti Mahal, in Daryaganj with two partners. At that time, refrigerating leftovers was not an option. Gujral didn’t want to be wasteful, so he experimented with dried pieces of chicken, adding tomatoes, butter, and some masalas to the gravy and thus the creation of the famous butter chicken.
According to Raghav Jaggi, a descendant of one of the partners, it was Jaggi’s grandfather Kundan Lal Jaggi who invented this famous dish. Jaggi was working at Mahal Moti restaurant, and he came up with butter chicken in Delhi when a big group of refugees came to the restaurant, and he didn’t have enough tandoori chicken to feed them all. So, he whipped up the gravy and added tandoori chicken to it, to stretch it, to feed all the refugees. Story versions aside, Moti Mahal would go on to become one of the most iconic restaurants populating tandoori cuisine and butter chicken to this day.
Butter + Cream
The name butter chicken often confuses people. Is butter chicken a curry or something else? The answer is–both. Because this dish has evolved into a widely popular dish, it’s not always easy to pin down its characteristics. Traditionally the chicken is cooked in a tandoor oven, but modern recipes have moved away from this. The flavorful marinade typically consists of cumin, turmeric, garlic, and ginger, as well as yogurt to help tenderize it. The flavorful sauce is made from tomato, butter (or ghee), and cream, but there are numerous variations out there.
The amount of butter and cream used to make butter chicken can really fluctuate a lot. Many recipes actually call for several sticks of butter. My version is a bit healthier. I use a lot less butter without sacrificing flavor. Perhaps the most important ingredient I learned, is kasoori methi(fenugreek seeds), a clover-like herb with a nutty flavor, so don’t skip it. Flavor profile-wise, my butter chicken is only a little spicy, with just a touch of sweetness, creating the perfect balance. This dish is considered a comfort food in India and beyond so here’s a version of it you can make at home, that does not involve a tandoori oven and it’s just as delicious.
For the chicken marinade: In a medium mixing bowl, add the chicken, yogurt, garlic, ginger, garam masala, turmeric, cumin, chili powder, and salt. Mix to coat. Refrigerate the chicken and marinate for at least 1 hour or overnight.
Place a large skillet over medium-high heat. Add the oil and when hot, but not smoking, add the chicken, and cook in batches, until browned, about 2-3 minutes per side. Remove the chicken from the pan and set aside.
For the butter sauce: Return the pan to the heat and add the ghee. When hot, add the onions and cook until softened, about 5-6 minutes. Add the garlic and ginger and sauté for 1 minute, until fragrant. Stir in the coriander, cumin, and garam masala. Cook for about 20 seconds until fragrant, while stirring occasionally.
Add the tomatoes, chili powder, cayenne, and salt. Simmer for about 10-15 minutes, stirring occasionally until the sauce thickens. Remove from heat, carefully pour the mixture into a food processor, and blend until smooth. Add 3-4 tablespoons of water, as needed, to help thin it out.
Pour the puréed sauce back into the pan. Stir in butter, cream, sugar, and fenugreek and mix well. Add the chicken and juices back into the pan. Simmer gently until the sauce has thickened, about 8-10 minutes.
Garnish with fresh cilantro and serve with rice or naan .
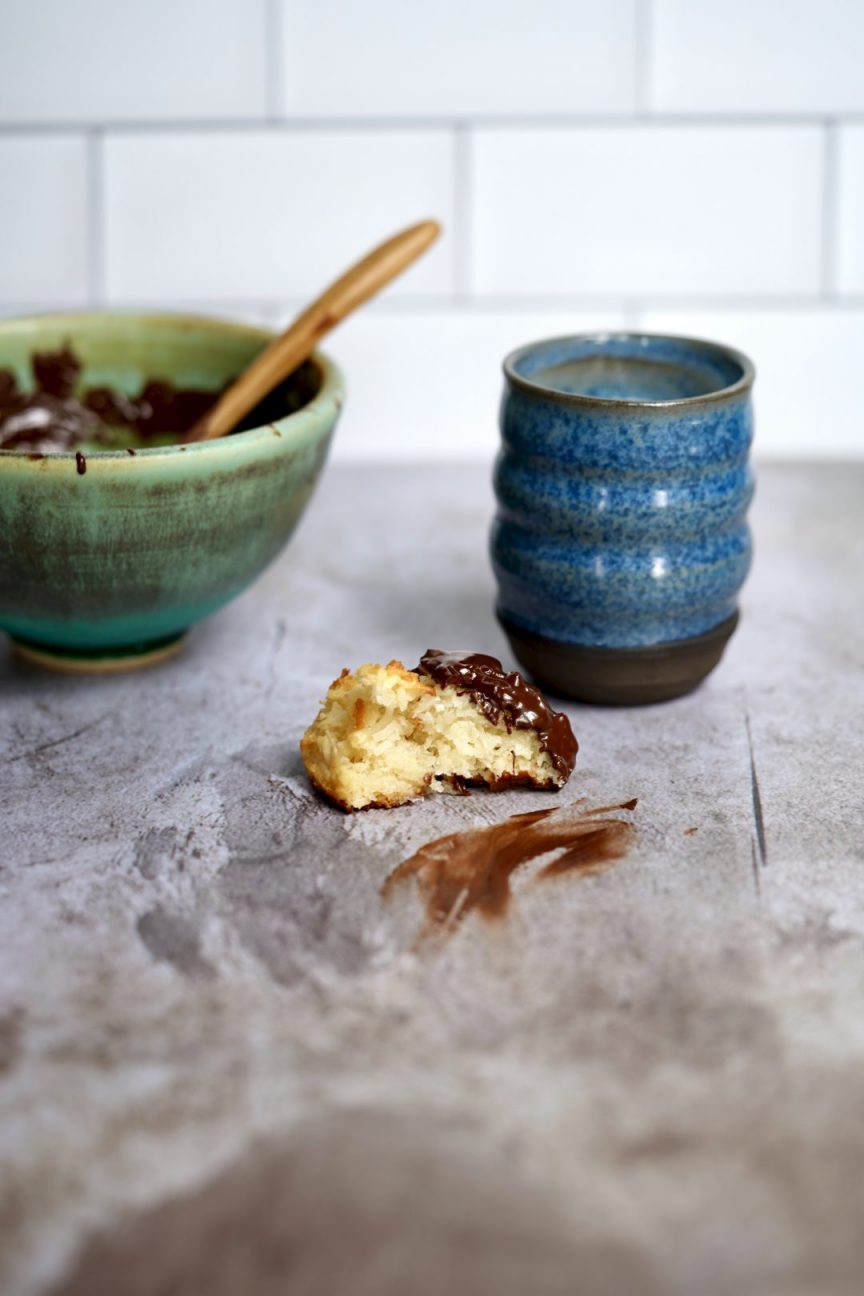
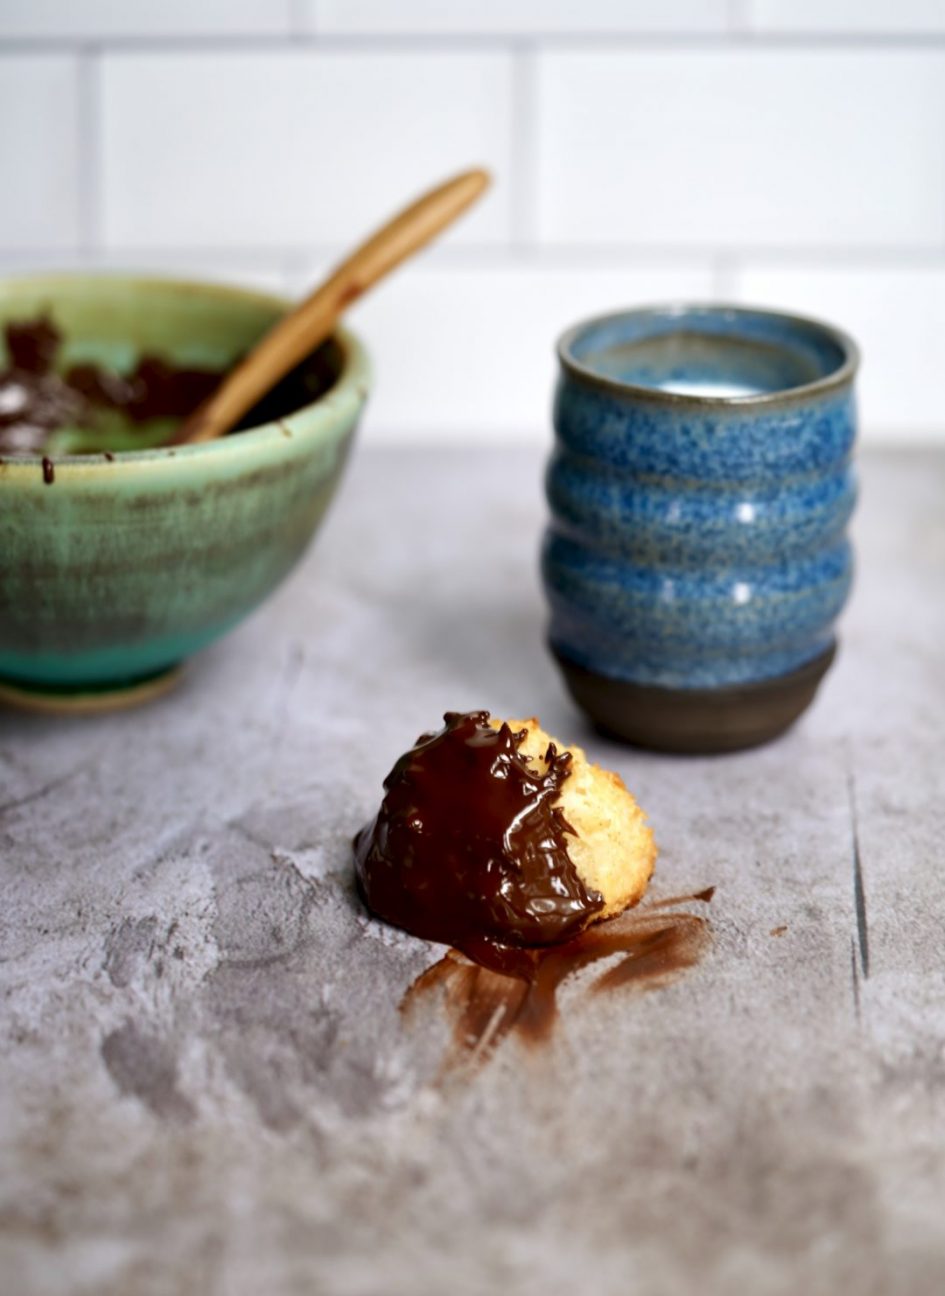
These beauties are my coconut dulce de leche cocadas and they are outrageously delicious. Cocadas are a traditional coconut candy or confectionery typically found in Latin America, Mexico, Argentina, Brazil, Colombia, and Venezuela as well as other areas in South America. If you are a coconut lover like I am, these are a must-make.
Similar to a coconut macaroon, cocadas have a chewy, yet soft texture. There are lots of variations out there from, brightly colored to golden brown with almonds or macadamia nuts. But in this recipe, I use dulce de leche to add even more richness as well as a creamy caramel flavoring that’s memorable.
Fun fact for you. Etymologically, the word “cocada” comes from the word “coconut” with the addition of the Spanish suffix “ada”, which means “a hit” or “a strike”. The suffix “ada” indicates to strike with a sharp object, such as in cracking a coconut open.
Cocadas are believed to be of Spanish origin, likely because, coconut, sugar, and milk are all products that were brought by the Spanish in the countries they colonized. After the Spanish Civil War, and a shortage of pine nuts (an ingredient heavily used in many recipes at the time), coconut began being used as a common substitute in many recipes. Some believe it was around this time, that cocadas were invented.
Cocadas Around The World
These outrageously delicious sweet treats have minimal ingredients. Traditional recipes use fresh, grated, or ground coconut and sugar and, with the possible addition of other ingredients, (depending on the region) served for a host of different reasons.
Spain: Typically prepared for and consumed on holidays. The most famous ones come from Barcelona.
Colombia and Mexico: Sold as both artisanal treats in boutique shops and as a popular street food.
Uruguay: Found in bakeries, sold under the name “coquitos”. The most delicate versions include a cherry on top and a coating in syrup.
Mexico: Popular during the coconut fair, a time in which the biggest “cocada del mundo” is prepared.
Brazil: Called “cocada preta” (black cocada), prepared with brown sugar and lightly burnt coconut which gets formed in an elongated shape.
Peru: Made two different ways here; the first is to cook the ingredients until boiling to the point that the resulting dough can be cut and frozen. The second is where the raw dough is divided into squares and baked or cut after cooking.
Venezuela: Refers to a coconut drink and the confectionery known as “conserva de coco”.
Like coconut, caramel is also a weakness for me, so its addition to this recipe seems rather fitting. I like to dip my cocadas in melted chocolate which balances the caramel and builds flavor complexity. This one-bowl recipe whips up in a minute and bakes off in just 30 minutes making them a great quick sweet treat, should you be needing one. I first served these beauties years ago at my husband’s Mexican-themed 40th birthday party and they disappeared almost instantly. Trust me, if you make them, you’ll understand why.
In a large mixing bowl combine the coconut, condensed milk, dulce de leche, corn starch, egg whites, and vanilla extract. Using a rubber spatula, mix well to incorporate. Place in the refrigerator and chill for 30 minutes.
Preheat the oven to 350 degrees F. Line two baking sheets with parchment paper, lightly grease, and set aside.
Using your hands, roll the coconut mixture into small balls and place them about 1 inch apart on the baking sheet.
Bake for 30 minutes, rotating sheet trays halfway through for even baking. Cool completely.
When cool, dip half the cocadas in the melted chocolate and place them back on the sheet tray to dry.
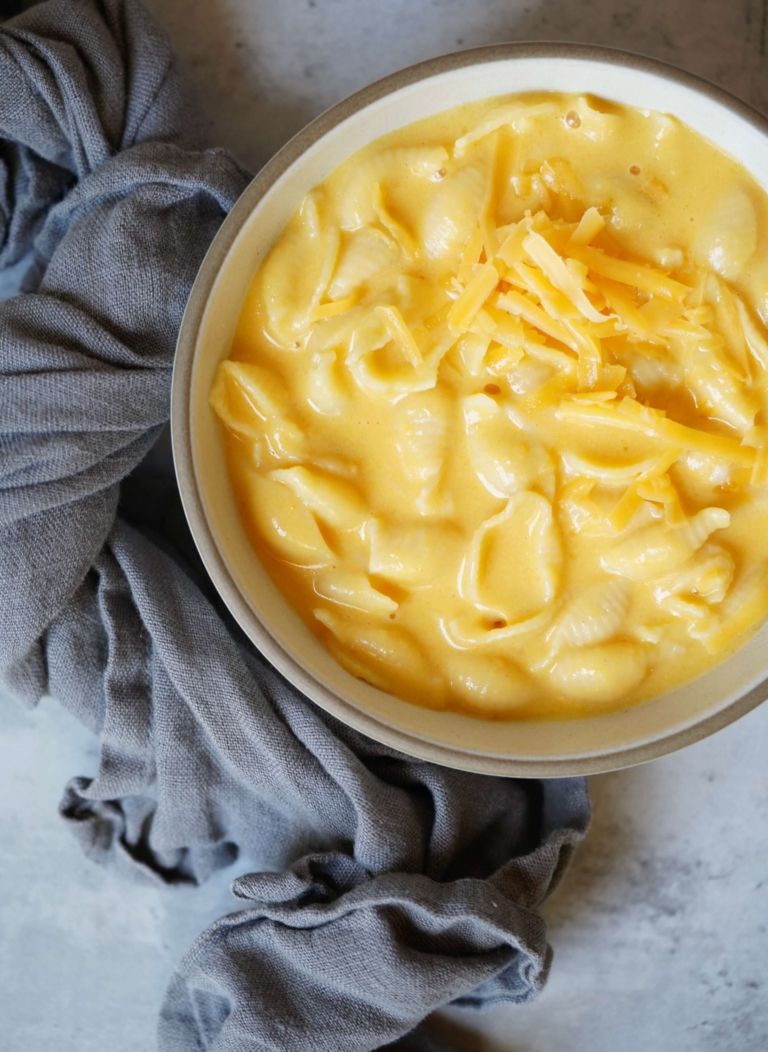
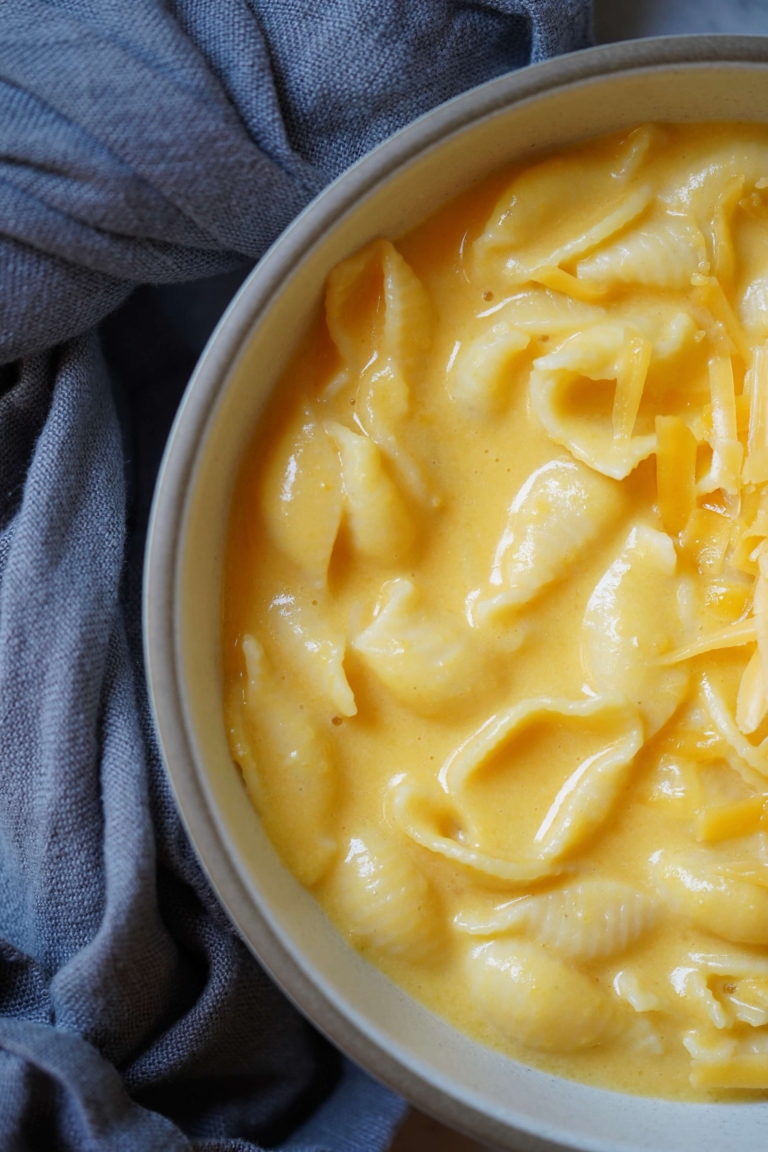
Butternut squash mac and cheese is a social media darling that I’ve recently come around to. Truthfully, I grew up loving macaroni and cheese, but I was often confused by it. My mother, who cooked some signature dishes, but not a ton, made mac and cheese from scratch. My mom’s version of this iconic dish was loaded with cheese, three kinds, if I recall correctly, and always made a mess of the Corningware casserole pan she baked it in. I reliably went for the corner piece where the abundance of extra crispy elbow noodles could be found. I loved it the day she made it, yet I loathed it afterward for the endless leftover days that followed. No matter the method, mac and cheese the day after was far less superior.
In contrast to my mom’s mac and cheese, my stepmother made the boxed kind. And by “boxed” let me remind you it was the 80s, there was only one kind out there and almost no one read nutritional labels at the time. I found the florescent-orange “cheese” powder questionable, yet fascinating. There were no crispy corners, but the box-to-table speed was appreciated, especially to my six-year-old self.
Over the years I strayed away from mac and cheese, only to revisit it once I had kids. Truth be told, and much to my surprise, neither of my kiddos were big mac and cheese fans when they were little, homemade or store-bought. And trust me, it was not without me trying. If I had to bet, if you ask them now which kind they would prefer, they would likely say they prefer the boxed kind (meaning the slightly healthier, organic kind). This is mainly because it’s quick, they can make it themselves and perhaps, most importantly, they don’t have that dreaded casserole pan to clean afterward.
Despite dishes dictating their pallets, I will still occasionally make the homemade kind as a treat in the winter and no one complains. I was late to embrace the healthier squash version, but here we are. This is my version of butternut squash mac and cheese which has a subtle, nutty sweetness from the squash to balance the creamy cheese sauce. This recipe is not like my mom’s mac and cheese, nor the boxed stuff, I would say it falls in a wonderful, healthier category of its own, and I’m a fan. I will not tell you it tastes the same as traditional mac and cheese, because it doesn’t, but it’s rich, earthy, and incredibly satisfying in a whole different way, minus a lot of the calories.
Butternut Squash Mac And Cheese
Rate this recipe
|
3 ratings
Prep:
20 minutes
Cook:
20 minutes
Total:
40 minutes
Ingredients:
2 tablespoons unsalted butter
1 large garlic cloves, grated
3 cups butternut squash, peeled, deseeded and 1/-inch dice
1 1/2 cups good quality vegetable stock
1 pound medium pasta shells
2 cups milk
10 ounces, (plus more if needed) medium cheddar cheese shredded, divided
Kosher sea, to taste
Directions:
Bring a large stock pot of salted water to a boil over high heat. Once boiling, add the pasta to the boiling water and cook according to package instructions until al dente. Drain the pasta and reserve 1 cup of the starchy pasta water for later in case it's needed.
While the pasta is cooking, in a medium stockpot, add the butter and place over medium heat. Once melted, add the garlic and cook, stirring occasionally, for 30 seconds without browning. Next, add the butternut squash and stock, stir to combine, and bring to a simmer. Once simmering, reduce the heat to medium-low, cover, and cook for about 10 minutes, until the squash is tender.
Carefully transfer the squash mixture and liquid to a kitchen blender, such as a Cusinart fitted with a blade attachment. Add the milk and blend on high until completely smooth.
Return the butternut squash mixture to the pot and place over medium-high heat. Stir in about 8 ounces of the shredded cheese, and cook until completely melted and smooth. Season, to taste, with salt.
Pour the cooked pasta into the butternut cheese sauce and use a rubber tip spatula to mix. If the sauce is too thick, and you wish to thin it out, add in some of the pasta water and mix to combine. If you would like it thicker, add a little more grated cheese.
Serve the mac and cheese warm, garnished with the remaining shredded cheese on top.
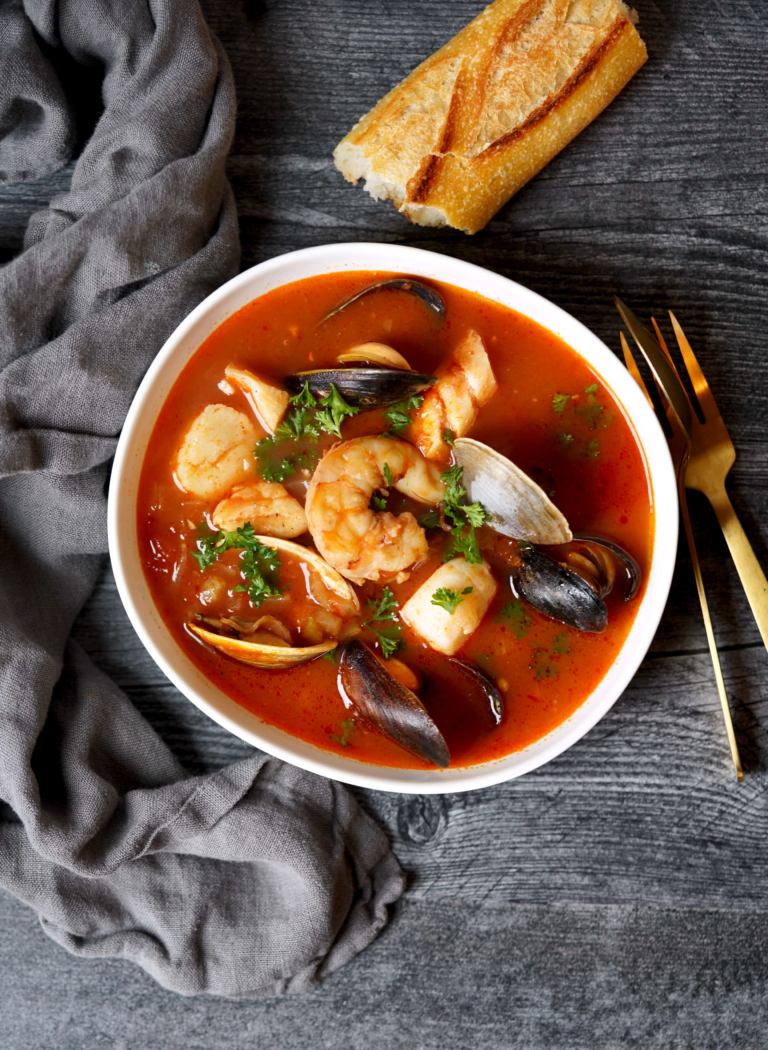
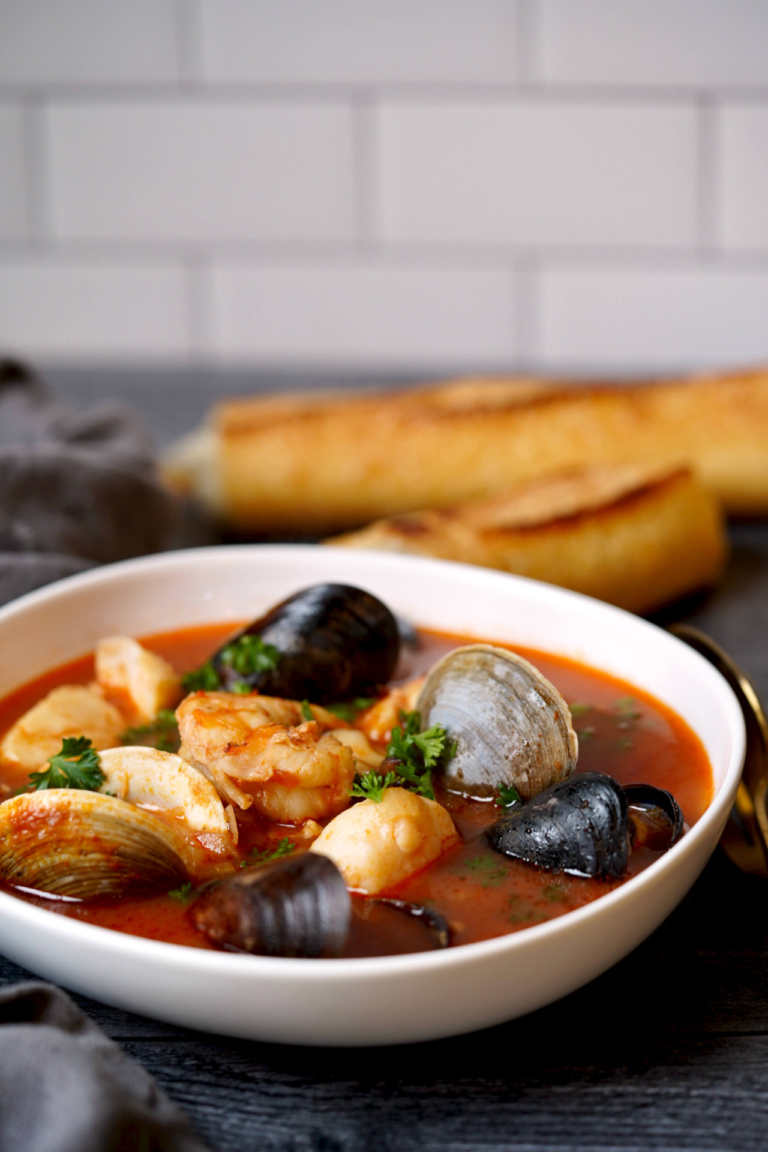
Ina Garten’s authentic Cioppino is outrageously good and truthfully, I wouldn’t change a thing about it. Cioppino, a classic tomato-based seafood stew loaded with shrimp, cod, mussels, scallops, and clams, is a healthy stew (or soup) that’s surprisingly easy to whip up in just about an hour. San Francisco is where Cioppino was invented way back in the 1800s when Italian immigrant fishermen would share the day’s catch with other fishermen who came home empty-handed. This famous soup was also commonly cooked on boats while out at sea, as well as in fisherman’s homes long before it made its way to restaurants along the famous San Francisco wharf.
Nunzio and Rose Alioto
The first restaurant that helped make Cioppino famous was Aliotos. In 1925 Nunzio Alioto, an Italian immigrant, set up a stall at #8 Fisherman’s Wharf to sell lunchtime snacks to the Italian workers. His business quickly grew, and by 1932 he had constructed the first building at the historic corner of Taylor and Jefferson, by combining the fish stand with a seafood bar specializing in shrimp cocktails and steamed fresh crab. Nunzio passed away unexpectedly and “Nonna” Rose, his widow, and her three children began running the stand. In doing so, Rose became the first woman to work on the wharf. By 1938 she had installed a kitchen in the original structure and officially opened Alioto’s Restaurant.
It’s been said that Rose used to put a bib around her son before eating Cioppino and say, “if it doesn’t splatter on your shirt, you aren’t doing it right.” Nothing could be further from the truth, this irresistible seafood stew is notorious for splattering while you eat it and mop up all its delicious broth. It’s a risk worth taking, if you ask me.
Cioppino vs. Bouillabaisse
Other cultures have a version of Cioppino, including Italy’s neighbor, France, where their “fisherman’s stew” is known as bouillabaisse. Cioppino is Italian in nature with a purely tomato-based broth, whereas bouillabaisse is French, and has the addition of saffron to its fish stock-based broth with chopped tomatoes added in.
This unfussy stew is a wonderful soup for seafood lovers and a great go-to year-round, but especially during these long winter days. For Californians, many of us who are enduring extreme weather, in the form of either atmospheric rivers or intense snow fall, Cioppino may just be a welcome comfort food to warm you up and calm down those nerves. Although making Cioppino may seem intimidating at first, it’s actually rather simple and Garten breaks it down perfectly. And the truth is, if it could be made on ships and wharfs at one time, I’m willing to be you can master it in your modern-day kitchen.
Cioppino Seafood Stew
Rate this recipe
|
4 ratings
Servings:
6
Prep:
30 minutes
Cook:
40 minutes
Total:
1 hour, 10 minutes
Ingredients:
1/4 cup Extra virgin olive oil
2 cups fennel, white part only, cut into 1/2-inch dice
1 pound cod fillets skin removed, cut into 2-inch pieces
1 pound large shrimp, peeled and deveined
1 pound sea scallops, halved crosswise
1 dozen mussels, scrubbed
1 dozen littleneck clams
1 tablespoon Pernod
3 tablespoons fresh parsley, minced
Directions:
In a Dutch oven add the olive oil and place over medium heat. When hot but not smoking, add the fennel and onion and sauté until tender, about 10 minutes.
Add the garlic, fennel seeds, and red pepper flakes and cook until fragrant, about 2 minutes. Stir in the tomatoes, stock, wine, 1 tablespoon salt, and 1 teaspoon black pepper. Bring to a boil, lower the heat, and simmer uncovered for 30 minutes.
Next, add the cod, followed by the shrimp, scallops, and finally the mussels. Do not stir. Bring to a simmer, lower the heat, cover, and cook for 10 minutes, until the seafood is cooked and the shellfish open.
Stir in the Pernod. Cover and set aside for a few minutes for the flavors to blend. Discard any shellfish that have not opened.
To serve, ladle the soup into large, shallow bowls and sprinkle with chopped parsley. And don't forget the bread for sopping.
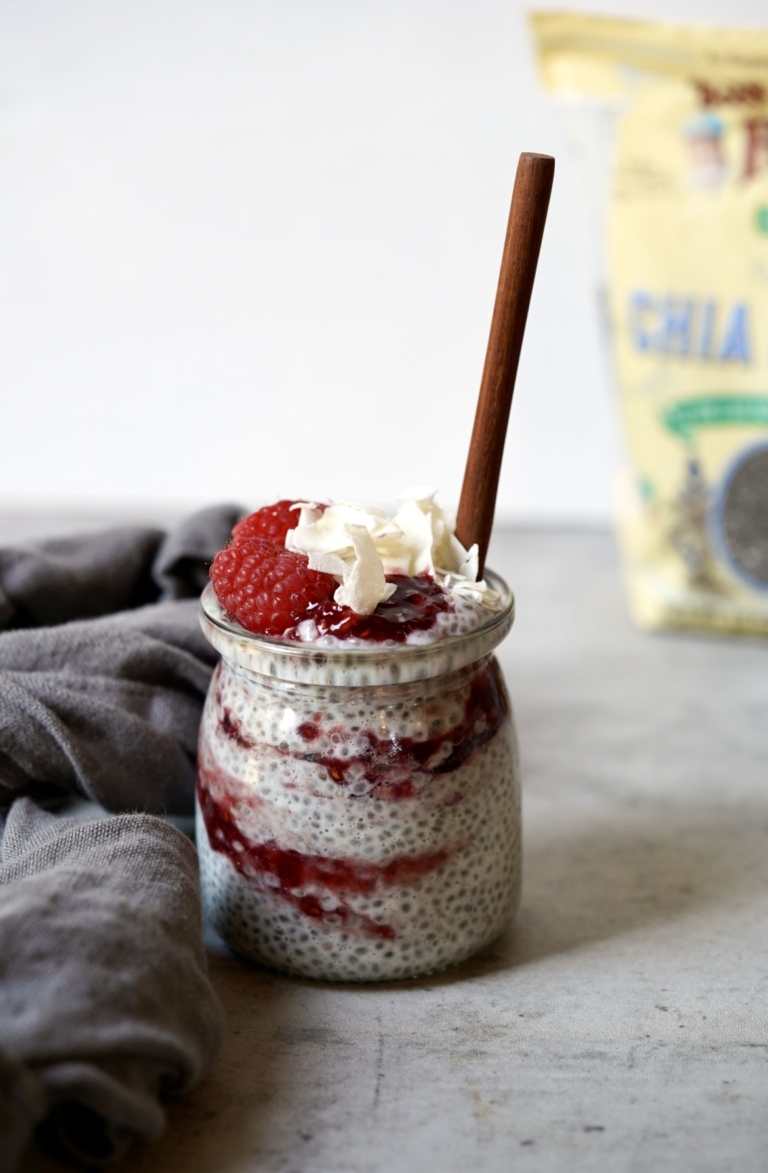
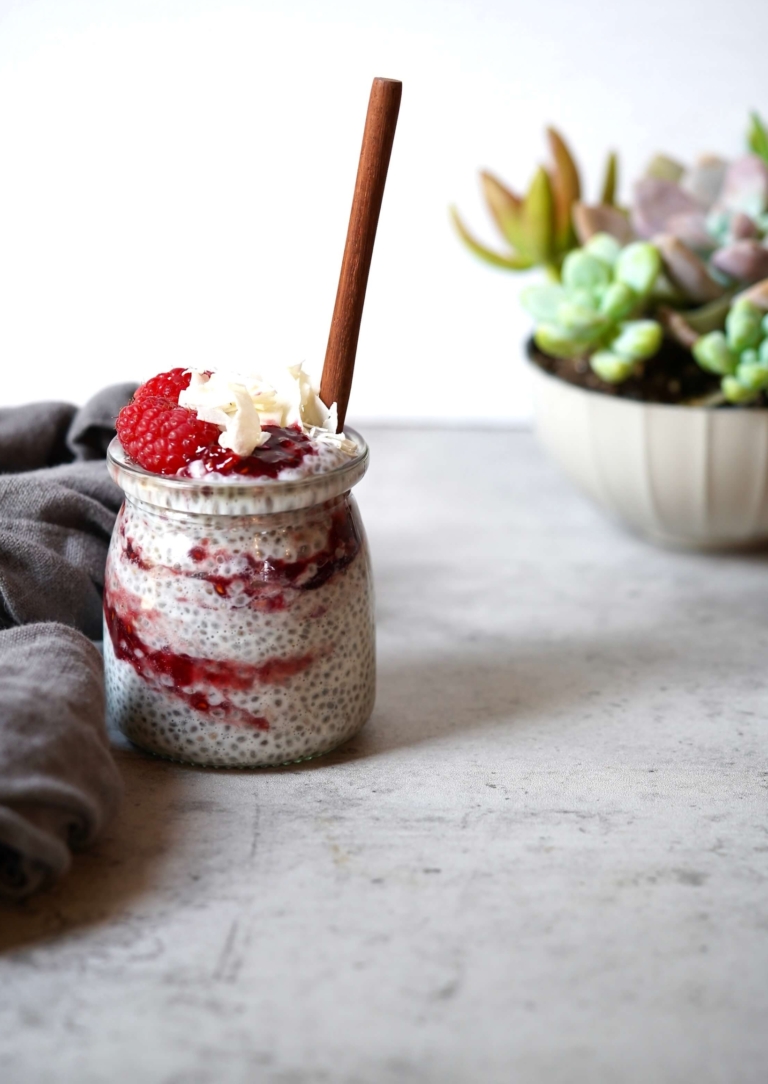
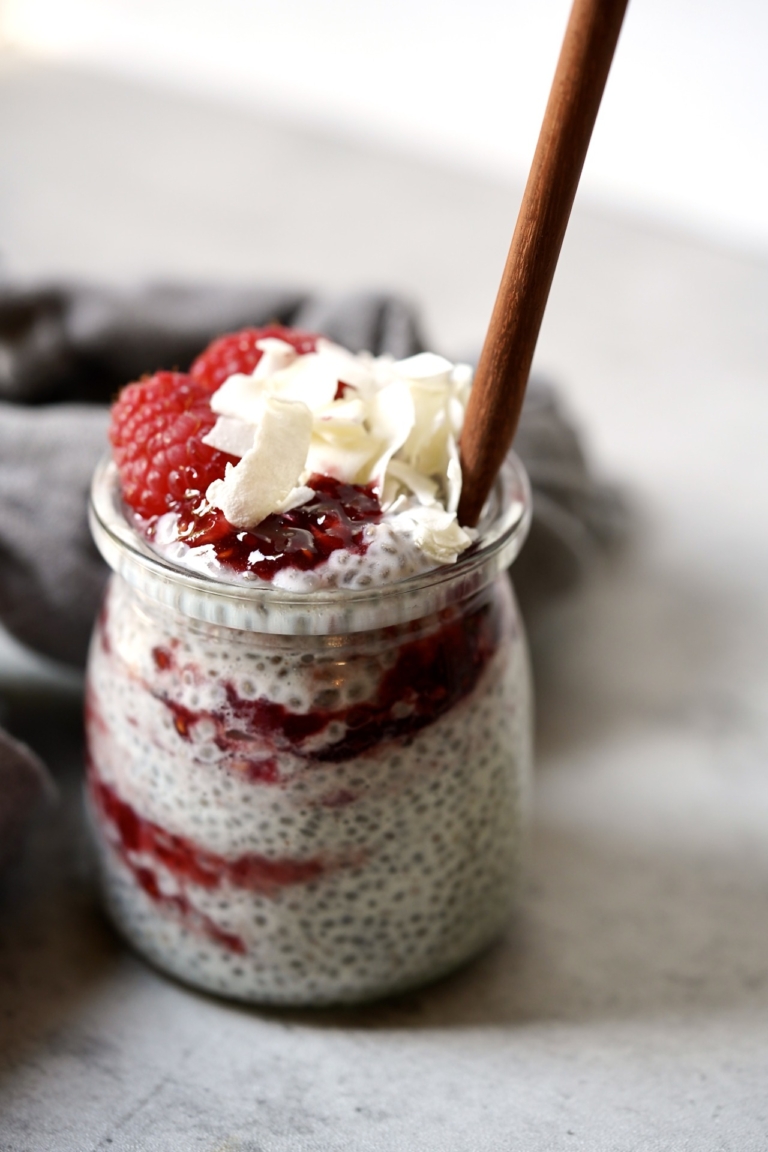
Chia pudding has been an Instagram favorite for years now with no signs of slowing down, and I get why. The luster of the presentation is intoxicating. Beautiful works of art, served in overflowing, handmade earthenware, or in adorable petite glass jars, all highlighting those gorgeous gray chia seeds. Seriously, what’s not to love? I’m late to join the chia pudding crazy, and although I’m still smitten with overnight oats, I’m jumping in anyway. Here’s my outrageous coconut raspberry chia pudding. Think light enough for breakfast, yet elegant and satisfying enough to be served as a healthy dessert option to kick off your New Year of more mindful eating.
A Superfood Seed
Chia seeds, which means “strength”, also called “miracle seeds,” “super seeds,” “superfood,” “magical,” and “the food of endurance runners” have been around for centuries. Decades ago, chia seeds were considered an essential food, that possibly contained supernatural powers, of the ancient Mayans, Aztecs, and Tarahumara Indians. History tells us, that Mayan and Aztec warriors used chia seeds as their sole food source when traveling long distances. They were highly desirable because a small pouch carried at their waists provided complete nutritional sustenance for several days and could be consumed without stopping.
Aside from being eaten whole, the chia seed was anciently used for many things. These special seeds were used in medicine, ground into flour, mixed as an ingredient in drinks, and pressed for oil. In addition to these practical uses, the chia seed ran deeper into the blood of the Aztecs. These special seeds were sacred and used as a sacrifice in religious ceremonies.
Dr. Wayne Coates
Fast forward a few thousand years to Dr. Wayne Coates, a research professor at the University of Arizona, who was one of the very first to (re)discover chia seeds in the 1980’s. Coates discovered the fact that they grew a thick green mat of grass-like shoots in a matter of hours. But for many years, the novelty of this overshadowed the very real nutritional value that Dr. Coates found in the tiny chia seed.
Roughly 20 years later, the health, fitness, and nutrition market exploded. Vegetarian and vegan lifestyles started to become incredibly popular, and the search for protein from plants took center stage. Chia seeds, as a source of protein, became a trendy go-to for many. And with that, chia seeds earned their rightful recognition as a superfood. “Super”, because they contain a very dense concentration of vital nutrients, vitamins, and minerals, as well as antioxidants, good fats, healthy enzymes, or other healthy properties that help to treat, lower the risk of, or prevent specific diseases.
A Powerful Little Seed
Chia seeds can be black or white (brown indicates that the seed is unripe), but there is no difference nutritionally between the two. But every tiny little chia seed comes with all the proteins, fats, vitamins and/or minerals, amino acids, and antioxidants needed to unlock their nutritional value. Chia seeds have everything necessary to process all the nutrients they contain, and that means, unlike many other foods, your body can use them quickly and efficiently.
Health Benefits of Chia Seeds
High in fiber, antioxidants, calcium, phosphorous, and magnesium
Excellent source of essential fatty acids, including alpha-linolenic acid, an important anti-inflammatory fat
Possible therapeutic benefit for certain cardiovascular, immune, and digestive conditions
Chia Flavor
Despite what you may believe, chia seeds don’t have a strong flavor, so, they can be included in a wide range of foods for added texture. They also form a slight gel-like texture when mixed with liquid. So, chia seeds can be substituted for eggs or even used as a soup thickener. Chia seeds can also be included in all kinds of baked goods or protein bites for some added energy.
Breakfast or Dessert
This coconut raspberry chia pudding is the ultimate healthy breakfast, snack, or even dessert. If you’re new to chia seeds, this easy chia pudding recipe is a great starting point. You simply stir everything together and refrigerate until thick. No fancy cooking gadgets, no whisking on the stovetop, and no baking required. And what you get is a thick, creamy, delicious pudding that’s healthful. Perhaps the best part, it’s vegan-friendly, gluten-free, raw, paleo, sugar-free, oil-free, nut-free, low calorie, low carb, soy-free, and keto-friendly.
In a medium bowl, whisk to combine chia seeds, milk of your choice, agave, and vanilla extract. Mix well, cover, and refrigerate for at least three hours but ideally overnight.
To serve, use a small whisk to blend the chia pudding. Mix the in the coconut extract. Divide the pudding into two serving bowls, and swirl in the raspberry jam. Top with coconut and fresh raspberries.
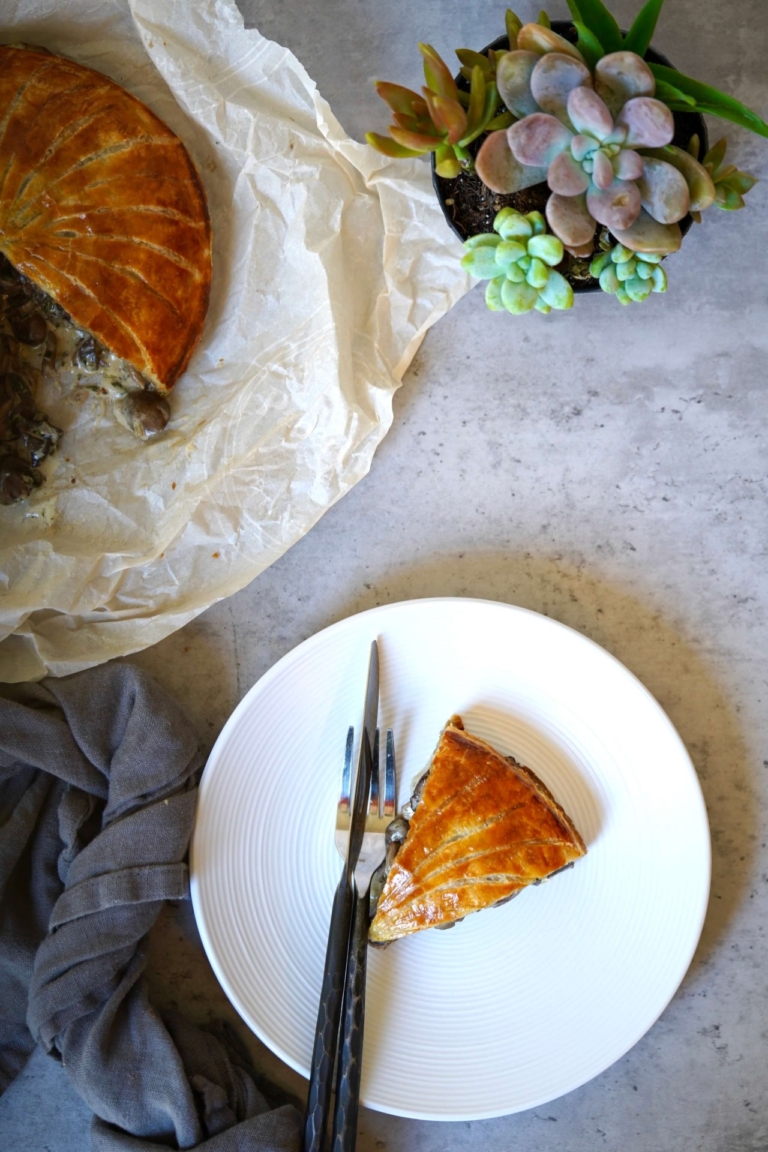
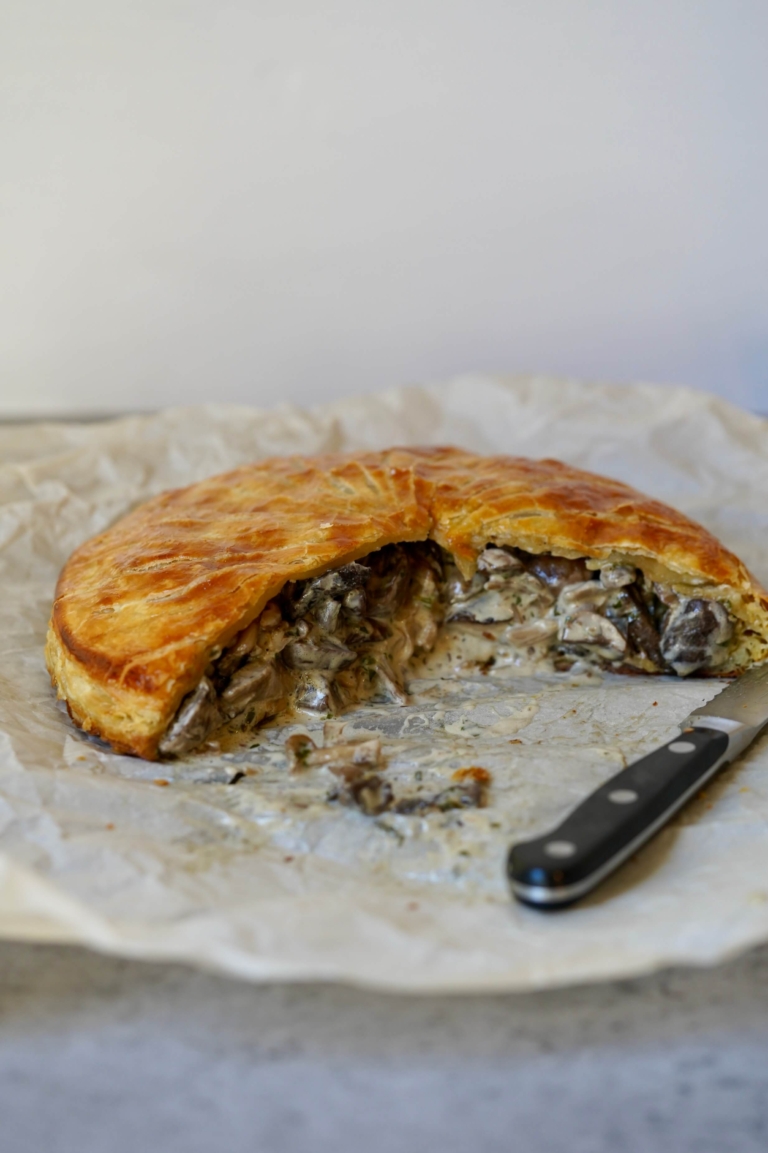
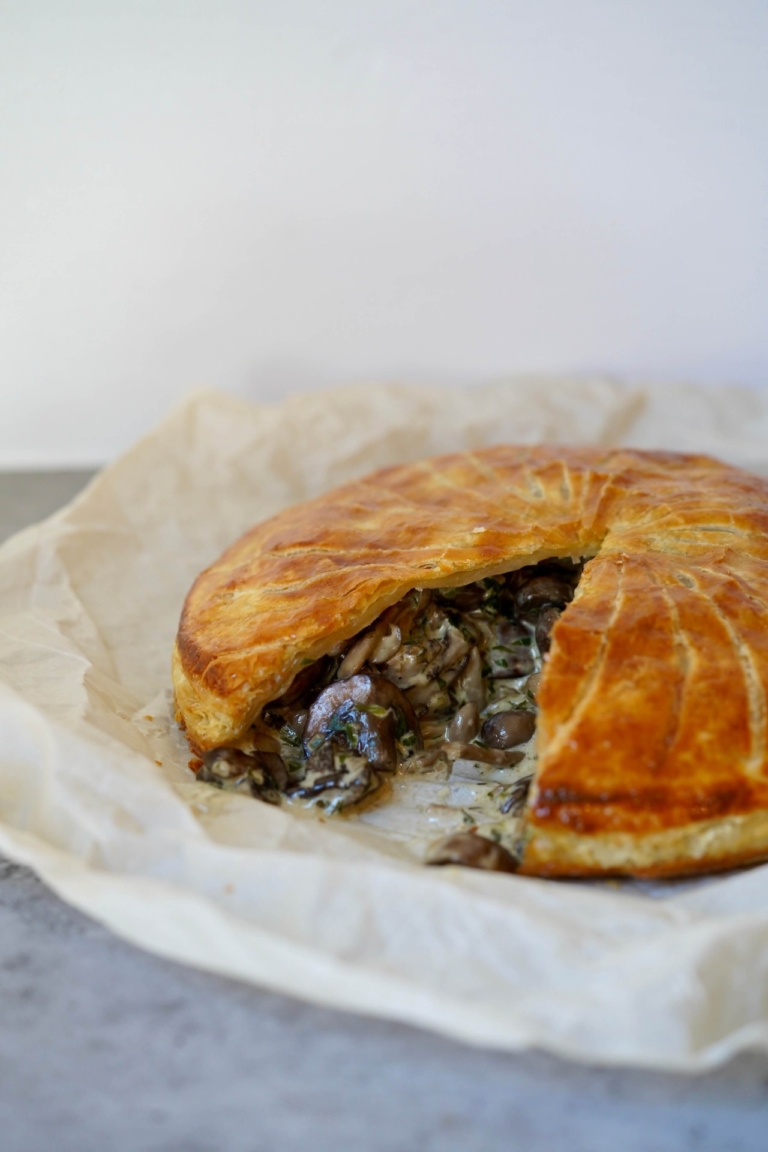
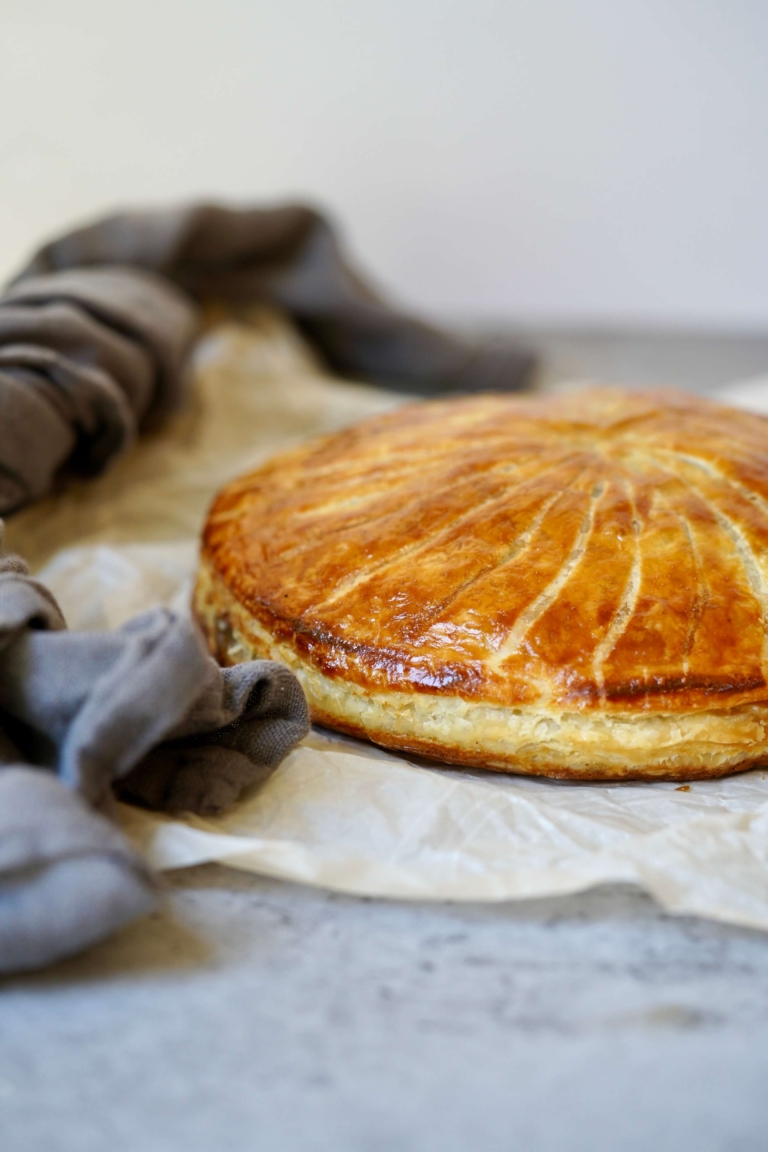
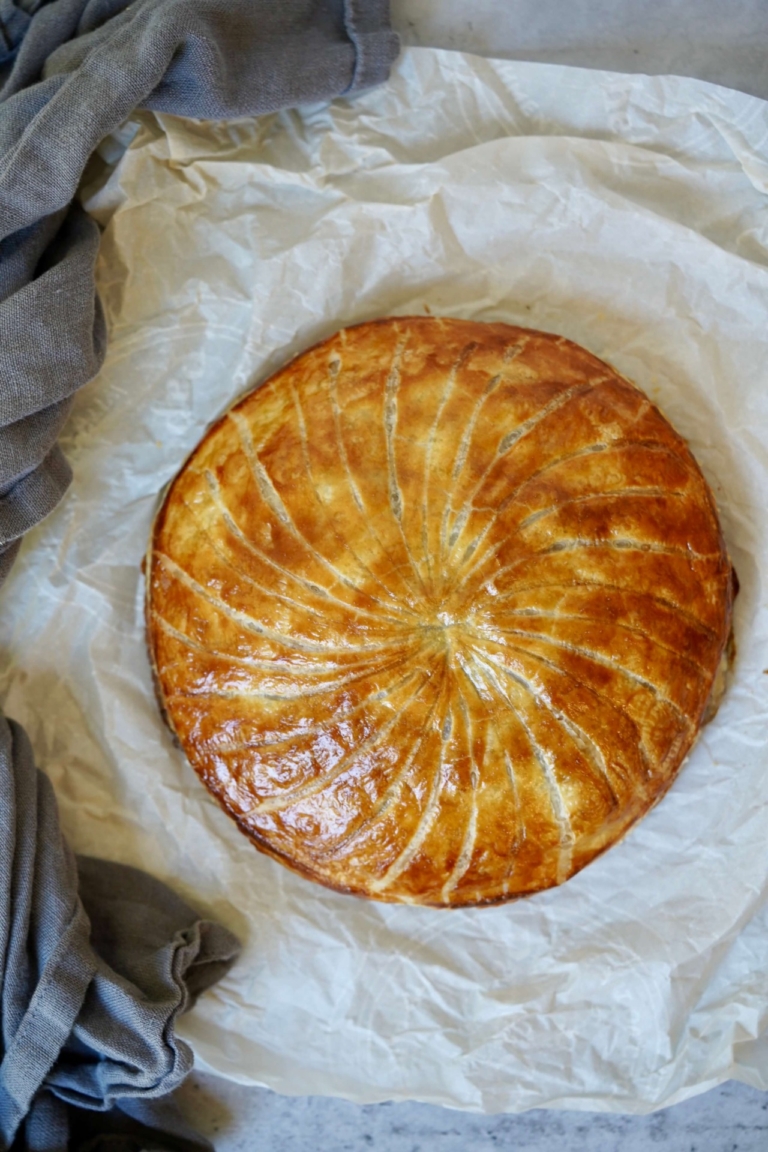
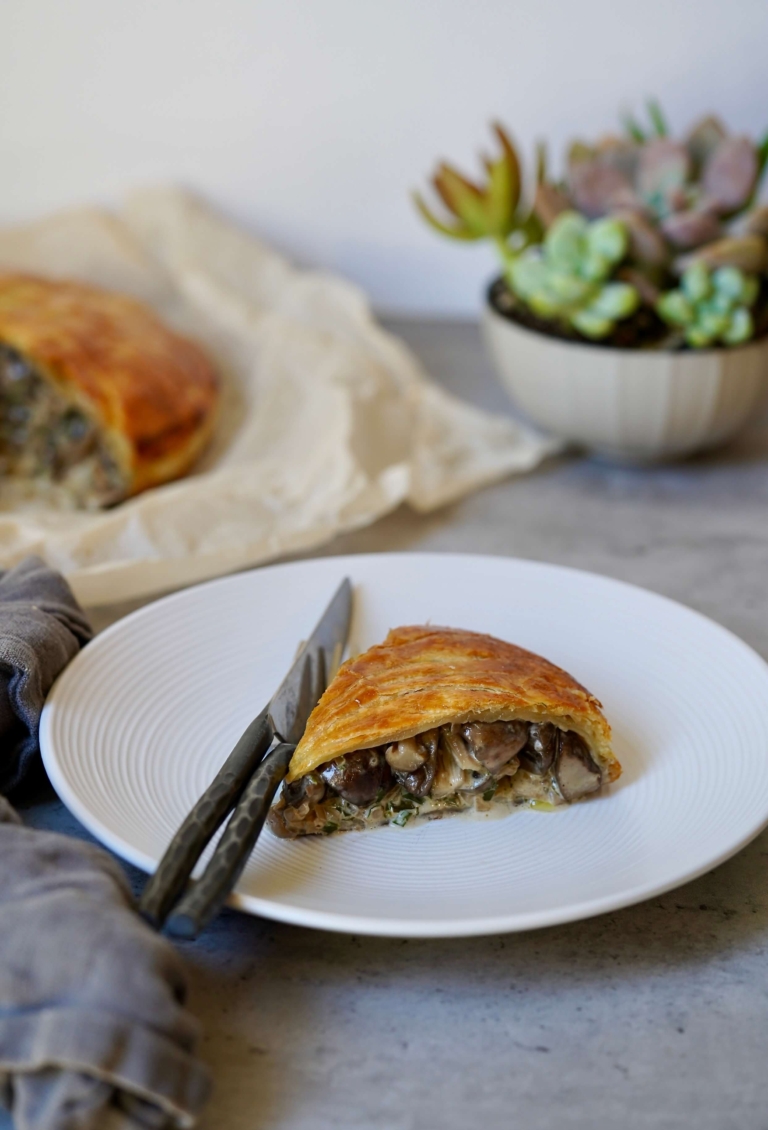
Let’s talk about true culinary decadence–a mushroom Pithivier. And if you’re staying in, it’s the perfect recipe to ring in the New Year. This gorgeous, golden-brown, wild mushroom Pithivier is a mushroom lover’s dream come true. Flaky, puff pastry filled with a wild mushroom and crème fraiche filling that is outrageously addictive. And if you still can’t quite imagine it, think beef Wellington, sans the beef. This is not my recipe, it was created by the incredibly talented Yotam Ottolenghi, my version below has been lightly adapted.
Pithivier
A Pithivier is a traditional French dish hailing from the town of Pithivier, in the Orléans region of France, which dates to the 17th century. A Pithivier is a free-standing, free-form puff pastry “pie” so stunning that it’s as much a centerpiece as it is a dish.
The traditional example, which is not dissimilar to the frangipane-filled galette des rois made to celebrate Epiphany, has a sweet almond center, though these days a Pithivier is just as likely to be savory. The internet is full of recipes for Pithiviers stuffed with fish, fruit, and even tofu and mushrooms.
Who is Ottolenghi?
The creator of this recipe, Yotam Ottolenghi is the chef-patron of the Ottolenghi group. He is the author of several best-selling cookbooks that have garnered numerous awards, including the National Book Award for Ottolenghi SIMPLE, which was also selected as the best book of the year by the New York Times. Ottolenghi has been a weekly columnist for the Saturday Guardian for over fifteen years and is a regular contributor to the New York Times. I have been a Ottolenghi fan for many years, and this delectable dish confirms why, he’s food is so exceptional.
The Pastry
The puff pastry is what ultimately defines a Pithivier – without the pastry, it’s just a pie. The truth is, if you’re willing and able, making your puff pastry is the way to go, and yes, it’s worth it. But that is not for everyone, and I get that. As I’ve said before, make sure to buy well. My go-to for pre-made puff pastry is what I used when I worked in restaurants, Dufour Pastry Kitchen Puff-Pastry. It is an exceptional product with a great buttery taste.
Homemade or not, it’s very important that the pastry and the filling are well chilled before you start construction. I also recommend resting the Pithivier before baking it, once assembled, to prevent the pastry from becoming too soft and compromising its structure. I also like to start the baking on convection. The air that circulates while cooking in this mode helps the puff pastry layer puff up and do its amazing thing.
This iconic dish makes a wonderful vegetarian show-stopper for the New Year but is rustic enough to hold its own at a Sunday brunch with friends just the same, so don’t hold back.
Wild Mushroom Pithivier
Rate this recipe
|
21 ratings
Servings:
6
Serving Size:
1 slice
Prep:
30 minutes
Cook:
45 minutes
Total:
1 hour, 15 minutes
Ingredients:
3 tablespoons Extra Virgin olive oil, divided
3 tablespoons unsalted butter, divided
2 shallots, peeled and finely chopped
24 ounces mixed wild mushrooms (cremini, button, shiitake, oyster, clamshell), cleaned and the larger ones quartered
Salt and freshly ground black pepper
6 ounces crème fraîche
2 tablespoons Pernod
1 1/2 teaspoons fresh tarragon, finely chopped
3 Tablespoons fresh parsley, finely chopped
2 pounds all-butter puff pastry, homemade or store bought
1 egg, lightly beaten
Directions:
Place a large sauté pan over medium-high heat, add a third of the oil and butter, add the shallots, and sauté for 10 minutes, stirring, until soft and brown. Transfer to a bowl. Add another third of the oil and butter to the pan, and cook the mushrooms on medium-high heat, stirring only when needed, until all the mushroom liquid has evaporated and you are beginning to see just a little coloration.
Add the shallots back to the pan, season with lots of salt and pepper, add the Pernot, and cook for a few minutes until the liquid is almost evaporated. Reduce the heat add the crème fraîche and cook for about 8 minutes. Once a relatively small amount of thick sauce is left, remove from the heat and stir in the tarragon and parsley, adjust the seasoning to taste, and set aside to cool.
Meanwhile, cut the pastry in two and roll both blocks into 1/4-inch squares. Rest in the fridge for 20 minutes, then cut into circles, one about 11-inches in diameter, and the other about 12-inches in diameter. Leave to rest in the fridge again for at least 10 minutes.
Heat the oven to 400 degrees F, convection setting ideally. Place the smaller circle on a baking sheet lined with parchment paper, and spread the cold mushroom filling on top, leaving a 3/4-inch border all around. Brush the edge with egg, lay the other circle on top, and seal the edges. Use a fork to make decorative parallel lines around the edge. Brush with egg and use the blunt edge of a small knife to create circular lines running from the center to the edge, just scoring the pastry but not cutting through it.
Place the Pithivier in the oven and bake for 35 minutes, until golden on top and cooked underneath. Allow to cool slightly, 5-10 minutes, before slicing. Serve warm or at room temperature
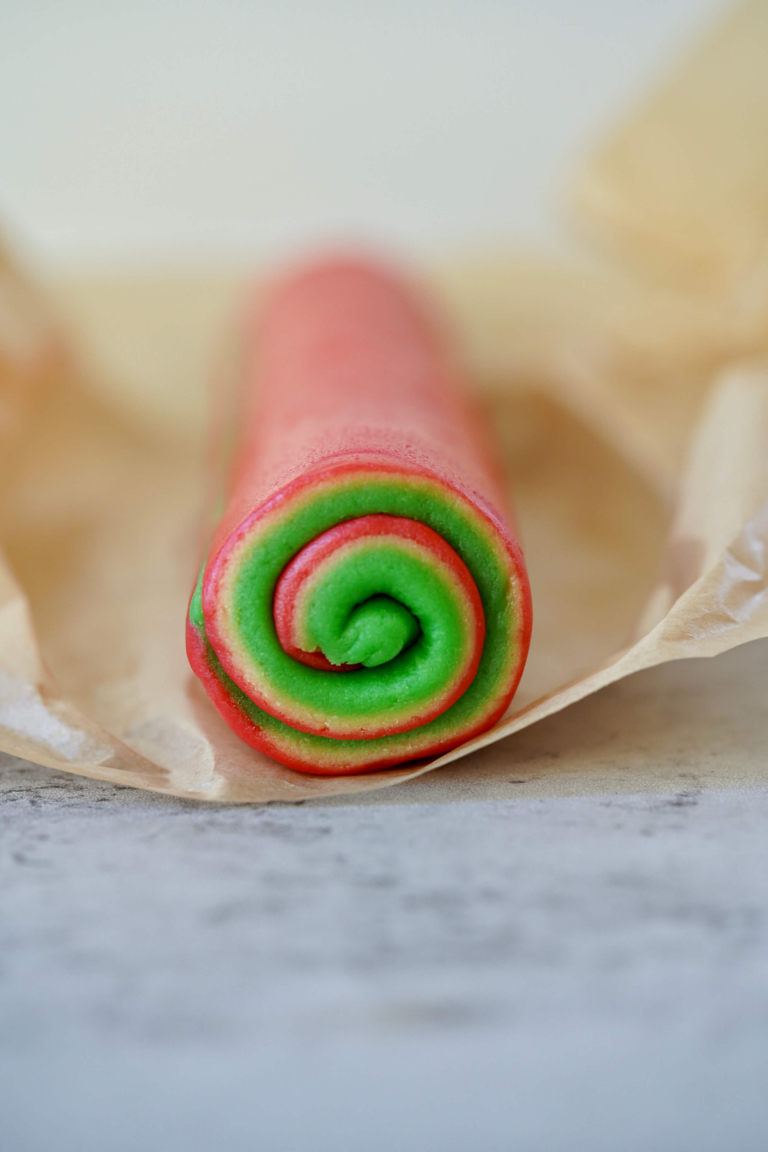
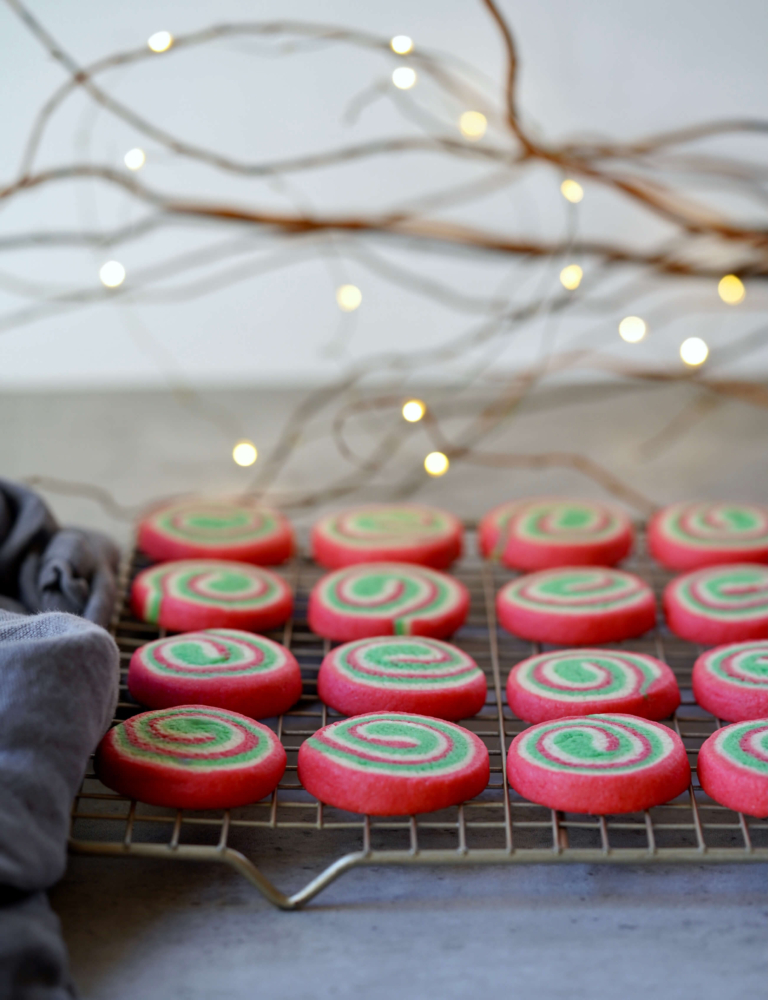
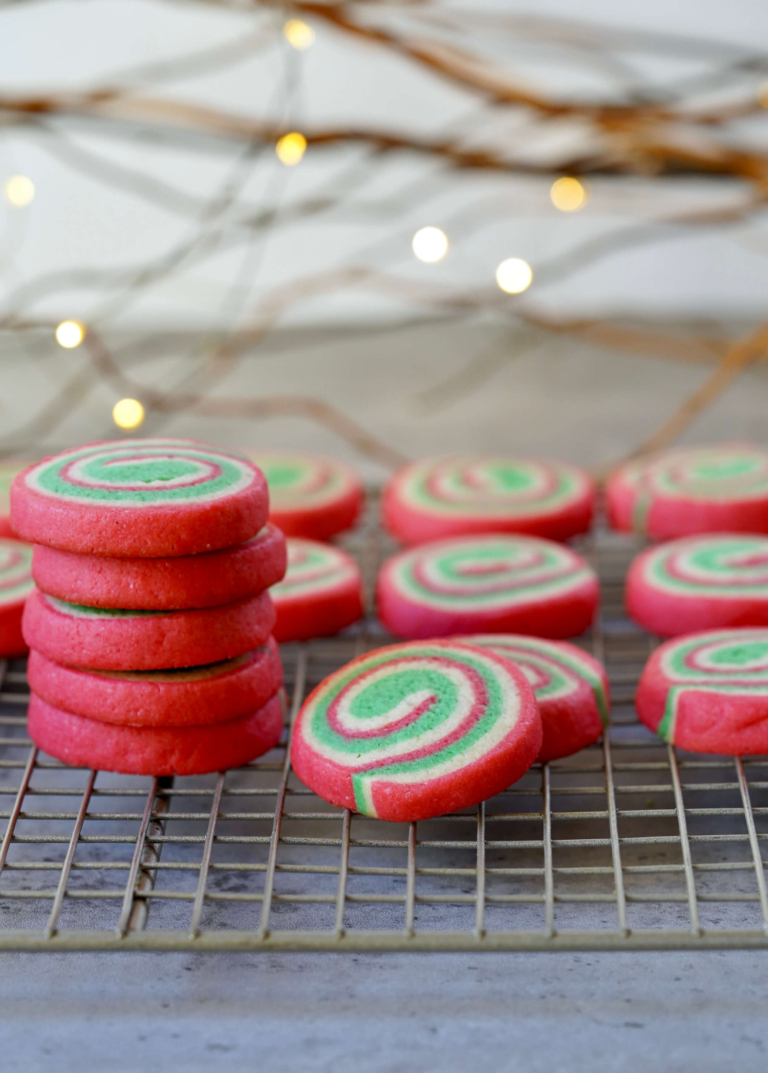
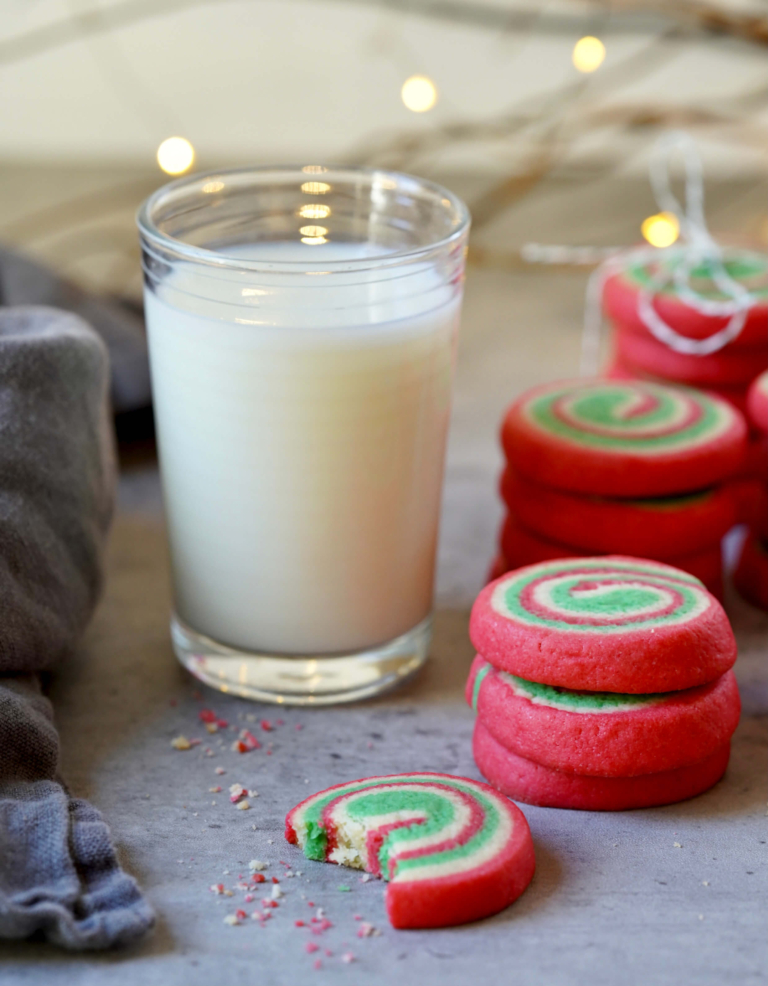
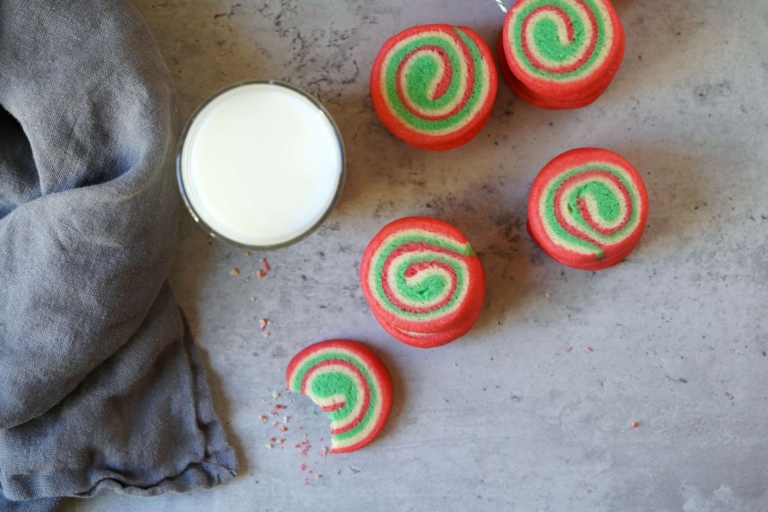
Pinwheel cookies have been around forever. These swirly, whirly, multi-colored beauties have a mesmerizing look, and buttery taste and make a great addition to any holiday cookie plate. Pinwheel cookies are classified as a type of icebox cookie, a category of cookies I’ve long been a fan of due to their ease and simplicity.
Named for the predecessor of the refrigerator, ice box cookies, took off with the rising popularity of the refrigerator as a common household appliance. What they offered was a typically dense dough designed to be chilled and sliced right before baking. Through the process, icebox cookies maintained their elegant shape, saving anyone who was making them time and effort. The design of the icebox cookie also reduced waste, as no scraps needed to be re-rolled and cut again.
Although invented earlier, the pinwheel cookie was everywhere by the 1930s and can be found in numerous cookbooks from that time. The most common pinwheel variation is a chocolate-vanilla one, consisting of a simple sugar cookie dough mixed with some cocoa. After rolling each piece of dough flat, the two pieces get stacked on top of one another, and then tightly rolled to create that signature swirl.
Food historians argue that the graphic design of the pinwheel was also representative of the bold, stylized lines of Art Deco, the 1930s style that took over everything from architecture to clothing.
Sky’s the limit when it comes to color variations of these beloved pinwheel cookies. These Christmas-themed ones are bright and cheery and a playful nod to the fun, festive holiday spirit that the holiday season encompasses.
That said, hues of pink and red can easily be used for Valentine’s Day, green and white, for St. Patrick’s Day, white and orange for Halloween, or the traditional chocolate variation for Thanksgiving all making a tasty and memorable cookie that requires very little effort from the baker.
Holiday Pinwheel Cookies
Rate this recipe
|
1 ratings
Servings:
10
Serving Size:
2 cookies
Prep:
30 minutes
Cook:
10 minutes
Wait:
2 hours
Total:
40 minutes
Ingredients:
2 cups all-purpose flour
1/2 teaspoon baking powder
Dash of salt
12 tablespoons (1 1/2 sticks) unsalted butter, room temperature
3/4 cup sugar
1 egg;1 1/2 teaspoons vanilla extract
Liquid green and red food coloring
Directions:
In a medium mixing bowl, add the flour, baking powder, and salt, mix well, and set aside.
In the bowl of a kitchen mixer, such as a KitchenAid, fitted with a paddle attachment, add the butter and sugar and beat on high for 1-2 minutes, until light and fluffy. Add the egg and vanilla and beat until combined, scraping down the sides as needed.
With the mixer on low, add the flour mixture and mix to blend, continuing to scrape the sides of the bowl down as needed.
Using your hands, divide the dough into 3 equal pieces and roll each piece into a ball. Place one ball of dough back in the bowl and break it up. Add several drops of red food coloring and beat on medium until the color is completely incorporated. Remove the red dough and place on a piece of plastic wrap. Clean your bowl and the paddle and add the second dough balls back in the bowl like you did with the first one. This time add the green food coloring. Beat on medium until the color is completely incorporated. Remove the green dough from the mixer and place on a second piece of plastic wrap. Leave the third piece of dough as-is.
Using your hands, press each piece of dough into a flat square wrap it in the plastic wrap and refrigerate for 1 hour.
Remove the dough from the refrigerator. Place the red dough between 2 sheets of parchment paper or waxed paper. Use a rolling pin to roll out the dough to a 10-inch square. Leave dough between the parchment and set aside. Repeat this process with the other 2 pieces of dough. Stack the rolled dough in parchment on top of each other and refrigerate for an additional 30 mins.
Remove the dough from the refrigerator, and take the top layer of parchment off each sheet of cookie dough layer. Place the red dough down on a counter. Top with the white dough, non-parchment sides touching lining up the edges of the dough as best as possible. Remove the parchment from the white dough. Top the white with the green, non-parchment sides touching. Remove parchment from the green dough. Use a large chef's knife to trim all the edges of the cookie dough into straight lines.
Using your hands, starting with one side, gently roll the dough into a long log shape. Lift onto a piece of parchment paper and wrap the dough log in it. Place the log in the refrigerator for 30 minutes.
Preheat your oven to 350 degrees F. Line a baking sheet with parchment paper. Use a slicing knife to cut the dough log into 1/4-inch thick slices. Place the cookies on your prepared baking sheets and bake for about 10 minutes, or until the cookies are set.
Carefully remove from the oven and let cool for 5 minutes on the baking sheet before transferring them to a wire rack to cool completely
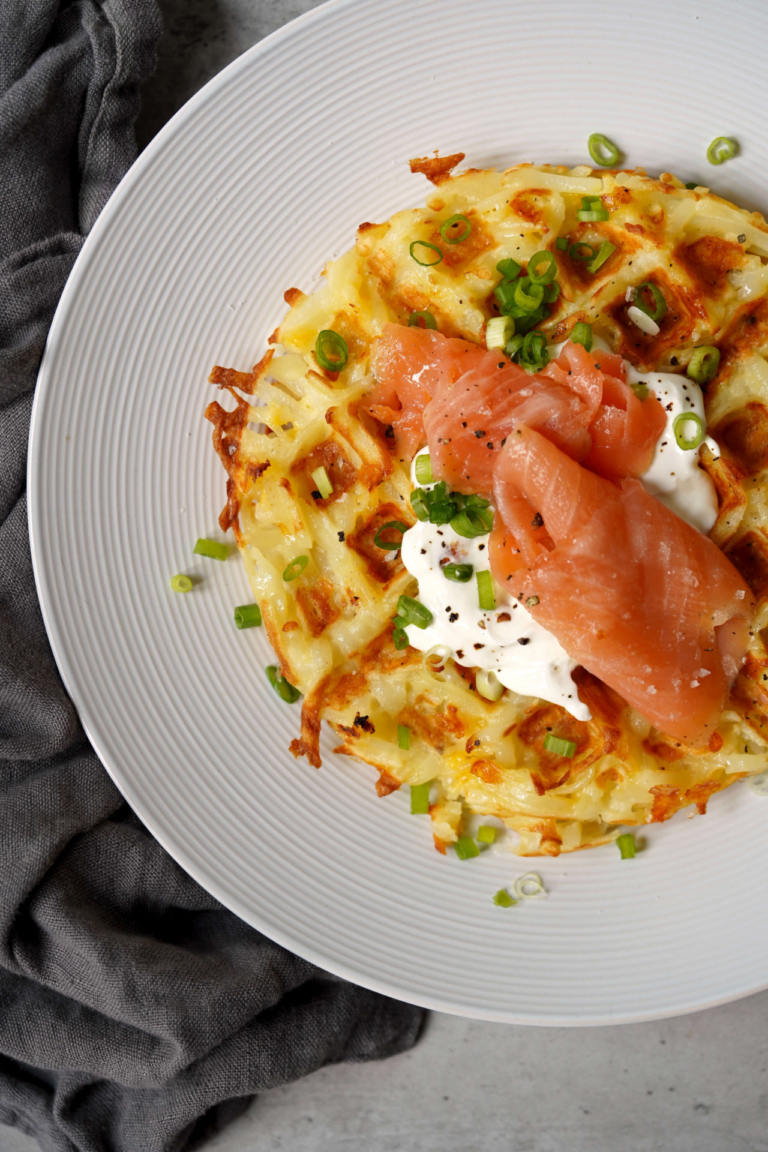
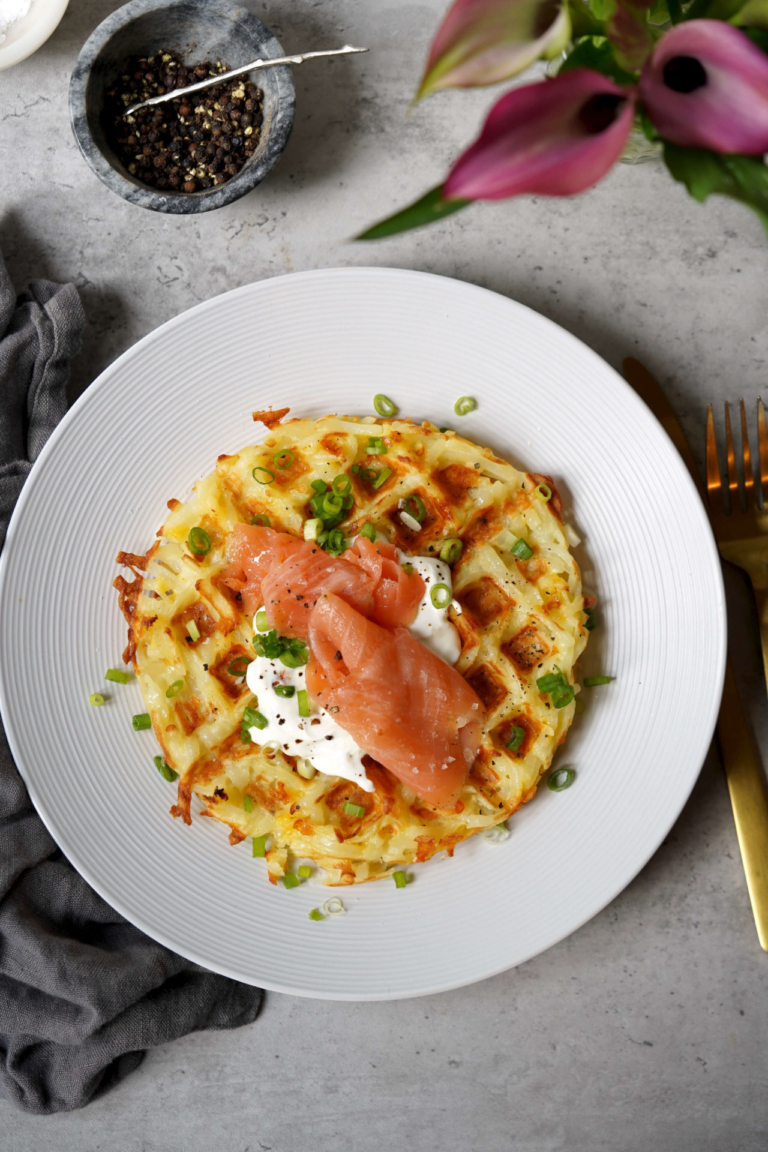
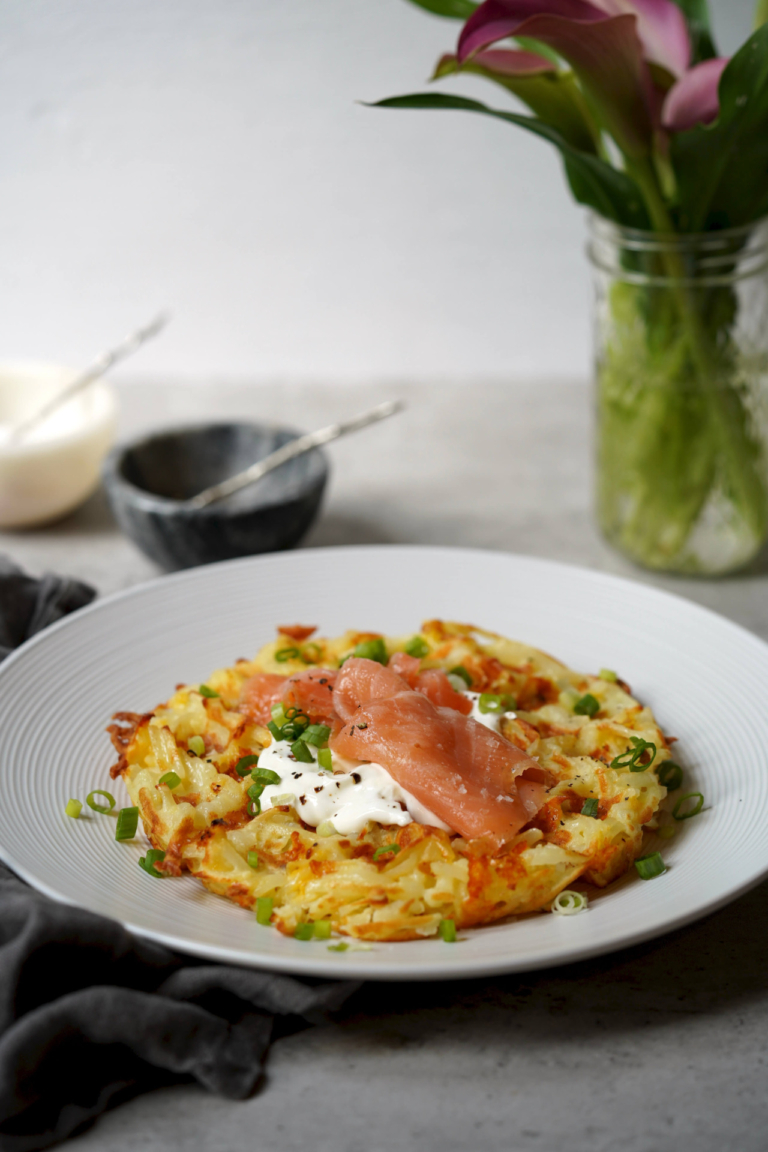
This is my latest and greatest obsession; savory shredded potato waffles topped with sour cream, smoked salmon, and scallions. As if breakfast could not get any better, or truthfully, more effortless. I’m talking, about crispy, buttery potatoes, made in minutes in a standard waffle maker, garnished like a baked potato, with sour cream and green onion, and finished with salty smoked fish. Think of this lovely dish as a modern take on a potato latke, and a combo most Jews I know have been eating together for decades. This dish is perfect for Hanukkah, but the truth is, you don’t have to be Jewish to love it or make it.
For Mother’s Day one year, I received a double waffle maker from my husband and kids. I will admit, I was a bit resistant about using this “gift,” which I think the rest of my family wanted, and wanted me to want. I say this because I’m not a huge waffle person. Don’t get me wrong, I like waffles, but because I’m more of a savory person, I don’t crave waffles like my kids do. That said, I have embraced my waffle maker over the years and am super pleased with the waffles it can churn out on a Sunday morning in no time at all.
I’m dropping this recipe in advance of the Festival of Lights later this week. I’ll be the first to admit, no one makes latkes every night and this potato waffle is a fun, easy-to-make sub for Hanukkah’s most notable dish. Potato waffles can also be served for breakfast, brunch, as an appetizer, or as a side dish, instead of any more traditional potato dish, alongside anything you can think up, from chicken to beef.
When time allows, I will often make my gravlax and top these savory waffles with that instead of smoked salmon which is a nice alternative. But if you don’t like the thought of that, no worries, a store-bought smoked salmon does the trick just as well.
Savory Potato Waffles With Smoked Salmon
Rate this recipe
|
3 ratings
Servings:
4
Prep:
20 minutes
Cook:
15 minutes
Total:
35 minutes
Ingredients:
2 pounds Idaho potatoes, peeled, shredded, and squeezed dry
2 large eggs, lightly beaten
3 tablespoons all-purpose flour
1 1/2 teaspoons kosher salt
1 teaspoon baking powder
1/2 cup shredded mild cheddar cheese
3 tablespoons unsalted butter, melted, plus more for brushing
In a large bowl, add the shredded potatoes, eggs, flour, salt, baking powder, cheese, and 3 tablespoons of butter.
Using a pastry brush, lightly brush the waffle iron with melted butter and spread one-fourth of the potato mixture onto it. Close and cook on high until the waffle is golden and crisp, 5 to 7 minutes. Transfer to a rack in the oven to keep warm. Repeat the above process with the remaining potato mixture. To serve, slice in quarters, top with sour cream, sour cream, and smoked salmon.
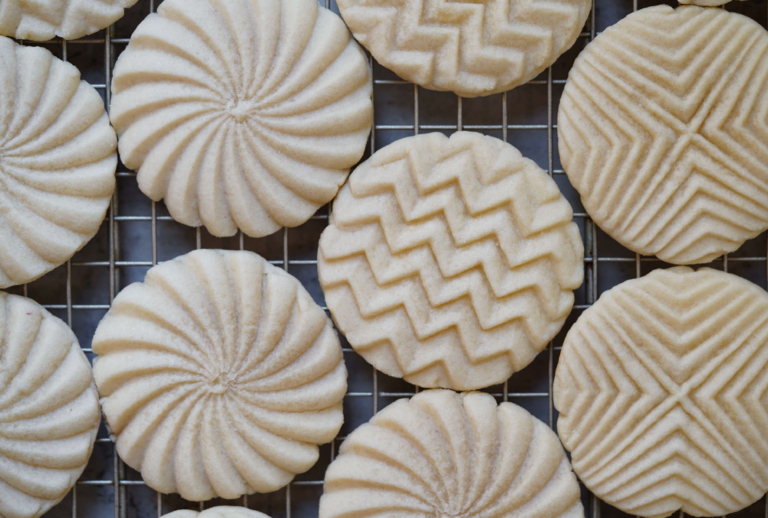
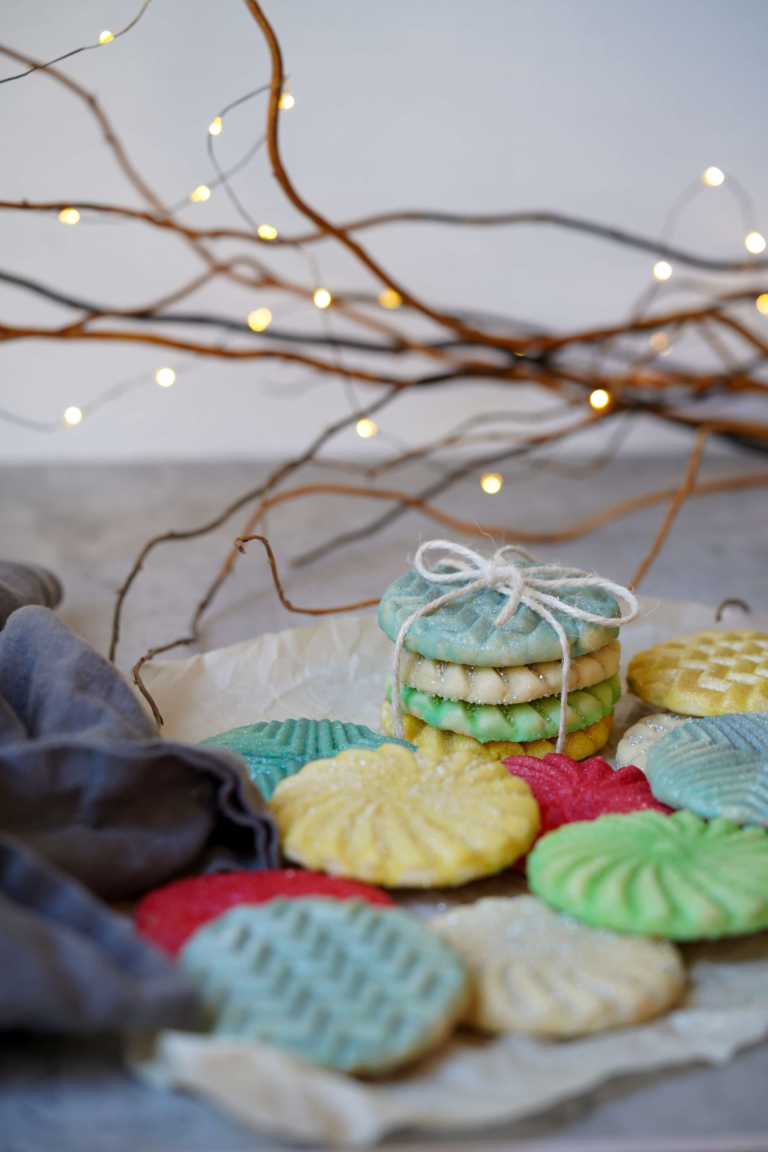
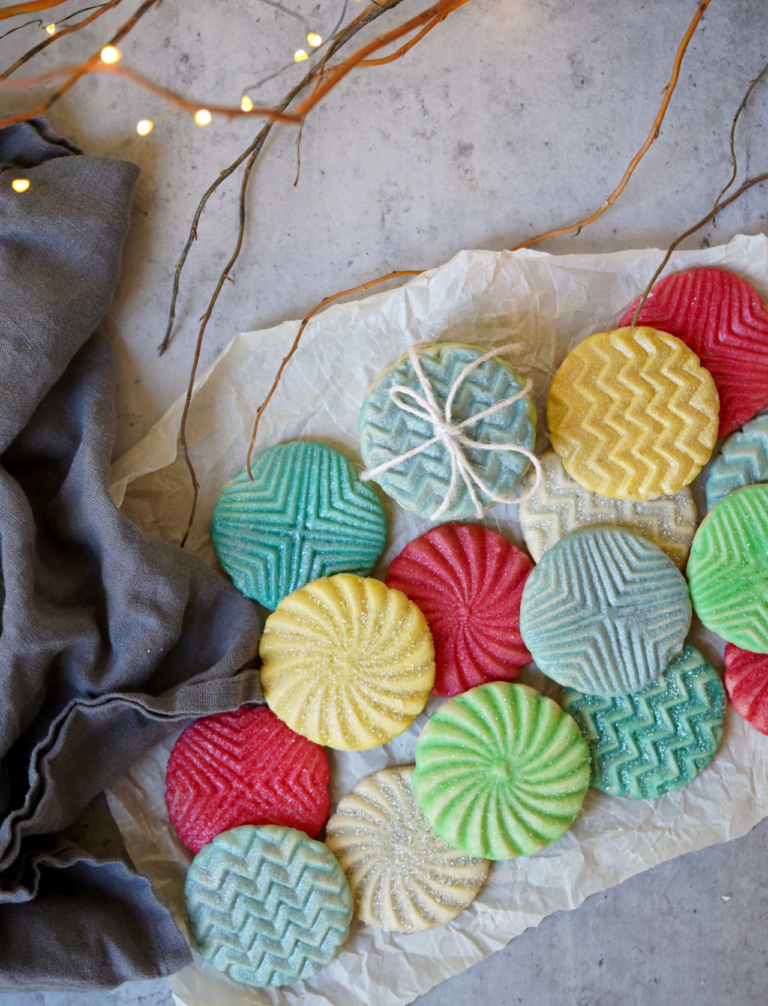
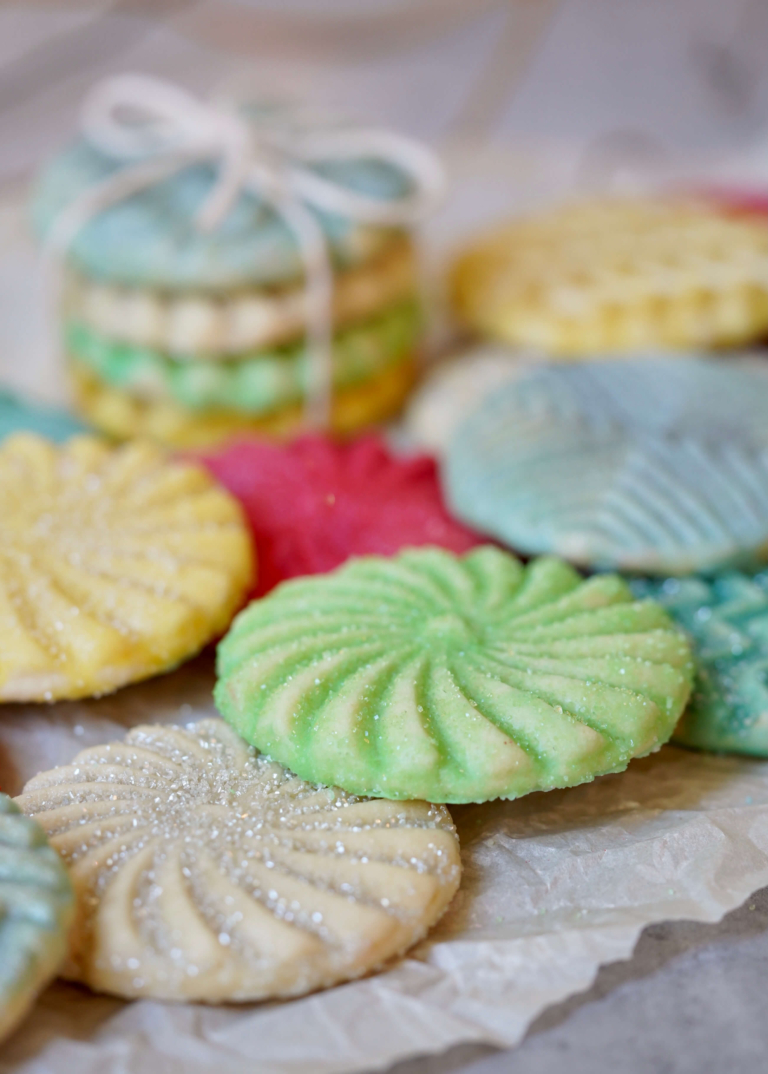
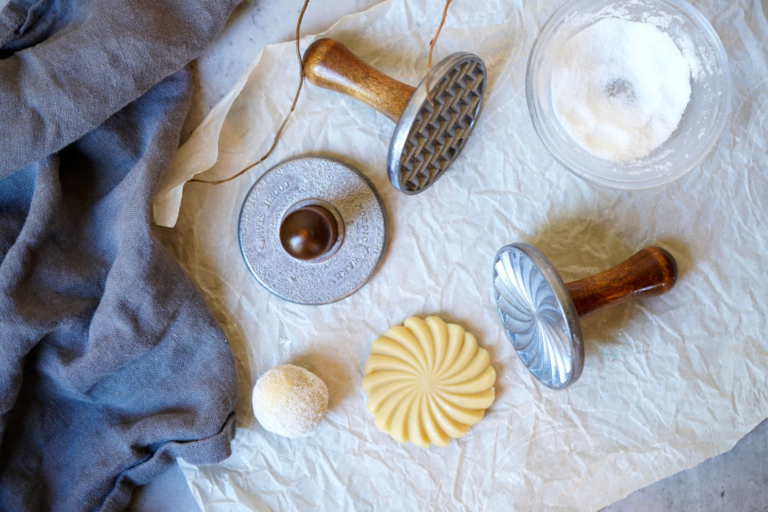
I am a self-proclaimed cookie lover and while I don’t discriminate, I have a weakness for sugar cookies the most. This year old-school holiday stamp cookies (aka, sugar cookies) are #1 on my holiday baking list. July 9th is National Sugar Cookie Day but I’m a bit perplexed by that. One would think any day in December would be more appropriate, considering the month-long cookie countdown till Christmas that occurs every year.
Sugar Cookies in History
A sugar cookie is a simple cookie, with the main ingredients being sugar, flour, butter, eggs, vanilla, and either baking powder or baking soda. Sugar cookies can be formed by hand, dropped, sliced, rolled, and cut into shapes or stamped. They are perhaps, the most versatile of all cookies out there. Most often, sugar cookies are decorated with additional sugar, icing, sprinkles, or a combination of these making them a welcome treat on just about any holiday.
American-style sugar cookies have been around since the early 1700’s, and are traceable to German Protestant settlers in Pennsylvania. Settlers created round, crumbly, butter cookies from basic ingredients that were easily shapable. These simple, yet irresistible cookies became an instant hit and remained a vital part of Pennsylvania’s history.
A Scandinavian Tradition
Historically, women in Scandinavian countries traditionally baked cookies for special occasions using carved stamps handed down from generation to generation of family bakers. It was customary to give decretive cakes and cookies to friends during the Christmas season, weddings, christenings, and other festive occasions. Some traditions never change. As a nod to history, the Nordiska Museum in Stockholm, Sweden has a collection of cookie stamps dating back to the 17th century in their permanent collection.
Rycraft
Eleanor Rycraft was the first American artist to introduce finely detailed, handmade-in-America terra cotta cookie stamps. Elenor and her husband, Carroll, started their company, Rycraft, in 1968. Eleanor patterned her ceramic cookie stamps in the manner of the antique wooden Scandinavian stamps handed down through generations. As a potter, Rycraft saw the possibility of using clay to make these cookie stamps using the designs made in the Scandinavian tradition.
When using any kind of cookie stamp, Rycraft, or otherwise, the cooking-making process remains the same. The dough is rolled into small balls and coated in sugar before being stamped with the desired design.
I don’t use Rycraft stamps myself, I use Nordicware cookie stamps which are just as wonderful, and slightly less expensive. These special heavy-cast aluminum cookie stamps come in all sorts of designs, including holiday-specific ones. Plus all Nordicware stamp handles are made from sustainably sourced American hardwood.
The takeaway, these holiday stamp cookies are a wonderful way to make festive, traditional holiday cookies, effortlessly. And perhaps the best part is they take less time to make, but taste just as amazing, as cutout cookies.
In a medium bowl add the flour, baking powder, and salt, whisk to blend, and set aside.
Using a kitchen mixer, such as a KitchenAid, fitted with a paddle attachment, add the butter and brown sugar and blend, on medium-high, until light and fluffy. Reduce the speed to low and add the egg and vanilla extract, blend well. Slowly, add the flour in two batches, mixing just until combined.
Next, divide the dough in half and shape each piece into a flat disk. Cover the disks with plastic wrap, place them in the refrigerator, and chill for at least 2 hours (or overnight if desired).
Once the dough has chilled, preheat the oven to 375 degrees F. Line two baking sheets with parchment paper and set near your workstation. Place the granulated sugar in a small mixing bowl near where you are working. Lightly oil the cookie stamps to prevent the dough from sticking. Note: Repeat this process as needed.
Using your hands dive the dough into small 1-inch balls. Next, roll each dough ball in the sugar to coat. Working one at a time, press the ball with the desired cookie stamp until the dough reaches the edges of the stamp. Place the stamped dough onto the prepared baking sheet. Repeat with remaining dough balls.
After you have filled a baking sheet, chill the unbaked stamped cookies for about 10 minutes. Once chilled, place the cookies in the oven and bake until lightly golden brown on the bottom, about 8 to 10 minutes.
Remove the cookies from the oven and allow them to cool on a baking sheet for a few minutes before you transfer them to a baking rack to cool completely and/or decorate.
For the Icing: Line two baking sheets with parchment paper and set them near your workstation. In a small bowl, add the confectioners' sugar, milk, and vanilla (if using) and whisk until smooth. Add just enough milk to make a thin glaze. Keep in mind, you do not want the icing to be too thick, so adjust the consistency as needed. Feel free to add colors to the glaze as desired.
Gently dip the cooled cookies in the glaze, allowing any excess to drip off before placing it on the baking sheet. Alternatively, you can brush the glaze on cookies using a cookie decorating brush. Decorating note: If you are using dusting sugar, sprinkle on the cookies before they fully dry. If you are using luster dust, apply with a decorating brush once the icing has fully dried.
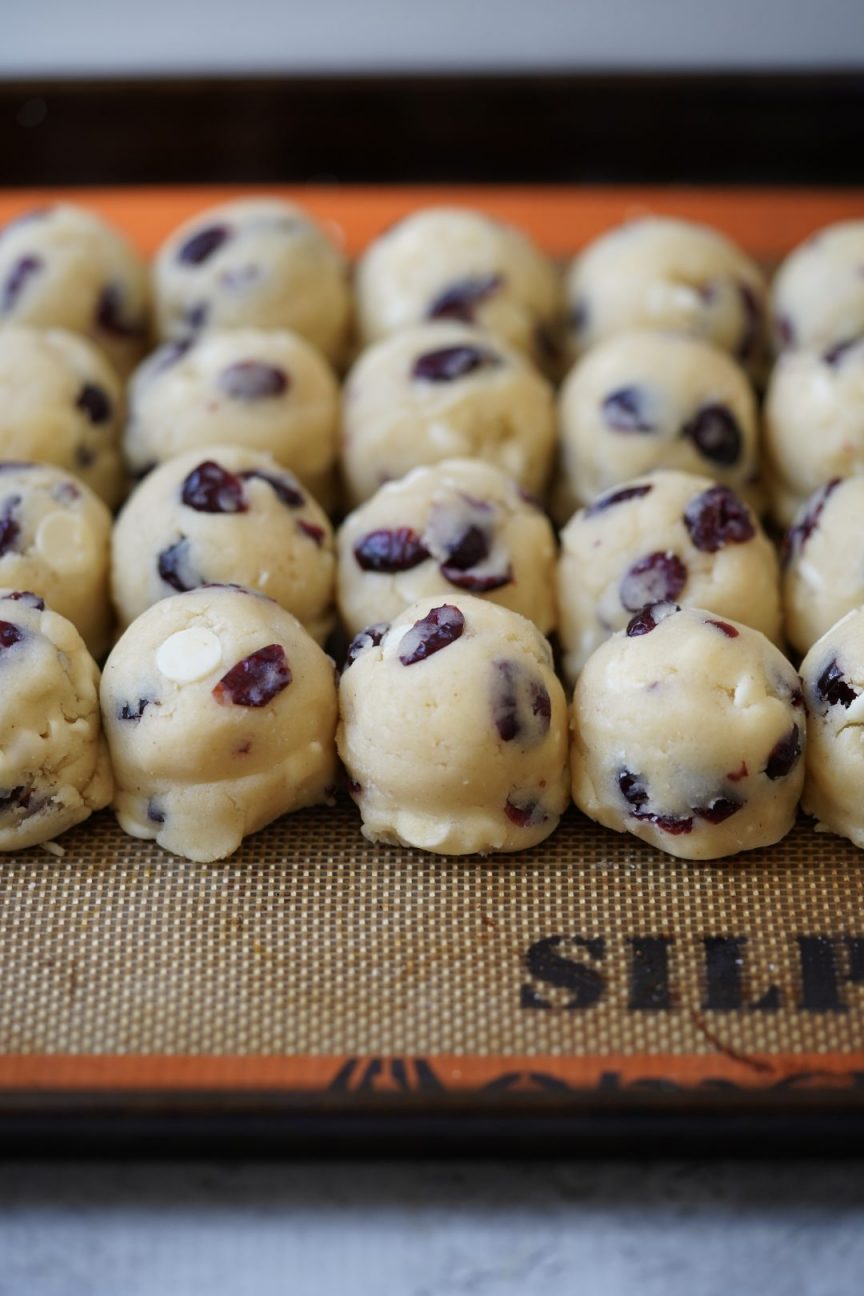
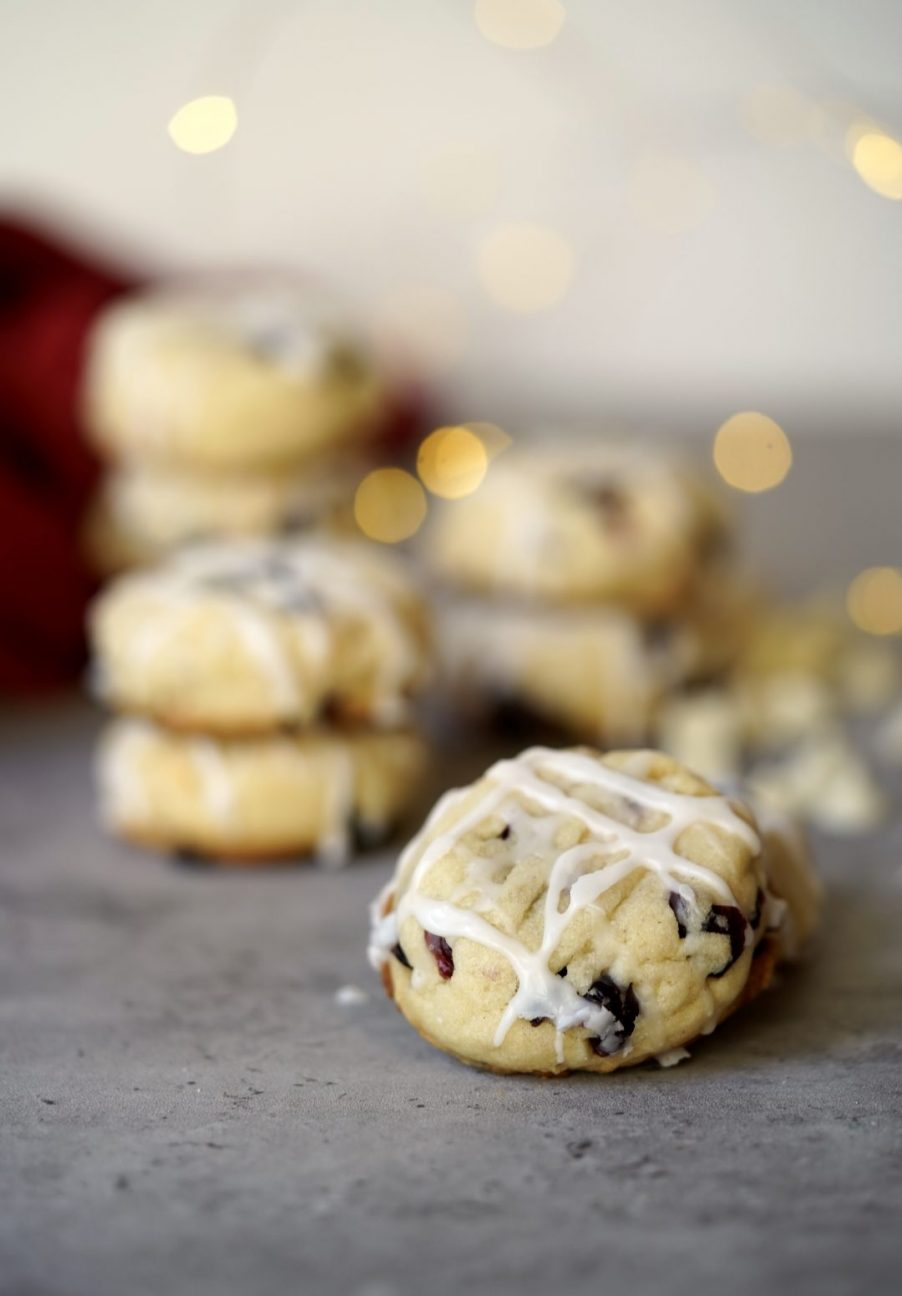
White chocolate cranberry cookies created just for me. Well, not exactly. I say that, because none of my crew likes white chocolate or cranberries, at least in a cookie. Honestly, I find this shocking. But you know what, I’m okay with it because it means when I make them, they are all for me. And that’s unheard of, at least in my house. I’m posting these beauties to kick off cookie season, or what I call, the most wonderful time of the year.
These simple, buttery cookies remind me of a lot of shortbread cookies, a cookie I’ve always been a fan of. And if you’re a big holiday baker like I am, once the glaze is added, these cookies look as festive as ever, and deserving of their place on the coveted holiday cookie plate. But perhaps what I love most about these cookies, is that they’re not overly sweet, making them even more irresistible.
The Scoop on White Chocolate
Many people wonder what exactly is the deal with white chocolate. Here’s the scoop. White chocolate is made with a blend of sugar, cocoa butter, milk products, vanilla, and a fatty substance called lecithin. Technically, white chocolate is not chocolate—and it doesn’t taste like one—because it doesn’t contain chocolate solids.
The history of white chocolate is largely unclear, but “the consensus,” according to Eagranie Yuh, author of “The Chocolate Tasting Kit“, is that “Nestlé was the first to develop white chocolate commercially in 1936 in Switzerland. This used up excess milk powder that had been produced for World War I and was no longer in demand.”
Despite the bad rap white chocolate has endured over the years, I’m still a fan. I still have fond memories of getting a white chocolate easter bunny in my Easter basket. And I still bake with white chocolate often, even if it’s not my family’s favorite. These white-chocolate cranberry cookies make the perfect addition to any holiday gathering offering up a lovely alternative to the traditional gingerbread and Christmas cut-out cookies.
White Chocolate-Cranberry Cookies
Rate this recipe
|
6 ratings
Servings:
12
Serving Size:
2 cookies
Prep:
15 minutes
Cook:
15 minutes
Total:
30 minutes
Ingredients:
2 1/2 cups all-purpose flour
1/4 teaspoon Kosher salt
1/8 teaspoon cinnamon
1/4 teaspoon baking powder
16 tablespoons (1 cup) unsalted butter, room temperature
1 cup sugar
1 egg
2 teaspoons vanilla extract
1 cup white chocolate chips
3/4 cup dried cranberries
For the Glaze:
1 cup confectioners' sugar
4-5 teaspoons milk
Directions:
Preheat the oven to 350 degrees F. Line two baking sheets with parchment paper and set aside.
In a small bowl add the flour, salt, cinnamon, and baking powder. Mix well and set it near your workstation.
In the bowl of a kitchen mixer, such as a KitchenAid, fitted with a paddle attachment, add the butter and sugar. Mix on medium-high until light and fluffy. Reduce the speed and add the egg and vanilla extract. Mix until blended, scraping down the sides as needed.
Reduce the speed to low and add the flour mixture. Blend well. Gently fold in the white chocolate chips and dried cranberries.
Scoop the cookie dough into 2-tablespoon balls and place on the prepared baking sheets. Place in the oven and bake, rotating the baking sheets halfway through, for about 12-15 minutes until the cookies are lightly brown around the edges. Allow the cookies to cool completely before glazing.
For the Glaze: In a small bowl add the confectioners' sugar and milk, and mix well to blend. Add additional milk as needed to get the right thick glaze consistency. Use a small spoon to drizzle the glaze on the cookies in a zig-zag pattern. Allow to dry completely before storing.
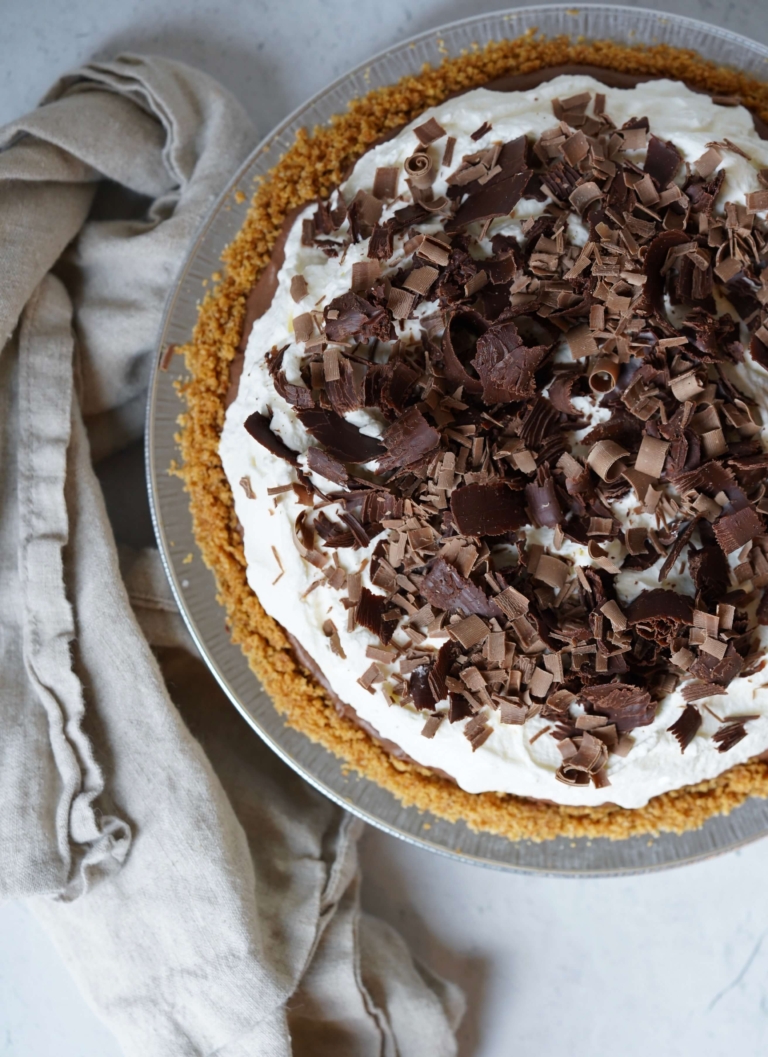
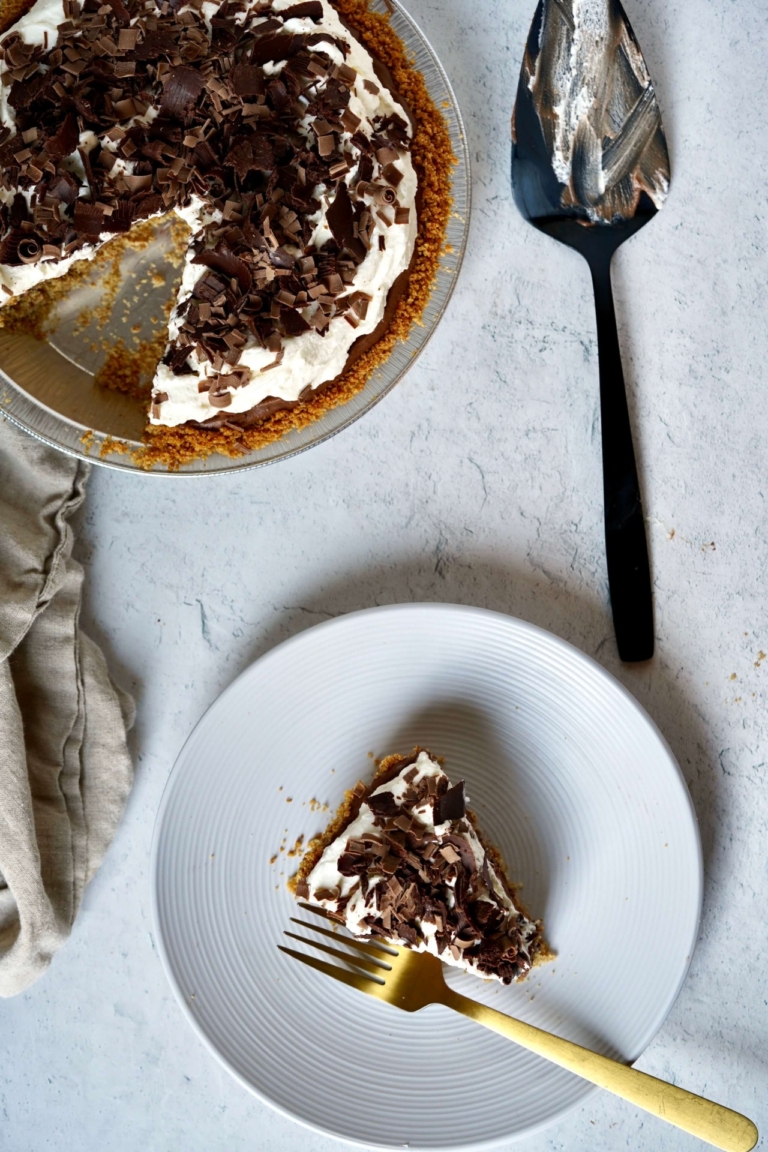
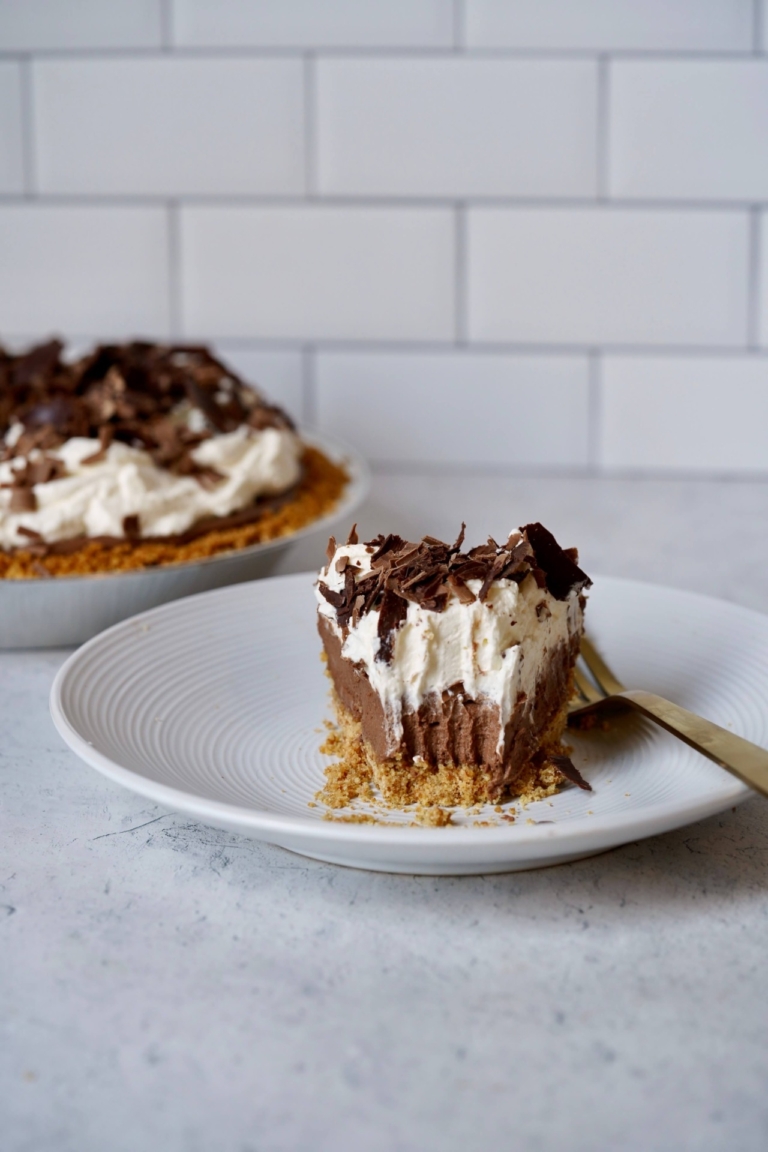
Chocolate cream pie with graham cracker crust be still my heart. Pies and tarts with edible pastry became popular during the court of Queen Elizabeth I. Americans’ taste for pies, both sweet and savory kinds, arrived in the New World along with colonists. Sweet pies entered our baking repertoire once the domestic sugar industry took hold in the early 1800s. Cream pies were a resourceful way to use ingredients at hand, such as eggs and dairy found on many farms. I’ve always been a big cream pie fan and welcome their comeback just in time for the holiday season.
What Are Cream Pies?
Cream pies are chilled pies with flour, chocolate, or graham cracker crusts, that are baked before being filled. Chocolate, banana, coconut, and Key Lime are the most popular kinds of cream-style pies around. Chocolate cream pies are made by adding semisweet, bittersweet, or unsweetened chocolate to the custard filling while cooking. I use a combination of milk and half-and-half, plus egg yolks, in my recipe to make the custard extra creamy.
Cream Pies vs. Custard Pies
Custard and cream pies are very similar, hence their confusion. The difference between the two is actually in their preparation. A custard pie filling of eggs, sugar, milk, plus flavorings gets whisked before being added to a pie shell, and baked.
Like custard pies, most cream pies have similar fillings, but their filling gets cooked stove-top before being added to a pre-baked pie shell. This precooking allows for cream pies to have a softer filling that’s more pudding-like than a custard pie.
Cream pies are typically faster to prepare than custard pies. This is because cooking the filling on the stove takes less time than baking plus set time. Custard pies are a little more hands-off during the prep since they just require mixing. But both kinds of pies require refrigeration and setting time before serving. Meringue or my favorite, whipped cream are the two classic cream pie toppings both of which make for an easy finish.
Chocolate cream pie with a creamy chocolate custard, sweetened whipped cream, chocolate curls, and graham cracker crust makes a decadent and irresistible prep-ahead dessert for chocolate lovers. And although some would say this is a warm-weather dessert, I disagree completely. A chocolate cream pie disappears just as fast in my house on a holiday such as Thanksgiving, just in case you’re wondering.
Chocolate Cream Pie With Graham Cracker Crust
Rate this recipe
|
4 ratings
Servings:
6
Serving Size:
1 slice
Prep:
20 minutes
Cook:
20 minutes
Wait:
5 hours
Total:
40 minutes
Ingredients:
For the Graham Cracker Crust:
1 1/2 cups graham cracker crumbs, about 12 full sheets
For the Graham Cracker Crust: Preheat oven to 350F. Using your hands break the graham crackers and place them in the bowl of a food processor, such as a Cuisinart fitted with blade attachments. Add the sugar, and melted butter and pulse on and off till finally chopped. The mixture should resemble coarse sand.
Pour the crumb mixture into an 8" - 9.5" pie pan. Use the back of a tablespoon to press it firmly in the bottom of the pan and a little bit up the sides of the pan.
Place in the oven and bake for 10 minutes until slightly golden. Remove from oven and allow to cool. Set aside.
For the Filling: In a medium mixing bowl add the chopped chocolate and vanilla. Place a fine mesh strainer over the chocolate bowl and place it near your workstation.
In a medium pot, add the sugar, cornstarch, cocoa powder, and salt, and whisk to blend. Add 1/4 cup milk and blend until smooth and paste-like. Once blended, slowly whisk in the remaining milk and half and half. Next, whisk in the egg yolks.
Place the pot over medium-high heat and bring the mixture to a boil. Once boiling, reduce the heat to medium and cook, while whisking continuously, until the mixture thickens to a pudding-like constancy, about 5-6 minutes. Be sure to watch very closely so you don't overheat and break the pudding.
Strain the chocolate pudding mix through the fine-mesh strainer directly over the chopped chocolate. Whisk the mixture until the chocolate has melted and the pudding is creamy. Lay a piece of plastic wrap directly onto the surface of the pudding. Place in the refrigerator and chill for 30 minutes.
In the bowl of an electric mixer, such as a KitchenAid, fitted with a whisk attachment, add the heavy cream and beat on high until soft peaks form. Slowly add the confectioners' sugar and blend.
Remove the pudding from the refrigerator and using a rubber tip spatula, fold in about 1 cup of whipped cream and mix until just incorporated. Next, pour the filling into the cooled graham cracker crust. Place in the refrigerator and chill for about 4 hours. Place the remaining whipped cream into a small bowl, cover, and refrigerate until serving.
To Serve: Top the pie with the remaining whipped cream covering the pudding. Use a vegetable peeler to make chocolate shavings. Sprinkle the top of the pie with chocolate shavings, slice and serve. The pie will keep in the fridge for about 2-3 days
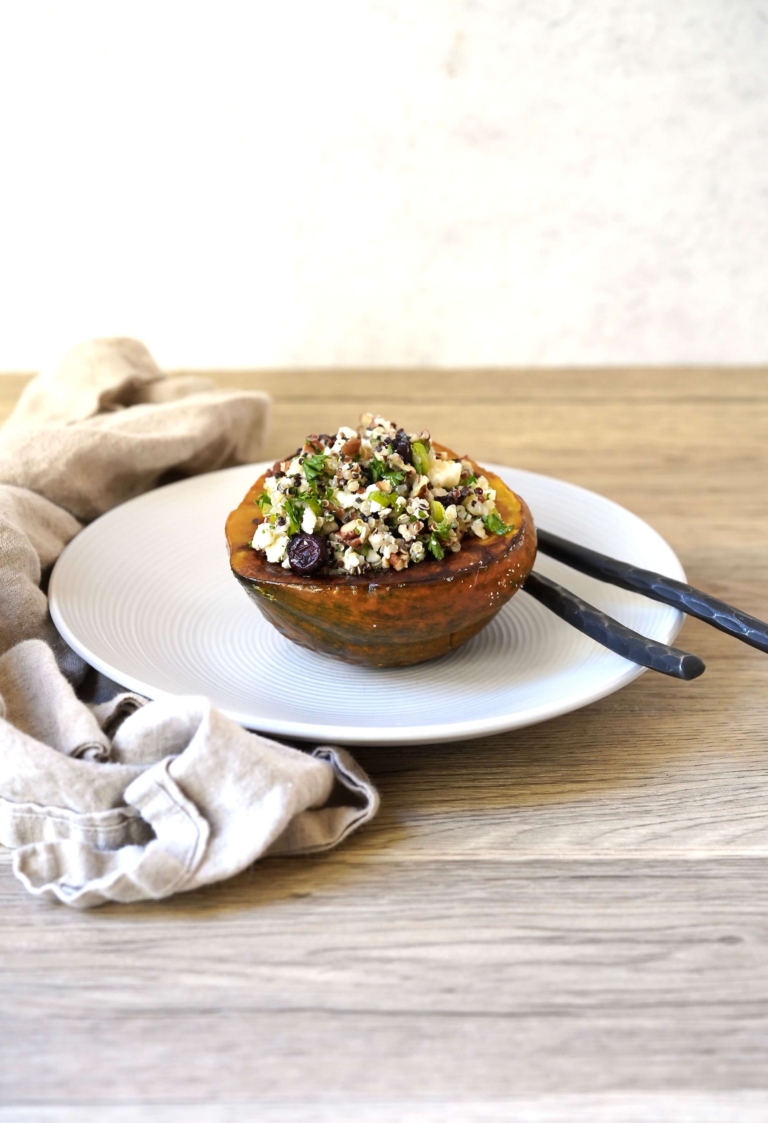
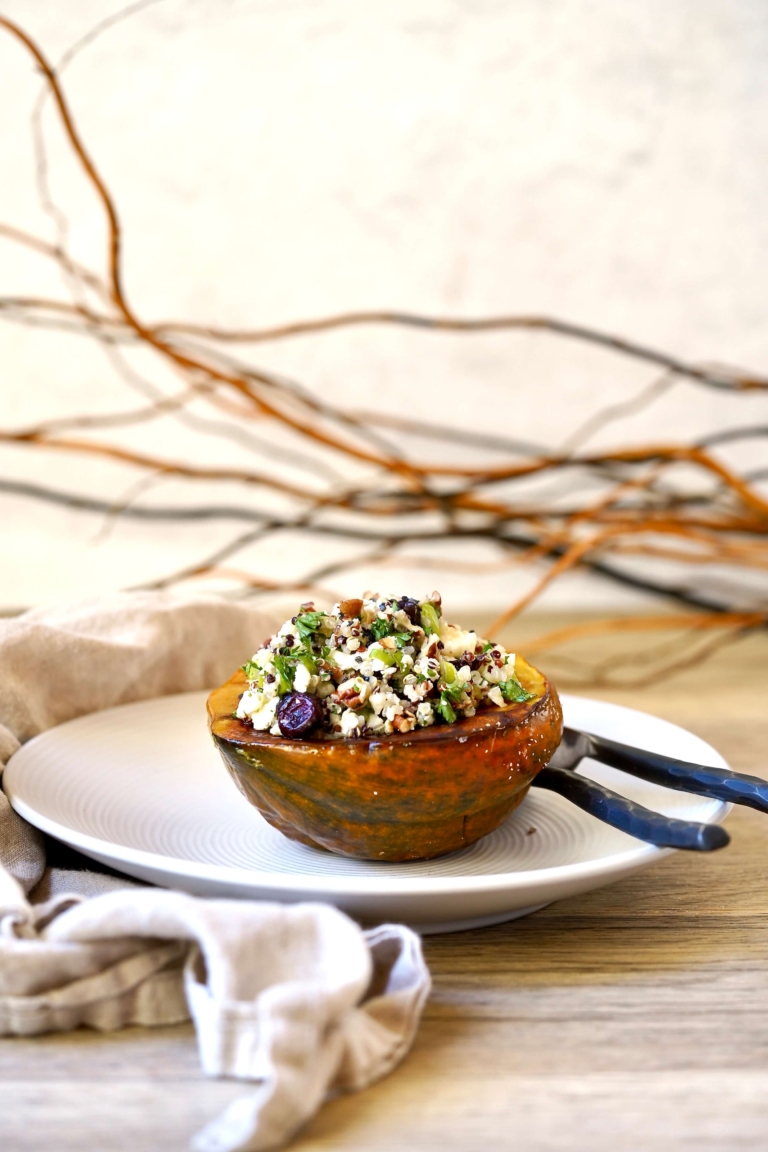
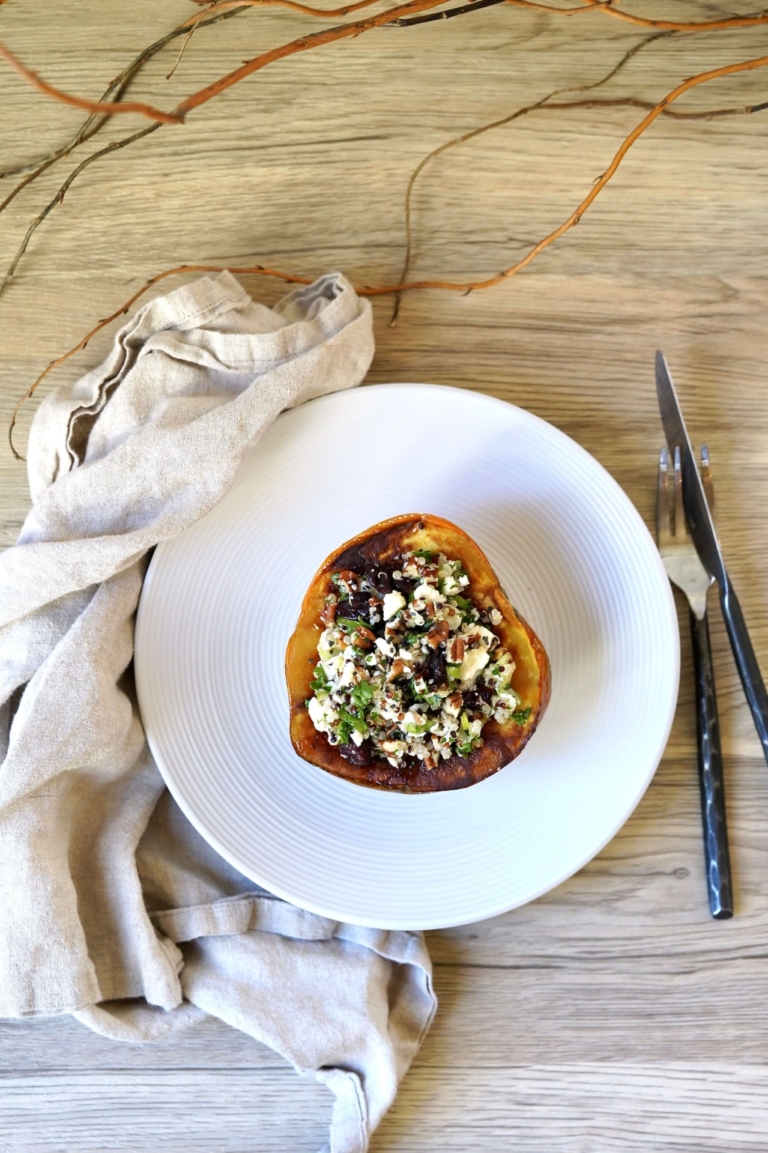
Thanksgiving is almost here and I’m ready for it to arrive. Case-in-point, I have been working away on new recipes and this roasted acorn squash with quinoa is my latest favorite. Packed with some of my all-time favorites (quinoa, pecans, and feta cheese), this flavorful dish is also an eye-catcher. I have a true soft spot in my heart for food-focused holidays and Thanksgiving takes the cake in that department. To me, what is so remarkable about Thanksgiving is the blending of foods that work no matter what. This holiday can include your grandmother’s classic recipes, while still leaving space for trying out new recipes that aid in building even more transitions.
For Thanksgiving in my house, I always take requests which will typically include some old favorites. But it almost always includes something new as well. This roasted acorn squash with quinoa, pecans, and feta is fantastic because it can be served as a side dish, but it is hearty enough to make a full-blown entree as well.
Acorn Squash
Although acorn squash belongs to the same species as summer squash like zucchini and crookneck squash, it’s commonly known as a winter squash. Many people especially enjoy its slightly nutty flavor and tender texture when cooked. Acorn squash is extremely nutrient-dense for its size. It is rich in dietary fiber, like most fruits and vegetables, and very low in saturated fat, cholesterol, and sodium. In terms of vitamins and minerals, acorn squash has significant levels of vitamin C, vitamin A, and thiamin, and its range of minerals is impressive, including potassium, magnesium, iron, copper, and calcium.
Quinoa
Quinoa is one of my favorite whole grains. It is technically the seed of a flowering plant from the Amaranth family. Quinoa, if you don’t already know it, is packed with protein, fiber, dietary minerals, and vitamins, and is naturally gluten-free. Although you can cook and eat quinoa seeds in a similar way to most grains, the quinoa plant itself is more similar to beetroots and spinach. You can eat both the seeds and leaves of this versatile and incredibly nutritious plant. Farmers cultivate over 120 different types of quinoa. However, the most common versions available in grocery stores are white, red, and black quinoa.
This lovely, seasonal, roasted acorn squash is a wonderful, more modern dish that will work with just about any Thanksgiving favorite, classic or otherwise.
Roasted Acorn Squash With Quinoa Pecans And Feta
Rate this recipe
|
2 ratings
Servings:
4
Prep:
15 minutes
Cook:
45 minutes
Total:
1 hour
Ingredients:
2 medium acorn squash
2 tablespoons Extra Virgin olive oil, divided
1/2 teaspoon Kosher salt divided
1/4 teaspoon freshly ground black pepper to taste
1/2 cup quinoa
1 cup water
1/4 cup pecans, roughly chopped
1/4 cup scallions, finely chopped
1/4 cup parsley, finely chopped
1/2 cup feta cheese, crumbled
Directions:
Preheat the oven to 400 degrees F. Line the baking sheet with parchment paper and set aside.
Use a serrated knife to slice through the squash from the tip to the stem. Use a tablespoon to scoop out the seeds and discard. Place the squash halves cut side up on the prepared baking sheet. Drizzle 1 tablespoon of the olive oil over the squash, and sprinkle with 1/4 teaspoon of salt. Rub the oil into the cut sides of the squash, then turn them over so the cut sides are against the pan. Place in the oven and bake until the squash flesh is tender about 30 -35 minutes. While the squash is cooking, make the filling.
In a medium saucepan add the quinoa and water, place over high heat, and bring to a boil. Once boiling, reduce the heat and simmer, uncovered, until all of the water is absorbed, about 15 minutes. Fluff the quinoa with a fork and set it near your workstation.
In a medium sauté pan, lightly toast the pecans over medium heat, stirring frequently, until fragrant, about 4 to 5 minutes. Set aside.
In a medium mixing bowl, add the quinoa. Chop the pecans and add to the quinoa along with the scallions, parsley, remaining 1/2 teaspoon salt, pepper, and the remaining 1 tablespoon olive oil. Mix to combine. Add the feta cheese and gently toss to coat.
Turn the cooked squash halves over so the cut sides are facing up. Divide the quinoa mixture evenly between the four squash halves with a large spoon. You can either serve the stuffed squash as is or return it to the oven to warm for an additional 10 minutes.
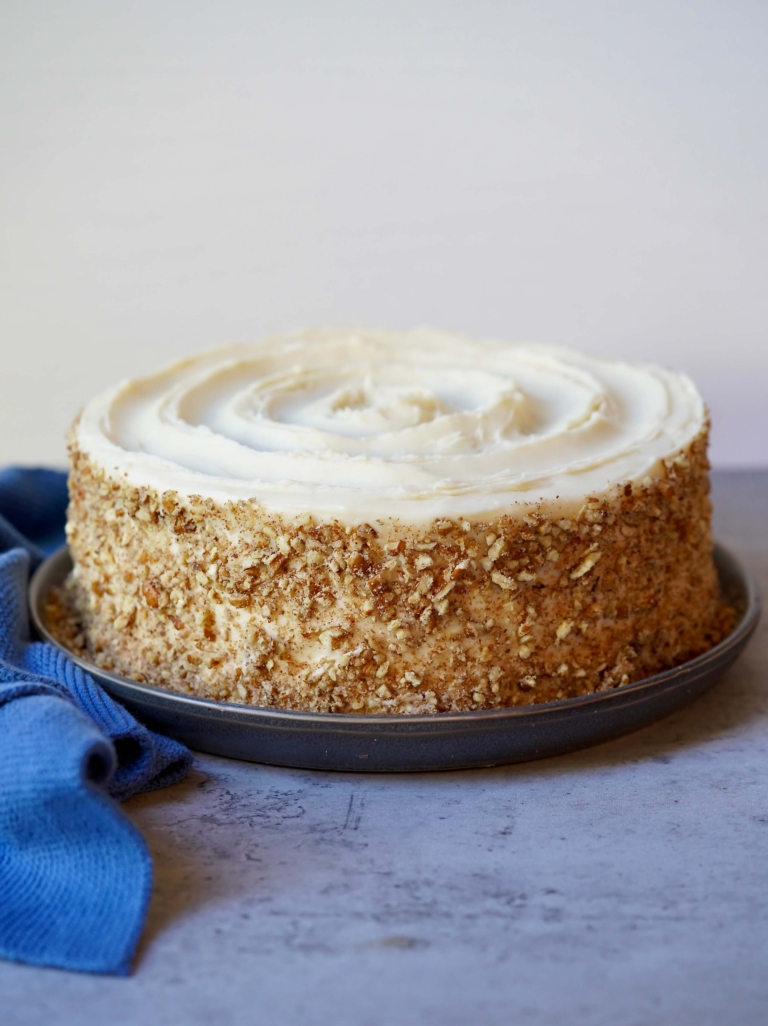
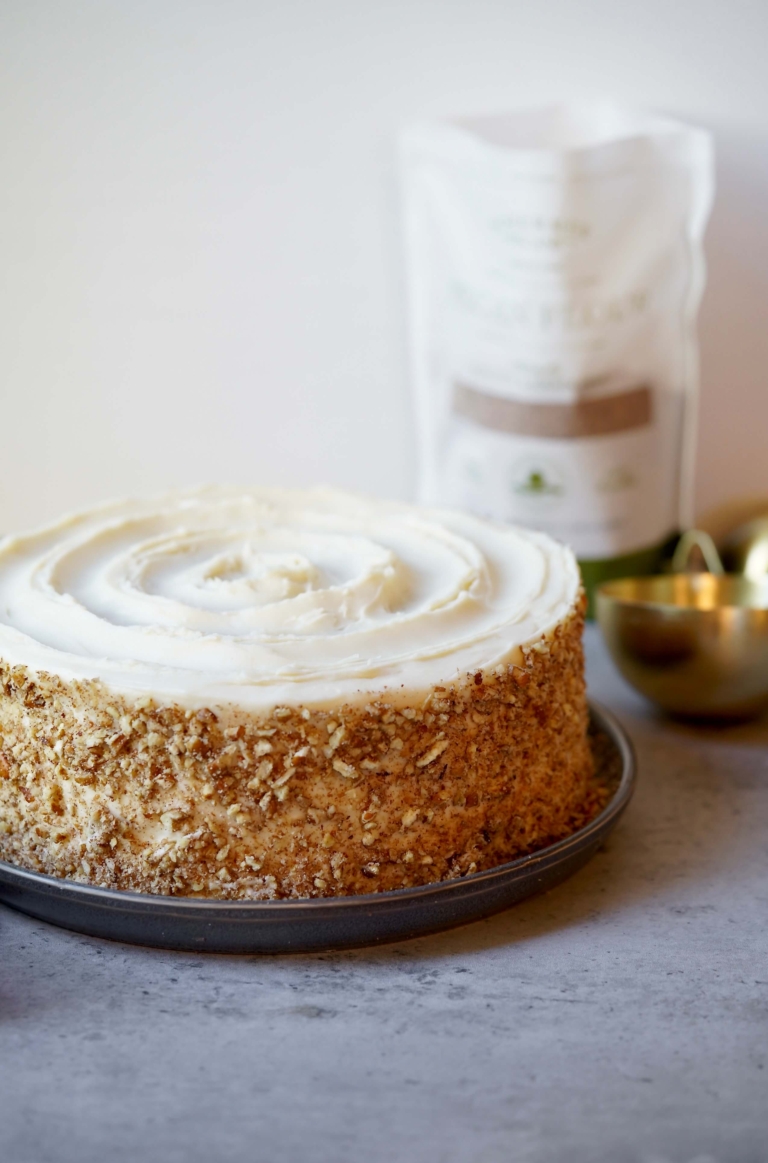
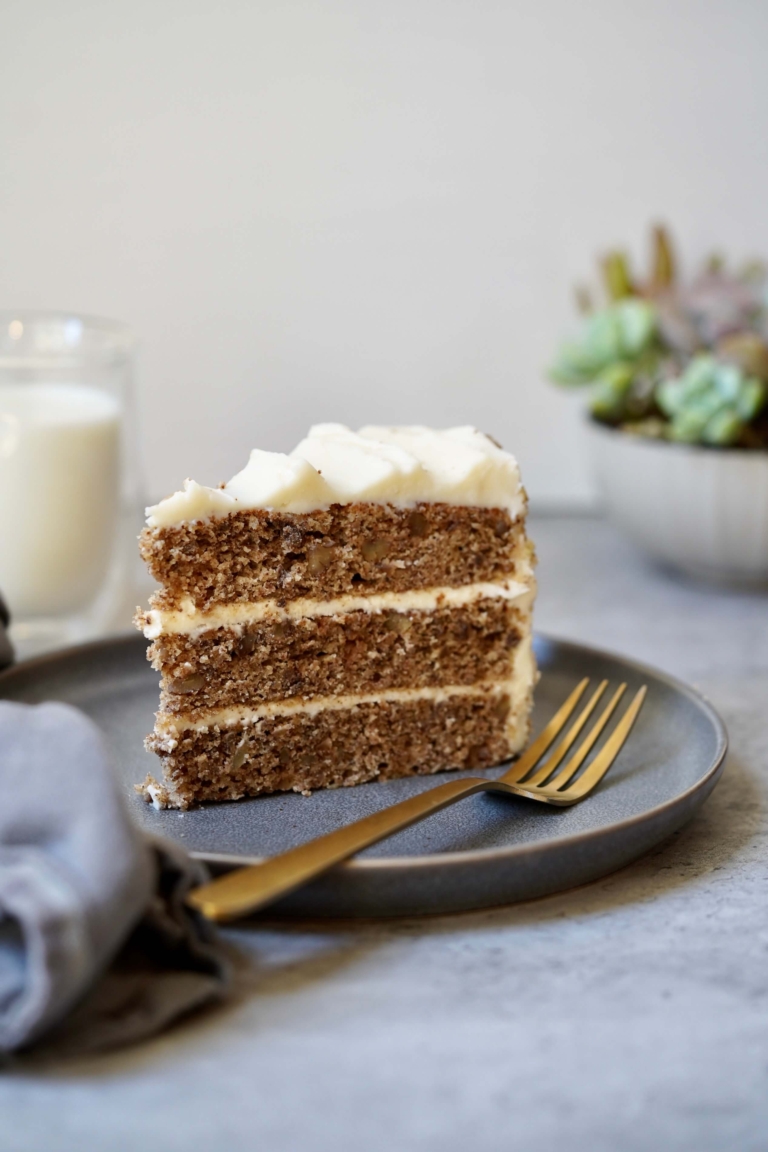
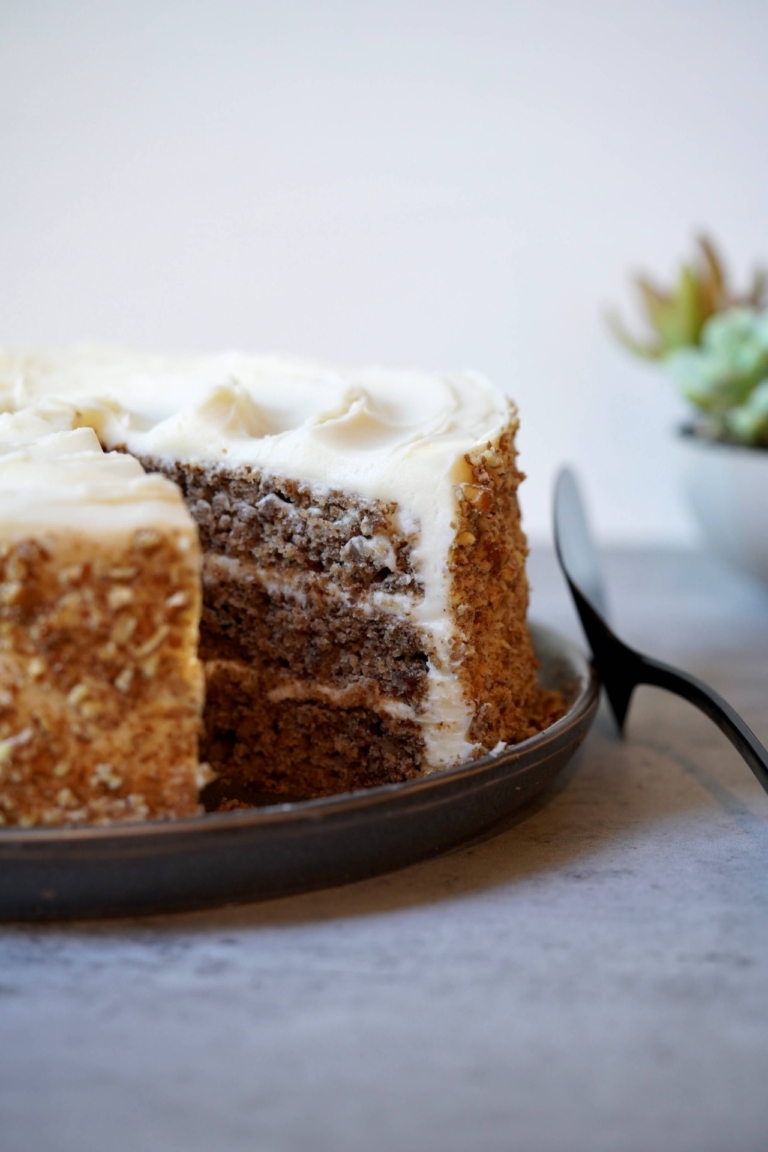
A gluten-free butter pecan cake with cream cheese frosting is still in my heart. I thought it wasn’t possible, but I proved myself wrong. This lovely layer cake is a nut-lover dream and makes a great addition to any holiday table. Within, you have rich cake layers, studded with toasted butter pecans, separated by a traditional cream cheese frosting. But why stop there, I decked out this killer cake, (which also happens to be gluten-free), with more fresh chopped pecans to maximize the nutty flavor, making each bite truly nutrageous.
I’ve always been a pecan fan, and like almonds, I love the flavor and versatility that pecans can bring to both sweet and savory recipes. Fall is the start of pecan season in my household, and they start showing up in recipes, even more often, as the holiday’s approach. So I’m marking this wonderful time of year with this memorable cake I can’t seem to stop making. The unique richness of this butter pecan cake comes from a blend of traditional gluten-free flour and flavorful pecan flour. Unlike most common layer cakes, pecan flour adds a hearty, nut flavor creating incredible texture.
Pecan Flour
Pecan flour is a baking flour that makes an excellent substitute for any normal wheat or other type of flour. My go-to pecan flour brand is one made by Schermer Pecans. I love supporting family businesses, and Schermer has harvested from Georgia orchards that have been in their family for over 70 years. Their pecan flour, like their pecans, is truly exceptional. Naturally gluten and grain-free, there are no additives mixed into their flour, just their incredible pecans to keep the flavor fresh and nutty. Schermer’s pecan flour has been “defatted in making pecan oil, so it is a genuine flour“. So, if you’re a baker, this flour is great for making cookies, brownies, pancakes, and many otherwise traditional recipes.
Unique Flavor
Besides being a great healthy option for cooking and baking, pecan flour also offers a lovely, unique flavor profile that can elevate almost any recipe to a whole new playing field. With an earthy and nutty flavor, pecan flour can be used in savory and sweet dishes alike. And pecan flour also pairs particularly well with the quintessential flavors of the fall/winter seasons: cinnamon, nutmeg, ginger, and pumpkin.
While pecan flour is higher in fat content than wheat flour, it is mostly made up of unsaturated fat. Unsaturated fats are good for the heart and can help lower bad cholesterol. Nut meal is also high in fiber, which is another key to great heart health.
This butter pecan cake is a true beauty when presented at a holiday meal such as Thanksgiving or Christmas, but don’t let that deter you from making it sooner, it’s a fantastic cake when a little butter pecan flavor is what you are longing for.
Preheat the oven to 350 degrees F. Line three 9-inch cake pans with parchment paper circles in the bottom. Lightly oil and flour the bottom and sides of the cake pans shaking off any excess flour. Set aside.
For the butter pecans: Place a medium skillet over medium-low heat. Add the butter melt the butter and once melted, add the pecans and the sugar. Cook, stirring frequently for about 3-4 minutes or until fragrant and lightly toasted. Spread the pecans on a baking sheet lined with parchment paper or a silicone baking mat. Set aside to cool.
For the cake: Combine the buttermilk and the milk together in a small bowl or measuring cup. Set aside.;;In a medium mixing bowl add the pecan flour, gluten-free flour, baking powder, baking soda, and salt, and mix well.
In the bowl of a kitchen mixer, such as a KitchenAid, fitted with a paddle attachment, add the butter, sugar, and vanilla and beat on medium-high speed until light and fluffy. Add the eggs one at a time. Scrape down the sides and the bottom of the bowl with a rubber spatula as needed.
With the mixer on low speed, slowly add about 1/3 of the flour mixture, alternating with 1/3 of the milk mixture. Mix until just combined. Using a spatula, fold in the pecans. Mix to combine.
Divide batter evenly between the three prepared cake pans. Bake the cakes for about 25-30 minutes or until a toothpick inserted in the center comes out clean. Remove from the oven and allow them to cool in the pans for about 15 minutes. Place the cakes on a wire rack and allow them to cool completely before assembling.
For the frosting: In a bowl KitchenAid, fitted with the paddle attachment, add the butter and the cream cheese and beat on high until smooth. Add the vanilla and gradually add the confectioners' sugar. Mix until fluffy and blended.
To assemble the cake: In a small mixing bowl mix together the finely chopped pecans and the pecan flour, set near your workstation. Using a serrated knife or cake leveler, remove and trim the cakes so that they’re flat. Place one layer on a plate or cake stand and cover the top with about a cup of cream cheese frosting. Spread evenly with an offset spatula. Add the second layer of cake and top with frosting. Spread the cream cheese frosting evenly. Using your hands, sprinkle the chopped pecans all along the side of the cake, pressing gently to adhere. Refrigerate the cake until ready to serve.
Welcome to my Simmer + Sauce. I always thought I was going to be a lawyer, but going to culinary school was one of the best decisions I ever made. I’m a former professional chef from NYC who loves to eat, cook and talk about food. My focus is great food, with solid recipes and reasonable ingredient lists. Cooking should be enjoyable, not stressful. Many of my recipes are family friendly and often on the healthy(ish) side.
Simmer + Sauce is a participant of the Amazon LLC Associates Program, an affiliate advertising program that allows websites to earn advertising fees by linking to Amazon.com.